1. Preface
1.1. Who Should Use This Guide
The HA Cluster Configuration Guide for Oracle Cloud Infrastructure (Linux) is intended for administrators who want to build a cluster system, and for system engineers and maintenance personnel who provide user support.
The software and setup examples introduced in this guide are for reference only, and the software is not guaranteed to run.
1.2. Scope of application
For information on the system requirements, see "Getting Started Guide" -> "Installation requirements for EXPRESSCLUSTER".
This guide contains product- and service-related information (e.g., screenshots) collected at the time of writing this guide. For the latest information, which may be different from the content in this guide, refer to corresponding websites and manuals.
1.3. How This Guide is Organized
"3. Mirror Disk Type Cluster Creation Procedure": Describes the procedure to create a mirror disk type cluster.
"4. Shared Disk Type Cluster Creation Procedure": Describes the procedure to create a shared disk type cluster.
"5. Error Messages": Describes the error messages and solutions.
"6. Notes and Restrictions": Describes the notes and restrictions on creating and operating a cluster.
1.4. EXPRESSCLUSTER X Documentation Set
The EXPRESSCLUSTER X manuals consist of the following five guides. The title and purpose of each guide is described below:
EXPRESSCLUSTER X Getting Started Guide
This guide is intended for all users. The guide covers topics such as product overview, system requirements, and known problems.
EXPRESSCLUSTER X Installation and Configuration Guide
This guide is intended for system engineers and administrators who want to build, operate, and maintain a cluster system. Instructions for designing, installing, and configuring a cluster system with EXPRESSCLUSTER are covered in this guide.
EXPRESSCLUSTER X Reference Guide
This guide is intended for system administrators. The guide covers topics such as how to operate EXPRESSCLUSTER, function of each module and troubleshooting. The guide is supplement to the Installation and Configuration Guide.
EXPRESSCLUSTER X Maintenance Guide
This guide is intended for administrators and for system administrators who want to build, operate, and maintain EXPRESSCLUSTER-based cluster systems. The guide describes maintenance-related topics for EXPRESSCLUSTER.
EXPRESSCLUSTER X Hardware Feature Guide
This guide is intended for administrators and for system engineers who want to build EXPRESSCLUSTER-based cluster systems. The guide describes features to work with specific hardware, serving as a supplement to the Installation and Configuration Guide.
1.5. Conventions
In this guide, Note, Important, See also are used as follows:
Note
Used when the information given is important, but not related to the data loss and damage to the system and machine.
Important
Used when the information given is necessary to avoid the data loss and damage to the system and machine.
See also
Used to describe the location of the information given at the reference destination.
The following conventions are used in this guide.
Convention |
Usage |
Example |
|---|---|---|
Bold |
Indicates graphical objects, such as text boxes, list boxes, menu selections, buttons, labels, icons, etc. |
Click Start.
Properties dialog box
|
Angled bracket within the command line |
Indicates that the value specified inside of the angled bracket can be omitted. |
|
# |
Prompt to indicate that a Linux user has logged on as root user. |
|
Monospace |
Indicates path names, commands, system output (message, prompt, etc.), directory, file names, functions and parameters. |
|
bold |
Indicates the value that a user actually enters from a command line. |
Enter the following:
# clpcl -s -a
|
|
Indicates that users should replace italicized part with values that they are actually working with. |
|
 In the figures of this guide, this icon represents EXPRESSCLUSTER.
1.6. Contacting NEC
For the latest product information, visit our website below:
2. Overview
2.1. Functional overview
Regions
OCI allows each node to be deployed in physical or logical units called a region (e.g., Tokyo).It is possible to build all nodes in a single region. However, in such a case, a network failure or a natural disaster can cause all nodes to go down, discontinuing the operation.To increase availability, distribute nodes to multiple regions.Availability domains
OCI allows each node to be deployed in a logical group called an availability domain.Locating each node in a different availability domain minimizes the impact of planned OCI maintenance or unplanned maintenance due to a physical hardware failure.
2.2. Basic configuration
Purpose |
EXPRESSCLUSTER resource to be selected |
Required OCI services |
|---|---|---|
Accessing from a client by using a virtual IP address (private IP address) |
Oracle Cloud virtual IP resource |
Private load balancer |
Accessing from a client by using a virtual IP address (global IP address) |
Oracle Cloud virtual IP resource |
Public load balancer |
HA clusters using a load balancer
A client application can connect a virtual machine in the OCI environment to a node that constitutes a cluster, by using a virtual IP (VIP) address.Using the VIP address eliminates the need for clients to be aware of switching between the virtual machines even after a failover or a group migration occurs.For a private load balancer, an HA cluster built in the OCI environment in Fig. 2.1 HA cluster using a private load balancer is accessed by specifying the VIP address. This VIP address is a private IP address assigned to the OCI load balancer.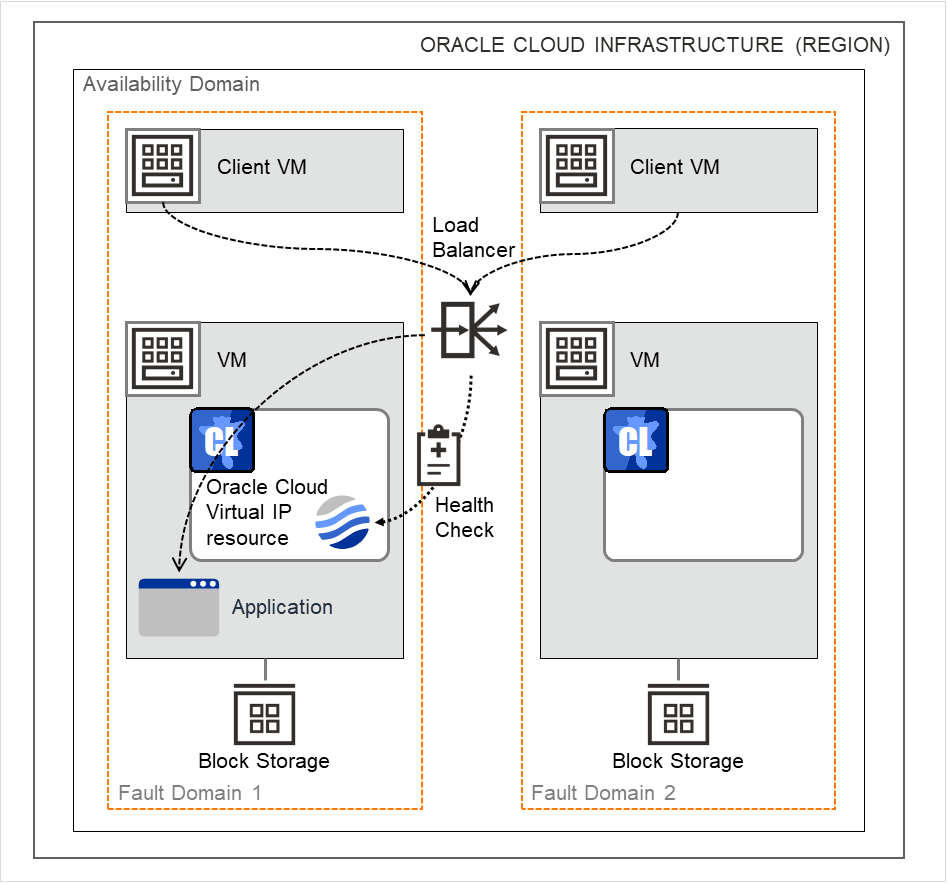
Fig. 2.1 HA cluster using a private load balancer
For a public load balancer, an HA cluster built in the OCI environment in Fig. 2.2 HA cluster using a public load balancer is accessed by specifying the VIP address. This VIP address is a global IP address assigned to the OCI load balancer.The active node and the standby node of a cluster are switched through a health check by the OCI load balancer. The health check can be performed through a port provided by the Oracle Cloud virtual IP resource.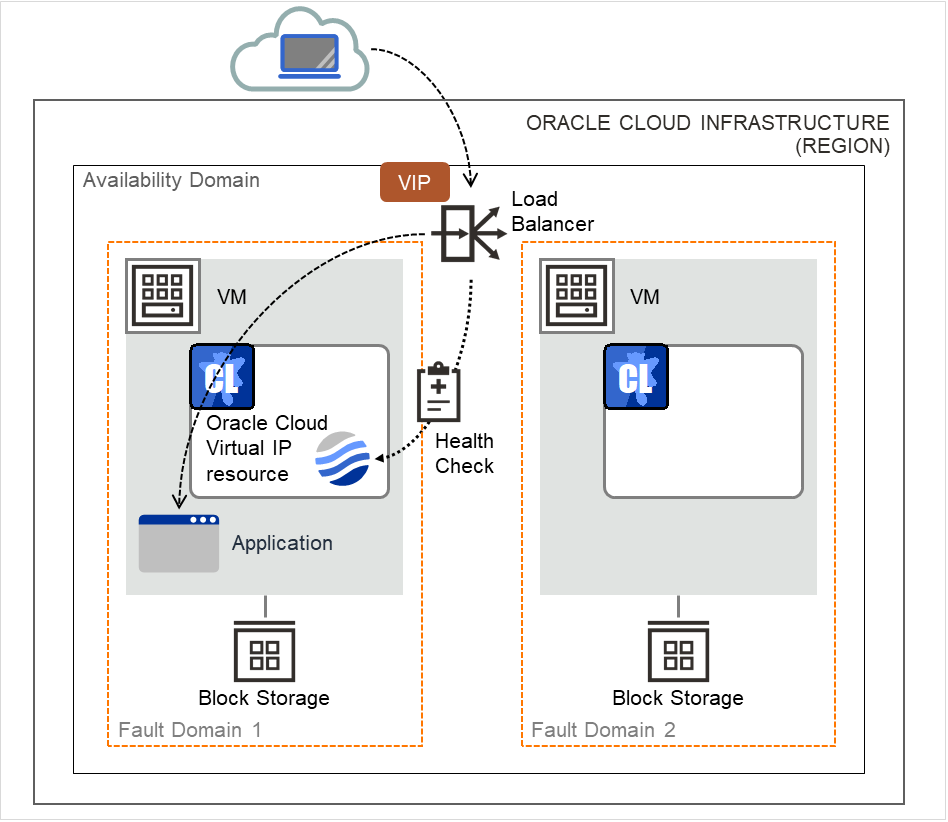
Fig. 2.2 HA cluster using a public load balancer
For details on the load balancer, refer to the following:Overview of Load Balancing:The following table describes the resources and monitor resources required for an HA cluster configuration using the load balancer:
Resource or monitor resource type
Description
Setting
Oracle Cloud virtual IP resource
Required
Oracle Cloud virtual IP monitor resource
Performs the alive monitoring of the control process, which starts upon the activation of the Oracle Cloud virtual IP resource, for a node where the Oracle Cloud virtual IP resource is running.
Required
Oracle Cloud load balance monitor resource
Monitors whether the same number as the health-check port number has already been used, for a node where an Oracle Cloud virtual IP resource has not been activated.
Required
Other resources and monitor resources
Depends on the configuration of applications, such as mirror disks or shared disks, which are used in an HA cluster.
Optional
2.3. Network partition resolution
Virtual machines constituting an HA cluster mutually perform alive monitoring through a heartbeat communication.If the virtual machines reside in different subnets, an interruption of the heartbeat causes an undesirable event such as a service starting more than once.To prevent double startup of the service, it is necessary to identify whether other virtual machines went down or whether the applicable virtual machine was isolated from a network (network partitioning: NP).The network partition resolution feature (NP resolution) uses a ping command to be sent to a device (access destination) that is always activated and can respond to the ping command etc. If there is no reply to the ping command, it is determined that the device entered the NP status and the specified action (such as a warning, recovery action, or server shutdown) is executed.For details on the configurations of the heartbeat and NP resolution, refer to the following.The following heartbeat and NP resolution types correspond to the figures below:
Heartbeat or NP resolution type
Type
(1)
Kernel mode LAN heartbeat resource
(2)
Kernel mode LAN heartbeat resource
(3)
(4)
Disk heartbeat resource
Heartbeat and NP resolution configuration (mirror disk type cluster)
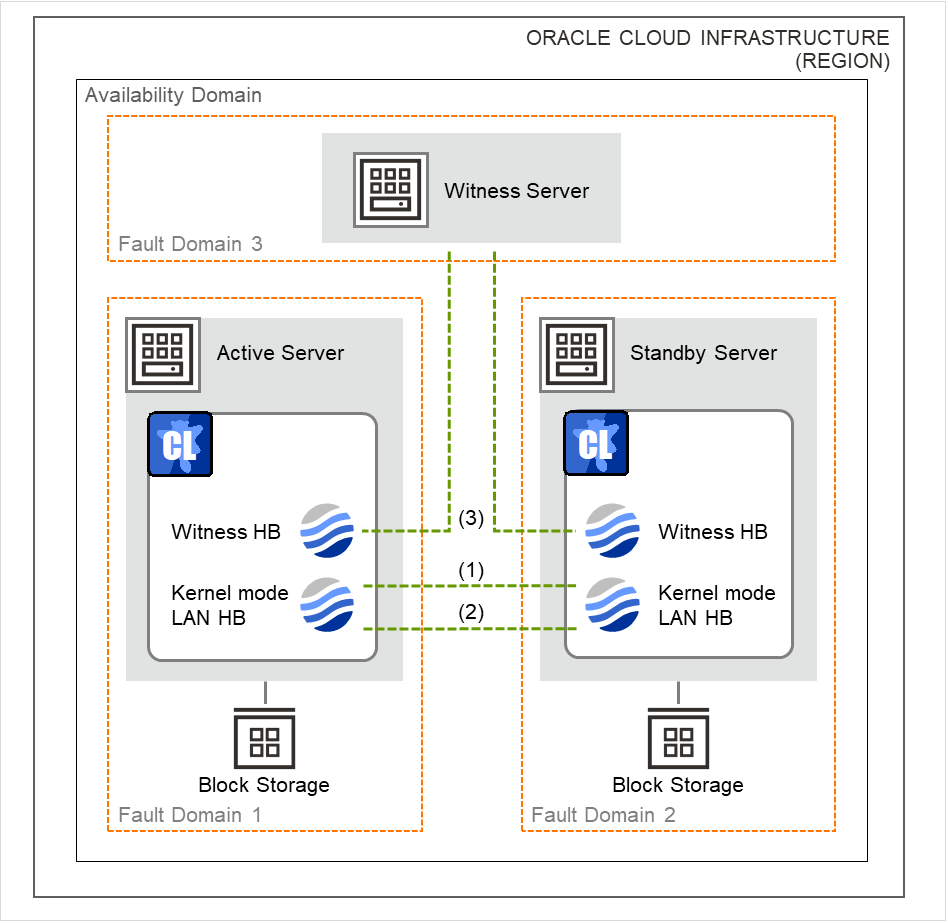
Fig. 2.3 Heartbeat and NP resolution configuration (mirror disk type cluster)
Heartbeat and NP resolution configuration (shared disk type cluster)
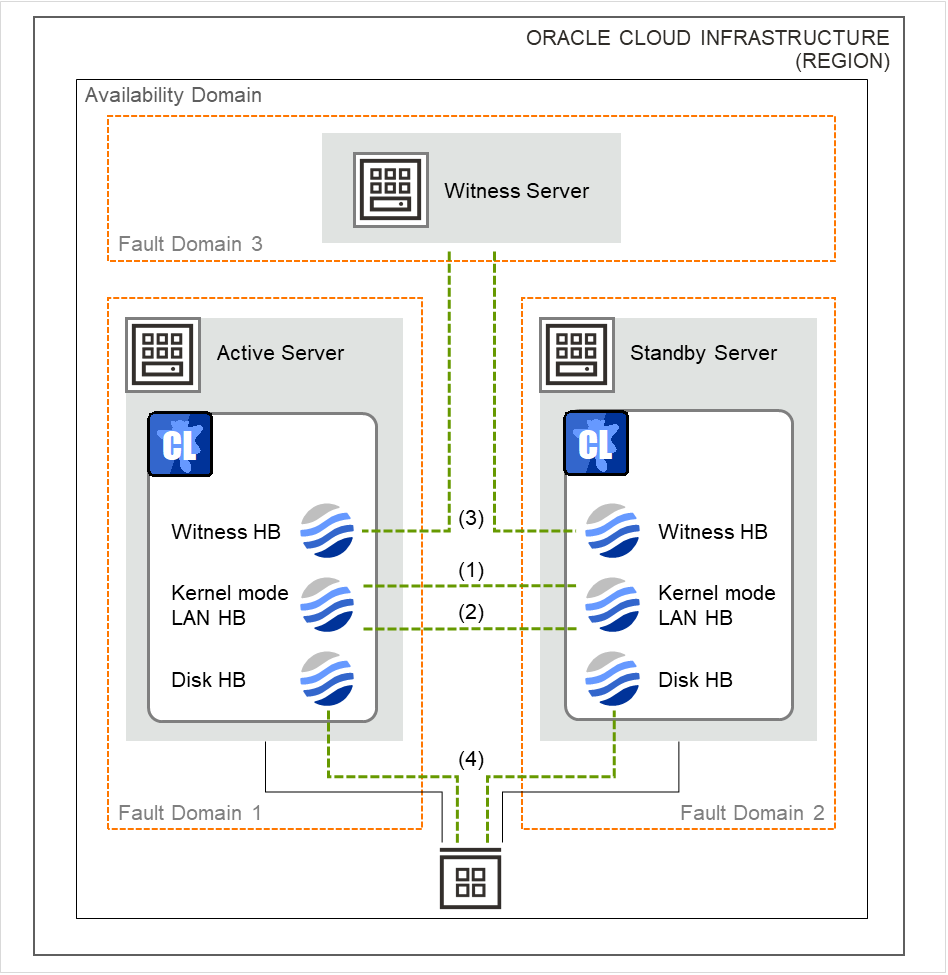
Fig. 2.4 Heartbeat and NP resolution configuration (shared disk type cluster)
Using the Witness heartbeat resource allows the aliveness of the other server to be confirmed based on the information on an access to the Witness server.With the Witness heartbeat resource in combination with the HTTP network partition resolution resource, when a failure occurs in all network channels (heartbeats) and network partitioning occurs, emergency shutdown takes place to protect data.The target and method of NP resolution needs to be individually considered, in accordance with the locations of clients accessing the cluster system and with the conditions for connecting to an on-premise environment (e.g. using a leased line).For details on the heartbeat resource and NP resolution, refer to the following:
2.4. Differences between on-premises and OCI
The following table describes the functional differences of EXPRESSCLUSTER between on-premises and OCI. "Y" indicates that the relevant function can be used and "N" indicates that the relevant function cannot be used.
Function |
On-premise |
OCI |
|---|---|---|
Creating a shared disk type cluster |
Y |
Y |
Creating a mirror disk type cluster |
Y |
Y |
Using a floating IP resource |
Y |
N |
Using an Oracle Cloud virtual IP resource |
N |
Y |
3. Mirror Disk Type Cluster Creation Procedure
3.1. Creation examples
This guide introduces the procedure for creating a two-node unidirectional standby cluster in OCI using EXPRESSCLUSTER.An HA cluster to be created is accessible from clients in the same virtual cloud network (hereafter described as VCN) in OCI.This procedure is intended to create a mirror disk type configuration in which server1 serves as the active server.The following tables describe the parameters that do not have default values and the parameters whose values have been changed from the default values.
OCI settings (common to each instance)
Setting item
Setting value
VCN settings
Name
test-vcn
Load balancer settings
Load balancer name
test-loadbalancer
Visibility type
Private / public (*)
Virtual cloud network
test-vcn
Load balancer settings (backend set settings)
Added backend: name
server1, server2
Added backend: port
8080 (the number of the port through which the application is available: cluster side)
Health check policy: protocol
TCP
Health check policy: port
12345
Health check policy: interval (in milliseconds)
5000
Load balancer settings (listener settings)
Traffic type
TCP
Port through which a listener monitors
80 (the number of the port through which the application is available: client side)
(*) Select Private when using a private load balancer, and Public when using a public load balancer.
OCI settings (individually configured for each instance)
Setting item
Setting value
server1
server2
witness-server
Compute instance settings
Instance name
server1
server2
witness-server
Availability domain
LhRE:AP-TOKYO-1-AD-1
LhRE:AP-TOKYO-1-AD-1
LhRE:AP-TOKYO-1-AD-1
Instance type
Virtual machine
Virtual machine
Virtual machine
Virtual cloud network
test-vcn
test-vcn
test-vcn
Fault domain
FAULT-DOMAIN-1
FAULT-DOMAIN-2
FAULT-DOMAIN-3
Block volume settings
Name
server1-datadisk-0
server2-datadisk-0
-
Availability domain
LhRE:AP-TOKYO-1-AD-1
LhRE:AP-TOKYO-1-AD-1
-
Device path
/dev/oracleoci/oraclevdb
/dev/oracleoci/oraclevdb
-
Network settings
Private IP address
10.0.0.2
10.0.0.3
10.0.0.4
Private IP address
10.0.1.2
10.0.1.3
-
(*) Public IP address
140.238.54.236
158.101.136.208
164.92.39.211
(*) Set when using a public load balancer.
EXPRESSCLUSTER settings (cluster properties)
Setting item
Setting value
server1
server2
Cluster name
cluster1
cluster1
Server name
server1
server2
Interconnect
Kernel mode
10.0.0.2
10.0.0.3
Kernel mode
10.0.1.2
10.0.1.3
Witness
Used
Used
NP resolution
HTTP
Used
Used
EXPRESSCLUSTER settings (failover group)
Resource name
Setting item
Setting value
Mirror disk resource
Resource name
md1
Details tab - Mirror partition device name
/dev/NMP1
Details tab - Mount point
/mnt/md1
Details tab - Data partition device name
/dev/oracleoci/oraclevdb2
Details tab - Cluster partition device name
/dev/oracleoci/oraclevdb1
Oracle Cloud virtual IP resource
Resource name
ocvip1
Port number
12345 (as specified in Health check policy: port)
EXPRESSCLUSTER settings (monitor resource)
Monitor resource name
Setting item
Setting value
Mirror disk monitor resource
Monitor resource name
mdw1
Mirror disk connect monitor resource
Monitor resource name
mdnw1
Oracle Cloud virtual IP monitor resource
Monitor resource name
ocvipw1
Recovery target
ocvip1
Oracle Cloud load balance monitor resource
Monitor resource name
oclbw1
Recovery target
ocvip1
3.2. Configuring OCI
Creating a VCN
Log in to OCI Console (https://console.us-ashburn-1.oraclecloud.com/).Create a VCN and a subnet.For details on the procedure, refer to the following:Networking Overview:Networking Scenarios:
Creating an instance
Create as many instances as there are virtual machines constituting a cluster, by using platform images.For details on the procedure, refer to the following:Creating an instance:Configure a secondary VNIC.For details on the procedure, refer to the following:
Setting an instance
Connect to each of the created instances and log in.For details on the procedure, refer to the following:Connecting to an Instance:
Creating a block volume
Add and attach a block volume to be used for mirror disks (cluster partitions and data partitions).Access: select Read/Write.For details on the procedure, refer to the following:Overview of Block Volume:Create a partition for mirror disk resources.For details on the settings of partitions for mirror disk resources, refer to the following:
Adding security lists for a load balancer
In creating a load balancer as shown below, the addition of a backend server allows the Load Balancing service to automatically create security list rules.For details on the procedure, refer to the following:Security Lists:Managing Load Balancers:
Creating a load balancer
Create a load balancer.Click Add Backends to add server1 and server2.Set Interval in ms for the health check policy to be shorter than Health Check Timeout for the Oracle Cloud virtual IP resource.For details on the procedure, refer to the following:Managing Load Balancers:Configure a route table and a security list as required.
Adjusting the OS startup time, verifying the network settings, verifying the route file system, verifying the firewall settings, synchronizing the server clock, and verifying SELinux settings
For information on each of the procedures, refer to the following:
3.3. Configuring the EXPRESSCLUSTER settings
Installing EXPRESSCLUSTER
For information on the installation procedure, refer to the following document. Restart the OS upon the completion of the installation.
Registering the EXPRESSCLUSTER license
For details on the license registration procedure, refer to the following:
Configuring EXPRESSCLUSTER
For Cluster WebUI setup and connection procedures, refer to the following:This section describes the procedure to add the following resources and monitor resources:- Mirror disk resource- Oracle Cloud virtual IP resource- Oracle Cloud virtual IP monitor resource- Oracle Cloud load balance monitor resourceFor the settings of other resources and monitor resources, refer to the following:- "Reference Guide"
Creating a cluster
Start the Cluster generation wizard to create a cluster.
Creating a cluster
Adding group resources
Defining a group
Create a failover group.
Mirror disk resource
Create a mirror disk resource.For more information, refer to the following:
Oracle Cloud virtual IP resource
In using EXPRESSCLUSTER in OCI, provides a mechanism to wait for the alive monitoring by a load balancer on a specific port of a node where operations are running.For details on the Oracle Cloud virtual IP resource, refer to the following:
Adding monitor resources
Oracle Cloud virtual IP monitor resource
Provides a mechanism for monitoring the alive-monitoring port for the node where an Oracle Cloud virtual IP resource has been activated.Adding one Oracle Cloud virtual IP resource automatically creates one Oracle Cloud virtual IP monitor resource.For details on the Oracle Cloud virtual IP monitor resource, refer to the following:Oracle Cloud load balance monitor resource
For the node where an Oracle Cloud virtual IP resource has not been activated, provides a mechanism for monitoring whether the same port number as the health-check port number has already been used.Adding one Oracle Cloud virtual IP resource automatically creates one Oracle Cloud load balance monitor resource.For details on the Oracle Cloud load balance monitor resource, refer to the following:
Applying the settings and starting the cluster
Refer to the following:
3.4. Verifying the operations
5. Error Messages
For details on the error messages related to resources and monitor resources, refer to the following:
"Reference Guide" -> "Error messages"
6. Notes and Restrictions
6.1. HA cluster using a load balancer
6.1.1. Notes on OCI
- In designing a performance-oriented system, keep this in mind: OCI tends to increase its performance deterioration rate in multi-tenant cloud environments, compared with that in physical environments or general and virtualized (non-cloud) environments.
6.1.2. Notes on EXPRESSCLUSTER
- Set the OS startup time to be longer than Heartbeat Timeout.
- Going to Cluster Properties -> the Monitor tab -> Shutdown Monitor Timeout, you can change the default value (Use Heartbeat Timeout) if necessary. Then make the value equal to or less than that of Heartbeat Timeout.Refer to the following:
- If a network failure occurs with the attachment method for a block volume set to be iSCSI, the deactivation of mirror disk resources or disk resources may fail.Therefore, if iSCSI is specified as the attachment method, set the operation in response to a resource deactivation failure to be a cluster service stop and OS shutdown.
Refer to the following:
"Getting Started Guide" -> "Notes and Restriction" -> "Communication port number"
"Getting Started Guide" -> "Notes and Restriction" -> "Setting up Oracle Cloud virtual IP resources"
"Getting Started Guide" -> "Notes and Restriction" -> "Setting up Oracle Cloud load balance monitor resources"
"Reference Guide" -> "Notes on Oracle Cloud Virtual IP resources"
"Reference Guide" -> "Notes on Oracle Cloud Virtual IP monitor resource"
"Reference Guide" -> "Notes on Oracle Cloud load balance monitor resources"