9. EXPRESSCLUSTER command reference
This chapter describes commands that are used on EXPRESSCLUSTER.
This chapter covers:
9.9. Changing, backing up, and checking cluster configuration data (clpcfctrl command)
9.14.4. Preparing for backup to a disk image (clpbackup.sh command)
9.14.5. Perform the processing after restoring from a disk image (clprestore.sh command)
9.15.1. Displaying the hybrid disk status (clphdstat command)
9.15.4. Preparing for backup to a disk image (clpbackup.sh command)
9.15.5. Perform the processing after restoring from a disk image (clprestore.sh command)
9.21. Requesting processing to cluster servers (clprexec command)
9.22. Controlling cluster activation synchronization wait processing (clpbwctrl command)
9.24. Controlling the rest point of DB2 (clpdb2still command)
9.25. Controlling the rest point of MySQL (clpmysqlstill command)
9.26. Controlling the rest point of Oracle (clporclstill command)
9.27. Controlling the rest point of PostgreSQL (clppsqlstill command)
9.28. Controlling the rest point of SQL Server (clpmssqlstill command)
9.29. Displaying the cluster statistics information (clpperfc command)
9.30. Checking the cluster configuration information (clpcfchk command)
9.31. Converting a cluster configuration data file (clpcfconv.sh command)
9.1. Operating the cluster from the command line
EXPRESSCLUSTER provides various commands to operate a cluster by the command line. These commands are useful for things like constructing a cluster or when you cannot use the Cluster WebUI. You can perform greater number of operations using the command line than Cluster WebUI.
Note
When you have configured a group resource (examples: disk resource and exec resource) as a recovery target in the settings of error detection by a monitor resource, and the monitor resource detects an error, do not perform the following actions by commands related to the actions or by the Cluster WebUI while recovery (reactivation -> failover -> final action) is ongoing.
terminate/suspend the cluster
start/terminate/migrate a group
If you perform the actions mentioned above against the cluster while the recovery caused by detection of an error by a monitor resource is ongoing, other group resources of that group may not terminate. However, you can perform these actions as long as the final action has been executed, even if a monitor resource detected an error.
Important
The installation directory contains executable-format files and script files that are not listed in this guide. Do not execute these files by programs or applications other than EXPRESSCLUSTER. Any problems caused by not using EXPRESSCLUSTER will not be supported.
9.2. EXPRESSCLUSTER commands
Commands for configuring a cluster
Command |
Description |
Page |
|---|---|---|
clpcfctrl |
Distributes configuration data created by the Cluster WebUI to servers.
Backs up the cluster configuration data to be used by the Cluster WebUI.
|
|
clplcnsc |
Manages the product or trial version license of this product. |
|
clpcfchk |
Checks the cluster configuration data. |
|
clpcfconv.sh |
Converts an old version of a cluster configuration data file into the current version. |
|
clpfwctrl.sh |
Adds a firewall rule. |
Commands for displaying status
Command |
Description |
Page |
|---|---|---|
clpstat |
Displays the cluster status and configuration information. |
|
clphealthchk |
Check the process health. |
Commands for cluster operation
Command |
Description |
Page |
|---|---|---|
clpcl |
Starts, stops, suspends, or resumes the EXPRESSCLUSTER daemon. |
|
clpdown |
Stops the EXPRESSCLUSTER daemon and shuts down the server. |
|
clpstdn |
Stops the EXPRESSCLUSTER daemon across the whole cluster and shuts down all servers. |
|
clpgrp |
Starts, stops, or moves groups. |
|
clptoratio |
Extends or displays the various time-out values of all servers in the cluster. |
|
clproset |
Modifies and displays I/O permission of a shared disk partition device. |
|
clpmonctrl |
Controls monitor resources. |
|
clpregctrl |
Displays or initializes the reboot count on a single server. |
|
clprsc |
Stops or resumes group resources |
|
clprexec |
Requests that an EXPRESSCLUSTER server execute a process from external monitoring. |
|
clpbwctrl |
Controls the cluster activation synchronization wait processing. |
Log-related commands
Command |
Description |
Page |
|---|---|---|
clplogcc |
Collects logs and OS information. |
|
clplogcf |
Modifies and displays a configuration of log level and the file size of log output. |
|
clpperfc |
Displays the cluster statistics data about groups and monitor resources. |
Script-related commands
Command |
Description |
Page |
|---|---|---|
clplogcmd |
Writes texts in the exec resource script to create a desired message to the output destination |
Mirror-related commands (when the Replicator is used)
Command |
Description |
Page |
|---|---|---|
clpmdstat |
Displays a mirroring status and configuration information. |
|
clpmdctrl |
Executes various operations such as mirror recovery and the activation/deactivation of mirror disk resources.
Displays or modifies the maximum number of the request queues.
|
|
clpmdinit |
Initializes the cluster partition of a mirror disk resource.
Creates a file system on the data partition of a mirror disk resource.
|
|
clpbackup.sh |
Allows a partition to be mirrored to be backed up to a disk image. |
|
clprestore.sh |
Allows a restored mirror disk image to be enabled. |
Hybrid disk-related commands (when the Replicator DR is used)
Command |
Description |
Page |
|---|---|---|
clphdstat |
Displays the hybrid disk status and configuration information. |
|
clphdctrl |
Executes various operations such as mirror recovery and the activation/deactivation of hybrid disk resources.
Displays or modifies the maximum number of the request queues.
|
|
clphdinit |
Initializes the cluster partition of a hybrid disk resource. |
|
clpbackup.sh |
Allows a partition to be mirrored to be backed up to a disk image. |
|
clprestore.sh |
Allows a restored mirror disk image to be enabled. |
DB rest point-related commands
Command |
Description |
Page |
|---|---|---|
clpdb2still |
Controls the securing/release of the rest point of DB2. |
|
clpmysqlstill |
Controls the securing/release of the rest point of MySQL. |
|
clporclstill |
Controls the securing/release of the rest point of Oracle. |
|
clppsqlstill |
Controls the securing/release of the rest point of PostgreSQL. |
|
clpmssqlstill |
Controls the securing/release of the rest point of SQL Server. |
Other commands
Command |
Description |
Page |
|---|---|---|
clplamp |
Lights off the warning light of the specified server. |
9.3. Displaying the cluster status (clpstat command)
the clpstat command displays cluster status and configuration information.
-
Command line - clpstat -s [--long] [-h hostname]clpstat -g [-h hostname]clpstat -m [-h hostname]clpstat -n [-h hostname]clpstat -f [-h hostname]clpstat -i [--detail] [-h hostname]clpstat --cl [--detail] [-h hostname]clpstat --sv [server_name] [--detail] [-h hostname]clpstat --hb [hb_name] [--detail] [-h hostname]clpstat --fnc [fnc_name] [--detail] [-h hostname]clpstat --svg [servergroup_name] [--detail] [-h hostname]clpstat --grp [group_name] [--detail] [-h hostname]clpstat --rsc [resource_name] [--detail] [-h hostname]clpstat --mon [monitor_name] [--detail] [-h hostname]clpstat --xcl [xclname] [--detail] [-h hostname]clpstat --local
-
Description This command line displays a cluster status and configuration data.
-
Option -
-s
-
Nooption¶ Displays a cluster status.
-
--long¶ Displays a name of the cluster name and resource name until the end.
-
-g¶ Displays a cluster group map.
-
-m¶ Displays status of each monitor resource on each server.
-
-n¶ Displays each heartbeat resource status on each server.
-
-f¶ Displays the status of fencing function (network partition resolution and forced stop resource) on each server.
-
-i¶ Displays the configuration information of the whole cluster.
-
--cl¶ Displays the cluster configuration data. Displays the Mirror Agent information as well for the Replicator, Replicator DR.
-
--sv[server_name]¶ Displays the server configuration information. By specifying the name of a server, you can display information of the specified server.
-
--hb[hb_name]¶ Displays heartbeat resource configuration information. By specifying the name of a heartbeat resource, you can display only the information on the specified heartbeat.
-
--fnc[fnc_name]¶ Displays the configuration information on the fencing function (the network partition resolution resource and the forced stop resource). By specifying the resource name, you can display only the information on the specified network partition resolution resource or the specified forced stop resource.
-
--svg[servergroup_name]¶ Displays server group configuration information. By specifying the name of a server group, you can display only the information on the specified server group.
-
--rsc[resource_name]¶ Displays group resource configuration information. By specifying the name of a group resource, you can display only the information on the specified group resource.
-
--mon[monitor_name]¶ Displays monitor resource configuration information. By specifying the name of a monitor resource, you can display only the information on the specified resource.
-
--xcl[xclname]¶ Displays configuration information of exclusion rules.By specifying exclusion rule name, only the specified exclusion name information can be displayed.
-
--detail¶ Displays more detailed information on the setting.
-
-hhostname¶ Acquires information from the server specified with hostname. Acquires information from the command running server (local server) when the -h option is omitted.
-
--local¶ Displays the cluster status. This option displays the same information when -s option is specified or when no option is specified. However, this option displays only information of the server on which this command is executed, without communicating with other servers.
-
-
Return Value When the -s option is not specified
0
Success
Other than the above
Failure
-
Remarks According to the combination of options, configuration information shows information in various forms.
"*" alongside the server name, displayed after executing this command, represents the server that executed this command.
-
Notes Run this command as the root user.
This command cannot be double launched.
When you specify the name of a server for the -h option, the server should be in the cluster.
For the language used for command output, see "Cluster properties - Info tab" in "2. Parameter details" in this guide.
When you run the clpstat command with the -s option or without any option, names such as a cluster or a resource will not be displayed halfway.
-
Example of Execution Examples of information displayed after running these commands are provided in the next topic.
-
Error Messages Message
Cause/Solution
Log in as root.
Log on as the root user.
Invalid configuration file. Create valid cluster configuration data.
Create valid cluster configuration data by using the Cluster WebUI.
Invalid option.
Specify a valid option.
Could not connect to the server. Check if the cluster daemon is active.
Check if the EXPRESSCLUSTER Information Base service is started.
Invalid server status.
Check if the cluster daemon is started.
Server is not active. Check if the cluster daemon is active.
Check if the cluster daemon is started.
Invalid server name. Specify a valid server name in the cluster.
Specify the valid name of a server in the cluster.
Invalid heartbeat resource name. Specify a valid heartbeat resource name in the cluster.
Specify the valid name of a heartbeat resource in the cluster.
Invalid network partition resource name.Specify a valid network partition resource name in the cluster.Specify the valid name of a network partition resolution resource in the cluster.
Invalid group name. Specify a valid group name in the cluster.
Specify the valid name of a group in the cluster.
Invalid group resource name. Specify a valid group resource name in the cluster.
Specify the valid name of a group resource in the cluster.
Invalid monitor resource name. Specify a valid monitor resource name in the cluster.
Specify the valid name of a monitor resource in the cluster.
Connection was lost. Check if there is a server where the cluster daemon is stopped in the cluster.
Check if there is any server on which the cluster daemon has stopped in the cluster.
Invalid parameter.
The value specified as a command parameter may be invalid.
Internal communication timeout has occurred in the cluster server. If it occurs frequently, set the longer timeout.
A time-out occurred in the EXPRESSCLUSTER internal communication.If time-out keeps occurring, set the internal communication time-out longer.Internal error. Check if memory or OS resources are sufficient.
Check to see if the memory or OS resource is sufficient.
Invalid server group name. Specify a valid server group name in the cluster.
Specify the correct server group name in the cluster.
The cluster is not created.
Create and apply the cluster configuration data.
Could not connect to the server. Internal error. Check if memory or OS resources are sufficient.
Check to see if the memory or OS resource is sufficient.
Cluster is stopped. Check if the cluster daemon is active.
Check if the cluster daemon is started.
Cluster is suspended. To display the cluster status, use --local option.
Cluster is suspended. To display the cluster status, use --local option.
9.3.1. Common entry examples
9.3.2. Displaying the status of the cluster (-s option)
The following is an example of display when you run the clpstat command with the -s option or without any option:
-
Example of a command entry # clpstat -s
-
Example of the display after running the command ===================== CLUSTER STATUS ====================== Cluster : cluster <server> *server1............: Online server1 lanhb1 : Normal LAN Heartbeat lanhb2 : Normal LAN Heartbeat diskhb1 : Normal Disk Heartbeat witnesshb1 : Normal Witness Heartbeat pingnp1 : Normal ping resolution pingnp2 : Normal ping resolution httpnp1 : Normal http resolution forcestop1 : Normal Forced stop server2.............: Online server2 lanhb1 : Normal LAN Heartbeat lanhb2 : Normal LAN Heartbeat diskhb1 : Normal Disk Heartbeat witnesshb1 : Normal Witness Heartbeat pingnp1 : Normal ping resolution pingnp2 : Normal ping resolution httpnp1 : Normal http resolution forcestop1 : Normal Forced stop <group> failover1..........: Online failover group1 current : server1 disk1 : Online /dev/sdb5 exec1 : Online exec resource1 fip1 : Online 10.0.0.11 failover2..........: Online failover group2 current : server2 disk2 : Online /dev/sdb6 exec2 : Online exec resource2 fip2 : Online 10.0.0.12 <monitor> diskw1 : Normal disk monitor1 diskw2 : Normal disk monitor2 ipw1 : Normal ip monitor1 pidw1 : Normal pidw1 userw : Normal usermode monitor sraw : Normal sra monitor =============================================================
Information on each status is provided in "Status Descriptions".
9.3.3. Displaying a group map (-g option)
To display a group map, run the clpstat command with the -g option.
-
Example of a command entry # clpstat -g
-
Example of the display after running the command ===================== GROUPMAP INFORMATION ================= Cluster : cluster *server0 : server1 server1 : server2 ------------------------------------------------------------- server0 [o] : failover1[o] failover2[o] server1 [o] : failover3[o] =============================================================
Groups that are not running are not displayed.
Information on each status is provided in "Status Descriptions".
9.3.4. Displaying the status of monitor resources (-m option)
To display the status of monitor resources, run the clpstat command with the -m option.
-
Example of a command entry # clpstat -m
-
Example of the display after running the command =================== MONITOR RESOURCE STATUS ================= Cluster : cluster *server0 : server1 server1 : server2 Monitor0 [diskw1 : Normal] ------------------------------------------------------------- server0 [o] : Online server1 [o] : Online Monitor1 [diskw2 : Normal] ------------------------------------------------------------- server0 [o] : Online server1 [o] : Online Monitor2 [ipw1 : Normal] ------------------------------------------------------------- server0 [o] : Online server1 [o] : Online Monitor3 [pidw1 : Normal] ------------------------------------------------------------- server0 [o] : Online server1 [o] : Offline Monitor4 [userw : Normal] ------------------------------------------------------------- server0 [o] : Online server1 [o] : Online Monitor5 [sraw : Normal] ------------------------------------------------------------- server0 [o] : Online server1 [o] : Online =============================================================
Information on each status is provided in "Status Descriptions".
9.3.5. Displaying the status of heartbeat resources (-n option)
To display the status of heartbeat resources, run clpstat command with the -n option.
-
Example of a command entry # clpstat -n
-
Example of the display after running the command ================== HEARTBEAT RESOURCE STATUS ==================== Cluster : cluster *server0 : server1 server1 : server2 HB0 : lanhb1 HB1 : lanhb2 HB2 : diskhb1 HB3 : witnesshb1 [on server0 : Online] HB 0 1 2 3 ----------------------------------------------------------------- server0 : o o o o server1 : o o x x [on server1 : Online] HB 0 1 2 3 ----------------------------------------------------------------- server0 : o o x o server1 : o o o o =================================================================
Detailed information on each status is provided in "Status Descriptions".
-
The status of the example shown above The example above presents the status of all heartbeat resources seen from server0 and server1 when the disk heartbeat resource is disconnected.
Because diskhb1, a disk heartbeat resource, is not able to communicate from both servers, communication to server1 on server0 or communication to server0 on server1 is unavailable.
The rest of heartbeat resources on both servers are in the status allowing communications.
9.3.6. Displaying the status of fencing function (-f option)
To display the status of fencing function (network partition resolution resources or a forced stop resource), run clpstat command with the -f option.
-
Example of a command entry # clpstat -f
-
Example of the display after running the command ======================== FENCING STATUS ========================= Cluster : cluster *server0 : server1 server1 : server2 NP0 : pingnp1 NP1 : pingnp2 NP2 : httpnp1 FST : forcestop1 [on server0 : Caution] NP/FST 0 1 2 F ----------------------------------------------------------------- server0 : o x o o server1 : o x o - [on server1 : Caution] NP/FST 0 1 2 F ----------------------------------------------------------------- server0 : o x o - server1 : o x o o =================================================================
Detailed information on each status is provided in "Status Descriptions".
-
The status of the example shown above The example above presents the status of all the network partition resolution resources seen from server0 and server1 when the device to which ping of the network partition resolution resource pingnp2 is sent is down.
9.3.7. Displaying the cluster configuration data (--cl option)
To display the configuration data of a cluster, run the clpstat command with the -i, --cl, --svg, --hb, --grp, --rsc, --mon, or --xcl option. You can see more detailed information by specifying the --detail option.
For details of each item of the list, see "Cluster properties" in "2. Parameter details" in this guide.
To display the cluster configuration data, run the clpstat command with the --cl option.
-
Example of a command entry # clpstat --cl
-
Example of the display after running the command ===================== CLUSTER INFORMATION ================== [Cluster : cluster] Comment : failover cluster =============================================================
9.3.8. Displaying only the configuration data of certain servers (--sv option)
When you want to display only the cluster configuration data on a specified server, specify the name of the server after the --sv option in the clpstat command. If you want to see the details, specify the --detail option. When the name of the server is not specified, cluster configuration data of all servers are displayed.
-
Example of a command entry # clpstat --sv server1
-
Example of the display after running the command ===================== CLUSTER INFORMATION ================== [Server0 : server1] Comment : server1 Virtual Infrastructure : vSphere Product : EXPRESSCLUSTER X 5.0 for Linux Internal Version : 5.0.0-1 Edition : X Platform : Linux =============================================================
9.3.9. Displaying only the resource information of certain heartbeats (--hb option)
When you want to display only the cluster configuration data on a specified heartbeat resource, specify the name of the heartbeat resource after the --hb option in the clpstat command. If you want to see the details, specify the --detail option.
-
Example of a command entry For a LAN heartbeat resource:
# clpstat --hb lanhb1
-
Example of the display after running the command ==================== CLUSTER INFORMATION =================== [HB0 : lanhb1] Type : lanhb Comment : LAN Heartbeat =============================================================
-
Example of a command entry For disk heartbeat resource:
# clpstat --hb diskhb
-
Example of the display after running the command ===================== CLUSTER INFORMATION ================== [HB2 : diskhb1] Type : diskhb Comment : Disk Heartbeat =============================================================
-
Example of a command entry For kernel mode LAN heartbeat resource:
# clpstat --hb lankhb
-
Example of the display after running the command ===================== CLUSTER INFORMATION ================== [HB4 : lankhb1] Type : lankhb Comment : Kernel Mode LAN Heartbeat =============================================================
-
Tips By using the --sv option and the --hb option together, you can see the information as follows.
-
Example of a command entry # clpstat --sv --hb
-
Example of the display after running the command: ===================== CLUSTER INFORMATION ================= [Server0 : server1] Comment : server1 Virtual Infrastructure : Product : EXPRESSCLUSTER X 5.0 for Linux Internal Version : 5.0.0-1 Edition : X Platform : Linux [HB0 : lanhb1] Type : lanhb Comment : LAN Heartbeat [HB1 : lanhb2] Type : lanhb Comment : LAN Heartbeat [HB2 : diskhb1] Type : diskhb Comment : Disk Heartbeat [HB3 : witnesshb] Type : witnesshb Comment : Witness Heartbeat [Server1 : server2] Comment : server2 Virtual Infrastructure : Product : EXPRESSCLUSTER X 5.0 for Linux Internal Version : 5.0.0-1 Edition : X Platform : Linux [HB0 : lanhb1] Type : lanhb Comment : LAN Heartbeat [HB1 : lanhb2] Type : lanhb Comment : LAN Heartbeat [HB2 : diskhb1] Type : diskhb Comment : Disk Heartbeat [HB3 : witnesshb] Type : witnesshb Comment : Witness Heartbeat ============================================================
9.3.10. Displaying only the configuration data of certain fencing function (--fnc option)
When you want to display only the cluster configuration data on a specified fencing function (network partition resolution resource and forced stop resource), specify the name of the network partition resolution resource or the forced stop resource after the --fnc option in the clpstat command. If you want to see the details, specify the --detail option. If the network partition name or the forced stop resource name is not specified, the cluster configuration data on all the fencing function is displayed.
-
Example of a command entry For a PING network partition resolution resource:
# clpstat --fnc pingnp1
-
Example of the display after running the command ===================== CLUSTER INFORMATION ===================== [NP0 : pingnp1] Type : pingnp Comment : ping resolution =================================================================
-
Example of a command entry For a HTTP network partition resolution resource:
# clpstat --fnc httpnp1
-
Example of the display after running the command ===================== CLUSTER INFORMATION ===================== [NP0 : httpnp1] Type : httpnp Comment : http resolution =================================================================
-
Example of a command entry For a forced stop resource:
# clpstat --fnc forcestop1
-
Example of the display after running the command ===================== CLUSTER INFORMATION ===================== [FST : forcestop1] Type : bmc Comment : Forced stop =================================================================
9.3.11. Displaying only the configuration data of certain server group (--svg option)
To display only the cluster configuration data on a specified server group, specify the name of server group after --svg option in the clpstat command. When you do not specify the name of server group, the cluster configuration data of all the server groups is displayed.
-
Example of a command entry # clpstat --svg servergroup1
-
Example of the display after running the command ===================== CLUSTER INFORMATION ===================== [ServerGroup0 : servergroup1] server0 : server1 server1 : server2 server2 : server3 =================================================================
9.3.12. Displaying only the configuration data of certain groups (--grp option)
When you want to display only the cluster configuration data on a specified group, specify the name of the group after the --grp option in the clpstat command. If you want to see the details, specify the --detail option. When you do not specify the name of group, the cluster configuration data of all the groups is displayed.
-
Example of a command entry # clpstat --grp failover1
-
Example of the display after running the command ===================== CLUSTER INFORMATION ================== [Group0 : failover1] Type : failover Comment : failover group1 ============================================================
9.3.13. Displaying only the configuration data of a certain group resource (--rsc option)
When you want to display only the cluster configuration data on a specified group resource, specify the group resource after the --rsc option in the clpstat command. If you want to see the details, specify the --detail option. When you do not specify the name of server group, the cluster configuration data of all the group resources is displayed.
-
Example of a command entry For floating IP resource:
# clpstat --rsc fip1
-
Example of the display after running the command ===================== CLUSTER INFORMATION ===================== [Resource2 : fip1] Type : fip Comment : 10.0.0.11 IP Address : 10.0.0.11 ================================================================
-
Tips By using the --grp option and the --rsc option together, you can display the information as follows.
-
Example of a command entry # clpstat --grp --rsc
-
Example of the display after running the command ===================== CLUSTER INFORMATION ================== [Group0 : failover1] Type : failover Comment : failover group1 [Resource0 : disk1] Type : disk Comment : /dev/sdb5 Disk Type : disk File System : ext2 Device Name : /dev/sdb5 Raw Device Name : Mount Point : /mnt/sdb5 [Resource1 : exec1] Type : exec Comment : exec resource1 Start Script Path : /opt/userpp/start1.sh Stop Script Path : /opt/userpp/stop1.sh [Resource2 : fip1] Type : fip Comment : 10.0.0.11 IP Address : 10.0.0.11 [Group1 : failover2] Type : failover Comment : failover group2 [Resource0 : disk2] Type : disk Comment : /dev/sdb6 Disk Type : disk File System : ext2 Device Name : /dev/sdb6 Raw Device Name : Mount Point : /mnt/sdb6 [Resource1 : exec2] Type : exec Comment : exec resource2 Start Script Path : /opt/userpp/start2.sh Stop Script Path : /opt/userpp/stop2.sh [Resource2 : fip2] Type : fip Comment : 10.0.0.12 IP Address : 10.0.0.12 =============================================================
9.3.14. Displaying only the configuration data of a certain monitor resource (--mon option)
When you want to display only the cluster configuration data on a specified monitor resource, specify the name of the monitor resource after the --mon option in the clpstat command. If you want to see the details, specify --detail option. When you do not specify the name of monitor resource, the cluster configuration data of all monitor resources is displayed.
-
Example of a command entry For floating IP monitor resource:
# clpstat --mon fipw1
-
Example of the display after running the command: ===================== CLUSTER INFORMATION ===================== [Monitor2 : fipw1] Type : fipw Comment : fip monitor1 =================================================================
9.3.15. Displaying the configuration data of a resource specified for an individual server (--rsc option or --mon option)
When you want to display the configuration data on a resource specified for an individual server, specify the name of the resource after the --rsc or --mon option in the clpstat command.
-
Example of a command entry When the monitor target IP address of the IP monitor resource is set to an individual server:
# clpstat --mon ipw1
-
Example of the display after running the command: ===================== CLUSTER INFORMATION ===================== [Monitor2 : ipw1] Type : ipw Comment : ip monitor1 IP Addresses : Refer to server's setting <server1> IP Addresses : 10.0.0.253 : 10.0.0.254 <server2> IP Addresses : 10.0.1.253 : 10.0.1.254 =================================================================
9.3.16. Displaying only the configuration data of specific exclusion rules (--xcl option)
When you want to display only the cluster configuration data on a specified exclusion rules, specify the exclusive rule name after the --xcl option in the clpstat command.
-
Example of a command entry # clpstat --xcl excl1
-
Example of the display after running the command ===================== CLUSTER INFORMATION ===================== [Exclusive Rule0 : excl1] Exclusive Attribute : Normal group0 : failover1 group1 : failover2 =================================================================
9.3.17. Displaying all configuration data (-i option)
By specifying the -i option, you can display the configuration information that is shown when --cl, --sv, --hb, --svg, --grp, --rsc, --mon, and --xcl options are all specified.
If you run the command with the -i option and the --detail option together, all the detailed cluster configuration data is displayed. Because this option displays large amount of information at a time, use a command, such as the less command, and pipe, or redirect the output in a file for the output.
-
Tips Specifying the -i option displays all the information on a console. If you want to display some of the information, it is useful to combine the --cl, --sv, --hb, --svg, --grp, --rsc, and/or --mon option. For example, you can use these options as follows:
-
Example of a command entry If you want to display the detailed information of the server whose name is "server0," the group whose name is "failover1," and the group resources of the specified group, enter:
# clpstat --sv server0 --grp failover1 --rsc --detail
9.3.18. Displaying the status of the cluster (--local option)
By specifying the --local option, you can display only information of the server on which you execute the clpstat command, without communicating with other servers.
-
Example of a command entry # clpstat --local
-
Example of the display after running the command ===================== CLUSTER STATUS ====================== Cluster : cluster cluster..........: Start cluster <server> *server1..........: Online server1 lanhb1 : Normal LAN Heartbeat lanhb2 : Normal LAN Heartbeat diskhb1 : Normal DISK Heartbeat witnesshb1 : Normal Witness Heartbeat pingnp1 : Normal ping resolution pingnp2 : Normal ping resolution httpnp1 : Normal http resolution forcestop1 : Normal Forced stop server2...........: Online server2 lanhb1 : - LAN Heartbeat lanhb2 : - LAN Heartbeat diskhb1 : - DISK Heartbeat witnesshb1 : - Witness Heartbeat pingnp1 : - ping resolution pingnp2 : - ping resolution httpnp1 : - http resolution forcestop1 : - Forced stop <group> failover1.........: Online failover group1 current : server1 disk1 : Online /dev/sdb5 exec1 : Online exec resource1 fip1 : Online 10.0.0.11 failover2.........: - failover group2 current : server2 disk2 : - /dev/sdb6 exec2 : - exec resource2 fip2 : - 10.0.0.12 <monitor> diskw1 : Online disk monitor1 diskw2 : Online disk monitor2 ipw1 : Online ip monitor1 pidw1 : Online pidw1 userw : Online usermode monitor sraw : Online sra monitor =============================================================
Information on each status is provided in "Status Descriptions".
9.3.19. Status Descriptions
-
Cluster Function
Status
Description
Status display (--local)
Start
Starting
Suspend
Being suspended
Stop
Offline Pending
Unknown
Status unknown
-
Server Function
Status
Description
Status displayHeartbeat resource status displayOnline
Starting
Offline
Offline Pending
Online Pending
Now being started
Offline Pending
Now being stopped
Caution
Heartbeat resource failure
Unknown
Status unknown
-
Status unknown
Group map displayMonitor resource status displayo
Starting
x
Offline Pending
-
Status unknown
-
Heartbeat Resource Function
Status
Description
Status display
Normal
Normal
Caution
Failure (Some)
Error
Failure (All)
Unused
Not used
Unknown
Unknown
-
Status unknown
Heartbeat resource status display
o
Able to communicate
x
Unable to communicate
-
Not used or status unknown
-
Network Partition Resolution Resource and Forced Stop Resource Function
Status
Description
Status display
Normal
Normal
Error
Failure
Unused
Not used
Unknown
Status unknown
-
Status unknown
Network partition resolution /Forced stop resourcestatus displayo
Able to communicate
x
Unable to communicate
-
Not used or status unknown
-
Group Function
Status
Description
Status display
Online
Started
Offline
Stopped
Online Pending
Now being started
Offline Pending
Now being stopped
Error
Error
Unknown
Status unknown
-
Status unknown
Group map display
o
Started
e
Error
p
Now being started/stopped
-
Group Resource Function
Status
Description
Status display
Online
Started
Offline
Stopped
Online Pending
Now being started
Offline Pending
Now being stopped
Online Failure
Starting failed
Offline Failure
Stopping failed
Unknown
Status unknown
-
Status unknown
-
Monitor Resource Function
Status
Description
Status Display
Normal
Normal
Caution
Error (Some)
Error
Error (All)
Not Used
Not Used
Unknown
Status Unknown
Status display (--local)Monitor Resource Status DisplayOnline
Started and normal
Offline
Stopped
Caution
Caution
Suspend
Stopped temporary
Online Pending
Now being started
Offline Pending
Now being stopped
Online Failure
Error
Offline Failure
Stopping failed
Not used
Not used
Unknown
Status unknown
-
Status unknown
9.4. Operating the cluster (clpcl command)
the clpcl command operates a cluster
-
Command line - clpcl -s [-a] [-h hostname]clpcl -t [-a] [-h hostname] [-w timeout] [--apito timeout]clpcl -r [-a] [-h hostname] [-w timeout] [--apito timeout]clpcl --suspend [--force] [-w timeout] [--apito timeout]clpcl --resume
-
Description This command starts, stops, suspends, or resumes the cluster daemon.
-
Option -
-s¶ Starts the cluster daemon.
-
-t¶ Stops the cluster daemon.
-
-r¶ Restarts the cluster daemon.
-
--suspend¶ Suspends the entire cluster
-
-wtimeout¶ clpcl command specifies the wait time to stop or suspend the cluster daemon to be completed when -t, -r, or --suspend option is used. The unit of time is second.
When a time-out is not specified, it waits for unlimited time.
When "0 (zero)" is specified, it does not wait.
When -w option is not specified, it waits for (heartbeat time-out x 2) seconds.
-
--resume¶ Resumes the entire cluster. The status of group resource of the cluster when suspended is kept.
-
-a¶ Executed the command on all servers
-
-hhostname¶ Makes a request to run the command to the server specified in hostname. Makes a processing request to the server on which this command runs (local server) if the -h option is omitted.
-
--force¶ When used with the --suspend option, forcefully suspends the cluster regardless of the status of all the servers in the cluster.
-
--apitotimeout¶ - Specify the interval (internal communication timeout) to wait for the EXPRESSCLUSTER daemon start or stop in seconds. A value from 1 to 9999 can be specified.When the --apito option is not specified, the command waits for 3600 seconds.
-
-
Return Value 0
Success
Other than 0
Failure
-
Remarks - When this command is executed with the -s or --resume option specified, it returns control when processing starts on the target server.When this command is executed with the -t or --suspend option specified, it returns control after waiting for the processing to complete.When this command is executed with the -r option specified, it returns control when the EXPRESSCLUSTER daemon restarts on the target server after stopping once.
Run the clpstat command to display the started or resumed status of the EXPRESSCLUSTER daemon.
-
Notes Run this command as the root user.
This command cannot be executed while a group is being started or stopped.
For the name of a server for the -h option, specify the name of a server in the cluster.
When you suspend the cluster, the cluster daemon should be started in all servers in the cluster. When the --force option is used, the cluster is forcefully suspended even if there is any stopped server in the cluster.
When you start up or resume the cluster, access the servers in the cluster in the order below, and use one of the paths that allowed successful access.
via the IP address on the interconnect LAN
via the IP address on the public LAN
When you resume the cluster, use the clpstat command to see there is no activated server in the cluster.
This command starts, stops, restarts, suspends, or resumes only the EXPRESSCLUSTER daemon. The mirror agent and the like are not started, stopped, restarted, suspended, or resumed together.
-
Example of a command entry Example 1: Activating the cluster daemon in the local server
# clpcl -s
Example 2: Activating the cluster daemon in server1 from server0
# clpcl -s -h server1
Start server1 : Command succeeded.
If a server name is specified, the display after running the command should look similar to above.
Start hostname : Execution result
(If the activation fails, cause of the failure is displayed)
Example 3: Activating the cluster daemon in all servers
# clpcl -s -a
Start server0 : Command succeeded.
Start server1 : Performed startup processing to the active cluster daemon. When all the servers are activated, the display after running the command should look similar to above. Start hostname : Execution result
(If the activation fails, cause of the failure is displayed)
Example 4: Stopping the cluster daemon in all servers
# clpcl -t -a
If the cluster daemon stops on all the servers, it waits till the EXPRESSCLUSTER daemons stop on all the servers.
If stopping fails, an error message is displayed.
-
Error Messages Message
Cause/Solution
Log in as root.
Log on as the root user.
Invalid configuration file. Create valid cluster configuration data.
Create valid cluster configuration data using the Cluster WebUI.
Invalid option.
Specify a valid option
Performed stop processing to the stopped cluster daemon.
The stopping process has been executed on the stopped cluster daemon.
Performed startup processing to the active cluster daemon.
The startup process has been executed on the activated cluster daemon.
Could not connect to the server. Check if the cluster daemon is active.
Check if the cluster daemon is started.
Could not connect to the data transfer server. Check if the server has started up.
Check if the server is running.
Failed to obtain the list of nodes.Specify a valid server name in the cluster.Specify the valid name of a server in the cluster.
Failed to obtain the daemon name.
Failed to obtain the cluster name.
Failed to operate the daemon.
Failed to control the cluster.
Resumed the daemon that is not suspended.
Performed the resume process for the HA Cluster daemon that is not suspended.
Invalid server status.
Check that the cluster daemon is started.
Server is busy. Check if this command is already run.
This command may have already been run.
Server is not active. Check if the cluster daemon is active.
Check if the cluster daemon is started.
There is one or more servers of which cluster daemon is active. If you want to perform resume, check if there is any server whose cluster daemon is active in the cluster.
When you execute the command to resume, check if there is no server in the cluster on which the cluster daemon is started.
All servers must be activated. When suspending the server, the cluster daemon need to be started on all servers in the cluster.
When you execute the command to suspend, the cluster daemon must be started in all servers in the cluster.
Resume the server because there is one or more suspended servers in the cluster.
Execute the command to resume because some server(s) in the cluster is in the suspend status.
Invalid server name. Specify a valid server name in the cluster.
Specify the valid name of a server in the cluster.
Connection was lost. Check if there is a server where the cluster daemon is stopped in the cluster.
Check if there is any server on which the cluster daemon is stopped in the cluster.
Invalid parameter.
The value specified as a command parameter may be invalid.
Internal communication timeout has occurred in the cluster server. If it occurs frequently, set the longer timeout.
A time-out occurred in the HA Cluster internal communication.If time-out keeps occurring, set the internal communication time-out longer.Processing failed on some servers. Check the status of failed servers.
If stopping has been executed with all the servers specified, there is one of more servers on which the stopping process has failed.Check the status of the server(s) on which the stopping process has failed.Internal error. Check if memory or OS resources are sufficient.
Check to see if the memory or OS resource is sufficient.
There is a server that is not suspended in cluster. Check the status of each server.
There is a server that is not suspended in the cluster. Check the status of each server.
Suspend %s : Could not suspend in time.
The server failed to complete the suspending process of the cluster daemon within the time-out period. Check the status of the server.
Stop %s : Could not stop in time.
The server failed to complete the stopping process of the cluster daemon within the time-out period. Check the status of the server.
Stop %s : Server was suspended.Could not connect to the server. Check if the cluster daemon is active.The request to stop the cluster daemon was made. However the server was suspended.
Could not connect to the server. Check if the cluster daemon is active.
The request to stop the cluster daemon was made. However connecting to the server failed. Check the status of the server.
Suspend %s : Server already suspended.Could not connect to the server. Check if the cluster daemon is active.The request to suspend the cluster daemon was made. However the server was suspended.
Event service is not started.
Event service is not started. Check it.
Mirror Agent is not started.
Mirror Agent is not started. Check it.
Event service and Mirror Agent are not started.
Event service and Mirror Agent are not started. Check them.
Some invalid status. Check the status of cluster.
The status of a group may be changing. Try again after the status change of the group is complete.
Failed to shut down the server.
Failed to shut down or reboot the server.
9.5. Shutting down a specified server (clpdown command)
the clpdown command shuts down a specified server.
-
Command line clpdown [-r] [-h hostname]
-
Description This command stops the cluster daemon and shuts down a server.
-
Option -
None¶ Shuts down a server.
-
-r¶ Reboots the server.
-
-hhostname¶ Makes a processing request to the server specified in hostname. Makes a processing request to the server on which this command runs (local server) if the -h option is omitted.
-
-
Return Value 0
Success
Other than 0
Failure
-
Remarks - This command runs the following commands internally after stopping the cluster daemon.Without any option specified shutdownWith the -r option specified reboot
This command returns control when the group stop processing is completed.
This command shuts down the server even when the EXPRESSCLUSTER daemon is stopped.
-
Notes Run this command as the root user.
This command cannot be executed while a group is being started or stopped.
Do not use this command while a cluster is suspended.
For the name of a server for the -h option, specify the name of a server in the cluster.
-
Example of a command entry Example 1: Stopping and shutting down the cluster daemon in the local server
# clpdown
Example 2: Shutting down and rebooting server1 from server0
# clpdown -r -h server1
-
Error Message
9.6. Shutting down the entire cluster (clpstdn command)
the clpstdn command shuts down the entire cluster
-
Command line clpstdn [-r] [-h hostname]
-
Description This command stops the cluster daemon in the entire cluster and shuts down all servers.
-
Option -
None¶ Executes cluster shutdown.
-
-r¶ Executes cluster shutdown reboot.
-
-hhostname¶ Makes a processing request to the server specified in hostname. Makes a processing request to the server on which this command runs (local server) if the -h option is omitted.
-
-
Return Value 0
Success
Other than 0
Failure
-
Remarks This command returns control when the group stop processing is completed.
-
Notes Run this command as the root user.
This command cannot be executed while a group is being started or stopped.
For the name of a server for the -h option, specify the name of a server in the cluster.
A server that cannot be accessed from the server that runs the command (for example, a server with all LAN heartbeat resources are off-line.) will not shut down.
-
Example of a command entry Example 1: Shutting down the cluster
# clpstdn
Example 2: Performing the cluster shutdown reboot
# clpstdn -r
-
Error Message
9.7. Operating groups (clpgrp command)
the clpgrp command operates groups
-
Command line - clpgrp -s [group_name] [-h hostname] [-f] [--apito timeout]clpgrp -t [group_name] [-h hostname] [-f] [--apito timeout]clpgrp -m [group_name] [-h hostname] [-a hostname] [--apito timeout]
-
Description This command starts, deactivates or moves groups.
-
Option -
-s[group_name]¶ Starts groups. When you specify the name of a group, only the specified group starts up. If no group name is specified, all groups start up.
-
-t[group_name]¶ Stops groups. When you specify the name of a group, only the specified group stops. If no group name is specified, all groups stop.
-
-m[group_name]¶ Moves a specified group. If no group name is specified, all the groups are moved. The status of the group resource of the moved group is kept.
-
-hhostname¶ Makes a processing request to the server specified in hostname. Makes a processing request to the server on which this command runs (local server) if the -h option is omitted.
-
-ahostname¶ Defines the server which is specified by hostname as a destination to which a group will be moved. When the -a option is omitted, the group will be moved according to the failover policy
-
-f¶ - If you use this option with the -s option against a group activated on a remote server, it will forcefully be started on the server that requested the process.If this command is used with the -t option, the group will be stopped forcefully.
-
-ngroup_name¶ Displays the name of the server on which the group has been started.
-
--apitotimeout¶ - Specify the interval (internal communication timeout) to wait for the group resource start or stop in seconds. A value from 1 to 9999 can be specified.When the --apito option is not specified, the command waits for 3600 seconds.
-
-
Return Value 0
Success
Other than 0
Failure
-
Notes Run this command as the root user.
The cluster daemon must be started on the server that runs this command
Specify a server in the cluster when you specify the name of server name for the -h and -a options.
Make sure to specify a group name, when you use the -m option.
Moving a group by using the -m option is considered to have succeeded (the value 0 is returned), with the group start process started on the destination server; even so, be careful of a possible failure in resource activation there.To judge from a returned value the result of the group start process on the destination server, move the group by executing the following command:# clpgrp -s [group_name] [-h hostname] -f
In order to move a group belonging to exclusion rules whose exclusion attribute is set to "Normal" by using the [-m] option, explicitly specify a server to which the group is moved by the [-a] option.
With the [-a] option omitted, moving a group fails if a group belonging to exclusion rules whose exclusion attribute is set to "Normal" is activated in all the movable servers.
-
Example of Execution The following is an example of status transition when operating the groups.
Example: The cluster has two servers and two groups.
Failover policy of group
groupA server1 -> server2groupB server2 -> server1Both groups are stopped.

Fig. 9.1 Run-time state of the clpgrp command (1)
Run the following command on server1.
# clpgrp -s groupA
GroupA starts in server1.
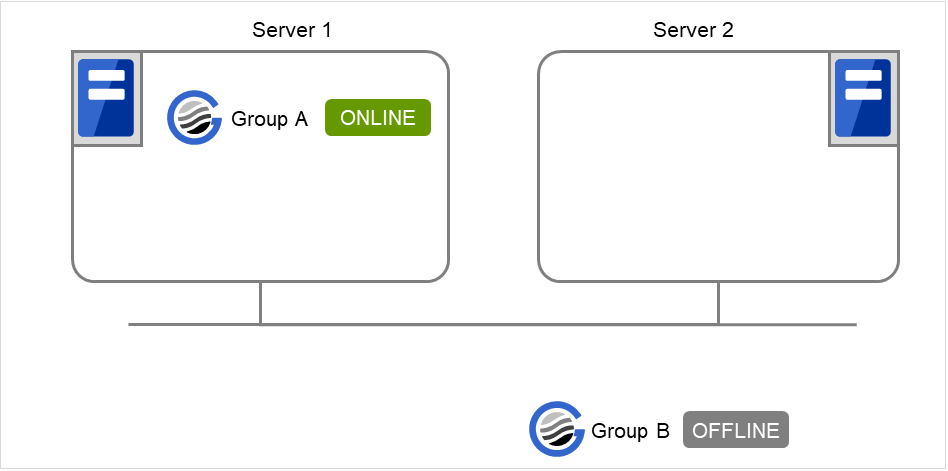
Fig. 9.2 Run-time state of the clpgrp command (2)
Run the following command in server1.
# clpgrp -n groupA
server1
When the command is executed, groupA is running on server1. So, "server1" appears.
Run the following command in server2.
# clpgrp -s
All groups that are currently stopped but can be started start in server2.
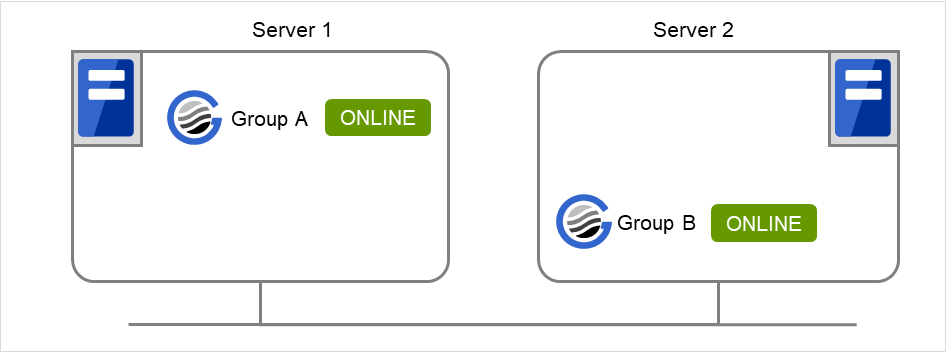
Fig. 9.3 Run-time state of the clpgrp command (3)
Run the following command in server1
# clpgrp -m groupA
GroupA moves to server2.
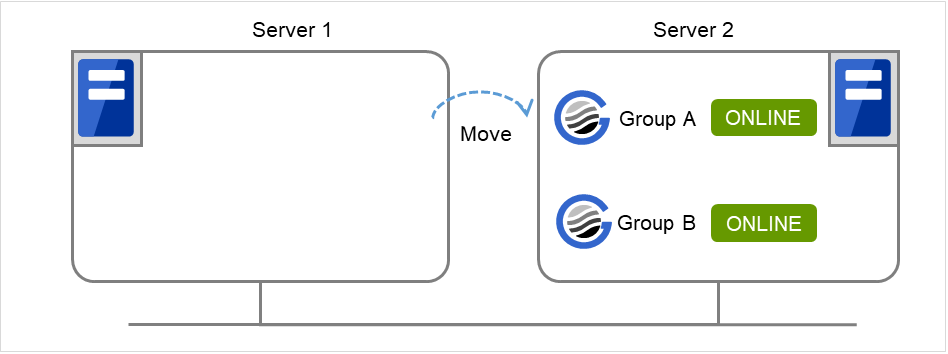
Fig. 9.4 Run-time state of the clpgrp command (4)
Run the following command in server1
# clpgrp -t groupA -h server2
GroupA stops.

Fig. 9.5 Run-time state of the clpgrp command (5)
Run the following command in server1.
# clpgrp -t
Command Succeeded.
When the command is executed, there is no group running on server1. So, "Command Succeeded." appears.
Add -f to the command you have run in Step 7 and execute it on server1.
# clpgrp -t -f
Groups which were started in server2 can be forcefully deactivated from server1.
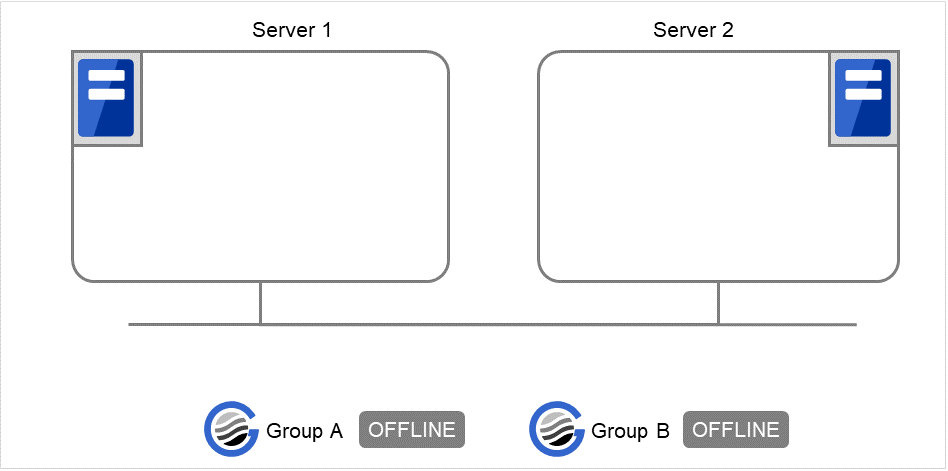
Fig. 9.6 Run-time state of the clpgrp command (6)
-
Error message Message
Cause/Solution
Log in as root.
Log on as the root user.
Invalid configuration file. Create valid cluster configuration data.
Create valid cluster configuration data using the Cluster WebUI
Invalid option.
Specify a valid option
Could not connect to the server. Check if the cluster daemon is active.
Check if the cluster daemon is started.
Invalid server status.
Check if the cluster daemon is started.
Server is not active. Check if the cluster daemon is active.
Check if the cluster daemon is started.
Invalid server name. Specify a valid server name in the cluster.
Specify the valid name of server in the cluster.
Connection was lost. Check if there is a server where the cluster daemon is stopped in the cluster.
Check if there is any server on which the cluster daemon has stopped in the cluster.
Invalid parameter.
The value specified as a command parameter may be invalid.
Internal communication timeout has occurred in the cluster server. If it occurs frequently, set the longer timeout.
A time-out occurred in the EXPRESSCLUSTER internal communication.If time-out keeps occurring, set the internal communication time-out longer.Invalid server. Specify a server that can run and stop the group, or a server that can be a target when you move the group.
The server that starts/stops the group or to which the group is moved is invalid.Specify a valid server.Could not start the group. Try it again after the other server is started, or after the Wait Synchronization time is timed out.
Start up the group after waiting for the remote server to start up, or after waiting for the time-out of the start-up wait time.
No operable group exists in the server.
Check if there is any group that is operable in the server which requested the process.
The group has already been started on the local server.
Check the status of the group by using the Cluster WebUI or the clpstat command.
The group has already been started on the other server. To start/stop the group on the local server, use -f option.
Check the status of the group by using the Cluster WebUI or the clpstat command.If you want to start up or stop a group which was started in a remote server from the local server, move the group or run the command with the -f option.The group has already been started on the other server. To move the group, use "-h <hostname>" option.
Check the status of the group by using the Cluster WebUI or clpstat command.If you want to move a group which was started on a remote server, run the command with the -h hostname option.The group has already been stopped.
Check the status of the group by using the Cluster WebUI or the clpstat command.
Failed to start one or more group resources. Check the status of group
Check the status of group by using Cluster WebUI or the clpstat command.
Failed to stop one or more group resources. Check the status of group
Check the status of group by using the Cluster WebUI or the clpstat command.
The group is busy. Try again later.
Wait for a while and then try again because the group is now being started up or stopped.
An error occurred on one or more groups. Check the status of group
Check the status of the group by using the Cluster WebUI or the clpstat command.
Invalid group name. Specify a valid group name in the cluster.
Specify the valid name of a group in the cluster.
Server is not in a condition to start group or any critical monitor error is detected.
Check the status of the server by using the Cluster WebUI or clpstat command.An error is detected in a critical monitor on the server on which an attempt was made to start a group.There is no appropriate destination for the group. Other servers are not in a condition to start group or any critical monitor error is detected.
Check the status of the server by using the Cluster WebUI or clpstat command.An error is detected in a critical monitor on all other servers.The group has been started on the other server. To migrate the group, use "-h <hostname>" option.
Check the status of the group by using the Cluster WebUI or clpstat command.If you want to move a group which was started on a remote server, run the command with the -h hostname option.Some invalid status. Check the status of cluster.
Invalid status for some sort of reason. Check the status of the cluster.
Internal error. Check if memory or OS resources are sufficient.
Check to see if the memory or OS resource is sufficient.
9.8. Collecting logs (clplogcc command)
the clplogcc command collects logs.
-
Command line clplogcc [ [-h hostname] | [-n targetnode1 -n targetnode2 ......] ] [-t collect_type] [-r syslog_rotate_number] [-o path] [-l]
-
Description This command collects information including logs and the OS information by accessing the data transfer server.
-
Option -
None¶ Collects logs in the cluster.
-
-hhostname¶ Specifies the name of the access destination server for collecting cluster node information
-
-tcollect_type¶ Specifies a log collection pattern. When this option is omitted, a log collection pattern will be type1. Information on log collection types is provided in "Collecting logs by specifying a type (-t option)".
-
-rsyslog_rotate _number¶ Specifies how many generations of syslog will be collected. When this option is omitted, only one generation will be collected.
-
-opath¶ Specifies the output destination of collector files. When this option is skipped, logs are output under tmp of the installation path.
-
-ntargetnode¶ Specifies the name of a server that collects logs. With this specification, logs of the specified server, rather than of the entire cluster, will be collected.
-
-l¶ - Collects logs on the local server without going through the data transfer server.The -h option and the -n option cannot be specified at the same time.
-
-
Return Value 0
Success
Other than 0
Failure
-
Remarks Since log files are compressed by tar.gz, add the xzf option to the tar command to decompress them.
-
Notes Run this command as the root user.
For the name of server for the -h option, specify the name of a server in the cluster that allows name resolution.
For the name of server for the -n option, specify the name of server that allows name resolution. If name resolution is not possible, specify the interconnect or public LAN address.
In executing this command, the IP addresses of cluster servers are tried to be connected in order of interconnect priority, then a successful route is used.
If the log files collected on Linux OS (pax format of the tar command's compression) are decompressed with gnutar format of the tar command, a PaxHeaders.X folder is generated. However, it does not affect the operation.
-
Example of command execution Example 1: Collecting logs from all servers in the cluster
# clplogcc
Collect Log server1 : Success
Collect Log server2 : Success
Log collection results (server status) of servers on which log collection is executed are displayed.
Process hostname: result of loc collection (server status)
-
Execution Result For this command, the following processes are displayed.
Steps in Process
Meaning
Connect
Displayed when the access fails.
Get File size
Displayed when acquiring the file size fails.
Collect Log
Displayed with the file acquisition result.
The following results (server status) are displayed:
Result (server status)
Meaning
Success
Success
Timeout
Time-out occurred.
Busy
The server is busy.
Not Exist File
The file does not exist.
No Free space
No free space on the disk.
Failed
Failure caused by other errors.
-
Error Message Message
Cause/Solution
Log in as root.
Log on as the root user.
Invalid configuration file. Create valid cluster configuration data.
Create valid cluster configuration data using the Cluster WebUI.
Invalid option.
Specify a valid option.
Specify a number in a valid range.
Specify a number within a valid range.
Specify a correct number.
Specify a valid number.
Specify correct generation number of syslog.
Specify a valid number for the syslog generation.
Collect type must be specified 'type1' or 'type2' or 'type3' or 'type4' or 'type5' or 'type6'. Incorrect collection type is specified.
Invalid collection type has been specified.
Specify an absolute path as the destination of the files to be collected.
Specify an absolute path for the output destination of collected files.
Specifiable number of servers are the max number of servers that can constitute a cluster.
The number of servers you can specify is within the maximum number of servers for cluster configuration.
Could not connect to the server. Check if the cluster daemon is active.
Check if the cluster daemon is started.
Failed to obtain the list of nodes.
Specify a valid server name in the cluster.
Specify the valid name of a server in the cluster.
Invalid server status.
Check if the cluster daemon is started.
Server is busy. Check if this command is already run.
This command may have been already activated. Check the status.
Internal error. Check if memory or OS resources are sufficient.
Check to see if the memory or OS resource is sufficient.
9.8.1. Collecting logs by specifying a type (-t option)
To collect only the specified types of logs, run the clplogcc command with the -t option.
Specify a type from 1 through 6 for the log collection.
type1 |
type2 |
type3 |
type4 |
type5 |
type6 |
|
|---|---|---|---|---|---|---|
|
✓ |
✓ |
✓ |
✓ |
n/a |
n/a |
|
✓ |
✓ |
✓ |
n/a |
n/a |
n/a |
|
✓ |
✓ |
n/a |
✓ |
n/a |
n/a |
|
✓ |
✓ |
✓ |
✓ |
n/a |
n/a |
|
✓ |
✓ |
n/a |
n/a |
n/a |
n/a |
|
✓ |
✓ |
n/a |
n/a |
n/a |
n/a |
|
n/a |
✓ |
n/a |
n/a |
n/a |
n/a |
|
n/a |
n/a |
n/a |
n/a |
✓ |
n/a |
|
n/a |
n/a |
n/a |
n/a |
n/a |
✓ |
|
✓ |
✓ |
✓ |
✓ |
n/a |
✓ |
Run this command from the command line as follows.
Example: When collecting logs using type2
# clplogcc -t type2
When no option is specified, a log type will be type 1.
Information to be collected by default
Information on the following is collected by default:
Logs of each module in the EXPRESSCLUSTER Server
Alert logs
Attribute of each module (ls -l) in the EXPRESSCLUSTER Server
In bin, lib
In cloud
In alert/bin, webmgr/bin
In ha/jra/bin, ha/sra/bin, ha/jra/lib, ha/sra/lib
In drivers/md
In drivers/khb
In drivers/ka
All installed packages (rpm -qa expresscls execution result)
EXPRESSCLUSTER version
distribution (/etc/*-release)
License information
Cluster configuration data file
Policy file
Cloud environment configuration directory
Dump of shared memory used by EXPRESSCLUSTER
Local node status of EXPRESSCLUSTER (clpstat --local execution results)
Process and thread information (ps, top execution result)
PCI device information (lspci execution result)
Service information (execution results of the commands such as systemctl, chkconfig, and ls)
Output result of kernel parameter (result of running sysctl -a)
glibc version (rpm -qi glibc execution result)
Kernel loadable module configuration (/etc/modules.conf. /etc/modprobe.conf)
File system (/etc/fstab)
IPC resource (ipcs execution result)
System (uname -a execution result)
Network statistics (netstat, ss execution result IPv4/IPv6)
ip (execution results of the command ip addr, link, maddr, route or -s l)
All network interfaces (ethtool execution result)
Information collected at an emergency OS shutdown (See "Collecting information when a failure occurs".)
libxml2 version (rpm -qi libxml2 execution result)
Static host table (/etc/hosts)
File system export table (exportfs -v execution result)
User resource limitations (ulimit -a execution result)
File system exported by kernel-based NFS (/etc/exports)
OS locale
Terminal session environment value (export execution result)
Language locale (/etc/sysconfig/i18n)
Time zone (env - date execution result)
Work area of EXPRESSCLUSTER server
- Monitoring optionsThis information is collected if options are installed.
Collected dump information when the monitor resource timeout occurred
Collected Oracle detailed information when Oracle monitor resource abnormity was detected
Operation log of Cluster WebUI (see "Maintenance Guide" -> "The system maintenance information" -> "Function for outputting the operation log of Cluster WebUI")
AWS-related information
Results of executing the following commands:
which aws
aws --version
aws configure list
aws ec2 describe-network-interfaces
aws ec2 describe-instance-attribute --attribute disableApiStop
syslog
syslog (/var/log/messages)
syslog (/var/log/syslog)
Syslogs for the number of generations specified (/var/log/messages.x)
journal log (such as files in /var/run/log/journal/)
core file
- core file of EXPRESSCLUSTER moduleStored in /opt/nec/clusterpro/log by the following archive names.
Alert related:
altyyyymmdd_x.tar
The WebManager server related:
wmyyyymmdd_x.tar
EXPRESSCLUSTER core related:
clsyyyymmdd_x.tar
srayyyymmdd_x.tar
jrayyyymmdd_x.tar
yyyymmdd indicates the date when the logs are collected. x is a sequence number.
OS information
OS information on the following is collected by default:
Kernel mode LAN heartbeat, keep alive
/proc/khb_moninfo
/proc/ka_moninfo
/proc/devices
/proc/mdstat
/proc/modules
/proc/mounts
/proc/meminfo
/proc/cpuinfo
/proc/partitions
/proc/pci
/proc/version
/proc/ksyms
/proc/net/bond*
all files of /proc/scsi/ all files in the directory
all files of /proc/ide/ all files in the directory
/etc/fstab
/etc/rc*.d
/etc/syslog.conf
/etc/syslog-ng/syslog-ng.conf
/etc/snmp/snmpd.conf
Kernel ring buffer (dmesg execution result)
ifconfig (the result of running ifconfig)
iptables (the result of running iptables -L)
ipchains (the result of running ipchains -L)
df (the result of running df)
raw device information (the result of running raw -qa)
kernel module load information (the result of running lsmod)
host name, domain name information (the result of running hostname, domainname)
dmidecode (the result of running dmidecode)
LVM device information (the result of running vgdisplay -v)
snmpd version information (snmpd -v execution result)
Virtual Infrastructure information (the result of running virt-what)
blockdev (the result of running blockdev --report)
lsblk (the result of running lsblk -i)
getenforce (the result of running getenforce)
When you collect logs, you may find the following message on the console. This does not mean failure. The logs are collected normally.
hd#: bad special flag: 0x03
ip_tables: (C) 2000-2002 Netfilter core team
(Where hd# is the name of the IDE device that exists on the server)
Script
Start/stop script for a group that was created with the Cluster WebUI.
If you specify a user-defined script other than the above (/opt/nec/clusterpro/scripts), it is not included in the log collection information. It must be collected separately.
ESMPRO/AC Related logs
Files that are collected by running the acupslog command.
HA logs
System resource information
JVM monitor log
System monitor log
Mirror statistics information
Mirror statistics information
In perf/disk
Cluster statistics information
Cluster statistics information
In perf/cluster
System resource statistics information
System resource statistics information
In perf/system
9.8.2. Syslog generations (-r option)
To collect syslogs for the number of generations specified, run the following command.
Example: Collecting logs for the 3 generations
# clplogcc -r 3
The following syslogs are included in the collected logs.
When no option is specified, only /var/log/messages is collected.
You can collect logs for 0 to 99 generations.
When 0 is specified, all syslogs are collected.
Number of Generation |
Number of generations to be acquired |
|---|---|
0 |
All Generations |
1 |
Current |
2 |
Current + Generation 1 |
3 |
Current + Generation 1 to 2 |
: |
|
: |
|
x |
Current + Generation 1 to (x-1) |
9.8.3. Output paths of log files (-o option)
Log file is named and be saved as "server name-log.tar.gz"
If an IP address is specified for the -n option, a log file is named and saved as "IP address-log.tar.gz."
Since log files are compressed by tar.gz, decompress them by adding the xzf option to the tar command.
If not specifying -o option
Logs are output in tmp of installation path.
# clplogcc
Collect Log hostname : Success
# ls /opt/nec/clusterpro/tmp
hostname-log.tar.gz
When the -o option is not specified:
If you run the command as follows, logs are located in the specified /home/log directory.
# clplogcc -o /home/log
Collect Log hostname: Success
# ls /home/log
hostname-log.tar.gz
9.8.4. Specifying log collector server (-n option)
By using the -n option, you can collect logs only from the specified server.
Example: Collecting logs from Server1 and Server3 in the cluster.
# clplogcc -n Server1 -n Server3
Specify a server in the same cluster.
The number of servers you can specify is within the maximum number of servers in the cluster configuration.
9.8.5. Collecting information when a failure occurs
When the following failure occurs, the information for analyzing the failure is collected.
When a cluster daemon configuring the cluster abnormally terminates due to interruption by a signal (core dump) or internal status error etc.
When a group resource activation error or deactivation error occurs
When monitoring error occurs in a monitor resource
Information to be collected is as follows:
Cluster information
Some module logs in EXPRESSCLUSTER servers
Dump files in the shared memory used by EXPRESSCLUSTER
Cluster configuration information files
OS information (/proc/*)
/proc/devices
/proc/partitions
/proc/mdstat
/proc/modules
/proc/mounts
/proc/meminfo
/proc/net/bond*
Information created by running a command
Results of the sysctl -a
Results of the ps
Results of the top
Results of the ipcs
Results of the netstat -in
Results of the netstat -apn
Results of the netstat -gn
Results of the netstat -rn
Results of the ifconfig
Results of the ip addr
Results of the ip -s l
Results of the df
Results of the raw -qa
journalctl -e execution result
These are collected by default in the log collection. You do not need to collect them separately.
9.9. Changing, backing up, and checking cluster configuration data (clpcfctrl command)
9.9.1. Creating a cluster and changing the cluster configuration data
the clpcfctrl --push command delivers cluster configuration data to servers.
-
Command line clpcfctrl --push [-h hostname|IP] [-p portnumber] [-x directory] [--force] [--nocheck]
-
Description This command delivers the configuration data created by the Cluster WebUI to servers.
-
Option -
--push¶ Specify this option when delivering the data. You cannot omit this option.
-
-hhostname | IP¶ - Specifies a server to which configuration data is delivered. Specify host name or IP address.If this option is omitted, configuration data is delivered to all servers.
-
-pportnumber¶ - Specifies a port number of data transfer port.When this option is omitted, the default value will be used. In general, it is not necessary to specify this option.
-
-xdirectory¶ - Specify this option when delivering configuration data to the specified directory.
-
--force¶ Even if there is a server that has not started, the configuration data is delivered forcefully.
-
--nocheck¶ When this option is specified, cluster configuration data is not checked.
-
-
Return Value 0
Success
Other than 0
Failure
-
Remarks To deliver the cluster configuration data file exported from Cluster WebUI, to cluster servers by executing the clpcfctrl --push command, follow these steps:
Start Cluster WebUI, then switch to Config Mode.
If necessary, change the cluster configuration in Cluster WebUI.
In Cluster WebUI, select Export, then export the cluster configuration data file (in zip format) to any folder.
In any folder accessible from the cluster servers, unzip the exported zip file.
On any of the cluster servers, start Command Prompt, then execute the clpcfctrl --push command.
-
Notes Run this command as the root user.
When you run this command, access the servers in the order below, and use one of the paths that allowed successful access.
via the IP address on the interconnect LAN
via the IP address on the public LAN
Before uploading cluster configuration data with one or more servers removed, uninstall the EXPRESSCLUSTER Server on the servers that will be removed from the cluster configuration.
-
Example of command execution Example 1: Delivering configuration data that was saved on the file system using the Cluster WebUI on Linux
# clpcfctrl --push -x /mnt/config
file delivery to server 10.0.0.11 success.
file delivery to server 10.0.0.12 success.
The upload is completed successfully.(cfmgr:0)
Command succeeded.(code:0)
Example 2: Delivering the configuration data to the server which has been reinstalled.
# clpcfctrl --push -h server2
The upload is completed successfully.(cfmgr:0)
Command succeeded.(code:0)
-
Error Message Message
Cause/Solution
Log in as root.
Log on as the root user.
This command is already run.
This command has been already started.
Invalid option.
The option is invalid.Check the option.Invalid mode.Check if --push is specified.Check if the --push option is specified.
The target directory does not exist.
The specified directory is not found.
Invalid host name.Server specified by -h option is not included in the configuration dataThe server specified with -h is not included in configuration data.Check if the specified server name or IP address is valid.Canceled.
Displayed when anything other than "y" is entered for command inquiry.
Failed to initialize the xml library. Check if memory or OS resources are sufficient.
Check if the memory or OS resource is sufficient.
Failed to load the configuration file.Check if memory or OS resources are sufficient.Same as above.
Failed to change the configuration file.Check if memory or OS resources are sufficient.Same as above.
Failed to load the policy files.Reinstall the RPM.Reinstall the EXPRESSCLUSTER Server RPM.
Failed to load the cfctrl policy file.Reinstall the RPM.Reinstall the EXPRESSCLUSTER Server RPM.
Failed to get the install path.Reinstall the RPM.Reinstall the EXPRESSCLUSTER Server RPM.
Failed to get the cfctrl path.Reinstall the RPM.Reinstall the EXPRESSCLUSTER Server RPM.
Failed to get the list of group.
Failed to acquire the list of group.
Failed to get the list of resource.
Failed to acquire the list of resource.
Failed to initialize the trncl library.Check if memory or OS resources are sufficient.Check to see if the memory or OS resource is sufficient.
Failed to connect to server %s.Check if the other server is active and then run the command again.Accessing the server has failed. Check if other server(s) has been started.Run the command again after the server has started up.Failed to connect to trnsv.Check if the other server is active.Accessing the server has failed. Check that other server has been started up.
Failed to get the collect size.
Getting the size of the collector file has failed.Check if other server(s) has been started.Failed to collect the file.
Collecting of the file has failed. Check if other server(s) has been started.
Failed to get the list of node.Check if the server name or ip addresses are correct.Check if the server name and the IP address in the configuration information have been set correctly.
Failed to check server property.Check if the server name or ip addresses are correct.Check if the server name and the IP address in the configuration information have been set correctly.
File delivery failed. Failed to deliver the configuration data.Check if the other server is active and run the command again.Delivering configuration data has failed. Check if other server(s) has been started.Run the command again after the server has started up.Multi file delivery failed. Failed to deliver the configuration data.Check if the other server is active and run the command again.Delivering configuration data has failed. Check if other server(s) has been started.Run the command again after the server has started up.Failed to deliver the configuration data.Check if the other server is active and run the command again.Delivering configuration data has failed. Check if other server(s) has been started.Run the command again after the server has started up.The directory "/work" is not found.Reinstall the RPM.Reinstall the EXPRESSCLUSTER Server RPM.
Failed to make a working directory.
Check to see if the memory or OS resource is sufficient.
The directory does not exist.
Check if the path to the cluster configuration data file is correct.
This is not a directory.
Check if the path to the cluster configuration data file is correct.
The source file does not exist.
Check if the path to the cluster configuration data file is correct.
The source file is a directory.
Check if the path to the cluster configuration data file is correct.
The source directory does not exist.
Check if the path to the cluster configuration data file is correct.
The source file is not a directory.
Check if the path to the cluster configuration data file is correct.
Failed to change the character code set (EUC to SJIS).
Check to see if the memory or OS resource is sufficient.
Failed to change the character code set (SJIS to EUC).
Check to see if the memory or OS resource is sufficient.
Command error.
Check to see if the memory or OS resource is sufficient.
Failed to initialize the cfmgr library.Check if memory or OS resources are sufficient.Check to see if the memory or OS resource is sufficient.
Failed to get size from the cfmgr library.Check if memory or OS resources are sufficient.Check to see if the memory or OS resource is sufficient.
Failed to allocate memory.
Check to see if the memory or OS resource is sufficient.
Failed to change the directory.
Check to see if the memory or OS resource is sufficient.
Failed to run the command.
Check to see if the memory or OS resource is sufficient.
Failed to make a directory.
Check to see if the memory or OS resource is sufficient.
Failed to remove the directory.
Check to see if the memory or OS resource is sufficient.
Failed to remove the file.
Check to see if the memory or OS resource is sufficient.
Failed to open the file.
Check if the path to the cluster configuration data file is correct.
Failed to read the file.
Check to see if the memory or OS resource is sufficient.
Failed to write the file.
Check to see if the memory or OS resource is sufficient.
Internal error.Check if memory or OS resources are sufficient.Check to see if the memory or OS resource is sufficient.
The upload is completed successfully.To start the cluster, refer to "How to create a cluster"in the Installation and Configuration Guide.The upload is successfully completed.To start the cluster, refer to "Creating a cluster" in "Creating the cluster configuration data"in the "Installation and Configuration Guide".The upload is completed successfully.To apply the changes you made, shutdown and reboot the cluster.The upload is successfully completed. To apply the changes you made, shut down the cluster, and reboot it.
The upload was stopped.To upload the cluster configuration data, stop the cluster.The upload was stopped. To upload the cluster configuration data, stop the cluster.
The upload was stopped.To upload the cluster configuration data, stop the Mirror Agent.The upload was stopped.To upload the cluster configuration data, stop the Mirror Agent.The upload was stopped.To upload the cluster configuration data, stop the resources to which you made changes.The upload was stopped.To upload the cluster configuration data, stop the resources to which you made changes.The upload was stopped.To upload the cluster configuration data, stop the groups to which you made changes.The upload was stopped. To upload the cluster configuration data, suspend the cluster. To upload, stop the group to which you made changes.
The upload was stopped.To upload the cluster configuration data, suspend the cluster.The upload was stopped. To upload the cluster configuration data, suspend the cluster.
The upload is completed successfully.To apply the changes you made, restart the Alert Sync service.To apply the changes you made, restart the WebManager service.The upload is completed successfully.To apply the changes you made, restart the Alert Sync service.To apply the changes you made, restart the WebManager service.The upload is completed successfully.To apply the changes you made, restart the Information Base service.The upload is completed successfully.To apply the changes you made, restart the Information Base service.The upload is completed successfully.To apply the changes you made, restart the API service.The upload is completed successfully.To apply the changes you made, restart the API service.The upload is completed successfully.To apply the changes you made, restart the Node Manager service.The upload is completed successfully.To apply the changes you made, restart the Node Manager service.Internal error.Check if memory or OS resources are sufficient.Check to see if the memory or OS resource is sufficient.
The upload is completed successfully.
The upload is successfully completed.
The upload was stopped.Failed to deliver the configuration data.Check if the other server is active and run the command again.The upload was stopped.Failed to deliver the configuration data.Check if the other server is active and run the command again.The upload was stopped.There is one or more servers that cannot be connected to.To apply cluster configuration information forcibly, run the command again with "--force" option.The upload was stopped. The server that cannot connect exists. To forcibly upload the cluster configuration information, run the command again with the --force option.
9.9.2. Backing up the Cluster configuration data
the clpcfctrl --pull command backups cluster configuration data.
-
Command line clpcfctrl --pull -l|-w [-h hostname|IP] [-p portnumber] [-x directory]
-
Description This command backs up cluster configuration data to be used for the Cluster WebUI.
-
Option -
--pull¶ Specify this option when performing backup. You cannot omit this option.
-
-l¶ - Specify this option when backing up configuration data that is used for the Cluster WebUI on Linux.You cannot specify both -l and -w together.
-
-w¶ - Specify this option when backing up configuration data that is used for the Cluster WebUI on Windows.You cannot specify both -l and -w together.
-
-hhostname | IP¶ - Specifies the source server for backup. Specify a host name or IP address.When this option is omitted, the configuration data on the server running the command is used.
-
-pportnumber¶ - Specifies a port number of data transfer port.When this option is omitted, the default value is used. In general, it is not necessary to specify this option.
-
-xdirectory¶ - Backs up the configuration data in the specified directory.Use this option with either -l or -w.When -l is specified, configuration data is backed up in the format which can be loaded by the Cluster WebUI on Linux.When -w is specified, configuration data is saved in the format which can be loaded by the Cluster WebUI on Windows.
-
-
Return Value 0
Success
Other than 0
Failure
-
Remarks To deliver the cluster configuration data file obtained by executing the clpcfctrl --pull command, from Cluster WebUI to cluster servers, follow these steps:
Execute the clpcfctrl --pull command to save the cluster configuration data file (in zip format) to any folder.
Unzip the zip file, select the clp.conf file and the scripts folder, and then create a zipped file (named freely).
Start Cluster WebUI, switch to Config Mode, and then click Import to import the file created in Step 2.
If necessary, change the cluster configuration in Cluster WebUI, then click Apply the Configuration File.
-
Notes Run this command as the root user.
When you run this command, access the servers in the cluster in the order below, and use one of the paths that allowed successful access.
via the IP address on the interconnect LAN
via the IP address on the public LAN
-
Example of command execution Example 1: Backing up configuration data to the specified directory so that the data can be loaded by the Cluster WebUI on Linux
# clpcfctrl --pull -l -x /mnt/config
Command succeeded.(code:0)
-
Error Message Message
Cause/Solution
Log in as root.
Log on as the root user.
This command is already run.
This command has been already started.
Invalid option.
The option is invalid. Check the option.
Invalid mode.Check if --push or --pull option is specified.Check to see if the --pull is specified.
The target directory does not exist.
The specified directory does not exist.
Canceled.
Displayed when anything other than "y" is entered for command inquiry.
Failed to initialize the xml library.Check if memory or OS resources are sufficient.Check to see if the memory or OS resource is sufficient.
Failed to load the configuration file.Check if memory or OS resources are sufficient.Same as above.
Failed to change the configuration file.Check if memory or OS resources are sufficient.Same as above.
Failed to load the all.pol file.Reinstall the RPMReinstall the EXPRESSCLUSTER Server RPM.
Failed to load the cfctrl.pol file.Reinstall the RPMReinstall the EXPRESSCLUSTER Server RPM.
Failed to get the install path.Reinstall the RPM.Reinstall the EXPRESSCLUSTER Server RPM.
Failed to get the cfctrl path.Reinstall the RPM.Reinstall the EXPRESSCLUSTER Server RPM
Failed to initialize the trncl library.Check if memory or OS resources are sufficient.Check to see if the memory or OS resource is sufficient.
Failed to connect to server %1.
Accessing the server has failed. Check if other server(s) has been started.
Check if the other server is active and then run the command again.
Run the command again after the server has started up.
Failed to connect to trnsv.Check if the other server is active.Accessing the server has failed. Check if other server(s) has been started.
Failed to get configuration data.Check if the other server is active.Acquiring configuration data has failed. Check if other(s) server has been started.
The directory "/work" is not found.Reinstall the RPM.Reinstall the EXPRESSCLUSTER Server RPM
Failed to make a working directory.
Check to see if the memory or OS resource is sufficient.
The directory does not exist.
Same as above.
This is not a directory.
Same as above.
The source file does not exist.
Same as above.
The source file is a directory.
Same as above.
The source directory does not exist.
Same as above.
The source file is not a directory.
Same as above.
Failed to change the character code set (EUC to SJIS).
Same as above.
Failed to change the character code set (SJIS to EUC).
Same as above.
Command error.
Same as above.
Failed to initialize the cfmgr library.Check if memory or OS resources are sufficient.Check to see if the memory or OS resource is sufficient.
Failed to get size from the cfmgr library.Check if memory or OS resources are sufficient.Check to see if the memory or OS resource is sufficient.
Failed to allocate memory.
Check to see if the memory or OS resource is sufficient.
Failed to change the directory.
Same as above.
Failed to run the command.
Same as above.
Failed to make a directory.
Same as above.
Failed to remove the directory.
Same as above.
Failed to remove the file.
Same as above.
Failed to open the file.
Same as above.
Failed to read the file.
Same as above.
Failed to write the file.
Same as above.
Internal error.Check if memory or OS resources are sufficient.Check to see if the memory or OS resource is sufficient.
9.9.3. Adding a resource without stopping the group
the clpcfctrl --dpush command adds a resource without stopping the group.
-
Command line clpcfctrl --dpush [-p portnumber] [-x directory] [--force]
-
Description This command dynamically adds a resource without stopping the group.
-
Option -
--dpush¶ Specify this option when dynamically adding a resource. You cannot omit this option.
-
-pportnumber¶ - Specifies a port number of data transfer port.When this option is omitted, the default value will be used. In general, it is not necessary to specify this option.
-
-xdirectory¶ - Specify this option when delivering configuration data to the specified directory.
-
--force¶ Even if there is a server that has not started, the configuration data is delivered forcefully.
-
-
Return Value 0
Success
Other than 0
Failure
-
Notes Run this command as the root user.
When you run this command, access the servers in the order below, and use one of the paths that allowed successful access.
via the IP address on the interconnect LAN
via the IP address on the public LAN
For details on resources that support dynamic resource addition, refer to "How to add a resource without stopping the group" in "The system maintenance information" in the "Maintenance Guide".
To use this command, the internal version of EXPRESSCLUSTER of all the nodes in the cluster must be 3.2.1-1 or later.
While the dynamic resource addition command is running, do not resume the command. Otherwise, the cluster configuration data may become inconsistent, and the cluster may stop or the server may shut down.
If you abort the dynamic resource addition command, the activation status of the resource to be added may become undefined. In this case, run the command again or reboot the cluster manually.
-
Example of command execution Example 1: Dynamically adding a resource using configuration data that was saved on the file system using the Cluster WebUI on Linux
# clpcfctrl --dpush -x /mnt/config
file delivery to server 10.0.0.11 success.
file delivery to server 10.0.0.12 success.
The upload is completed successfully.(cfmgr:0)
Command succeeded.(code:0)
-
Error Message Message
Cause/Solution
Log in as root.
Log on as the root user.
This command is already run.
This command has been already started.
Invalid option.
The option is invalid.Check the option.Invalid mode.Check if --push or --pull option is specified.Check if the --push option is specified.
The target directory does not exist.
The specified directory is not found.
Invalid host name.Server specified by -h option is not included in the configuration data.The server specified with -h is not included in configuration data. Check if the specified server name or IP address is valid.
Canceled.
Displayed when anything other than "y" is entered for command inquiry.
Failed to initialize the xml library.Check if memory or OS resources are sufficient.Check if the memory or OS resource is sufficient.
Failed to load the configuration file.Check if memory or OS resources are sufficient.Same as above.
Failed to change the configuration file.Check if memory or OS resources are sufficient.Same as above.
Failed to load the all.pol file.Reinstall the RPM.Reinstall the EXPRESSCLUSTER Server RPM.
Failed to load the cfctrl.pol file.Reinstall the RPM.Reinstall the EXPRESSCLUSTER Server RPM.
Failed to get the install path.Reinstall the RPM.Reinstall the EXPRESSCLUSTER Server RPM.
Failed to get the cfctrl path.Reinstall the RPM.Reinstall the EXPRESSCLUSTER Server RPM.
Failed to get the list of group.
Failed to acquire the list of groups.
Failed to get the list of resource.
Failed to acquire the list of resources.
Failed to initialize the trncl library.Check if memory or OS resources are sufficient.Check to see if memory or OS resource is sufficient.
Failed to connect to server %1.Check if the other server is active and then run the command again.Accessing the server has failed. Check if other server(s) has been started.Run the command again after the server has started up.Failed to connect to trnsv.Check if the other server is active.Accessing the server has failed. Check if other server(s) has been started up.
Failed to get the collect size.
Getting the size of the collector file has failed. Check if other server(s) has been started.
Failed to collect the file.
Collecting the file has failed. Check if other server(s) has been started.
Failed to check server property.Check if the server name or ip addresses are correct.Check if the server name and the IP address in the configuration information have been set correctly.
File delivery failed.Failed to deliver the configuration data. Check if the other server is active and run the command again.Delivering configuration data has failed. Check if other server(s) has been started.Run the command again after the server has started up.Multi file delivery failed.Failed to deliver the configuration data. Check if the other server is active and run the command again.Delivering configuration data has failed. Check if other server(s) has been started.Run the command again after the server has started up.Failed to deliver the configuration data.Check if the other server is active and run the command again.Delivering configuration data has failed. Check if other server(s) has been started.Run the command again after the server has started up.The directory "work" is not found.Reinstall the RPM.Reinstall the EXPRESSCLUSTER Server RPM.
Failed to make a working directory.
Check if the memory or OS resource is sufficient.
The directory does not exist.
Same as above.
This is not a directory.
Same as above.
The source file does not exist.
Same as above.
The source file is a directory.
Same as above.
The source directory does not exist.
Same as above.
The source file is not a directory.
Same as above.
Failed to change the character code set (EUC to SJIS).
Same as above.
Failed to change the character code set (SJIS to EUC).
Same as above.
Command error.
Same as above.
Failed to initialize the cfmgr library.Check if memory or OS resources are sufficient.Check if the memory or OS resource is sufficient.
Failed to get size from the cfmgr library.Check if memory or OS resources are sufficient.Check if the memory or OS resource is sufficient.
Failed to allocate memory.
Check if the memory or OS resource is sufficient.
Failed to change the directory.
Same as above.
Failed to run the command.
Same as above.
Failed to make a directory.
Same as above.
Failed to remove the directory.
Same as above.
Failed to remove the file.
Same as above.
Failed to open the file.
Same as above.
Failed to read the file.
Same as above.
Failed to write the file.
Same as above.
Internal error.Check if memory or OS resources are sufficient.Check if the memory or OS resource is sufficient.
The upload is completed successfully.To start the cluster, refer to "How to create a cluster"in the Installation and Configuration Guide.The upload is successfully completed.To start the cluster, refer to "Creating a cluster" in "Creating the cluster configuration data" in the "Installation and Configuration Guide".The upload is completed successfully.To apply the changes you made, shutdown and reboot the cluster.The upload is successfully completed. To apply the changes you made, shut down the cluster, and reboot it.
The upload was stopped.To upload the cluster configuration data, stop the cluster.The upload was stopped. To upload the cluster configuration data, stop the cluster.
The upload was stopped.To upload the cluster configuration data, stop the Mirror Agent.The upload was stopped. To upload the cluster configuration data, stop the Mirror Agent.
The upload was stopped.To upload the cluster configuration data, stop the resources to which you made changes.The uploaded was stopped. To upload the cluster configuration data, stop the resource to which you made changes.
The upload was stopped.To upload the cluster configuration data, stop the groups to which you made changes.The upload was stopped. To upload the cluster configuration data, suspend the cluster. To upload, stop the group to which you made changes.
The upload was stopped.To upload the cluster configuration data, suspend the cluster.The upload was stopped. To upload the cluster configuration data, suspend the cluster.
The upload is completed successfully.To apply the changes you made, restart the Alert Sync service.To apply the changes you made, restart the WebManager service.The upload is completed successfully.To apply the changes you made, restart the Alert Sync service.To apply the changes you made, restart the WebManager service.The upload is completed successfully.To apply the changes you made, restart the Information Base service.The upload is completed successfully.To apply the changes you made, restart the Information Base service.The upload is completed successfully.To apply the changes you made, restart the API service.The upload is completed successfully.To apply the changes you made, restart the API service.The upload is completed successfully.To apply the changes you made, restart the Node Manager service.The upload is completed successfully.To apply the changes you made, restart the Node Manager service.The upload is completed successfully.
The upload is successfully completed.
The upload was stopped.Failed to deliver the configuration data.Check if the other server is active and run the command again.The upload was stopped. Failed to deliver the cluster configuration data. Check if the other server is active and run the command again.
The upload was stopped.There is one or more servers that cannot be connected to.To apply cluster configuration information forcibly, run the command again with "--force" option.The upload was stopped. The server that cannot connect exists. To forcibly upload the cluster configuration information, run the command again with the --force option.
The upload was stopped.Failed to active resource.Please check the setting of resource.The upload was stopped. Failed to activate the resource. Check the setting of the resource.
9.9.4. Checking cluster configuration data when dynamically adding a group resource
This command checks the cluster configuration data when dynamically adding a group resource.
-
Command line clpcfctrl --compcheck [-x directory]
-
Description This command checks if there is no problem with the cluster configuration data when dynamically adding a resource without stopping the group.
-
Option -
--compcheck¶ - Specify this option when checking configuration data.You cannot omit this option.
-
-xdirectory¶ - Specify this option when delivering configuration data to the specified directory.
-
-
Return Value 0
Success
Other than 0
Failure
-
Notes Run this command as the root user.
When you run this command, access the cluster servers in the order below, and use one of the paths that allowed successful access.
Via the IP address on the interconnect LAN
Via the IP address on the public LAN
This command finds the difference between the new and existing configuration data, and checks the resource configuration data in the added configuration data.
-
Example of command execution Example 1: Checking configuration data that was saved on the file system using the Cluster WebUI on Linux
# clpcfctrl --compcheck -x /mnt/config
The check is completed successfully.(cfmgr:0)
Command succeeded.(code:0)
-
Error Message Message
Cause/Solution
Log in as root.
Log in as the root user.
This command is already run.
This command has been already started.
Invalid option.
The option is invalid.Check the option.The target directory does not exist.
The specified directory is not found.
Canceled.
Displayed when anything other than "y" is entered for command inquiry.
Failed to initialize the xml library.Check if memory or OS resources are sufficient.Check if the memory or OS resource is sufficient.
Failed to load the configuration file.Check if memory or OS resources are sufficient.Same as above.
Failed to change the configuration file.Check if memory or OS resources are sufficient.Same as above.
Failed to load the all.pol file.Reinstall the RPM.Reinstall the EXPRESSCLUSTER Server RPM.
Failed to load the cfctrl.pol file.Reinstall the RPM.Reinstall the EXPRESSCLUSTER Server RPM.
Failed to get the install path.Reinstall the RPM.Reinstall the EXPRESSCLUSTER Server RPM.
Failed to get the cfctrl path.Reinstall the RPM.Reinstall the EXPRESSCLUSTER Server RPM.
Failed to get the list of group.
Failed to acquire the list of group.
Failed to get the list of resource.
Failed to acquire the list of resource.
Failed to initialize the trncl library.Check if memory or OS resources are sufficient.Check if the memory or OS resource is sufficient.
Failed to connect to server %1.Check if the other server is active and then run the command again.Accessing the server has failed. Check if other server(s) has been started.Run the command again after the server has started up.Failed to connect to trnsv.Check if the other server is active.Accessing the server has failed. Check that other server has been started up.
Failed to get the collect size.
Getting the size of the collector file has failed. Check if other server(s) has been started.
Failed to collect the file.
Collecting of the file has failed. Check if other server(s) has been started.
Failed to get the list of node.Check if the server name or ip addresses are correct.Check if the server name and the IP address in the configuration information have been set correctly.
Failed to check server property.Check if the server name or ip addresses are correct.Check if the server name and the IP address in the configuration information have been set correctly.
File delivery failed.Failed to deliver the configuration data. Check if the other server is active and run the command again.Delivering configuration data has failed. Check if other server(s) has been started.Run the command again after the server has started up.Multi file delivery failed.Failed to deliver the configuration data. Check if the other server is active and run the command again.Delivering configuration data has failed. Check if other server(s) has been started.Run the command again after the server has started up.Failed to deliver the configuration data.Check if the other server is active and run the command again.Delivering configuration data has failed. Check if other server(s) has been started.Run the command again after the server has started up.The directory "work" is not found.Reinstall the RPM.Reinstall the EXPRESSCLUSTER Server RPM.
Failed to make a working directory.
Check if the memory or OS resource is sufficient.
The directory does not exist.
Same as above.
This is not a directory.
Same as above.
The source file does not exist.
Same as above.
The source file is a directory.
Same as above.
The source directory does not exist.
Same as above.
The source file is not a directory.
Same as above.
Failed to change the character code set (EUC to SJIS).
Same as above.
Failed to change the character code set (SJIS to EUC).
Same as above.
Command error.
Failed to initialize the cfmgr library.Check if memory or OS resources are sufficient.Check if the memory or OS resource is sufficient.
Failed to get size from the cfmgr library.Check if memory or OS resources are sufficient.Check if the memory or OS resource is sufficient.
Failed to allocate memory.
Check if the memory or OS resource is sufficient.
Failed to change the directory.
Same as above.
Failed to run the command.
Same as above.
Failed to make a directory.
Same as above.
Failed to remove the directory.
Same as above.
Failed to remove the file.
Same as above.
Failed to open the file.
Same as above.
Failed to read the file.
Same as above.
Failed to write the file.
Same as above.
Internal error.Check if memory or OS resources are sufficient.Check if the memory or OS resource is sufficient.
9.10. Adjusting time-out temporarily (clptoratio command)
the clptoratio command extends or displays the current time-out ratio.
-
Command line - clptoratio -r ratio -t timeclptoratio -iclptoratio -s
-
Description This command displays or temporarily extends the various time-out values of the following on all servers in the cluster.
Monitor resource
Heartbeat resource
Mirror Agent
Mirror driver
Alert synchronous service
WebManager service
-
Option -
-rratio¶ - Specifies the time-out ratio. Use 1 or larger integer. The maxim time-out ratio is 10,000.If you specify "1," you can return the modified time-out ratio to the original as you can do so when you are using the -i option.
-
-ttime¶ - Specifies the extension period.You can specify minutes for m, hours for h, and days for d. The maximum period of time is 30 days.Example: 2m, 3h, 4d
-
-i¶ Sets back the modified time-out ratio.
-
-s¶ Refers to the current time-out ratio.
-
-
Return Value 0
Success
Other than 0
Failure
-
Remarks When the cluster is shutdown, the time-out ratio you have set will become ineffective. However, if any server in the cluster is not shutdown, the time-out ratio and the extension period that you have set will be maintained.
With the -s option, you can only refer to the current time-out ratio. You cannot see other information such as remaining time of extended period.
You can see the original time-out value by using the status display command.
Heartbeat time-out
# clpstat --cl --detail
Monitor resource time-out
# clpstat --mon monitor resource name --detail
-
Notes Run this command as the root user.
Make sure that the cluster daemon is started in all servers in the cluster.
When you set the time-out ratio, make sure to specify the extension period. However, if you set "1" for the time-out ratio, you cannot specify the extension period.
You cannot specify a combination such as "2m3h," for the extension period.
When the server restarts within the ratio extension period, the time-out ratio is not returned to the original even after the extension period. In this case, run the clptoratio -i command to return it to the original.
This command does not support the time-out values of forced stop resources.
-
Example of a command entry Example 1: Doubling the time-out ratio for three days
# clptoratio -r 2 -t 3d
Example 2: Setting back the time-out ratio to original
# clptoratio -i
Example 3: Referring to the current time-out ratio
# clptoratio -s
present toratio : 2
The current time-out ratio is set to 2.
-
Error Message Message
Cause/Solution
Log in as root.
Log on as the root user.
Invalid configuration file. Create valid cluster configuration data.
Create valid cluster configuration data by using the Cluster WebUI.
Invalid option.
Specify a valid option.
Specify a number in a valid range.
Specify a number within a valid range.
Specify a correct number.
Specify a valid number.
Scale factor must be specified by integer value of 1 or more.
Specify 1 or larger integer for ratio.
Specify scale factor in a range less than the maximum scale factor.
Specify a ratio that is not larger than the maximum ratio.
Set the correct extension period.
Set a valid extension period.
Ex) 2m, 3h, 4d
Set the extension period which does not exceed the maximum ratio.
Set the extension period in a range less than the maximum extension period.
Check if the cluster daemon is started.
Could not connect to the server. Check if the cluster daemon is active.
Check if the cluster daemon is started.
Server is not active.Check if the cluster daemon is active.Check if there is any server in the cluster with the cluster daemon stopped.
Connection was lost.Check if there is a server where the cluster daemon is stopped in the cluster.Check if there is any server in the cluster with the cluster daemon stopped.
Invalid parameter.
The value specified as a parameter of the command may be invalid.
Internal communication timeout has occurred in the cluster server.If it occurs frequently, set the longer timeout.Time-out has occurred in the internal communication of EXPRESSCLUSTER.If it occurs frequently, set the internal communication time-out longer.Processing failed on some servers. Check the status of failed servers.
There are servers that failed in processing. Check the status of server in the cluster.Operate it while all the servers in the cluster are up and running.Internal error. Check if memory or OS resources are sufficient.
Check to see if the memory or OS resource is sufficient.
9.11. Modifying the log level and size (clplogcf command)
the clplogcf command modifies and displays log level and log output file size.
-
Command line clplogcf -t type -l level -s size
-
Description This command modifies the log level and log output file size, or displays the values currently configured.
-
Option -
-ttype¶ - Specifies a module type whose settings will be changed.For types which can be specified, see the Type column, which shows information outputted by executing the command with no options specified.
-
-llevel¶ - Specifies a log level.You can specify one of the following for a log level.1, 2, 4, 8, 16, 32You can see more detailed information as the log level increases.
-
-ssize¶ - Specifies the size of a file for log output.The unit is byte.
-
None¶ None Displays the entire configuration information currently set.
-
-
Return Value 0
Success
Other than 0
Failure
-
Remarks Each type of output logs from EXPRESSCLUSTER uses four log files. Therefore, it is necessary to have the disk space that is four times larger than what is specified by -s.
-
Notes Run this command as the root user.
To run this command, the EXPRESSCLUSTER event service must be started.
The changes made are effective only for the server on which this command was run.The settings revert to the default values when the server restarts.
-
Example of command execution Example 1: Modifying the pm log level
# clplogcf -t pm -l 8
Example 2:Seeing the pm log level and log file size
# clplogcf -t pm
TYPE, LEVEL, SIZE
pm, 8, 1000000
Example 3: Displaying the values currently configured
# clplogcf
TYPE, LEVEL, SIZE
trnsv, 4, 1000000
xml, 4, 1000000
logcf, 4, 1000000
-
Error Message Message
Cause/Solution
Log in as root.
Log on as the root user.
Invalid option.
The option is invalid. Check the option.
Failed to change the configuration. Check if clpevent is running.
clpevent may not have been started.
Invalid level
The specified level is invalid.
Invalid size
The specified size is invalid.
Failed to load the configuration file. Check if memory or OS resources are sufficient.
Non-clustered server
Failed to initialize the xml library. Check if memory or OS resources are sufficient.
Check to see if the memory or OS resource is sufficient.
Failed to print the configuration. Check if clpevent is running.
clpevent may not be started yet.
9.12. Managing licenses (clplcnsc command)
the clplcnsc command manages licenses.
-
Command line - clplcnsc -i [licensefile...]clplcnsc -l [-a]clplcnsc -d serialno [-q]clplcnsc -d -t [-q]clplcnsc -d -a [-q]clplcnsc --distributeclplcnsc --reregister licensefile...
-
Description This command registers, refers to and remove the licenses of the product version and trial version of this product.
-
Option -
-i[licensefile...]¶ When a license file is specified, license information is acquired from the file for registration. You can specify multiple licenses. You can also specify a wildcard. If nothing is specified, you need to enter license information interactively.
-
-l[-a]¶ References the registered license. The name of displayed items are as follows.
Item
Explanation
Serial No
Serial number (product version only)
User name
User name (trial version only)
Key
License key
Licensed Number of CPU
The number of license (per CPU)
Licensed Number of Computers
The number of license (per node)
Start date
End date
Status
Status of the license
- 1(1,2,3,4)
Displayed in the case of the fixed term license
- 2(1,2,3,4)
Displayed in the case of the license of trial version
When -a option not specified, the license status of "invalid", "unknown" and "expired" are not displayed.
When specifying -a option, all the licenses are displayed regardless of the license status.
-
-d<param>¶ param
- serialno
Deletes the license with the specified serial number.
- -t
Deletes all the registered licenses of the trial version.
- -a
Deletes all the registered licenses.
-
-q¶ Deletes licenses without displaying a warning message. This is used with -d option.
-
--distribute¶ License files are delivered to all servers in the cluster. Generally, it is not necessary to run the command with this option.
-
--reregisterlicensefile...¶ This option, usually not used, is for reinstalling only some servers of a cluster in an environment where a fixed-term license is used.
-
-
Return Value 0
Normal termination
1
Cancel
2
Normal termination (with licenses not synchronized)
* This means that license synchronization failed in the cluster at the time of license registration.
For the actions to be taken, refer to "Troubleshooting for licensing" in Appendix A "Troubleshooting" in the "Installation and Configuration Guide".
3
Initialization error
5
Invalid option
8
Other internal error
-
Example of a command entry for registration
Registering the license interactively
# clplcnsc -i
Product Version/Product Version (Fixed Term)
Select a product division
Selection of License Version
  1. Product Version
  2. Trial Version
  e. Exit
Select License Version. [1, 2, or e (default:1)] ...
Enter a serial number
Enter serial number [ Ex. XXXXXXXX000000] .
Enter a license key
Enter license key
[ Ex. XXXXXXXX-XXXXXXXX-XXXXXXXX-XXXXXXXX] ...
Trial Version
Select a product division
Selection of License Version
  1. Product Version
  2. Trial Version
  e. Exit
Select License Version. [1, 2, or e (default:1)] ...
Enter a user name
Enter user name [ 1 to 63byte ] .
Enter a license key
Enter license key
[Ex. XXXXX-XXXXXXXX-XXXXXXXX-XXXXXXXX].
Specify a license file
# clplcnsc -i /tmp/cpulcns.key
for referring to the license
# clplcnsc -l
Product version
< EXPRESSCLUSTER X <PRODUCT> >
Seq... 1
    Key..... A1234567-B1234567-C1234567-D1234567
    Licensed Number of CPU... 2
    Status... valid
Seq... 2
    Serial No..... AAAAAAAA000002
    Key..... E1234567-F1234567-G1234567-H1234567
    Licensed Number of Computers... 1
    Status... valid
Product version (fixed term)
< EXPRESSCLUSTER X <PRODUCT> >

Seq... 1
    Serial No..... AAAAAAAA000001
    Key..... A1234567-B1234567-C1234567-D1234567
    Start date..... 2018/01/01
    End date...... 2018/01/31
    Status........... valid
Seq... 2
    Serial No..... AAAAAAAA000002
    Key..... E1234567-F1234567-G1234567-H1234567
    Status........... inactive
Trial version
< EXPRESSCLUSTER X <TRIAL> >
Seq... 1
    Key..... A1234567-B1234567-C1234567-D1234567
    User name... NEC
    Start date..... 2018/01/01
    End date...... 2018/02/28
    Status........... valid
for deleting the license
# clplcnsc -d AAAAAAAA000001 -q
for referring to deleting the license
# clplcnsc -d -t -q
for deleting the license
# clplcnsc -d -a
Deletion confirmation
Are you sure to remove the license? [y/n] ...
-
Notes Run this command as the root user.
When you register a license, verify that the data transfer server is started up and a cluster has been generated for license synchronization.
In license synchronization, the IP addresses of cluster servers are tried to be connected in order of interconnect priority, then a successful route is used.
When you delete a license, only the license information on the server where this command was run is deleted. The license information on other servers is not deleted. To delete the license information in the entire cluster, run this command in all servers.
Furthermore, when you use -d option and -a option together, all the trial version licenses and product version licenses will be deleted. To delete only the trial license, also specify the -t option. If the licenses including the product license have been deleted, register the product license again.
When you refer to a license which includes multiple licenses, all included licenses information are displayed.
If one or more servers in the cluster are not working, it may take time to execute this command.
-
Error Messages Message
Cause/Solution
Processed license num(success : %d error : %d).The number of processed licenses (success:%d error:%d)If error is not 0, check if the license information is correct.Command succeeded.
The command ran successfully.
Command failed.
The command did not run successfully.
Command succeeded.But the license was not applied to all the servers in the clusterbecause there are one or more servers that are not started up.There is one or more server that is not running in the cluster.Perform the cluster generation steps in all servers in the cluster.Refer to "Installing EXPRESSCLUSTER" the "Installation and Configuration Guide" for information on cluster generation.Log in as root.
You are not authorized to run this command. Log on as the root user.
Invalid cluster configuration data. Check the cluster configuration information.
The cluster configuration data is invalid. Check the cluster configuration data by using the Cluster WebUI.
Initialization error. Check if memory or OS resources are sufficient.
Check to see if the memory or OS resource is sufficient.
The command is already run.
The command is already running. Check the running status by using a command such as the ps command.
The license is not registered.
The license has not been registered yet.
Could not open the license file. Check if the license file exists on the specified path.
Input/Output cannot be done to the license file. Check to see if the license file exists in the specified path.
Could not read the license file. Check if the license file exists on the specified path.
Same as above.
The field format of the license file is invalid. The license file may be corrupted. Check the destination from where the file is sent.
The field format of the license file is invalid. The license file may be corrupted. Check it with the file sender.
The cluster configuration data may be invalid or not registered.
The cluster configuration data may be invalid or not registered. Check the configuration data.
Failed to terminate the library. Check if memory or OS resources are sufficient.
Check to see if the memory or OS resource is sufficient.
Failed to register the license. Check if the entered license information is correct.
Check to see if the entered license information is correct.
Failed to open the license. Check if the entered license information is correct.
Same as above.
Failed to remove the license.
License deletion failed. Parameter error may have occurred or resources (memory or OS) may not be sufficient.
This license is already registered.
This license has already been registered.Check the registered license.This license is already activated.
This license has already been activated.Check the registered license.This license is unavailable for this product.
This license is unavailable for this product.Check the license.The maximum number of licenses was reached.
The maximum number of registrable licenses was reached.Delete the expired licenses.Internal error. Check if memory or OS resources are sufficient.
Check to see if the memory or OS resource is sufficient.
9.13. Locking disk I/O (clproset command)
the clproset command modifies and displays I/O permission of the partition device.
-
Command line - clproset -o [-d device_name | -r resource_name -t resource_type | -a]clproset -w [-d device_name | -r resource_name -t resource_type | -a]clproset -s [-d device_name | -r resource_name -t resource_type | -a]
-
Description This command configures the partition device I/O permission of a shared disk to ReadOnly/ReadWrite possible.
This command displays the configured I/O permission status of the partition device.
-
Option -
-o¶ Sets the partition device I/O to ReadOnly. When ReadOnly is set to a partition device, you cannot write the data into the partition device.
-
-w¶ Sets the partition device I/O to ReadWrite possible. When ReadWrite is set to a partition device, you may read from and write the data into the partition device.
-
-s¶ Displays the I/O permission status of the partition device.
-
-ddevice_name¶ Specifies a partition device.
-
-rresource_name¶ Specifies a disk resource name.
-
-tresource_type¶ Specifies a group resource type. For the current EXPRESSCLUSTER version, always specify "disk" as group resource type.
-
-a¶ Runs this command against all disk resources.
-
-
Return Value 0
Success
Other than 0
Failure
-
Notes Run this command as the root user.
This command can only be used on shared disk resources. It cannot be used for mirror disk resources and hybrid disk resources.
Make sure to specify a group resource type when specifying a resource name.
-
Example of command execution Example 1: When changing the I/O of disk resource name, disk1, to RW:
# clproset -w -r disk1 -t disk
/dev/sdb5 : succeeded (disk1)
Example 2:When acquiring I/O information of all resources:
# clproset -s -a
/dev/sdb5 : rw (disk)
/dev/sdb6 : ro (raw)
-
Error Messages Message
Cause/Solution
Log in as root.
Log on as the root user.
Invalid configuration file. Create valid cluster configuration data.
Create valid cluster configuration data by using the Cluster WebUI.
Invalid option.
Specify a valid option.
The -t option must be specified for the -r option.
Be sure to specify the -t option when using the -r option.
Specify 'disk' or 'raw to specify a group resource.
Specify "disk" or "raw" when specifying a group resource type.
Invalid group resource name. Specify a valid group resource name in the cluster.
Specify a valid group resource name.
Invalid device name.
Specify a valid device name.
Command timeout.
The OS may be heavily loaded. Check to see how heavily it is loaded.
Internal error. Check if memory or OS resources are sufficient.
Check to see if the memory or OS resource is sufficient.
Note
Do not use this command for the purposes other than those mentioned in "Verifying operation" in the "Installation and Configuration Guide".If you run this command while the cluster daemon is started, the file system may get corrupted.
9.16. Outputting messages (clplogcmd command)
the clplogcmd command registers the specified message with syslog and alert, reports the message by mail, or sends it as an SNMP trap.
-
Command line clplogcmd -m message [--syslog] [--alert] [--mail] [--trap] [-i eventID] [-l level]
Note
Generally, it is not necessary to run this command for constructing or operating the cluster. You need to write the command in the exec resource script.
-
Description Write this command in the exec resource script and output messages you want to send to the destination.
-
Options -
-mmessage¶ - Specifies a message. This option cannot be omitted. The maximum size of message is 511 bytes. (When syslog is specified as an output destination, the maximum size is 485 bytes.) The message exceeding the maximum size will not be shown.You may use alphabets, numbers, and symbols. See below 7 for notes on them.
-
--syslog
-
--alert
-
--mail
-
--trap¶ Specify the output destination from syslog, alert, mail, and trap. (Multiple destinations can be specified.)
This parameter can be omitted. The syslog and alert will be the output destinations when the parameter is omitted.
For more information on output destinations, see "Directory structure of EXPRESSCLUSTER" in "The system maintenance information" in the "Maintenance Guide".
-
-ieventID¶ Specify event ID. The maximum value of event ID is 10000.
This parameter can be omitted. The default value 1 is set when the parameter is omitted.
-
-llevel¶ Select a level of alert output from ERR, WARN, or INFO. The icon on the alert logs of the Cluster WebUI is determined according to the level you select here.
This parameter can be omitted. The default value INFO is set when the parameter is omitted. For more information, see the online manual.
-
- 7
Notes on using symbols in the message:
The symbols below must be enclosed in double quotes (" "):
# & ' ( ) ~ | ; : * < > , .
(For example, if you specify "#" in the message, # is produced.)
The symbols below must have a backslash \ in the beginning:
\ ! " & ' ( ) ~ | ; : * < > , .
(For example, if you specify \\ in the message, \ is produced.)
The symbol that must be enclosed in double quotes (" ") and have a backslash \ in the beginning:
(For example, if you specify "\`" in the message, ` will is produced.)
When there is a space in the message, it must be placed in enclosed in double quotes (" ").
The symbol % cannot be used in the message.
-
Return Value 0
Success
Other than 0
Failure
-
Notes Run this command as the root user.
When mail is specified as the output destination, you need to make the settings to send mails by using the mail command.
-
Example of command execution Example 1: When specifying only message (output destinations are syslog and alert):
When the following is written in the exec resource script, the message is produced in syslog and alert.
clplogcmd -m test1.
The following log is the log output in syslog:
Sep 1 14:00:00 server1 expresscls: <type: logcmd><event: 1> test1
Example 2: When specifying message, output destination, event ID, and level (output destination is mail):
When the following is written in the exec resource script, the message is sent to the mail address set in the Cluster Properties. For more information on the mail address settings, see "Alert Service tab" in "Cluster properties" in "2. Parameter details" in this guide.
clplogcmd -m test2 --mail -i 100 -l ERR
The following information is sent to the mail destination:
Message:test2Type: logcmdID: 100Host: server1Date: 2004/09/01 14:00:00Example 3: When specifying a message, output destination, event ID, and level (output destination is trap):
When the following is written in the exec resource script, the message is set to the SNMP trap destination set in Cluster Properties of the Cluster WebUI. For more information on the SNMP trap destination settings, see "Alert Service tab" in "Cluster properties" in "2. Parameter details" in this guide.
clplogcmd -m test3 --trap -i 200 -l ERR
The following information is sent to the SNMP trap destination:
Trap OID: clusterEventErrorAttached data 1: clusterEventMessage = test3Attached data 2: clusterEventID = 200Attached data 3: clusterEventDateTime = 2011/08/01 09:00:00Attached data 4: clusterEventServerName = server1Attached data 5: clusterEventModuleName = logcmd
9.17. Controlling monitor resources (clpmonctrl command)
the clpmonctrl command controls the monitor resources.
-
Command line - clpmonctrl -s [-h <hostname>] [-m resource_name] [-w wait_time]clpmonctrl -r [-h <hostname>] [-m resource_name] [-w wait_time]clpmonctrl -c [-m resource_name]clpmonctrl -v [-m resource_name]clpmonctrl -e [-h <hostname>] -m resource_nameclpmonctrl -n [-h <hostname>] [-m resource_name]
Note
The -c and -v options must be run on all servers that control monitoring because the command controls the monitor resources on a single server.It is recommended to use the Cluster WebUI if you suspend or resume monitor resources on all the servers in a cluster.
-
Description This command suspends and/or resumes the monitor resources, displays and/or resets the times counter of the recovery action, and enable and/or disable Dummy Failure.
-
Option -
-s¶ Suspends monitoring
-
-r¶ Resumes monitoring
-
-c¶ Resets the times counter of the recovery action.
-
-v¶ Displays the times counter of the recovery action.
-
-e¶ Enables the Dummy Failure. Be sure to specify a monitor resource name with the -m option.
-
-n¶ Disables the Dummy Failure. When a monitor resource name is specified with the -m option, the function is disabled only for the resource. When the -m option is omitted, the function is disabled for all monitor resources.
-
-mresource_name¶ - Specifies a monitor resource to be controlled.This option can be omitted. All monitor resources are controlled when the option is omitted.
-
-wwait_time¶ - Waits for control monitoring on a monitor resource basis (in seconds).This option can be omitted. The default value 5 is set when the option is omitted.
-
-h¶ Makes a processing request to the server specified in hostname. Makes a processing request to the server on which this command runs (local server) if the -h option is omitted. The -c and -v options cannot specify the server.
-
-
Return Value 0
Normal termination
1
Privilege for execution is invalid
2
The option is invalid
3
Initialization error
4
The cluster configuration data is invalid
5
Monitor resource is not registered.
6
The specified monitor resource is invalid
10
The cluster is not activated
11
The cluster daemon is suspended
12
Waiting for cluster synchronization
90
Monitoring control wait time-out
128
Duplicated activation
200
Server connection error
201
Invalid status
202
Invalid server name
255
Other internal error
-
Example of command execution Example 1: When suspending all monitor resources:
# clpmonctrl -s
Command succeeded.
Example 2: When resuming all monitor resources:
# clpmonctrl -r
Command succeeded.
-
Remarks If you suspend a monitor resource that is already suspended or resume that is already resumed, this command terminates with error, without changing the status of the monitor resource.
-
Notes Run this command as the root user.
Check the status of monitor resource by using the status display clpstat command or Cluster WebUI.
Before you run this command, use the clpstat command or Cluster WebUI to verify that the status of monitor resources is in either "Online" or "Suspend."
If the recovery action for the monitor resource is set as follows, "Final Action Count", which displayed by the -v option, means the number of times "Execute Script before Final Action" is executed.
Execute Script before Final Action: Enable
final action: No Operation
-
Error Messages Message
Causes/Solution
Command succeeded.
The command ran successfully.
Log in as root.
You are not authorized to run this command. Log on as the root user.
Initialization error. Check if memory or OS resources are sufficient.
Check to see if the memory or OS resource is sufficient.
Invalid cluster configuration data. Check the cluster configuration information.
The cluster configuration data is invalid. Check the cluster configuration data by using the Cluster WebUI.
Monitor resource is not registered.
The monitor resource is not registered.
Specified monitor resource is not registered. Check the cluster configuration information.
The specified monitor resource is not registered.Check the cluster configuration data by using the Cluster WebUI.The cluster has been stopped. Check the active status of the cluster daemon by using the command such as ps command.
The cluster has been stopped.Check the activation status of the cluster daemon by using a command such as ps command.The cluster has been suspended. The cluster daemon has been suspended. Check activation status of the cluster daemon by using a command such as the ps command.
The cluster daemon has been suspended. Check the activation status of the cluster daemon by using a command such as ps command.
Waiting for synchronization of the cluster. The cluster is waiting for synchronization. Wait for a while and try again.
Synchronization of the cluster is awaited.Try again after cluster synchronization is completed.Monitor %1 was unregistered, ignored. The specified monitor resources %1 is not registered, but continue processing. Check the cluster configuration data.There is an unregistered monitor resource in the specified monitor resources but it is ignored and the process is continuedCheck the cluster configuration data by using the Cluster WebUI.%1: Monitor resource nameMonitor %1 denied control permission, ignored. but continue processing.
The specified monitor resources contain the monitor resource which cannot be controlled, but it does not affect the process.%1: Monitor resource nameThis command is already run.
The command is already running. Check the running status by using a command such as ps command.
Internal error. Check if memory or OS resources are sufficient.
Check to see if the memory or OS resource is sufficient.
Could not connect to the server.Check if the cluster service is active.Check if the cluster service has started.
Some invalid status.Check the status of cluster.The status is invalid.Check the status of the cluster.Invalid server name. Specify a valid server name in the cluster.
Specify the valid server name in the cluster.
-
Monitor resource types that can be specified for the -m option Type
Suspending/resuming monitoring
Resetting the times counter of the recovery action
Enabling/disabling
Dummy Failure
arpw
n/a
✓
n/a
diskw
✓
✓
✓
fipw
✓
✓
✓
ipw
✓
✓
✓
miiw
✓
✓
✓
mtw
✓
✓
✓
pidw
✓
✓
✓
volmgrw
✓
✓
✓
userw
✓
✓
n/a
vipw
n/a
✓
n/a
ddnsw
n/a
✓
n/a
mrw
✓
✓
n/a
genw
✓
✓
✓
mdw
✓
✓
n/a
mdnw
✓
✓
n/a
hdw
✓
✓
n/a
hdnw
✓
✓
n/a
oraclew
✓
✓
✓
db2w
✓
✓
✓
psqlw
✓
✓
✓
mysqlw
✓
✓
✓
odbcw
✓
✓
✓
sqlserverw
✓
✓
✓
sambaw
✓
✓
✓
nfsw
✓
✓
✓
httpw
✓
✓
✓
ftpw
✓
✓
✓
smtpw
✓
✓
✓
pop3w
✓
✓
✓
imap4w
✓
✓
✓
tuxw
✓
✓
✓
wlsw
✓
✓
✓
wasw
✓
✓
✓
otxw
✓
✓
✓
jraw
✓
✓
✓
sraw
✓
✓
✓
psrw
✓
✓
✓
psw
✓
✓
✓
awsazw
✓
✓
✓
awsdnsw
✓
✓
✓
awseipw
✓
✓
✓
awssipw
✓
✓
✓
awsvipw
✓
✓
✓
azurednsw
✓
✓
✓
azurelbw
✓
✓
✓
azureppw
✓
✓
✓
gcdnsw
✓
✓
✓
gclbw
✓
✓
✓
gcvipw
✓
✓
✓
oclbw
✓
✓
✓
ocvipw
✓
✓
✓
9.18. Controlling group resources (clprsc command)
the clprsc command controls group resources
-
Command line - clprsc -s resource_name [-h hostname] [-f] [--apito timeout]clprsc -t resource_name [-h hostname] [-f] [--apito timeout]clprsc -n resource_nameclprsc -v resource_name
-
Description This command starts and stops group resources.
-
Option -
-s¶ Starts group resources.
-
-t¶ Stops group resources.
-
-h¶ Requests processing to the server specified by the hostname.
When this option is skipped, request for processing is made to the following servers.
When the group is offline, the command execution server (local server).
When the group is online, the server where group is activated.
-
-f¶ When the group resource is online, all group resources that the specified group resource depends starts up.
When the group resource is offline, all group resources that the specified group resource depends stop.
-
-n¶ Displays the name of the server on which the group resource has been started.
-
--apitotimeout¶ Specify the interval (internal communication timeout) to wait for the group resource start or stop in seconds. A value from 1 to 9999 can be specified.
When the --apito option is not specified, the command waits for 3600 seconds.
-
-v¶ Displays the failover counter of the group resource.
-
-
Return Value 0
success
Other than 0
failure
-
Example Group resource configuration
# clpstat

=========== CLUSTER STATUS ===========
 Cluster : cluster
 <server>
  *server1..................: Online
     lanhb1                 : Normal
     lanhb2                 : Normal
     pingnp1                : Normal
   server2..................: Online
     lanhb1                 : Normal
     lanhb2                 : Normal
     pingnp1                : Normal
 <group>
     ManagementGroup........: Online
      current               : server1
      ManagementIP          : Online
     failover1..............: Online
      current               : server1
      fip1                  : Online
      md1                   : Online
      exec1                 : Online
     failover2..............: Online
      current               : server2
      fip2                  : Online
      md2                   : Online
      exec2                 : Online
 <monitor>
     ipw1                   : Normal
     mdnw1                  : Normal
     mdnw2                  : Normal
     mdw1                   : Normal
     mdw2                   : Normal
======================================
Example 1: When stopping the resource (fip1) of the group (failover 1)
# clprsc -t fip1
Command succeeded.
#clpstat

========== CLUSTER STATUS =============
 <abbreviation>
 <group>
     ManagementGroup........: Online
      current               : server1
      ManagementIP          : Online
     failover1..............:Online
      current               : server1
      fip1                  : Offline
      md1                   : Online
      exec1                 : Online
     failover2..............: Online
      current               : server2
      fip2                  : Online
      md2                   : Online
      exec2                 : Online
  <abbreviation>
Example 2: When starting the resource (fip1) of the group(failover 1)
# clprsc -s fip1
Command succeeded.
# clpstat

========== CLUSTER STATUS ============
 <Abbreviation>
 <group>
      ManagementGroup.......: Online
       current              : server1
       ManagementIP         : Online
      failover1.............: Online
       current              : server1
       fip1                 : Online
       md1                  : Online
       exect1               : Online
      failover2.............: Online
       current              : server2
       fip2                 : Online
       md2                  : Online
       exec2                : Online
 <Abbreviation>
-
Notes Run this command as a user with root privileges.
Check the status of the group resources by the status display or the Cluster WebUI.
When there is an active group resource in the group, the group resources that are offline cannot be started on another server.
-
Error Messages Message
Causes/Solution
Log in as root.
Run this command as a user with root privileges.
Invalid cluster configuration data. Check the cluster configuration information.
The cluster construction information is not correct. Check the cluster construction information by Cluster WebUI.
Invalid option.
Specify a correct option.
Could not connect server. Check if the cluster service is active.
Check if the EXPRESSCLUSTER is activated.
Invalid server status. Check if the cluster service is active.
Check if the EXPRESSCLUSTER is activated.
Server is not active. Check if the cluster service is active.
Check if the EXPRESSCLUSTER is activated.
Invalid server name. Specify a valid server name in the cluster.
Specify a correct server name in the cluster.
Connection was lost. Check if there is a server where the cluster service is stopped in the cluster.
Check if there is any server with EXPRESSCLUSTER service stopped in the cluster,
Internal communication timeout has occurred in the cluster server. If it occurs frequently, set the longer timeout.
Timeout has occurred in internal communication in the EXPRESSCLUSTER.Set the internal communication timeout longer if this error occurs frequently.The group resource is busy. Try again later.
Because the group resource is in the process of starting or stopping, wait for a while and try again.
An error occurred on group resource. Check the status of group resource.
Check the group resource status by using the Cluster WebUI or the clpstat command.
Could not start the group resource. Try it again after the other server is started, or after the Wait Synchronization time is timed out.
Wait until the other server starts or the wait time times out, and then start the group resources.
No operable group resource exists in the server.
Check there is a processable group resource on the specified server.
The group resource has already been started on the local server.
Check the group resource status by using the Cluster WebUI or clpstat command.
The group resource has already been started on the other server.
Check the group resource status by using the Cluster WebUI or clpstat command.Stop the group to start the group resources on the local server.The group resource has already been stopped.
Check the group resource status by using the Cluster WebUI or clpstat command.
Failed to start group resource. Check the status of group resource.
Check the group resource status by using the Cluster WebUI or clpstat command.
Failed to stop resource. Check the status of group resource.
Check the group resource status by using the Cluster WebUI or clpstat command.
Depended resource is not offline. Check the status of resource.
Because the status of the depended group resource is not offline, the group resource cannot be stopped. Stop the depended group resource or specify the -f option.
Depending resource is not online. Check the status of resource.
Because the status of the depended group is not online, the group resource cannot be started. Start the depended group resource or specify the -f option.
Invalid group resource name. Specify a valid group resource name in the cluster.
The group resource is not registered.
Server is not in a condition to start resource or any critical monitor error is detected.
Check the group resource status by using the Cluster WebUI or clpstat command.An error is detected in a critical monitor on the server on which an attempt to start a group resource was made.Internal error. Check if memory or OS resources are sufficient.
Memory or OS resources may be insufficient. Check them.
9.19. Controlling reboot count (clpregctrl command)
the clpregctrl command controls reboot count limitation.
-
Command line - clpregctrl --getclpregctrl -gclpregctrl --clear -t type -r registryclpregctrl -c -t type -r registry
Note
This command must be run on all servers that control the reboot count limitation because the command controls the reboot count limitation on a single server.
-
Description This command displays and/or initializes reboot count on a single server.
-
Option -
-g,--get¶ Displays reboot count information.
-
-c,--clear¶ Initializes reboot count.
-
-ttype¶ Specifies the type to initialize the reboot count. The type that can be specified is rc or rm.
-
-rregistry¶ Specifies the registry name. The registry name that can be specified is haltcount.
-
-
Return Value 0
Normal termination
1
Privilege for execution is invalid
2
Duplicated activation
3
Option is invalid
4
The cluster configuration data is invalid
10 to 17
Internal error
20 to 22
Obtaining reboot count information has failed.
90
Allocating memory has failed.
91
Changing the work directory as failed.
-
Example of command execution Display of reboot count information
# clpregctrl -g
******************************

-------------------------
   type       : rc
   registry   : haltcount
   comment    : halt count
   kind       : int
   value      : 0
   default    : 0

-------------------------
   type       : rm
   registry   : haltcount
   comment    : halt count
   kind       : int
   value      : 3
   default    : 0

******************************
Command succeeded.(code:0)
The reboot count is initialized in the following examples.
Run this command on server2 when you want to control the reboot count of server2.
Example1: When initializing the count of reboots caused by group resource error:
# clpregctrl -c -t rc -r haltcount
Command succeeded.(code:0)
#
Example2: When initializing the count of reboots caused by monitor resource error:
# clpregctrl -c -t rm -r haltcount
Command succeeded.(code:0)
#
-
Remarks For information on the reboot count limit, see "Attributes common to group resources" "Reboot count limit" in "3. Group resource details" in this guide.
-
Notes Run this command as the root user.
-
Error Messages Message
Causes/Solution
Command succeeded.
The command ran successfully.
Log in as root.
You are not authorized to run this command. Log on as the root user.
The command is already executed. Check the execution state by using the "ps" command or some other command.
The command is already running. Check the running status by using a command such as ps command.
Invalid option.
Specify a valid option.
Internal error. Check if memory or OS resources are sufficient.
Check to see if the memory or OS resource is sufficient.
9.20. Turning off warning light (clplamp command)
The clplamp command turns the warning light off.
-
Command line clplamp -h hostname
-
Description Turns the warning light of the specified server off.
If the reproduction of audio file is set, audio file reproduction is stopped.
-
Option -
-hhostname¶ Specify a server whose warning light you want to turn off.
-
-
Return Value 0
Normal termination
Other than 0
Abnormal termination
-
Example Example 1: When turning off the warning light and audio alert for server1
# clplamp -h server1
Command succeeded
-
Notes This command should be performed by the user with root privilege.
9.21. Requesting processing to cluster servers (clprexec command)
This command requests a server to execute a process.
-
Command line - clprexec --failover ( [group_name] | [-r resource_name] ) -h IP [-w timeout] [-p port_number] [-o logfile_path]clprexec --script script_file -h IP [-p port_number] [-w timeout] [-o logfile_path]clprexec --notice ( [mrw_name] | [-k category[.keyword]] ) -h IP [-p port_number] [-w timeout] [-o logfile_path]clprexec --clear ( [mrw_name] | [-k category[.keyword]] ) -h IP [-p port_number] [-w timeout] [-o logfile_path]
-
Description The command issues the request to execute specified process to the server in another cluster.
-
Option -
--failover¶ Requests group failover. Specify a group name for group_name.
When not specifying the group name, specify the name of a resource that belongs to the group by using the -r option.
-
--scriptscript_name¶ Requests script execution.
For script_name, specify the file name of the script to execute (such as a shell script or executable file).
The script must be created in the work/rexec directory, which is in the directory where EXPRESSCLUSTER is installed, on each server specified using -h.
-
--notice¶ Sends an error message to the EXPRESSCLUSTER server.
Specify a message receive monitor resource name for mrw_name.
When not specifying the monitor resource name, specify the category and keyword of the message receive monitor resource by using the -k option.
-
--clear¶ Requests changing the status of the message receive monitor resource from "Abnormal" to "Normal."
Specify a message receive monitor resource name for mrw_name.
When not specifying the monitor resource name, specify the category and keyword of the message receive monitor resource by using the -k option.
-
-hIP Address¶ Specify the IP addresses of EXPRESSCLUSTER servers that receive the processing request.
Up to 32 IP addresses can be specified by separating them with commas.
* If this option is omitted, the processing request is issued to the local server.
-
-rresource_name¶ Specify the name of a resource that belongs to the target group for the processing request when the --failover option is specified.
-
-kcategory[.keyword]¶ For category, specify the category specified for the message receive monitor when the --notice or --clear option is specified.
To specify the keyword of the message receive monitor resource, specify them by separating them with dot after category.
-
-pport_number¶ Specify the port number.
For port_number, specify the data transfer port number specified for the server that receives the processing request.
The default value, 29002, is used if this option is omitted.
-
-ologfile_path¶ For logfile_path, specify the file path along which the detailed log of this command is output.
The file contains the log of one command execution.
* If this option is not specified on a server where EXPRESSCLUSTER is not installed, the log is always output to the standard output.
-
-wtimeout¶ Specify the command timeout time. The default, 180 seconds, is used if this option is not specified.
A value from 5 to MAXINT can be specified.
-
-
Return Value 0
Completed successfully.
Other than 0
Terminated due to a failure.
-
Notes When issuing error messages by using the clprexec command, the message receive monitor resources for which an action to take in EXPRESSCLUSTER server when an error occurs is specified must be registered and started.
The server that has the IP address specified for the -h option must satisfy the following conditions:
EXPRESSCLUSTER X3.0 or later must be installed.
- EXPRESSCLUSTER must be running.(When an option other than --script is used)
- mrw must be set up and running.(When the --notice or --clear option is used)
When using the Controlling connection by using client IP address function, add the IP address of the device in which the clprexec command is executed to the IP Addresses of the Accessible Clients list.
For details of the Controlling connection by using client IP address function, see "WebManager tab" in "Cluster properties" in "2. Parameter details" in this guide.
-
Examples Example 1: This example shows how to issue a request to fail over the group failover1 to EXPRESSCLUSTER server 1 (10.0.0.1):
# clprexec --failover failover1 -h 10.0.0.1 -p 29002
Example 2: This example shows how to issue a request to fail over the group to which the group resource (exec1) belongs to EXPRESSCLUSTER server 1 (10.0.0.1):
# clprexec --failover -r exec1 -h 10.0.0.1
Example 3: This example shows how to issue a request to execute the script (script1.sh) on EXPRESSCLUSTER server 1 (10.0.0.1):
# clprexec --script script1.sh -h 10.0.0.1
Example 4: This example shows how to issue an error message to EXPRESSCLUSTER server 1 (10.0.0.1):
*mrw1 set, category: earthquake, keyword: scale3
This example shows how to specify a message receive monitor resource name:
# clprexec --notice mrw1 -h 10.0.0.1 -w 30 -p /tmp/clprexec/ lprexec.log
This example shows how to specify the category and keyword specified for the message receive monitor resource:
# clprexec --notice -k earthquake.scale3 -h 10.0.0.1 -w 30 -p /tmp/clprexec/clprexec.log
Example 5: This example shows how to issue a request to change the monitor status of mrw1 to EXPRESSCLUSTER server 1 (10.0.0.1):
*mrw1 set, category: earthquake, keyword: scale3
This example shows how to specify a message receive monitor resource name:
# clprexec --clear mrw1 -h 10.0.0.1
This example shows how to specify the category and keyword specified for the message receive monitor resource:
# clprexec --clear -k earthquake.scale3 -h 10.0.0.1
-
Error messages Message
Cause/solution
rexec_ver:%s
-
%s %s : %s succeeded.
-
%s %s : %s will be executed from now.
Check the processing result on the server that received the request.
%s %s : Group Failover did not execute because Group(%s) is offline.
-
%s %s : Group migration did not execute because Group(%s) is offline.
-
Invalid option.
Check the command argument.
Could not connect to the data transfer servers. Check if the servers have started up.
Check whether the specified IP address is correct and whether the server that has the IP address is running.
Command timeout.
Check whether the processing is complete on the server that has the specified IP address.
All servers are busy.Check if this command is already run.
This command might already be running. Check whether this is so.
%s %s : This server is not permitted to execute clprexec.
Check whether the IP address of the server that executes the command is registered in the list of client IP addresses that are not allowed to connect to the Cluster WebUI.
%s %s : Specified monitor resource(%s) does not exist.
Check the command argument.
%s %s : Specified resource(Category:%s, Keyword:%s) does not exist.
Check the command argument.
%s failed in execute.
Check the status of the EXPRESSCLUSTER server that received the request.
9.22. Controlling cluster activation synchronization wait processing (clpbwctrl command)
The clpbwctrl command controls the cluster activation synchronization wait processing.
-
Command line - clpbwctrl -cclpbwctrl --np [on|off]clpbwctrl -h
Note
The command with the --np option must be executed on all the servers that control the processing because the command controls the processing on a single server.
-
Description - This command skips the cluster activation synchronization wait time that occurs if the server is started when the cluster services for all the servers in the cluster are stopped.Specifies whether to execute the NP resolution process when the cluster is started on a single server.
-
Option -
-c,--cancel¶ Cancels the cluster activation synchronization wait processing.
-
--np[on|off]¶ - Specifies whether to execute the NP resolution process when the cluster is started. When "on" is specified, the NP resolution process is executed. When "off" is specified, it is not executed.[on|off] is optional. When omitted, the current setting is displayed.
-
-h,--help¶ Displays the usage.
-
-
Return Value 0
Completed successfully.
Other than 0
Terminated due to a failure.
-
Notes This command must be executed by a user with root privileges.
-
Examples This example shows how to cancel the cluster activation synchronization wait processing:
# clpbwctrl -c
Command succeeded.
The NP resolution process is not performed at the cluster startup:
# clpbwctrl --np off
Command succeeded.

# clpbwctrl --np
Resolve network partition on startup : off
-
Error messages Message
Cause/solution
Log in as root
Log in as a root user.
Invalid option.
The command option is invalid.Specify correct option.Cluster service has already been started.
The cluster has already been started. It is not in startup synchronization waiting status.
The cluster is not waiting for synchronization.
The cluster is not in startup synchronization waiting processing. The cluster service stop or other causes are possible.
Command Timeout.
Command execution timeout.
Internal error.
Internal error occurred.
9.23. Checking the process health (clphealthchk command)
Checks the process health.
-
Command line clphealthchk [ -t pm | -t rc | -t rm | -t nm | -h ]
Note
This command must be run on the server whose process health is to be checked because this command checks the process health of a single server.
-
Description This command checks the process health of a single server.
-
Option -
None¶ Checks the health of all of clppm, clprc, clprm, and clpnm.
-
-t<process>¶ process
- pm
Checks the health of clppm.
- rc
Checks the health of clprc.
- rm
Checks the health of clprm.
- nm
Checks the health of clpnm.
-
-h¶ Displays the usage.
-
-
Return Value 0
Normal termination
1
Privilege for execution is invalid
2
Duplicated activation
3
Initialization error
4
The option is invalid
10
The process stall monitoring function has not been enabled.
11
The cluster is not activated (waiting for the cluster to start or the cluster has been stopped.)
12
The cluster daemon is suspended
100
There is a process whose health information has not been updated within a certain period.
If the -t option is specified, the health information of the specified process is not updated within a certain period.
255
Other internal error
-
Examples Example 1: When the processes are healthy
# clphealthchk
pm OK
rc NG
rm OK
nm OK
Example 2: When clprc is stalled
# clphealthchk
pm OK
rc NG
rm OK
nm OK
# clphealthchk -t rc
rc NG
Example 3: When the cluster has been stopped
# clphealthchk
The cluster has been stopped
-
Remarks If the cluster has been stopped or suspended, the process is also stopped.
-
Notes Run this command as the root user.
-
Error Messages Message
Cause/Solution
Log in as root.
You are not authorized to run this command. Log on as the root user.
Initialization error. Check if memory or OS resources are sufficient.
Check to see if the memory or OS resource is sufficient.
Invalid option.
Specify a valid option.
The function of process stall monitor is disabled.
The process stall monitoring function has not been enabled.
The cluster has been stopped.
The cluster has been stopped.
The cluster has been suspended.
The cluster has been suspended.
This command is already run.
The command has already been started. Check the running status by using a command such as ps command.
Internal error. Check if memory or OS resources are sufficient.
Check to see if the memory or OS resource is sufficient.
9.24. Controlling the rest point of DB2 (clpdb2still command)
Controls the rest point of DB2.
-
Command line - clpdb2still -d databasename -u username -sclpdb2still -d databasename -u username -r
-
Description Controls the securing/release of the rest point of DB2.
-
Option -
-ddatabasename¶ Specifies the name of the target database for the rest point control.
-
-uusername¶ Specifies the name of a user who executes the rest point control.
-
-s¶ Secures the rest point.
-
-r¶ Releases the rest point.
-
-
Return Value 0
Normal completion
2
Invalid command option
5
Failed to secure the rest point.
6
Failed to release the rest point.
-
Examples # clpdb2still -d sample -u db2inst1 -s Database Connection Information Database server = DB2/LINUXX8664 11.1.0 SQL authorization ID = DB2INST1 Local database alias = SAMPLE DB20000I The SET WRITE command completed successfully. DB20000I The SQL command completed successfully. DB20000I The SQL DISCONNECT command completed successfully.
# clpdb2still -d sample -u db2inst1 -r

Database Connection Information

Database server = DB2/LINUXX8664 11.1.0
SQL authorization ID = DB2INST1
Local database alias = SAMPLE

DB20000I The SET WRITE command completed successfully.
DB20000I The SQL command completed successfully.
DB20000I The SQL DISCONNECT command completed successfully.
-
Notes Run this command as the root user.
A user specified in the -u option needs to have the privilege to run the SET WRITE command of DB2.
-
Error Messages Message
Cause/Solution
invalid database name
The database name is invalid.Check the database name.invalid user name
The user name is invalid.Check the user name.missing database name
No database name is specified.Specify a database name.missing user name
No user name is specified.Specify a user name.missing operation '-s' or '-r'
Neither the securing nor release of the rest point is specified.Specify either the securing or release of the rest point.suspend command return code = n
Failed to secure the rest point.If an error message of the su command is output at the last minute, check the user name and password. Additionally, if an error message of the db2 command is output, take appropriate actions based on the error message.resume command return code = n
Failed to release the rest point.If an error message of the su command is output at the last minute, check the user name and password. Additionally, if an error message of the db2 command is output, take appropriate actions based on the error message.
9.25. Controlling the rest point of MySQL (clpmysqlstill command)
Controls the rest point of MySQL.
-
Command line - clpmysqlstill -d databasename [-u username] -sclmypsqlstill -d databasename -r
-
Description Controls the securing/release of the rest point of MySQL.
-
Option -
-ddatabasename¶ Specifies the name of the target database for rest point control.
-
-uusername¶ Specifies the name of the database user who executes rest point control. This option can be specified only when the -s option is specified. If it is omitted, root is automatically set as a default user.
-
-s¶ Secures the rest point.
-
-r¶ Releases the rest point.
-
-
Return Value 0
Normal completion
2
Invalid command option
3
DB connection error
4
Authentication error for the user specified in the -u option
5
Failed to secure the rest point.
6
Failed to release the rest point.
99
Internal error
-
Examples # clpmysqlstill -d mysql -u root -s Command succeeded.
# clpmysqlstill -d mysql -r
Command succeeded.
-
Notes Run this command as the root user.
Configure a directory, where libmysqlclient.so client library of MySQL exists, to LD_LIBRARY_PATH, an environment variable.
Preliminarily configure the password of a user specified in the -u option, in the stillpoint.conf file of the etc directory under EXPRESSCLUSTER install directory. Use the following format for the password. Put a colon ":" at the end of the row.
"User name:Password:"
Example of file path: /opt/nec/clusterpro/etc/stillpoint.conf
Example of password setting: root:password:
A user specified in the -u option needs to have privileges to execute FLUSH TABLES WITH READ LOCK statement of MySQL.
If the rest point has been secured by running the command for securing the rest point with the -s option, the control is not returned while the command remains resident. By running the command for releasing the rest point with the -r option at a different process, the resident command for securing the rest point finishes and the control is returned.
-
Error Messages Message
Cause/Solution
Invalid option.
Invalid command option.Check the command option.Cannot connect to database.
Failed to connect to the database.Check the name and the status of the database.Username or password is not correct.
User authentication failed.Check your user name and password.Suspend database failed.
Failed to secure the rest point.Check the user privileges and the database settings.Resume database failed.
Failed to release the rest point.Check the user privileges and the database settings.Internal error.
An internal error has occurred.
9.26. Controlling the rest point of Oracle (clporclstill command)
Controls the rest point of Oracle.
-
Command line - clporclstill -d connectionstring [-u username] -sclporclstill -d connectionstring -r
-
Description Controls the securing/release of the rest point of Oracle.
-
Option -
-dconnectionstring¶ Specifies the connection string for the target database for rest point control.
-
-uusername¶ Specifies the name of a database user who executes rest point control. This option can be specified only when the -s option is specified. If it is omitted, OS authentication is used.
-
-s¶ Secures the rest point.
-
-r¶ Releases the rest point.
-
-
Return Value 0
Normal completion
2
Invalid command option
3
DB connection error
4
User authentication error
5
Failed to secure the rest point.
6
Failed to release the rest point.
99
Internal error
-
Examples # clporclstill -d orcl -u oracle -s Command succeeded.
# clporclstill -d orcl -r
Command succeeded.
-
Notes Run this command as the root user.
Configure a directory, where libclntsh.so client library of Oracle exists, to LD_LIBRARY_PATH, an environment variable.
Additionally, configure the home directory of Oracle to ORACLE_HOME, an environment variable.
If OS authentication is used without specifying the -u option, a user who runs this command needs to belong to the dba group, in order to gain administrative privileges for Oracle.
Preliminarily configure the password of a user specified in the -u option, in the stillpoint.conf file of the etc directory under EXPRESSCLUSTER install directory. Use the following format for the password. Put a colon ":" at the end of the row.
"User name:Password:"
Example of file path: /opt/nec/clusterpro/etc/stillpoint.conf
Example of password setting: root:password:
A user specified in the -u option needs to have administrative privileges for Oracle.
If the rest point has been secured by running the command for securing the rest point with the -s option, the control is not returned while the command remains resident. By running the command for releasing the rest point with the -r option at a different process, the resident command for securing the rest point finishes and the control is returned.
Configure Oracle in the ARCHIVELOG mode in advance to run this command.
If an Oracle data file is acquired while this command is used to secure the rest point, the backup mode will be set for the data file. To restore and use the data file, disable the backup mode on Oracle to restore the data file.
-
Error Messages Message
Cause/Solution
Invalid option.
Invalid command option.Check the command option.Cannot connect to database.
Failed to connect to the database.Check the name and the status of the database.Username or password is not correct.
User authentication failed.Check your user name and password.Suspend database failed.
Failed to secure the rest point.Check the user privileges and the database settings.Resume database failed.
Failed to release the rest point.Check the user privileges and the database settings.Internal error.
An internal error has occurred.
9.27. Controlling the rest point of PostgreSQL (clppsqlstill command)
Controls the rest point of PostgreSQL.
-
Command line - clppsqlstill -d databasename -u username -sclppsqlstill -d databasename -r
-
Description Controls the securing/release of the rest point of PostgreSQL.
-
Option -
-ddatabasename¶ Specifies the name of the target database for rest point control.
-
-uusername¶ Specifies the name of the database user who executes rest point control.
-
-s¶ Secures the rest point.
-
-r¶ Releases the rest point.
-
-
Return Value 0
Normal completion
2
Invalid command option
3
DB connection error
4
Authentication error for the user specified in the -u option
5
Failed to secure the rest point.
6
Failed to release the rest point.
99
Internal error
-
Examples # clppsqlstill -d postgres -u postgres -s Command succeeded.
# clppsqlstill -d postgres -r
Command succeeded.
-
Notes This command is not available for use after PostgreSQL 15.1.
Run this command as the root user.
Configure a directory, where libpq.so client library of PostgreSQL exists, to LD_LIBRARY_PATH, an environment variable.
If any number other than the default value (5432) is set to the port number connected to PostgreSQL, configure the port number in PQPORT, an environment variable.
Preliminarily configure the password of a user specified in the -u option, in the stillpoint.conf file of the etc directory under EXPRESSCLUSTER install directory. Use the following format for the password. Put a colon ":" at the end of the row.
"User name:Password:"
Example of file path: /opt/nec/clusterpro/etc/stillpoint.conf
Example of password setting: root:password:
A user specified in the -u option needs to have superuser privileges for PostgreSQL.
Enable WAL archive of PostgreSQL in advance to run this command.
If the rest point has been secured by running the command for securing the rest point with the -s option, the control is not returned while the command remains resident. By running the command for releasing the rest point with the -r option at a different process, the resident command for securing the rest point finishes and the control is returned.
-
Error Messages Message
Cause/Solution
Invalid option.
Invalid command option.Check the command option.Cannot connect to database.
Failed to connect to the database.Check the name and the status of the database.Username or password is not correct.
User authentication failed.Check your user name and password.Suspend database failed.
Failed to secure the rest point.Check the user privileges and the database settings.Resume database failed.
Failed to release the rest point.Check the user privileges and the database settings.Internal error.
An internal error has occurred.
9.28. Controlling the rest point of SQL Server (clpmssqlstill command)
Controls the rest point of SQL Server.
-
Command line - clpmssqlstill -d databasename -u username -v vdiusername -sclpmssqlstill -d databasename -v vdiusername -r
-
Description Controls the securing/release of the rest point of SQL Server.
-
Option -
-ddatabasename¶ Specifies the name of the target database for rest point control.
-
-uusername¶ Specifies the name of the database user who executes rest point control.
-
-vvdiusername¶ Specifies the name of an OS user who executes vdi
-
-s¶ Secures the rest point.
-
-r¶ Releases the rest point.
-
-
Return Value 0
Normal completion
2
Invalid command option
3
DB connection error
4
Authentication error for the user specified in the -u option
5
Failed to secure the rest point.
6
Failed to release the rest point.
7
Timeout error
99
Internal error
-
Examples # clpmssqlstill -d userdb -u sa -v mssql -s Command succeeded.
# clpmssqlstill -d userdb -v mssql -r
Command succeeded.
-
Notes Run this command as the root user.
Configure directories, where libsqlvdi.so VDI client library of SQL Server and libodbc.so ODBC library exist, to LD_LIBRARY_PATH, an environment variable.
Preliminarily configure the password of a user specified in the -u option, in the stillpoint.conf file of the etc directory under EXPRESSCLUSTER install directory. Use the following format for the password. Put a colon ":" at the end of the row.
"User name:Password:"
Example of file path: /opt/nec/clusterpro/etc/stillpoint.conf
Example of password setting: sa:password:
A user specified in the -u option needs to have privileges to execute the BACKUP DATABASE statement of SQL Server.
An OS user specified in the -v option needs to have privileges to execute VDI client.
You need to preliminarily configure the timeout value of this command in the stillpoint.conf file of the etc directory under EXPRESSCLUSTER install directory. Use the following format for the timeout time. Put a colon ":" at the last row. Unless it is set, the value described in the following example will be used as the default value.
"Timeout name: number of seconds:"
Example of file path: /opt/nec/clusterpro/etc/stillpoint.conf
Example of time-out (GetConfiguration) configured: cfgtimeout:1:
Example of time-out (GetCommand) configured: cmdtimeout:90:
Example of time-out (SQL) configured: sqltimeout:60:
You need to preliminarily configure the ODBC driver used for operating the database, in the stillpoint.conf file of the etc directory under EXPRESSCLUSTER install directory. Use the following format for the ODBC driver. Put a colon ":" at the end of the row. Unless it is set, the value described in the following example is used as the default value.
"ODBC driver: Name of ODBC driver to be used:"
Example of file path: /opt/nec/clusterpro/etc/stillpoint.conf
Example of ODBC driver: odbcdriver:ODBC Driver 13 for SQL Server:
If the rest point has been secured by running the command for securing the rest point with the -s option, the control is not returned while the command remains resident. By running the command for releasing the rest point with the -r option at a different process, the resident command for securing the rest point finishes and the control is returned.
-
Error Messages Message
Cause/Solution
Invalid option.
Invalid command option.Check the command option.Cannot connect to database.
Failed to connect to the database.Check the name and the status of the database.Username or password is not correct.
User authentication failed.Check your user name and password.Suspend database failed.
Failed to secure the rest point.Check the user privileges and the database settings.Resume database failed.
Failed to release the rest point.Check the user privileges and the database settings.Timeout.
The command timed out.
Internal error.
An internal error has occurred.
9.29. Displaying the cluster statistics information (clpperfc command)
the clpperfc command displays the cluster statistics information.
-
Command line - clpperfc --starttime -g group_nameclpperfc --stoptime -g group_nameclpperfc -g [group_name]clpperfc -m monitor_name
-
Description This command displays the median values (millisecond) of the group start time and group stop time.
This command displays the monitoring processing time (millisecond) of the monitor resource.
-
Option -
--starttime-g group_name¶ Displays the median value of the group start time.
-
--stoptime-g group_name¶ Displays the median value of the group stop time.
-
-g[group_name]¶ Displays the each median value of the group start time and group stop time.
If groupname is omitted, it displays the each median value of the start time and stop time of all the groups.
-
-mmonitor_name¶ Displays the last monitor processing time of the monitor resource.
-
-
Return value 0
Normal termination
1
Invalid command option
2
User authentication error
3
Configuration information load error
4
Configuration information load error
5
Initialization error
6
Internal error
7
Internal communication initialization error
8
Internal communication connection error
9
Internal communication processing error
10
Target group check error
12
Timeout error
-
Example of Execution When displaying the median value of the group start time:
# clpperfc --starttime -g failover1
200
When displaying each median value of the start time and stop time of the specific group:
# clpperfc -g failover1
            start time    stop time
failover1          200          150
When displaying the monitor processing time of the monitor resource:
# clpperfc -m monitor1
100
-
Remarks The time is output in millisecond by this commands.
If the valid start time or stop time of the group was not obtained, - is displayed.
If the valid monitoring time of the monitor resource was not obtained, 0 is displayed.
-
Notes Execute this command as a root user.
-
Error Messages Message
Cause/Solution
Log in as root.
Run this command as the root user.
Invalid option.
The command option is invalid. Check the command option.
Command timeout.
Command execution timed out.
Internal error.
Check if memory or OS resources are sufficient.
9.30. Checking the cluster configuration information (clpcfchk command)
This command checks the cluster configuration information.
-
Command line - clpcfchk -o path [-i conf_path]
-
Description This command checks the validness of the setting values based on the cluster configuration information.
-
Option -
-opath¶ Specifies the directory to store the check results.
-
-iconf_path¶ Specifies the directory which stored the configuration information to check.
If this option is omitted, the applied configuration information is checked.
-
-
Return Value 0
Normal termination
Other
than 0 Termination with an error
-
Example of Execution When checking the applied configuration information:
# clpcfchk -o /tmp
server1 : PASS
server2 : PASS
When checking the stored configuration information:
# clpcfchk -o /tmp -i /tmp/config
server1 : PASS
server2 : FAIL
-
Execution Result For this command, the following check results (total results) are displayed.
Check Results (Total Results)
Description
PASS
No error found.
FAIL
An error found.Check the check results.
-
Remarks Only the total results of each server are displayed.
-
Notes Run this command as a root user.
When checking the configuration information exported through Cluster WebUI, decompress it in advance.
-
Error Messages Message
Cause/Solution
Log in as root.
Log in as a root user.
Invalid option.
Specify a valid option.
Could not opened the configuration file. Check if the configuration file exists on the specified path.
The specified path does not exist. Specify a valid path.
Server is busy. Check if this command is already run.
This command has been already activated.
Failed to obtain properties.
Failed to obtain the properties.
Failed to check validation.
Failed to check the cluster configuration.
Internal error. Check if memory or OS resources are sufficient.
The amount of memory or OS resources may be insufficient. Check for any insufficiency.
9.31. Converting a cluster configuration data file (clpcfconv.sh command)
Converts a cluster configuration data file.
-
Command line - clpcfconv.sh -i <input-path> [-o <output-path>]
-
Description Converts an old version of a cluster configuration data file into the current version.
-
Option -
-i<input-path>¶ Specifies a directory where an old version of a cluster configuration data file exists.
-
-o<output-path>¶ - Specifies a directory where the converted cluster configuration data file is outputted.If this option is omitted, the converted cluster configuration data file is outputted to the current directory.
-
-
Return value 0
Normal termination
Other
than 0 Termination with an error
-
Notes Run this command as a root user.
This command converts only clp.conf among cluster configuration data files.
This command cannot be executed right under <installation destination directory>/etc.
This command does not support any cluster configuration data file created with a version older than EXPRESSCLUSTER X 3.3 for Linux (internal version: 3.3.5-1).
If a password was set on the cluster password method with a version older than EXPRESSCLUSTER X 5.0 for Linux, executing this command clears the password.After applying the converted cluster configuration data, set the password again by using Cluster WebUI.For information on how to set a password, see this guide: "2. Parameter details" -> "Cluster properties" -> "WebManager tab".
-
Example of Execution When the conversion succeeds
# clpcfconv.sh -i /tmp/config_x430 -o /tmp/config_new
Command succeeded.
When the conversion succeeds and the password is cleared
# clpcfconv.sh -i /tmp/config_x430 -o /tmp/config_new
Command succeeded.

Password for Operation has been initialized.
Password for Reference has been initialized.
Please set the password again by using Cluster WebUI.
-
Error Messages Message
Cause/Solution
Command succeeded.
The command ran successfully.
Password for Operation has been initialized.
The operation password set on the cluster password method has been cleared.
Password for Reference has been initialized.
The reference password set on the cluster password method has been cleared.
Please set the password again by using Cluster WebUI.
Set the cleared password again by using Cluster WebUI.
Log in as root.
Log in as a root user.
Not available in this directory.
This command cannot be executed right under <installation destination directory>/etc.Change the current directory to a different directory (other than <installation destination directory>/etc).Could not opened the configuration file. Check if the configuration file exists on the specified path.
The cluster configuration data file (clp.conf) does not exist on the path specified with the -i option.Check if the cluster configuration data file exists on the specified path.The specified output-path does not exist.
The path specified with the -o option does not exist.Specify the right path.Invalid configuration file.
The cluster configuration data file is invalid.Check the cluster configuration data file.The version of this configuration data file is not supported. Convert it with Builder for offline use (internal version 3.3.5-1), then retry.
The version of the cluster configuration data file is not supported by this command.Convert it with Builder for offline use (internal version: 3.3.5-1), then retry.%1 : Command failed. code:%2
The command (%1) failed.Check the returned value (%2) of the command, or the error message displayed just before this error message.Command failed.
This command failed.Check for any error message displayed immediately before this error message appears.
9.32. Adding a firewall rule (clpfwctrl.sh command)
Adds or deletes a firewall rule on servers for EXPRESSCLUSTER.
-
Command line - clpfwctrl.sh --add [--zone=<ZONE>]clpfwctrl.sh --removeclpfwctrl.sh --help
-
Description Note
Before executing this command, start up the server firewall service.
Note
This command adds a rule to or deletes it from a firewall zone on a single server, and therefore must be executed on every server for which you want the rule to be added or deleted.
Note
Execute this command immediately after installing EXPRESSCLUSTER and directly after applying configuration data.
Note
This command supports only environments where the firewall-cmd and firewall-offline-cmd commands can be used.
A rule can be added to a firewall zone for accessing port numbers for EXPRESSCLUSTER, and the added rule can be deleted from the zone.For more information on port numbers to be specified with this command, and for that on protocols, see "Getting Started Guide" -> "Notes and Restrictions" -> "Before installing EXPRESSCLUSTER" -> "Communication port number".Add a rule with the following name to a firewall zone. If the rule name is already used, first delete it, then add it again. Do not change the rule name.Rule name
clusterpro
-
Option -
--add[--zone=<ZONE>]¶ Adds a firewall rule, to a zone (if specified). If no zone is specified, the rule is added to the default zone.
-
--remove¶ Deletes the added firewall rule.
-
--help¶ Displays the usage.
-
-
Return value 0
Success
Other than 0
Failure
-
Notes - Execute this command as root.This command does not add an outbound firewall rule. Adding it requires a separate procedure.Once a JVM monitor resource is registered, this command always allows the port number for managing the resource.Executing this command discards the firewall configuration that is temporarily set on the memory.
-
Example of Execution Adding a rule to the default zone:
# clpfwctrl.sh --add
Command succeeded.
-
Example of Execution Adding a rule to the home zone:
# clpfwctrl.sh --add --zone=home
Command succeeded.
-
Example of Execution Deleting the added rule:
# clpfwctrl.sh --remove
Command succeeded.
-
Error Messages Message
Cause/Solution
Log in as root.
Log in as a user with root privileges.
Invalid option.
Specify the right option.
Failed to register rule(CLUSTERPRO). Invalid port.
Check the configuration data, which includes an invalid port number.
Failed to register rule(CLUSTERPRO). Invalid zone.
Check the zone name, which is invalid.
Unsupported environment.
The OS is unsupported.
Could not read xmlpath. Check if xmlpath exists on the specified path. (%1)
Check if the xml path exists in the configuration data.%1: xml pathCould not opened the configuration file. Check if the configuration file exists on the specified path. (%1)
Check if the policy file exists.%1: xml pathCould not read type. Check if type exists on the policy file. (%1)
Check if the policy file exists.%1: xml pathnot exist xmlpath. (%1)
Check if the xml path exists in the configuration data.%1: xml pathFailed to obtain properties. (%1)
Check if the xml path exists in the configuration data.%1: xml pathNot exist java install path. (%1)
Check if the Java installation path exists.%1: Java installation pathInternal error. Check if memory or OS resources are sufficient. (%1)
The possible cause is insufficient memory or insufficient OS resources. Check if these two are sufficient.%1: xml path