1. Preface
1.1. Who Should Use This Guide
The EXPRESSCLUSTER X SingleServerSafe for Windows Installation Guide is intended for system engineers who intend to introduce a system using EXPRESSCLUSTER X SingleServerSafe and system administrators who will operate and maintain the introduced system. It describes how to install EXPRESSCLUSTER X SingleServerSafe.
1.2. How This Guide Is Organized
2. About EXPRESSCLUSTER X SingleServerSafe: Explains the functions and requirements of EXPRESSCLUSTER X SingleServerSafe.
3. Installing EXPRESSCLUSTER X SingleServerSafe: Describes how to install EXPRESSCLUSTER X SingleServerSafe.
4. Updating, uninstalling, reinstalling or upgrading: Describes how to upgrade EXPRESSCLUSTER X SingleServerSafe, uninstall and reinstall EXPRESSCLUSTER X SingleServerSafe, and upgrade to EXPRESSCLUSTER X.
5. Latest version information: Provides the latest information about EXPRESSCLUSTER X SingleServerSafe.
6. Additional information: Provides tips on installing EXPRESSCLUSTER X SingleServerSafe.
7. Notes and Restrictions: Provides notes and restrictions you need to know before starting the actual operation of EXPRESSCLUSTER X SingleServerSafe.
8. Troubleshooting: Describes problems you might experience when installing or setting up EXPRESSCLUSTER X SingleServerSafe and how to resolve them.
1.3. Terms Used in This Guide
EXPRESSCLUSTER X SingleServerSafe, which is described in this guide, uses windows and commands common to those of the clustering software EXPRESSCLUSTER X SingleServerSafe to ensure high compatibility with EXPRESSCLUSTER X SingleServerSafe in terms of operation and other aspects. Therefore, cluster-related terms are used in parts of the guide.
The terms used in this guide are defined below.
- Cluster, cluster system
A single server system using EXPRESSCLUSTER X SingleServerSafe
- Cluster shutdown, reboot
Shutdown or reboot of a system using EXPRESSCLUSTER X SingleServerSafe
- Cluster resource
A resource used in EXPRESSCLUSTER X SingleServerSafe
- Cluster object
A resource object used in EXPRESSCLUSTER X SingleServerSafe
- Failover group
A group of group resources (such as applications and services) used in EXPRESSCLUSTER X SingleServerSafe
1.4. EXPRESSCLUSTER X SingleServerSafe Documentation Set
The EXPRESSCLUSTER X SingleServerSafe manuals consists of the four guides below. The title and purpose of each guide is described below:
EXPRESSCLUSTER X SingleServerSafe Installation Guide
This guide is intended for system engineers who intend to introduce a system using EXPRESSCLUSTER X SingleServerSafe and describes how to install EXPRESSCLUSTER X SingleServerSafe.
EXPRESSCLUSTER X SingleServerSafe Configuration Guide
This guide is intended for system engineers who intend to introduce a system using EXPRESSCLUSTER X SingleServerSafe and system administrators who will operate and maintain the introduced system. It describes how to set up EXPRESSCLUSTER X SingleServerSafe.
EXPRESSCLUSTER X SingleServerSafe Operation Guide
This guide is intended for system administrators who will operate and maintain an introduced system that uses EXPRESSCLUSTER X SingleServerSafe. It describes how to operate EXPRESSCLUSTER X SingleServerSafe.
EXPRESSCLUSTER X SingleServerSafe Legacy Feature Guide
This guide is intended for system engineers who want to introduce systems using EXPRESSCLUSTER X SingleServerSafe and describes EXPRESSCLUSTER X SingleServerSafe 4.0 WebManager and Builder.
1.5. Conventions
In this guide, Note, Important, See also are used as follows:
Note
Used when the information given is important, but not related to the data loss and damage to the system and machine.
Important
Used when the information given is necessary to avoid the data loss and damage to the system and machine.
See also
Used to describe the location of the information given at the reference destination.
The following conventions are used in this guide.
Convention |
Usage |
Example |
|---|---|---|
Bold |
Indicates graphical objects, such as fields, list boxes, menu selections, buttons, labels, icons, etc. |
In User Name, type your name.
On the File menu, click Open Database.
|
Angled bracket within the command line |
Indicates that the value specified inside of the angled bracket can be omitted. |
|
Monospace (courier) |
Indicates path names, commands, system output (message, prompt, etc), directory, file names, functions and parameters. |
|
Monospace bold (courier) |
Indicates the value that a user actually enters from a command line. |
Enter the following:
clpcl -s -a
|
Monospace italic
(courier)
|
Indicates that users should replace italicized part with values that they are actually working with. |
|
1.6. Contacting NEC
For the latest product information, visit our website below:
2. About EXPRESSCLUSTER X SingleServerSafe
This chapter describes the functions and requirements of EXPRESSCLUSTER X SingleServerSafe.
This chapter covers:
2.2. Checking system requirements for EXPRESSCLUSTER X SingleServerSafe
2.3. Preparing and verifying the server environment before installation
2.1. What is EXPRESSCLUSTER X SingleServerSafe?
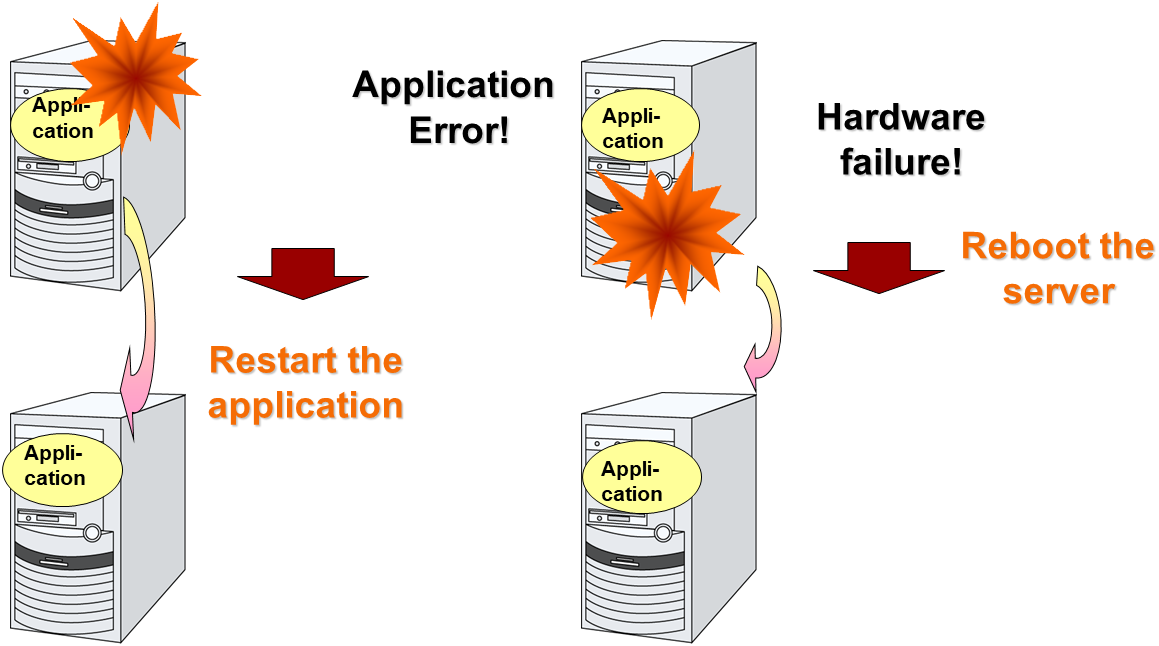
EXPRESSCLUSTER X SingleServerSafe is set up on a server. It monitors for application errors and hardware failures on the server and, upon detecting an error or failure, restarts the failed application or reboots the server so as to ensure greater server availability.
2.1.1. EXPRESSCLUSTER X SingleServerSafe software configuration
EXPRESSCLUSTER X SingleServerSafe consists of following two software applications:
- EXPRESSCLUSTER ServerThis is a main module of EXPRESSCLUSTER X SingleServerSafe. Install it on the server.
- EXPRESSCLUSTER Cluster WebUIThis is a tool to create the configuration data of EXPRESSCLUSTER X SingleServerSafe and to manage EXPRESSCLUSTER X SingleServerSafe operations.It uses a Web browser as a user interface.

2.2. Checking system requirements for EXPRESSCLUSTER X SingleServerSafe
Check the configuration and operation requirements below for each machine to be used.
EXPRESSCLUSTER X SingleServerSafe
Machine on which the EXPRESSCLUSTER X SingleServerSafe can be installed
PC that supports one of the following operating systems.
Supported operation systems
Windows Server 2012 StandardWindows Server 2012 DatacenterWindows Server 2012 R2 StandardWindows Server 2012 R2 DatacenterWindows Server 2016 StandardWindows Server 2016 DatacenterWindows Server, version 1709 StandardWindows Server, version 1709 DatacenterWindows Server, version 1803 StandardWindows Server, version 1803 DatacenterWindows Server, version 1809 StandardWindows Server, version 1809 DatacenterWindows Server 2019 StandardWindows Server 2019 DatacenterWindows Server, version 1903 StandardWindows Server, version 1903 DatacenterWindows Server, version 1909 StandardWindows Server, version 1909 DatacenterMemory size
User mode: 256 MB 1Kernel mode: 32MBDisk Size
Initial size at installation: 100 MBDuring operation: 5.0 GB- 1
excepting for optional products.
Cluster WebUI
Supported browsers
Internet Explorer 11Internet Explorer 10FirefoxGoogle ChromeMemory size
User mode 500 MB
Disk size
200 MB
Note
Note
No mobile devices, such as tablets and smartphones, are supported.
2.2.1. Operation environment for SNMP linkage functions
EXPRESSCLUSTER with SNMP Service of Windows is validated on following OS.
x86_64 version
OS
EXPRESSCLUSTER
Remarks
version
Windows Server 2012
12.00 or later
Windows Server 2012 R2
12.00 or later
Windows Server 2016
12.00 or later
Windows Server, version 1709
12.00 or later
2.2.2. Operation environment for JVM monitor
The use of the JVM monitor requires a Java runtime environment.
Installation procedure
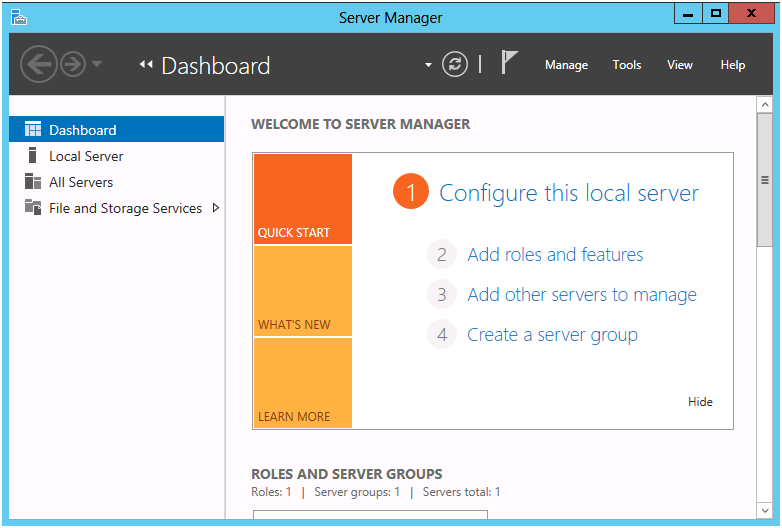
Fig. 2.1 Server Manager
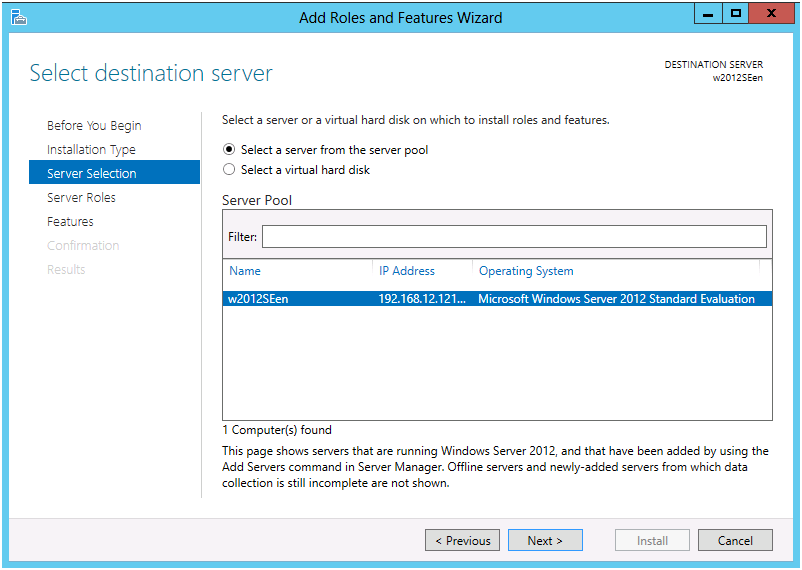
Fig. 2.2 Select Server
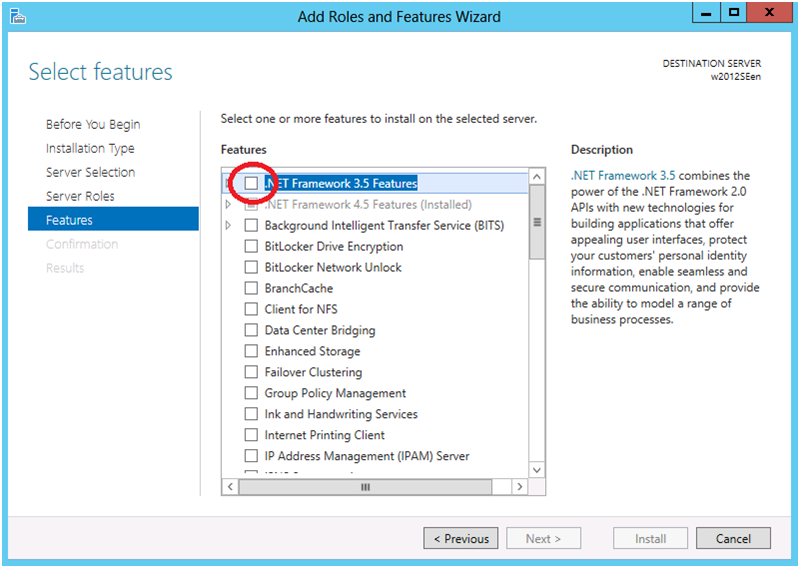
Fig. 2.3 Select Features
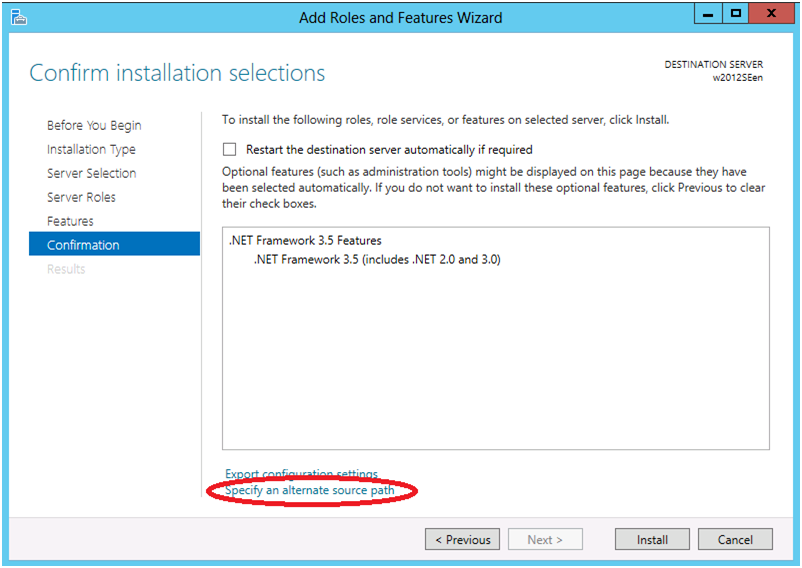
Fig. 2.4 Confirm Installation Options
Specify the path to the OS installation medium in the Path field while referring to the explanation displayed in the window, and then click OK. After this, click Install to install .Net Framework 3.5.
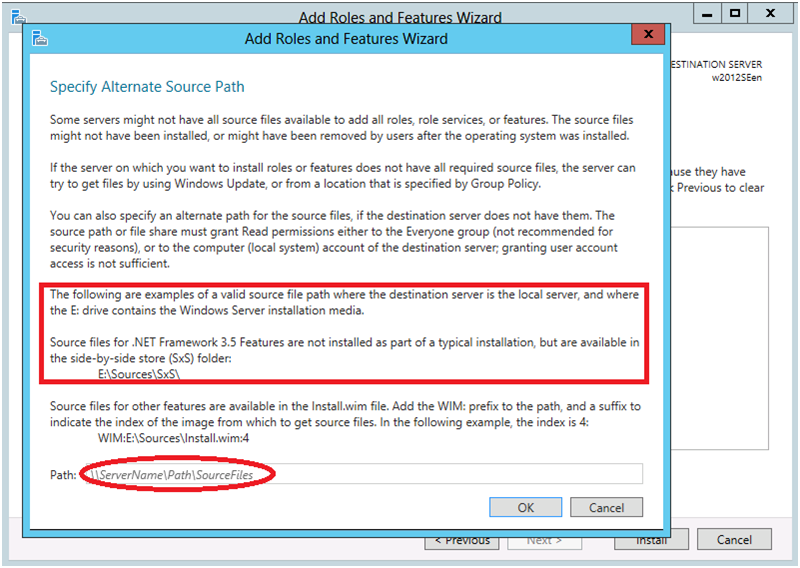
Fig. 2.5 Specify Alternative Source Path
The tables below list the load balancers that were verified for the linkage with the JVM monitor.
x86_64 version
Express5800/LB400h or later
12.00 or later
InterSec/LB400i or later
12.00 or later
BIG-IP v11
12.00 or later
CoyotePoint Equalizer
12.00 or later
2.2.3. Operation environment for system monitor or function of collecting system resource information
Note
On the OS of Windows Server 2012 or later, NET Framework 4.5 version or later is pre-installed (The version of the pre-installed one varies depending on the OS).
2.3. Preparing and verifying the server environment before installation
After installing the hardware, verify the following:
2.3.1. Verifying the network settings (Required)
Check the network settings by using the ipconfig and ping commands.
IP Address
Host name
2.3.2. Verifying the firewall settings (Required)
By default, EXPRESSCLUSTER X SingleServerSafe uses the port numbers below. You can change these port numbers by using the Cluster WebUI. Do not access any of these port numbers from a program other than EXPRESSCLUSTER X SingleServerSafe. When setting up a firewall, set up EXPRESSCLUSTER X SingleServerSafe so that it can access the port numbers below.
Internal processing in the local server
From
To
Remarks
Server
Automatic allocation
Server
29001/TCP
Internal communication
Server
Automatic allocation
Server
29002/TCP
Data transfer
Server
Automatic allocation
Server
29003/UDP
Alert synchronization
Server
Automatic allocation
Server
29008/TCP
Cluster information management
Server
Automatic allocation
Server
29010/TCP
Restful API internal communication
Server
29106/UDP
Server
29106/UDP
Heartbeat (kernel mode)
From the client to the server
From
To
Remarks
Restful API client
Automatic allocation
Server
29009/TCP
http communication
From the Cluster WebUI to the server
From
To
Remarks
Cluster WebUI
Automatic allocation
Server
29003/TCP
http communication
Others
From
To
Remarks
Server
Automatic allocation
Server
Management port number set by the Cluster WebUI
JVM monitor
Server
Automatic allocation
Monitoring target
Connection port number set by the Cluster WebUI
JVM monitor
Server
Automatic allocation
Server
Management port number for Load Balancer Linkage set by the Cluster WebUI
JVM monitor
Server
Automatic allocation
BIG-IP LTM
Communicationport number set by the Cluster WebUIJVM monitor
Note
An available port number at the time is automatically assigned.
2.3.3. Turning off the power saving function (Required)
For EXPRESSCLUSTER X SingleServerSafe, the power saving function (for example, standby or hibernation) cannot be used with the OnNow, ACPI, or APM function. Do not use any power saving functions.
3. Installing EXPRESSCLUSTER X SingleServerSafe
This chapter describes how to install EXPRESSCLUSTER X SingleServerSafe. To install EXPRESSCLUSTER X SingleServerSafe, install the EXPRESSCLUSTER Server, which is the main module of EXPRESSCLUSTER SingleServerSafe.
This chapter covers:
3.1. Installing the EXPRESSCLUSTER Server
3.1.1. Installing EXPRESSCLUSTER X SingleServerSafe for the first time
To install EXPRESSCLUSTER X SingleServerSafe, follow the procedure below.
Note
To install EXPRESSCLUSTER X SingleServerSafe, use an account that has administrator privileges.
Note
Installing EXPRESSCLUSTER X SingleServerSafe disables the Windows media sense function that deactivates an IP address if a link failure occurs due to disconnecting the LAN cable or some other reason.
Note
Insert the Installation CD-ROM to the CD-ROM drive.
Select NEC EXPRESSCLUSTER® SingleServerSafe for Windows.
Note
If the menu screen does not open automatically, double-click menu.exe in the root folder of the CD-ROM.
Select NEC EXPRESSCLUSTER® X SingleServerSafe 4.2 for Windows.
[Welcome to the InstallShield Wizard for NEC EXPRESSCLUSTER SingleServerSafe] is displayed. Click Next.
The Choose Destination Location dialog box is displayed. When changing the install destination, click Browse to select a directory. Click Next.
The Ready to Install the Program dialog box is displayed. Click Install to start the installation.
When the installation successfully finishes, the Port Number dialog box is displayed. Normally, click Next without changing the default setting.
Note
The port number configured here needs to be configured again when creating the configuration data. For details on port number, refer to "Cluster properties" in "Other setting details" in the "Configuration Guide".
License Manager is displayed. Click Register to register the license. For detailed information on the registration procedure, refer to "6.2.1. Registering a license by specifying a license file" in "6. Additional information" in this guide.
Click Finish to close the License Manager dialog box.
[InstallShield Wizard Complete] is displayed. Select [Yes, I want to restart my computer now.] and click Finish to restart the server. If you want to restart the server later, select [No, I will restart my computer later.] and click Finish.
3.1.2. Installing EXPRESSCLUSTER X SingleServerSafe in Silent Mode
Note
To install EXPRESSCLUSTER X SingleServerSafe, use an account that has administrator privileges.
Note
Installing EXPRESSCLUSTER X SingleServerSafe disables the Windows media sense function that deactivates an IP address if a link failure occurs due to disconnecting the LAN cable or some other reason.
Note
Preparation
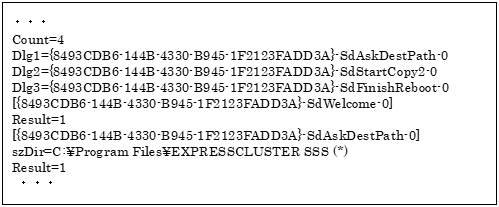
If you want to change the installation folder (default:C:\Program Files\EXPRESSCLUSTER SSS), create a response file in advance following the procedure below.
Windows\4.2\common\server\x64\response\setup_sss_inst_en.iss
Installation procedure
Windows\4.2\common\server\x64\silent-install.batin the installation CD-ROM* When installing the EXPRESSCLUSTER X SingleServerSafe in the default directory (C:\Program Files\EXPRESSCLUSTER SSS), omit <Path of response file>.Restart the server.
3.1.3. Setting up the SNMP linkage function manually
Note
If you only use the SNMP trap transmission function, this procedure is not required.
Note
Use an Administrator account to perform the registration.
Install the Windows SNMP Service.
Stop the Windows SNMP Service.
- Register the SNMP linkage function of EXPRESSCLUSTER with the Windows SNMP Service.3-1. Start the registry editor.3-2. Open the following key:
HKEY_LOCAL_MACHINE\SYSTEM\CurrentControlSet\Services\SNMP\Parameters\ExtensionAgents
3-3. Specify the following to create a string value in the opened key:Value name :mgtmibValue type :REG_SZValue data :SOFTWARE\NEC\EXPRESSCLUSTER\SnmpAgent\mgtmib\CurrentVersion
3-4. Exit the registry editor. Start the Windows SNMP Service.
Note
Configure the settings required for SNMP communication on Windows SNMP Service.
4. Updating, uninstalling, reinstalling or upgrading
This chapter describes how to update to the latest version of EXPRESSCLUSTER X SingleServerSafe and uninstall or reinstall EXPRESSCLUSTER X SingleServerSafe. Also, this chapter describes how to upgrade EXPRESSCLUSTER X SingleServerSafe to EXPRESSCLUSTER X.
This chapter covers:
4.1. Updating EXPRESSCLUSTER X SingleServerSafe
This section describes how to update from the old version of EXPRESSCLUSTER X SingleServerSafe to the latest version of it.
4.1.1. Updating from the old EXPRESSCLUSTER X SingleServerSafe version
Before starting the update, read the following notes.
You can update from EXPRESSCLUSTER X SingleServerSafe 1.0, 2.0, 2.1, 3.0, 3.1, 3.2 or 3.3 for Windows to EXPRESSCLUSTER X SingleServerSafe 4.2 for Windows. Updating from other versions is not possible.
To update from EXPRESSCLUSTER X SingleServerSafe 1.0, 2.0, 2.1, 3.0, 3.1, 3.2 or 3.3 for Windows to EXPRESSCLUSTER X SingleServerSafe 4.2 for Windows, you need the license of EXPRESSCLUSTER X SingleServerSafe 4.1 for Windows (including the licenses of optional products, if used).
You cannot use the cluster configuration data that was created by using EXPRESSCLUSTER X higher than EXPRESSCLUSTER X in use.
The cluster configuration data that was created by using EXPRESSCLUSTER X 1.0, 2.0, 2.1, 3.0, 3.1, 3.2, 3.3, 4.0, 4.1 or 4.2 for Windows is available for EXPRESSCLUSTER X in use.
EXPRESSCLUSTER X SingleServerSafe must be updated with the account having the Administrator's privilege.
The following procedure describes how to update from EXPRESSCLUSTER X SingleServerSafe 1.0, 2.0, 2.1, 3.0, 3.1, 3.2 or 3.3 for Windows to EXPRESSCLUSTER X SingleServerSafe 4.2 for Windows.
Make sure that the server and all the resources are in the normal status by using the WebManager or clpstat command.
Back up the configuration data.
Uninstall EXPRESSCLUSTER X SingleServerSafe from the server. For details about the uninstallation procedure, refer to " 4.2.1. Uninstalling EXPRESSCLUSTER X SingleServerSafe".
Install the EXPRESSCLUSTER X 4.2 SingleServerSafe on the server. For details about the installation procedure, refer to "3.1. Installing the EXPRESSCLUSTER Server" in "3. Installing EXPRESSCLUSTER X SingleServerSafe".
- Access the below URL to start the WebManager.
http://actual IP address of an installed server :29003/main.htm
Change to Config Mode and import the cluster configuration file which was saved in the step 2. Start the Cluster WebUI , start the cluster, and confirm that each resource starts normally.
Updating completes. Check that the server is operating normally by the clpstat command or Cluster WebUI.
4.2. Uninstalling EXPRESSCLUSTER X SingleServerSafe
4.2.1. Uninstalling EXPRESSCLUSTER X SingleServerSafe
Note
You must log on as an Administrator to uninstall EXPRESSCLUSTER X SingleServerSafe.
To uninstall EXPRESSCLUSTER X SingleServerSafe, follow the procedure below.
Change the service startup type to the manual startup.
clpsvcctrl.bat --disable -aReboot the server.
Click Program and Features in Control Panel.
Select NEC EXPRESSCLUSTER SingleServerSafe, and then click Uninstall.
Click Yes in the uninstallation confirmation dialog box. If you click No, uninstallation will be canceled.
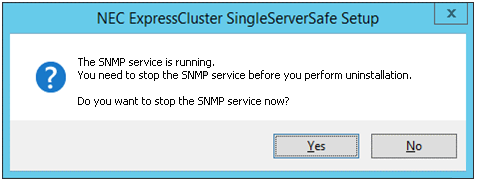
If the SNMP service is started, the message to confirm to stop the SNMP service is displayed. Click Yes. If you click No, uninstallation will be canceled.
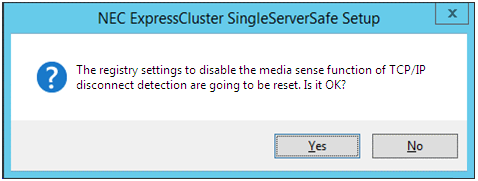
A message is displayed asking whether to return the media sense function (TCP/IP disconnection detection) to the state it was in before installing the EXPRESSCLUSTER Server. Click Yes to return to the state it was in before installing the EXPRESSCLUSTER Server. If you click No, the EXPRESSCLUSTER Server will be uninstalled with the media sense function disabled.
NEC ExpressCluster SingleSeverSafe Setup is displayed. Click Finish.
The confirmation message whether to restart the computer is displayed. Select Yes, I want to restart my computer or No, I will restart my computer later. And click Finish. Uninstallation of the EXPRESSCLUSTER Server is completed.
Note
4.3. Reinstalling EXPRESSCLUSTER X SingleServerSafe
4.3.1. Reinstalling the EXPRESSCLUSTER X SingleServerSafe
To reinstall the EXPRESSCLUSTER X SingleServerSafe, prepare the configuration data created using the Cluster WebUI (or the latest data if you changed the configuration).
After changing the configuration, make sure to save the latest configuration data. In addition to saving it to the Cluster WebUI after creation, you can back up the configuration data by using the clpcfctrl command. For details, see "Applying and backing up configuration data (clpcfctrl command)" in "EXPRESSCLUSTER X SingleServerSafe command reference" in the "EXPRESSCLUSTER X SingleServerSafe Operation Guide".
For details, see "Applying and backing up configuration data (clpcfctrl command)" -> "Backing up configuration data (clpcfctrl --pull)" in "EXPRESSCLUSTER X SingleServerSafe command reference" in the "EXPRESSCLUSTER X SingleServerSafe Operation Guide".
To reinstall the EXPRESSCLUSTER X SingleServerSafe, follow the procedures below:
Back up the configuration data.
- Uninstall the EXPRESSCLUSTER X SingleServerSafe.If reinstalling the OS, it is not necessary to uninstall the EXPRESSCLUSTER X SingleServerSafe. However, when reinstalling in the folder in which the EXPRESSCLUSTER X SingleServerSafe was formerly installed, the files in the installation folder must be deleted.
Shut down the OS when uninstalling the EXPRESSCLUSTER X SingleServerSafe is completed.
Install the EXPRESSCLUSTER X SingleServerSafe and register the license as necessary. Shut down the OS when installing EXPRESSCLUSTER X SingleServerSafe completed.
- Apply the configuration data to the server.To apply the configuration data, load the backup data by using the Cluster WebUI, and then upload it. For details, see "Applying configuration data" in "Creating configuration data" in the "EXPRESSCLUSTER X SingleServerSafe Configuration Guide".
4.4. Upgrading to EXPRESSCLUSTER X
When upgrading EXPRESSCLUSTER X SingleServerSafe to EXPRESSCLUSTER X, you can migrate the configuration data created using the Cluster WebUI (or the latest data if you changed the configuration).
In this case, save the latest configuration data before starting the upgrade. In addition to saving it to the Cluster WebUI after creation, you can back up the configuration data by using the clpcfctrl command. For details, see "Applying and backing up configuration data (clpcfctrl command)" in "EXPRESSCLUSTER X SingleServerSafe command reference" in the "EXPRESSCLUSTER X SingleServerSafe Operation Guide".
To upgrade EXPRESSCLUSTER X SingleServerSafe to EXPRESSCLUSTER X, follow the procedure below.
Back up the configuration data.
Uninstall EXPRESSCLUSTER X SingleServerSafe from the server for which to perform the upgrade. For details about the uninstallation procedure, see "4.2.1. Uninstalling EXPRESSCLUSTER X SingleServerSafe".
Shut down the OS when uninstalling the EXPRESSCLUSTER X SingleServerSafe is completed.
Install EXPRESSCLUSTER X, and set up its environment. You can use the backup configuration data for this process. For details about how to set up EXPRESSCLUSTER X, see the EXPRESSCLUSTER X manual.
Note
For EXPRESSCLUSTER X, register the following licenses:EXPRESSCLUSTER X SingleServerSafe (two-CPU license)
EXPRESSCLUSTER X SingleServerSafe upgrade license
These licenses can be used for EXPRESSCLUSTER X (two-CPU license).
5. Latest version information
The latest information on the upgraded and improved functions is described in details.
This chapter covers:
5.1. EXPRESSCLUSTER X SingleServerSafe version and corresponding manual edition
This guide assumes the version of EXPRESSCLUSTER X SingleServerSafe below for its descriptions. Note the version of EXPRESSCLUSTER X SingleServerSafe and corresponding manual edition.
EXPRESSCLUSTER X SingleServerSafe Internal Version |
Manual |
Edition |
Remarks |
|---|---|---|---|
12.20 |
Installation Guide |
1st Edition |
|
Configuration Guide |
1st Edition |
||
Operation Guide |
1st Edition |
||
Legacy Feature Guide |
1st Edition |
5.2. New features and improvements
The following features and improvements have been released.
No.
|
Internal
Version
|
Contents
|
|---|---|---|
1 |
12.00 |
Management GUI has been upgraded to Cluster WebUI. |
2 |
12.00 |
HTTPS is supported for Cluster WebUI and WebManager. |
3 |
12.00 |
The fixed term license is released. |
4 |
12.00 |
Windows Server, version 1709 is supported. |
5 |
12.00 |
SQL Server monitor resource supports SQL Server 2017. |
6 |
12.00 |
Oracle monitor resource supports Oracle Database 12c R2. |
7 |
12.00 |
PostgreSQL monitor resource supports PowerGres on Windows 9.6. |
8 |
12.00 |
WebOTX monitor resource supports WebOTX V10.1. |
9 |
12.00 |
JVM monitor resource supports Apache Tomcat 9.0. |
10 |
12.00 |
JVM monitor resource supports WebOTX V10.1. |
11 |
12.00 |
The following monitor targets have been added to JVM monitor resource.
- CodeHeap non-nmethods
- CodeHeap profiled nmethods
- CodeHeap non-profiled nmethods
- Compressed Class Space
|
12 |
12.00 |
The clpstdncnf command to edit cluster termination behavior when OS shutdown initiated by other than cluster has been added. |
13 |
12.00 |
Monitoring behavior to detect error or timeout has been improved. |
14 |
12.00 |
The function to execute a script before or after group resource activation or deactivation has been added. |
15 |
12.00 |
Internal communication has been improved to save TCP port usage. |
16 |
12.00 |
The list of files for log collection has been revised. |
17 |
12.01 |
When HTTPS is unavailable in WebManager due to inadequate settings, a message is sent to event and alert logs. |
18 |
12.10 |
Windows Server, version 1803 is supported. |
19 |
12.10 |
Windows Server, version 1809 is supported. |
20 |
12.10 |
Windows Server 2019 is supported. |
21 |
12.10 |
Oracle monitor resource supports Oracle Database 18c. |
22 |
12.10 |
Oracle monitor resource supports Oracle Database 19c. |
23 |
12.10 |
PostgreSQL monitor resource supports PostgreSQL 11. |
24 |
12.10 |
PostgreSQL monitor resource supports PowerGres V11. |
25 |
12.10 |
Cluster WebUI supports cluster construction and reconfiguration. |
26 |
12.10 |
The number of settings has been increased that can apply a changed cluster configuration without the suspension of business. |
27 |
12.10 |
The Process resource monitor resource has been added to integrate the process resource monitor functions of the System monitor resource. |
28 |
12.10 |
A function has been added to save as cluster statistical information the operation statuses of failover groups, group resources and monitor resources. |
29 |
12.10 |
The restriction of not re-executing scripts has been released in the custom monitor resource where a target script whose Monitor Type is Asynchronous is finished and a monitor error occurs. |
30 |
12.10 |
A setting has been added to wait for stopping the custom monitor resource before stopping group resources when the cluster is stopped. |
31 |
12.10 |
A function has been added to not execute a recovery with the start scripts of the script resources. |
32 |
12.10 |
"mail" is supported as a destination to which notifications are output by the Alert Service with the clplogcmd command. |
33 |
12.10 |
SSL and TLS 1.0 are disabled for HTTPS connections to the WebManager server. |
34 |
12.11 |
Legibility and operability of Cluster WebUI have been improved. |
35 |
12.12 |
Cluster WebUI supports OpenSSL 1.1.1. |
36 |
12.20 |
A RESTful API has been added which allows the operation and status collection of the cluster. |
37 |
12.20 |
The process of collecting cluster information has been improved in Cluster WebUI and commands. |
38 |
12.20 |
A function has been added for checking cluster configuration data. |
39 |
12.20 |
A function has been added for disabling the automatic group start and the restoration during the activation/deactivation failure of a group resource. |
40 |
12.20 |
The license management command has allowed reconstructing a fixed-term license in deleting a cluster node. |
41 |
12.20 |
OS user accounts have allowed logging in to Cluster WebUI. |
42 |
12.20 |
The following application and scripts can now be executed as the user registered on the Account tab of Cluster Properties.
|
43 |
12.20 |
A function to prevent the log collection command from collecting event logs has been added. |
44 |
12.20 |
The log file can now be collected even when it exceeds 2GB. |
45 |
12.20 |
A log collection pattern of system statistics has been added. |
46 |
12.20 |
The conditions for setting a wait for stopping a group have been expanded. |
47 |
12.20 |
A function has been added to Cluster WebUI for displaying estimated time to start/stop a group. |
48 |
12.20 |
For Cluster WebUI and the clpstat command, the display in the state of a stopped/suspended cluster has been improved. |
49 |
12.20 |
Commands have been added for displaying estimated time to start/stop a group and time the monitor resource takes for monitoring. |
50 |
12.20 |
A function to collect the system resource statistics information has been added. |
51 |
12.20 |
The default value for retry count at activation failure of the service resource was changed from 0 to 1 . |
52 |
12.20 |
HTTP monitor resources support BASIC authentication. |
53 |
12.20 |
DB2 monitor resources support DB2 v11.5. |
54 |
12.20 |
SQL Server monitor resources support SQL Server 2019. |
5.3. Corrected information
Modification has been performed on the following minor versions.
Critical level:
- L
- M
- S
No.
|
Version in which the problem has been solved
/ Version in which the problem occurred
|
Phenomenon
|
Level
|
Occurrence condition/
Occurrence frequency
|
Cause
|
|---|---|---|---|---|---|
1
|
12.01/
12
|
Two fixed-term licenses of the same product may be enabled.
|
S
|
This problem occurs on rare occasions if the following two operations are performed simultaneously.
l An unused license in stock is automatically enabled when the license expires.
l A new license is registered by the command for registering a license.
|
There was a flaw in performing exclusive control when operating license information.
|
2
|
12.01/
12
|
A monitoring timeout of the monitor resource may not be detected.
|
M
|
This problem occurs depending on the timing, when the time required for monitoring exceeds the setting value for timeout.
|
There was a flaw in the timeout judgment.
|
3
|
12.01/
12
|
When an error is detected in ODBC monitoring, it is erroneously judged to be normal.
|
M
|
This problem occurs when there is a monitor error in OCBC monitoring.
|
There was a flaw in returning the status of the ODBC monitor resource.
|
4
|
12.01/
12
|
When using the JVM monitor resources, memory leak may occur in the Java VM to be monitored.
|
M
|
This problem may occur under the following condition:
- [Monitor the number of Active Threads] on [Thread] tab in [Tuning] properties on [Monitor (special)] tab is set to on.
|
When extending Java API being used, classes which are not released in Scavenge GC may be accumulated.
|
5
|
12.01/
12
|
Memory leak may occur In Java process of JVM monitor resources.
|
M
|
If all the following conditions are met, this problem may occur:
- All the settings in the [Tuning] properties on the [Monitor (special)] tab are set to OFF.
- More than one JVM monitor resource are created.
|
There was a flaw in disconnecting Java VM to be monitored.
|
6
|
12.01/
12
|
The JVM statistics log (jramemory.stat) is output, even if the following parameters are set to OFF in JVM monitor resources.
- [Monitor (special)] tab ? [Tuning] properties ? [Memory] tab ? [Memory Heap Memory Rate]
- [Memory (special)] tab ? [Tuning] properties ? [Memory] tab ? [Monitor Non-Heap Memory Rate]
|
S
|
If all the following conditions are met, this problem inevitably occurs:
- [Oracle Java (usage monitoring)] is selected for [JVM type] on the [Monitor (special)] tab.
- [Monitor Heap Memory Rate] on the [Memory] tab in the [Tuning] properties on the [Monitor (special)] tab is set to OFF.
- [Monitor Non-Heap Memory Rate] on the [Memory] tab in the [Tuning] properties on the [Monitor (special)] tab is set to OFF.
|
There was a flaw in deciding whether or not to output the JVM statistics log.
|
7
|
12.01/
12
|
The load balancer linkage function and BIG-IP linkage function do not run in JVM monitor resources.
|
M
|
Never fail to occur.
|
Since there are differences among binary signatures, the command of the function fails to run due to a security error.
|
8
|
12.01/
12
|
In the application using compatibility with EXPRESSCLUSTER Ver8.0 or earlier, some of cluster events cannot be properly collected.
|
M
|
This problem occurs when cluster events are monitored using compatible API.
|
There was a flaw in the process of notifying some of cluster events.
|
9
|
12.10/
12
|
When the WebOTX monitor resource monitors WebOTX V10.1, a monitor error occurs.
|
S
|
This problem inevitably occurs.
|
In WebOTX V10.1, the PATH environment variable does not contain
${AS_INSTALL}\bin where the WebOTX-provided otxadmin.bat command is located. |
10
|
12.10/
12
|
The JVM monitor resource keeps its monitor status warning.
|
S
|
This problem occurs on rare occasions depending on the timing when the monitoring starts.
|
Due to the following:
- There was a flaw in the process of starting the monitoring in the JVM monitor resource.
- There was a flaw in the countermeasure against failing to obtain an output message in the corresponding language.
|
11
|
12.10/
12
|
In SQL Server monitoring, SQL statements remaining in the DB cache may adversely affect the performance.
|
S
|
This problem occurs when the monitor level is Level 2.
|
A different update of SQL is issued every time the monitoring is performed.
|
12
|
12.10/
12
|
In ODBC monitoring, a timeout occurs in 15 seconds.
|
S
|
This problem occurs when the monitoring takes 15 seconds or more.
|
There was a flaw in the process of obtaining the timeout value of ODBC monitoring.
|
13
|
12.10/
12
|
In ODBC monitoring, no warning is issued but a monitor error occurs in such a case as invalidly naming a monitor user.
|
S
|
This problem occurs when a flaw exists in the configuration of the monitoring parameter.
|
Due to insufficient consideration for flaws in the configuration of the monitoring parameter.
|
14
|
12.10/
12
|
For listener monitoring in Oracle monitoring, a tnsping error does not lead to a monitor error.
|
S
|
This problem occurs when a tnsping error occurs in listener monitoring.
|
Due to the wrong return value for the tnsping error.
|
15
|
12.10/
12
|
A timeout in SQL Server monitoring causes the alert log to display the message of a function sequence error.
|
S
|
This problem occurs when a monitor timeout occurs.
|
Due to the incorrect error process to output the message of a function sequence error.
|
16
|
12.10/
12
|
Database monitoring may not output an error message to the alert log.
|
S
|
This problem occurs when some errors do not output their messages.
|
There was a flaw in the messages of some errors.
|
17
|
12.10/
12
|
In the custom monitor resource, detecting a timeout does not issue an error but issues a warning.
|
M
|
This problem inevitably occurs when a timeout is detected in the custom monitor resource.
|
There was a flaw in the process of judgment in timeout detection.
|
18
|
12.10/
12
|
In the service monitor resource, failing to obtain a handle to a target service does not issue an error but issues a warning.
|
S
|
This problem inevitably occurs when obtaining a handle to a target service fails in the service monitor resource.
|
There was a flaw in the process of judgment in the failure of obtaining a handle to a target service.
|
19
|
12.10/
12
|
Suspending a cluster may time out.
|
S
|
This problem occurs on rare occasions when the cluster is suspended during its resume.
|
There was a flaw in the countermeasure against simultaneously suspending and resuming the cluster.
|
20
|
12.10/
12
|
The clpstat command displays an inappropriate status of a server being processed for returning to the cluster.
|
S
|
This problem occurs when the clpstat -g command is executed between the start and the end of the process for returning to the cluster.
|
There was a flaw in the process of the judgment of the server status.
|
21
|
12.10/
12
|
The clpstat command displays an inappropriate status of a cluster being processed for stopping.
|
S
|
This problem occurs when the clpstat command is executed between the start and the end of the process for stopping the cluster.
|
There was a flaw in the process of the judgment of the status during the process of stopping the cluster.
|
22
|
12.10/
12
|
Although a group resource is still being processed for stopping, its status may be shown as stopped.
|
M
|
This problem occurs when either of the following is performed for a group resource whose process for stopping has failed:
- Start-up
- Stop
|
There was a flaw in the process of changing the status caused by starting or stopping the abnormal group resource.
|
23
|
12.10/
12
|
Failing to stop a group resource does not trigger the specified final operation, but may cause an emergency shutdown to be executed.
|
M
|
This problem occurs when the final action caused by a deactivation error in the group resource is specified as Stop the cluster service and reboot OS.
|
There was a flaw in the judgment of conditions for an emergency shutdown.
|
24
|
12.10/
12
|
Setting a time-out ratio with the clptoratio command does not work for the custom monitor resource.
|
S
|
This problem inevitably occurs.
|
The process of setting a time-out ratio was not included.
|
25
|
12.11/
12.1
|
Switching operation to Config Mode fails in Cluster WebUI.
|
S
|
This problem occurs when accessing Cluster WebUI via HTTPS with a specific web browser.
|
There was a location that could not handle the data transmission pattern from a specific web browser.
|
26
|
12.12
/ 12.10
|
The process of activating the application resource may fail.
|
S
|
This problem occurs when all of the followings are set on the application resource.
|
Some of the variables failed to be initialized.
|
27
|
12.20
/ 12.00 to 12.12
|
Executing the clpstat command may display the following error message:
Could not connect to the server.
Internal error.Check if memory or OS resources are sufficient.
|
S
|
This problem rarely occurs when running the clpstat command comes immediately after starting up the cluster.
|
There was a flaw in error handling.
|
28
|
12.20
/ 12.00 to 12.12
|
Applying configuration data may request the user to take an unnecessary step of restarting the WebManager server.
|
S
|
This problem occurs when the following two different modifications were simultaneously made: a modification requiring a shutdown and restart of the cluster and a modification requiring a restart of the WebManager server.
|
There was a flaw in the process of judging how to apply configuration data.
|
29
|
12.20
/ 12.00 to 12.12
|
Applying configuration data may request the user to take an unnecessary step of suspending/resuming.
|
S
|
This problem may occur when the properties of an automatically registered monitor resource are referenced.
|
There was a flaw in internal processing concerned.
|
30
|
12.20
/ 12.00 to 12.12
|
The EXPRESSCLUSTER Web Alert service may abend.
|
S
|
This problem occurs very rarely regardless of conditions.
|
Some of the variables failed to be initialized.
|
31
|
12.20
/ 12.00 to 12.12
|
The handles kept by wmiprvse.exe (the process of Windows OS) increase.
|
S
|
This problem occurs when WMI (Windows Management Instrumentation) is executed.
|
Some of the handles failed to be released.
|
32
|
12.20
/ 12.00 to 12.12
|
Even if deactivating a group or resource fails, the user may receive a notification that the deactivation has succeeded.
|
S
|
This problem may occur during an emergency shutdown.
|
Regardless of the results of deactivating a group or resource, an emergency shutdown led to a notification that the deactivation has succeeded.
|
33
|
12.20
/ 12.00 to 12.12
|
Recovery action scripts for the message receive monitor resource may fail to be executed.
|
S
|
This problem occurs when user application is specified through the following:
Path to cscript script file
|
There was a flaw in checking the path to the specified user application.
|
34
|
12.20
/ 12.10 to 12.12
|
Installation may fail.
|
S
|
This problem occurs when a folder other than the Program Files folder is specified for the installation folder.
|
The required DDL search fails.
|
35
|
12.20
/ 12.00 to 12.12
|
Deactivation may fail even after the service stops because the service resource is deactivated.
|
S
|
This problem may occur in specific services such as Oracle.
|
There are services which return the service stop request as an error even after the process of stopping such service is completed.
|
6. Additional information
This chapter provides tips on installing EXPRESSCLUSTER X SingleServerSafe.
This chapter covers:
6.1. EXPRESSCLUSTER X SingleServerSafe services
EXPRESSCLUSTER X SingleServerSafe consists of the system services listed below.
System Service Name |
Explanation |
|---|---|
EXPRESSCLUSTER |
EXPRESSCLUSTER |
EXPRESSCLUSTER Disk Agent |
Not used for EXPRESSCLUSTER X SingleServerSafe |
EXPRESSCLUSTER API |
EXPRESSCLUSTER Restfl API control |
EXPRESSCLUSTER Event |
Event log output |
EXPRESSCLUSTER Information Base |
Cluster information management |
EXPRESSCLUSTER Java Resource Agent |
Java Resource Agent |
EXPRESSCLUSTER Manager |
WebManager Server |
EXPRESSCLUSTER Old API Support |
Compatible API process |
EXPRESSCLUSTER X Server |
EXPRESSCLUSTER Server |
EXPRESSCLUSTER SingleServerSafe |
SingleServerSafe process |
EXPRESSCLUSTER System Resource Agent |
System Resource Agent |
EXPRESSCLUSTER Transaction |
Communication process |
EXPRESSCLUSTER Web Alert |
Alert synchronization |
6.2. Using the License Manager
The Start menu contains the menu for EXPRESSCLUSTER SingleServerSafe. You can start the License Manager from this menu.
6.2.1. Registering a license by specifying a license file
When using a trial license, obtain a license file instead of a license sheet. The following procedure describes how to register a license by specifying a license file.
Note
To register a license, use an account that has administrator privileges.
On the Start menu, click License Manager of NEC EXPRESSCLUSTER SingleServerSafe.
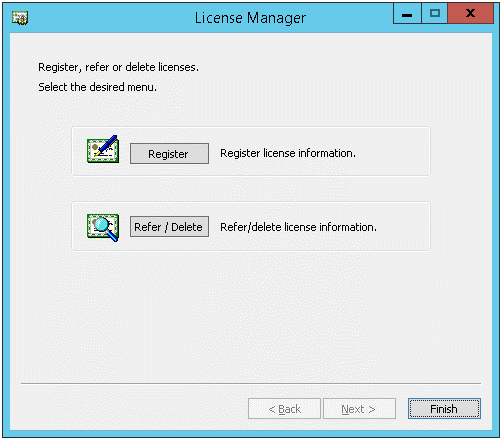
The License Manager dialog box is displayed. Click Register.
A dialog box is displayed for selecting the license registration method. Click Register with License File.
The License File Specification dialog box is displayed. In the License File Specification dialog box, select the license file to be registered and then click Open.
The message confirming registration of the license is displayed. Click OK.
Click Finish to close the license manager.
6.2.2. Referencing or deleting a registered license
The following procedure describes how to refer to and delete the registered license.
On the Start menu, click License Manager of NEC EXPRESSCLUSTER SingleServerSafe.
The License Manager dialog box is displayed. Click Refer/Delete.
The registered licenses are listed.
Select the license to delete and click Delete.
The confirmation message to delete the license is displayed. Click OK.
6.2.3. Switching from the trial license to the product license
When registering the official license to a server running with the trial license, you can add the official license without deleting the trial license. When you list the registered licenses, both the official and trial licenses are shown, but there is no problem.
7. Notes and Restrictions
This chapter provides information on known problems and how to troubleshoot the problems.
This chapter covers:
7.1. Before installing EXPRESSCLUSTER X SingleServerSafe
Consideration after installing an operating system, when configuring OS and disks are described in this section.
7.1.1. File system
Use NTFS as the file system for the partition on which to install the OS.
7.1.2. Mail reporting
The mail reporting function is not supported by STARTTLS and SSL.
7.2. Version up EXPRESSCLUSTER X SingleServerSafe
This section describes notes on version up EXPRESSCLUSTER X SingleServerSafe after starting cluster operation.
7.2.1. Changed functions
The following describes the functions changed for each of the versions:
Internal Version 12.00
Internal Version 12.10
7.2.2. Removed Functions
The following describes the functions removed for each of the versions:
Internal Version 12.00
WebManager Mobile
OfficeScan CL monitor resource
OfficeScan SV monitor resource
OracleAS monitor resource
7.2.3. Removed Parameters
The following tables show the parameters configurable with Cluster WebUI but removed for each of the versions:
Internal Version 12.00
Cluster
Parameters
Default
Cluster Properties
WebManager Tab
Enable WebManager Mobile Connection
Off
WebManager Mobile Password
Password for Operation
-
Password for Reference
-
JVM monitor resource
Parameters
Default
JVM Monitor Resource Properties
Monitor (special) Tab
Memory Tab (when Oracle Java is selected for JVM type)
Monitor Virtual Memory Usage
2048 megabytes
Memory Tab (when Oracle Java(usage monitoring) is selected for JVM Type)
Monitor Virtual Memory Usage
2048 megabytes
User mode monitor resource
Parameters
Default
User mode Monitor Resource Properties
Monitor (special) Tab
Use Heartbeat Interval/Timeout
On
Internal Version 12.10
Cluster
Parameters
Default
Cluster Properties
WebManager Tab
WebManager Tuning Properties
Behavior Tab
Max. Number of Alert Records on the Viewer
300
Client Data Update Method
Real Time
7.2.4. Changed Default Values
The following tables show the parameters which are configurable with Cluster WebUI but whose defaults have been changed for each of the versions:
To continue using a "Default value before update" after the upgrade, change the corresponding "Default value after update" to the desired one.
Any setting other than a "Default value before update" is inherited to the upgraded version and therefore does not need to be restored.
Internal Version 12.00
Cluster
Parameters
Default value before update
Default value after update
Remarks
Cluster Properties
JVM monitor Tab
Maximum Java Heap Size
7 megabytes
16 megabytes
Application monitor resource
Parameters
Default value before update
Default value after update
Remarks
Application Monitor Resource Properties
Monitor (common) Tab
Wait Time to Start Monitoring
0 seconds
3 seconds
Do Not Retry at Timeout Occurrence
Off
On
Do not Execute Recovery Action at Timeout Occurrence
Off
On
NIC Link Up/Down monitor resource
Parameters
Default value before update
Default value after update
Remarks
NIC Link Up/Down Monitor Resource Properties
Monitor (common) Tab
Timeout
60 seconds
180 seconds
Do Not Retry at Timeout Occurrence
Off
On
Do not Execute Recovery Action at Timeout Occurrence
Off
On
Service monitor resource
Parameters
Default value before update
Default value after update
Remarks
Service Monitor Resource Properties
Monitor (common) Tab
Wait Time to Start Monitoring
0 seconds
3 seconds
Do Not Retry at Timeout Occurrence
Off
On
Do not Execute Recovery Action at Timeout Occurrence
Off
On
Custom monitor resource
Parameters
Default value before update
Default value after update
Remarks
Custom Monitor Resource Properties
Monitor (common) Tab
Wait Time to Start Monitoring
0 seconds
3 seconds
Process Name monitor resource
Parameters
Default value before update
Default value after update
Remarks
Process Name Monitor Properties
Monitor (common) Tab
Wait Time to Start Monitoring
0 seconds
3 seconds
Do Not Retry at Timeout Occurrence
Off
On
Do not Execute Recovery Action at Timeout Occurrence
Off
On
SQL Server monitor resource
Parameters
Default value before update
Default value after update
Remarks
SQL Server Monitor Resource Properties
Monitor (special) Tab
ODBC Driver Name
SQL Native Client
ODBC Driver 13 for SQL Server
Weblogic monitor resource
Parameters
Default value before update
Default value after update
Remarks
Weblogic Monitor Resource Properties
Monitor (special) Tab
Install Path
C:\bea\weblogic92
JVM monitor resource
Parameters
Default value before update
Default value after update
Remarks
JVM Monitor Resource Properties
Monitor (common) Tab
Timeout
120 seconds
180 seconds
Internal Version 12.10
Script resource
Parameters
Default value before update
Default value after update
Remarks
Script Resource Properties
Details Tab
Script Resource Tuning Properties
Parameter Tab
Allow to Interact with Desktop
On
Off
Internal Version 12.20
Service resource
Parameters
Default value before update
Default value after update
Remarks
Service Resource Properties
Recovery Operation tab
Retry Count
0 [count]
1 [count]
7.2.5. Moved Parameters
The following table shows the parameters which are configurable with Cluster WebUI but whose controls have been moved for each of the versions:
Internal Version 12.00
Before the change
After the change
[Cluster Properties] - [Recovery Tab] - [Max Reboot Count]
[Cluster Properties] - [Extension Tab] - [Max Reboot Count]
[Cluster Properties] - [Recovery Tab] - [Max Reboot Count Reset Time]
[Cluster Properties] - [Extension Tab] - [Max Reboot Count Reset Time]
[Cluster Properties] - [Recovery Tab] - [Use Forced Stop]
[Cluster Properties] - [Extension Tab] - [Use Forced Stop]
[Cluster Properties] - [Recovery Tab] - [Forced Stop Action]
[Cluster Properties] - [Extension Tab] - [Forced Stop Action]
[Cluster Properties] - [Recovery Tab] - [Forced Stop Timeout]
[Cluster Properties] - [Extension Tab] - [Forced Stop Timeout]
[Cluster Properties] - [Recovery Tab] - [Virtual Machine Forced Stop Setting]
[Cluster Properties] - [Extension Tab] - [Virtual Machine Forced Stop Setting]
[Cluster Properties] - [Recovery Tab] - [Execute Script for Forced Stop]
[Cluster Properties] - [Extension Tab] - [Execute Script for Forced Stop]
[Cluster Properties] - [Power Saving Tab] - [Use CPU Frequency Control]
[Cluster Properties] - [Extension Tab] - [Use CPU Frequency Control]
[Cluster Properties] - [Auto Recovery Tab] - [Auto Return]
[Cluster Properties] - [Extension Tab] - [Auto Return]
8. Troubleshooting
When installing EXPRESSCLUSTER X SingleServerSafe
Behavior and Message
Cause
Solution
Licensing
Behavior and Message
Cause
Solution