1. Preface
1.1. Who Should Use This Guide
The EXPRESSCLUSTER X SingleServerSafe for Windows Installation Guide is intended for system engineers who intend to introduce a system using EXPRESSCLUSTER X SingleServerSafe and system administrators who will operate and maintain the introduced system. It describes how to install EXPRESSCLUSTER X SingleServerSafe.
1.2. How This Guide Is Organized
2. About EXPRESSCLUSTER X SingleServerSafe: Explains the functions and requirements of EXPRESSCLUSTER X SingleServerSafe.
3. Installing EXPRESSCLUSTER X SingleServerSafe: Describes how to install EXPRESSCLUSTER X SingleServerSafe.
4. Updating, uninstalling, reinstalling or upgrading: Describes how to upgrade EXPRESSCLUSTER X SingleServerSafe, uninstall and reinstall EXPRESSCLUSTER X SingleServerSafe, and upgrade to EXPRESSCLUSTER X.
5. Latest version information: Provides the latest information about EXPRESSCLUSTER X SingleServerSafe.
6. Additional information: Provides tips on installing EXPRESSCLUSTER X SingleServerSafe.
7. Notes and Restrictions: Provides notes and restrictions you need to know before starting the actual operation of EXPRESSCLUSTER X SingleServerSafe.
8. Troubleshooting: Describes problems you might experience when installing or setting up EXPRESSCLUSTER X SingleServerSafe and how to resolve them.
1.3. Terms Used in This Guide
EXPRESSCLUSTER X SingleServerSafe, which is described in this guide, uses windows and commands common to those of the clustering software EXPRESSCLUSTER X SingleServerSafe to ensure high compatibility with EXPRESSCLUSTER X SingleServerSafe in terms of operation and other aspects. Therefore, cluster-related terms are used in parts of the guide.
The terms used in this guide are defined below.
- Cluster, cluster system
A single server system using EXPRESSCLUSTER X SingleServerSafe
- Cluster shutdown, reboot
Shutdown or reboot of a system using EXPRESSCLUSTER X SingleServerSafe
- Cluster resource
A resource used in EXPRESSCLUSTER X SingleServerSafe
- Cluster object
A resource object used in EXPRESSCLUSTER X SingleServerSafe
- Failover group
A group of group resources (such as applications and services) used in EXPRESSCLUSTER X SingleServerSafe
1.4. EXPRESSCLUSTER X SingleServerSafe Documentation Set
The EXPRESSCLUSTER X SingleServerSafe manuals consists of the three guides below. The title and purpose of each guide is described below:
EXPRESSCLUSTER X SingleServerSafe Installation Guide
This guide is intended for system engineers who intend to introduce a system using EXPRESSCLUSTER X SingleServerSafe and describes how to install EXPRESSCLUSTER X SingleServerSafe.
EXPRESSCLUSTER X SingleServerSafe Configuration Guide
This guide is intended for system engineers who intend to introduce a system using EXPRESSCLUSTER X SingleServerSafe and system administrators who will operate and maintain the introduced system. It describes how to set up EXPRESSCLUSTER X SingleServerSafe.
EXPRESSCLUSTER X SingleServerSafe Operation Guide
This guide is intended for system administrators who will operate and maintain an introduced system that uses EXPRESSCLUSTER X SingleServerSafe. It describes how to operate EXPRESSCLUSTER X SingleServerSafe.
1.5. Conventions
In this guide, Note, Important, See also are used as follows:
Note
Used when the information given is important, but not related to the data loss and damage to the system and machine.
Important
Used when the information given is necessary to avoid the data loss and damage to the system and machine.
See also
Used to describe the location of the information given at the reference destination.
The following conventions are used in this guide.
Convention |
Usage |
Example |
|---|---|---|
Bold |
Indicates graphical objects, such as fields, list boxes, menu selections, buttons, labels, icons, etc. |
In User Name, type your name.
On the File menu, click Open Database.
|
Angled bracket within the command line |
Indicates that the value specified inside of the angled bracket can be omitted. |
|
Monospace |
Indicates path names, commands, system output (message, prompt, etc), directory, file names, functions and parameters. |
|
bold |
Indicates the value that a user actually enters from a command line. |
Enter the following:
clpcl -s -a
|
italic |
Indicates that users should replace italicized part with values that they are actually working with. |
|
 In the figures of this guide, this icon represents EXPRESSCLUSTER X SingleServerSafe.
1.6. Contacting NEC
For the latest product information, visit our website below:
2. About EXPRESSCLUSTER X SingleServerSafe
This chapter describes the functions and requirements of EXPRESSCLUSTER X SingleServerSafe.
This chapter covers:
2.2. Checking system requirements for EXPRESSCLUSTER X SingleServerSafe
2.3. Preparing and verifying the server environment before installation
2.1. What is EXPRESSCLUSTER X SingleServerSafe?
EXPRESSCLUSTER X SingleServerSafe is set up on a server. It monitors for application errors and hardware failures on the server and, upon detecting an error or failure, restarts the failed application or reboots the server so as to ensure greater server availability.
Occurrence of application failure

Fig. 2.1 Occurrence of failure

Fig. 2.2 Recovery from failure (Application restart)
Occurrence of hardware failure

Fig. 2.3 Occurrence of failure

Fig. 2.4 Recovery from failure (Server restart)
2.1.1. EXPRESSCLUSTER X SingleServerSafe software configuration
EXPRESSCLUSTER X SingleServerSafe consists of following two software applications:
- EXPRESSCLUSTER Server (Main module)This is a main module of EXPRESSCLUSTER X SingleServerSafe. Install it on the server.
- EXPRESSCLUSTER Cluster WebUIThis is a tool to create the configuration data of EXPRESSCLUSTER X SingleServerSafe and to manage EXPRESSCLUSTER X SingleServerSafe operations.It uses a Web browser as a user interface.
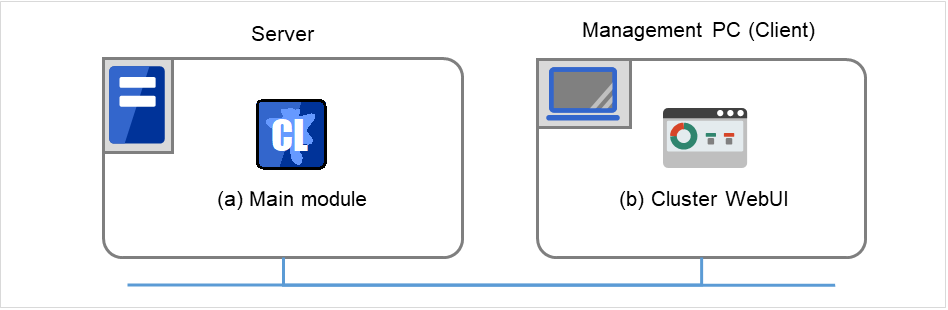
Fig. 2.5 Software configuration
2.2. Checking system requirements for EXPRESSCLUSTER X SingleServerSafe
Check the configuration and operation requirements below for each machine to be used.
EXPRESSCLUSTER X SingleServerSafe
Machine on which the EXPRESSCLUSTER X SingleServerSafe can be installed
PC that supports one of the following operating systems.
Supported operation systems
Windows Server 2016 StandardWindows Server 2016 DatacenterWindows Server 2019 StandardWindows Server 2019 DatacenterWindows Server 2022 StandardWindows Server 2022 DatacenterMemory size
User mode: 384 MB 1Kernel mode: 32MBDisk Size
Initial size at installation: 100 MBDuring operation: 5.0 GB- 1
excepting for optional products.
Cluster WebUI
Supported browsers
Internet Explorer 11Internet Explorer 10FirefoxGoogle ChromeMicrosoft Edge (Chromium)Memory size
User mode 500 MB
Disk size
200 MB
Note
Note
No mobile devices, such as tablets and smartphones, are supported.
Note
2.2.1. Operation environment for SNMP linkage functions
EXPRESSCLUSTER with SNMP Service of Windows is validated on following OS.
x86_64 version
OS
Remarks
Windows Server 2016
2.2.2. Operation environment for JVM monitor
The use of the JVM monitor requires a Java runtime environment.
Java(TM) Runtime Environment |
Version 8.0 Update 11 (1.8.0_11) or later |
Java(TM) Runtime Environment |
Version 9.0 (9.0.1) or later |
Java(TM) SE Development Kit |
Version 11.0 (11.0.5) or later |
Java(TM) SE Development Kit |
Version 17.0 (17.0.2) or later |
2.2.3. Operation environment for system monitor or function of collecting system resource information
Note
On the OS of Windows Server 2012 or later, NET Framework 4.5 version or later is pre-installed (The version of the pre-installed one varies depending on the OS).
2.2.4. Operation environment for enabling encryption
For EXPRESSCLUSTER components, enabling communication encryption requires the following software:
Software |
Version |
Remarks |
|---|---|---|
OpenSSL |
1.1.1 or later
3.0.0 or later
|
The following components support communication encryption using the above software:
Cluster WebUI
RESTful API
FTP monitor resource
Mail reporting function
2.3. Preparing and verifying the server environment before installation
After installing the hardware, verify the following:
2.3.1. Verifying the network settings (Required)
Check the network settings by using the ipconfig and ping commands.
IP Address
Host name
2.3.2. Verifying the firewall settings (Required)
By default, EXPRESSCLUSTER X SingleServerSafe uses the port numbers below. You can change these port numbers by using the Cluster WebUI. Do not access any of these port numbers from a program other than EXPRESSCLUSTER X SingleServerSafe. When setting up a firewall, set up EXPRESSCLUSTER X SingleServerSafe so that it can access the port numbers below.
After installing EXPRESSCLUSTER X SingleServerSafe, you can use the clpfwctrl command to configure a firewall. For more information, see "EXPRESSCLUSTER X SingleServerSafe Operation Guide" -> "EXPRESSCLUSTER X SingleServerSafe command reference" -> "Adding a firewall rule (clpfwctrl command)". Ports to be set with the clpfwctrl command are marked with ✓ in the clpfwctrl column of the table below. The applicable protocols are ICMPv4 and ICMPv6.
Internal processing in the local server
From
To
Remarks
clpfwctrl
Server
Automatic allocation
Server
29001/TCP
Internal communication
✓
Server
Automatic allocation
Server
29002/TCP
Data transfer
✓
Server
Automatic allocation
Server
29003/UDP
Alert synchronization
✓
Server
Automatic allocation
Server
29008/TCP
Cluster information management
✓
Server
Automatic allocation
Server
29010/TCP
Restful API internal communication
✓
Server
29106/UDP
Server
29106/UDP
Heartbeat (kernel mode)
✓
From the client to the server
From
To
Remarks
clpfwctrl
Restful API client
Automatic allocation
Server
29009/TCP
http communication
✓
From the Cluster WebUI to the server
From
To
Remarks
clpfwctrl
Cluster WebUI
Automatic allocation
Server
29003/TCP
http communication
✓
Others
From
To
Remarks
clpfwctrl
Server
Automatic allocation
Server
Management port number set by the Cluster WebUI
JVM monitor
✓
Server
Automatic allocation
Monitoring target
Connection port number set by the Cluster WebUI
JVM monitor
Note
An available port number at the time is automatically assigned.
2.3.3. Turning off the power saving function (Required)
In EXPRESSCLUSTER X SingleServerSafe, the power saving function (for example, standby or hibernation) cannot be used. Make sure to turn off the power saving function.
2.3.4. Setup of OpenSSL (Optional)
Encrypted communication using OpenSSL can be performed for the following functions:
Cluster WebUI
Witness heartbeat
HTTP network partition resolution resource
Mail reporting
To use OpenSSL for Cluster WebUI, prepare a certificate file and a private key file.
The prepared files will be used for configuring the settings in the config mode of Cluster WebUI: the "Encryption tab" of "Cluster properties" in "Other setting details" in the "EXPRESSCLUSTER X SingleServerSafe Configuration Guide".
3. Installing EXPRESSCLUSTER X SingleServerSafe
This chapter describes how to install EXPRESSCLUSTER X SingleServerSafe. To install EXPRESSCLUSTER X SingleServerSafe, install the EXPRESSCLUSTER Server, which is the main module of EXPRESSCLUSTER SingleServerSafe.
This chapter covers:
3.1. Installing the EXPRESSCLUSTER Server
3.1.1. Installing EXPRESSCLUSTER X SingleServerSafe for the first time
To install EXPRESSCLUSTER X SingleServerSafe, follow the procedure below.
Note
To install EXPRESSCLUSTER X SingleServerSafe, use an account that has administrator privileges.
Note
Installing EXPRESSCLUSTER X SingleServerSafe disables the Windows media sense function that deactivates an IP address if a link failure occurs due to disconnecting the LAN cable or some other reason.
Note
Insert the Installation DVD-ROM to the DVD-ROM drive.
Select NEC EXPRESSCLUSTER® SingleServerSafe for Windows.
Note
If the menu screen does not open automatically, double-click menu.exe in the root folder of the DVD-ROM.
Select NEC EXPRESSCLUSTER® X SingleServerSafe 5.1 for Windows.
[Welcome to the InstallShield Wizard for NEC EXPRESSCLUSTER SingleServerSafe] is displayed. Click Next.
The Choose Destination Location dialog box is displayed. When changing the install destination, click Browse to select a directory. Click Next.
The Ready to Install the Program dialog box is displayed. Click Install to start the installation.
When the installation successfully finishes, the Port Number dialog box is displayed. Normally, click Next without changing the default setting.
Note
The port number configured here needs to be configured again when creating the configuration data. For details on port number, refer to "Cluster properties" in "Other setting details" in the "Configuration Guide".
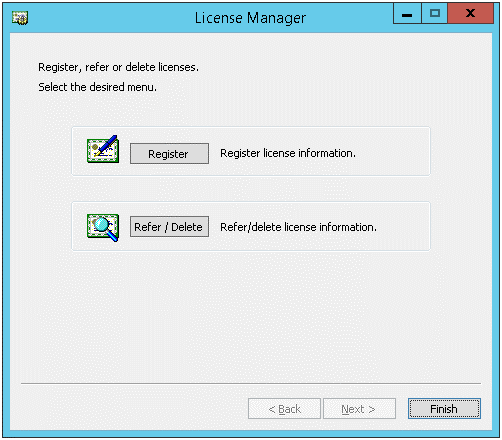
License Manager is displayed. Click Register to register the license. For detailed information on the registration procedure, refer to "6.2.1. Registering a license by specifying a license file" in "6. Additional information" in this guide.
Click Finish to close the License Manager dialog box.
[InstallShield Wizard Complete] is displayed. Select [Yes, I want to restart my computer now.] and click Finish to restart the server. If you want to restart the server later, select [No, I will restart my computer later.] and click Finish.
3.1.2. Installing EXPRESSCLUSTER X SingleServerSafe in Silent Mode
Note
To install EXPRESSCLUSTER X SingleServerSafe, use an account that has administrator privileges.
Note
Installing EXPRESSCLUSTER X SingleServerSafe disables the Windows media sense function that deactivates an IP address if a link failure occurs due to disconnecting the LAN cable or some other reason.
Note
Preparation
If you want to change the installation folder (default:C:\Program Files\EXPRESSCLUSTER SSS), create a response file in advance following the procedure below.
Windows\5.1\common\server\x64\response\setup_sss_inst_en.iss
Open the response file (setup_inst_jp.iss) with a text editor, and change the folder written in the szDir line into the above accessible location.
Count=4
Dlg1={8493CDB6-144B-4330-B945-1F2123FADD3A}-SdAskDestPath-0
Dlg2={8493CDB6-144B-4330-B945-1F2123FADD3A}-SdStartCopy2-0
Dlg3={8493CDB6-144B-4330-B945-1F2123FADD3A}-SdFinishReboot-0
[{8493CDB6-144B-4330-B945-1F2123FADD3A}-SdWelcome-0]
Result=1
[{8493CDB6-144B-4330-B945-1F2123FADD3A}-SdAskDestPath-0]
szDir=C:\Program Files\EXPRESSCLUSTER SSS
Result=1
Installation procedure
Windows\5.1\common\server\x64\silent-install.batin the installation DVD-ROM* When installing the EXPRESSCLUSTER X SingleServerSafe in the default directory (C:\Program Files\EXPRESSCLUSTER SSS), omit <Path of response file>.Restart the server.
3.1.3. Setting up the SNMP linkage function manually
Note
If you only use the SNMP trap transmission function, this procedure is not required.
Note
Use an Administrator account to perform the registration.
Install the Windows SNMP Service.
Stop the Windows SNMP Service.
- Register the SNMP linkage function of EXPRESSCLUSTER with the Windows SNMP Service.3-1. Start the registry editor.3-2. Open the following key:
HKEY_LOCAL_MACHINE\SYSTEM\CurrentControlSet\Services\SNMP\Parameters\ExtensionAgents
3-3. Specify the following to create a string value in the opened key:Value name :mgtmibValue type :REG_SZValue data :SOFTWARE\NEC\EXPRESSCLUSTER\SnmpAgent\mgtmib\CurrentVersion
3-4. Exit the registry editor. If a cluster is being started up, suspend and resume the cluster on Cluster WebUI or with the clpcl command.
Start the Windows SNMP Service.
Note
Configure the settings required for SNMP communication on Windows SNMP Service.
4. Updating, uninstalling, reinstalling or upgrading
This chapter describes how to update to the latest version of EXPRESSCLUSTER X SingleServerSafe and uninstall or reinstall EXPRESSCLUSTER X SingleServerSafe. Also, this chapter describes how to upgrade EXPRESSCLUSTER X SingleServerSafe to EXPRESSCLUSTER X.
This chapter covers:
4.1. Updating EXPRESSCLUSTER X SingleServerSafe
This section describes how to update from the old version of EXPRESSCLUSTER X SingleServerSafe to the latest version of it.
4.1.1. Updating from the old EXPRESSCLUSTER X SingleServerSafe version
Before starting the update, read the following notes.
The upgrade procedure described in this section is valid for EXPRESSCLUSTER X SingleServerSafe 3.3 for Windows (internal version 11.35) or later.
- In EXPRESSCLUSTER X SingleServerSafe 4.2 for Windows or later, port numbers for EXPRESSCLUSTER have been added. If you upgrade from EXPRESSCLUSTER X SingleServerSafe 4.1 for Windows or earlier, make necessary ports accessible beforehand.For information on port numbers for EXPRESSCLUSTER, refer to"2.3.2. Verifying the firewall settings (Required)".
EXPRESSCLUSTER X SingleServerSafe must be updated with the account having the Administrator's privilege.
See also
For the procedure of updating between the different versions of the same major version, refer to the "Update Procedure Manual".
The following procedure describes how to update from EXPRESSCLUSTER X SingleServerSafe 3.3 or 4.x for Windows to EXPRESSCLUSTER X SingleServerSafe 5.1 for Windows.
Make sure that the server and all the resources are in the normal status by using the Cluster WebUI, WebManager or clpstat command.
Save the current configuration file with the Cluster WebUI, Builder or clpcfctrl command. For details about saving the configuration file with clpcfctrl command, refer to "Applying and backing up configuration data (clpcfctrl command)" -> "Backing up configuration data (clpcfctrl --pull)" in "EXPRESSCLUSTER X SingleServerSafe command reference" in the "EXPRESSCLUSTER X SingleServerSafe Operation Guide".
Uninstall EXPRESSCLUSTER X SingleServerSafe from the server. For details about the uninstallation procedure, refer to " 4.2.1. Uninstalling EXPRESSCLUSTER X SingleServerSafe".
Install the EXPRESSCLUSTER X 5.1 SingleServerSafe on the server. For details about the installation procedure, refer to "3.1. Installing the EXPRESSCLUSTER Server" in "3. Installing EXPRESSCLUSTER X SingleServerSafe".
On the server with EXPRESSCLUSTER X SingleServerSafe installed as above, execute the command for converting configuration data.
Move to the work directory (such as C:\tmp) in which the conversion command is to be executed.
- To the moved work directory, copy and deploy the cluster configuration data backed up in step 2.Deploy clp.conf and the scripts directory.
Note
If backed up on Cluster WebUI, the cluster configuration data is zipped.Unzip the file, and clp.conf and the scripts directory will be extracted. Execute the following command to convert the cluster configuration data:
# clpcfconv.bat -i .
Under the work directory, zip the cluster configuration data (clp.conf) and the scripts directory.
Note
Create the zip file so that when unzipped, the clp.conf file and scripts directory are created.
- Open the config mode of Cluster WebUI, and click Import.Import the cluster configuration data zipped in step 5.
- Of the cluster configuration data, manually update its items if necessary.See "Removed Functions" of "Notes on upgrading EXPRESSCLUSTER" in "Notes and Restrictions" in the "Getting Started Guide". Then, if you have used any of the functions with its corresponding action described in the Action column of the table, change the cluster configuration data according to the described action.
Click Apply the Configuration File of the Cluster WebUI to apply the configuration data.
Open the operation mode of Cluster WebUI, and start the cluster.
Updating completes. Check that the server is operating normally by the clpstat command or Cluster WebUI.
4.2. Uninstalling EXPRESSCLUSTER X SingleServerSafe
4.2.1. Uninstalling EXPRESSCLUSTER X SingleServerSafe
Note
You must log on as an Administrator to uninstall EXPRESSCLUSTER X SingleServerSafe.
To uninstall EXPRESSCLUSTER X SingleServerSafe, follow the procedure below.
Change the service startup type to the manual startup.
clpsvcctrl.bat --disable -a
Reboot the server.
Click Program and Features in Control Panel.
Select NEC EXPRESSCLUSTER SingleServerSafe, and then click Uninstall.
Click Yes in the uninstallation confirmation dialog box. If you click No, uninstallation will be canceled.
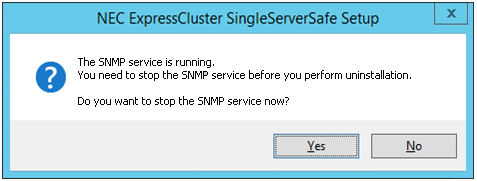
If the SNMP service is started, the message to confirm to stop the SNMP service is displayed. Click Yes. If you click No, uninstallation will be canceled.
A message is displayed asking whether to return the media sense function (TCP/IP disconnection detection) to the state it was in before installing the EXPRESSCLUSTER Server. Click Yes to return to the state it was in before installing the EXPRESSCLUSTER Server. If you click No, the EXPRESSCLUSTER Server will be uninstalled with the media sense function disabled.

NEC EXPRESSCLUSTER SingleServerSafe Setup is displayed. Click Finish.
The confirmation message whether to restart the computer is displayed. Select Yes, I want to restart my computer or No, I will restart my computer later. And click Finish. Uninstallation of the EXPRESSCLUSTER Server is completed.
4.3. Reinstalling EXPRESSCLUSTER X SingleServerSafe
4.3.1. Reinstalling the EXPRESSCLUSTER X SingleServerSafe
To reinstall the EXPRESSCLUSTER X SingleServerSafe, prepare the configuration data created using the Cluster WebUI (or the latest data if you changed the configuration).
After changing the configuration, make sure to save the latest configuration data. In addition to saving it to the Cluster WebUI after creation, you can back up the configuration data by using the clpcfctrl command. For details, see "Applying and backing up configuration data (clpcfctrl command)" in "EXPRESSCLUSTER X SingleServerSafe command reference" in the "EXPRESSCLUSTER X SingleServerSafe Operation Guide".
For details, see "Applying and backing up configuration data (clpcfctrl command)" -> "Backing up configuration data (clpcfctrl --pull)" in "EXPRESSCLUSTER X SingleServerSafe command reference" in the "EXPRESSCLUSTER X SingleServerSafe Operation Guide".
To reinstall the EXPRESSCLUSTER X SingleServerSafe, follow the procedures below:
Back up the configuration data.
- Uninstall the EXPRESSCLUSTER X SingleServerSafe.If reinstalling the OS, it is not necessary to uninstall the EXPRESSCLUSTER X SingleServerSafe. However, when reinstalling in the folder in which the EXPRESSCLUSTER X SingleServerSafe was formerly installed, the files in the installation folder must be deleted.
Shut down the OS when uninstalling the EXPRESSCLUSTER X SingleServerSafe is completed.
Install the EXPRESSCLUSTER X SingleServerSafe and register the license as necessary. Shut down the OS when installing EXPRESSCLUSTER X SingleServerSafe completed.
- Apply the configuration data to the server.To apply the configuration data, load the backup data by using the Cluster WebUI, and then upload it. For details, see "Applying configuration data" in "Creating configuration data" in the "EXPRESSCLUSTER X SingleServerSafe Configuration Guide".
4.4. Upgrading to EXPRESSCLUSTER X
When upgrading EXPRESSCLUSTER X SingleServerSafe to EXPRESSCLUSTER X, you can migrate the configuration data created using the Cluster WebUI (or the latest data if you changed the configuration).
In this case, save the latest configuration data before starting the upgrade. In addition to saving it to the Cluster WebUI after creation, you can back up the configuration data by using the clpcfctrl command. For details, see "Applying and backing up configuration data (clpcfctrl command)" in "EXPRESSCLUSTER X SingleServerSafe command reference" in the "EXPRESSCLUSTER X SingleServerSafe Operation Guide".
To upgrade EXPRESSCLUSTER X SingleServerSafe to EXPRESSCLUSTER X, follow the procedure below.
Back up the configuration data.
Uninstall EXPRESSCLUSTER X SingleServerSafe from the server for which to perform the upgrade. For details about the uninstallation procedure, see "4.2.1. Uninstalling EXPRESSCLUSTER X SingleServerSafe".
Shut down the OS when uninstalling the EXPRESSCLUSTER X SingleServerSafe is completed.
Install EXPRESSCLUSTER X, and set up its environment. You can use the backup configuration data for this process. For details about how to set up EXPRESSCLUSTER X, see the EXPRESSCLUSTER X manual.
Note
For EXPRESSCLUSTER X, register the following licenses:EXPRESSCLUSTER X SingleServerSafe (two-CPU license)
EXPRESSCLUSTER X SingleServerSafe upgrade license
These licenses can be used for EXPRESSCLUSTER X (two-CPU license).
5. Latest version information
The latest information on the upgraded and improved functions is described in details.
This chapter covers:
5.1. EXPRESSCLUSTER X SingleServerSafe version and corresponding manual edition
This guide assumes the version of EXPRESSCLUSTER X SingleServerSafe below for its descriptions. Note the version of EXPRESSCLUSTER X SingleServerSafe and corresponding manual edition.
EXPRESSCLUSTER X SingleServerSafe Internal Version |
Manual |
Edition |
Remarks |
|---|---|---|---|
13.12 |
Installation Guide |
5th Edition |
|
Configuration Guide |
3rd Edition |
||
Operation Guide |
3rd Edition |
5.2. New features and improvements
The following features and improvements have been released.
No.
|
Internal
Version
|
Contents
|
|---|---|---|
1 |
13.00 |
Windows Server 2022 is now supported. |
2 |
13.00 |
Along with the major upgrade, some functions have been removed. For details, refer to the list of removed functions. |
3 |
13.00 |
Added a function to give a notice in an alert log that the server restart count was reset as the final action against the detected activation error or deactivation error of a group resource or against the detected error of a monitor resource. |
4 |
13.00 |
Added the clpfwctrl command for adding a firewall rule. |
5 |
13.00 |
Added a function to collectively change actions (followed by OS shutdowns such as a recovery action following an error detected by a monitor resource) into OS reboots. |
6 |
13.00 |
Improved the alert message regarding the wait process for start/stop between groups. |
7 |
13.00 |
The display option for the clpstat configuration information has allowed displaying the setting value of the resource start attribute. |
8 |
13.00 |
The clpcl/clpstdn command has allowed specifying the -h option even when the cluster service on the local server is stopped. |
9 |
13.00 |
A warning message is now displayed when Cluster WebUI is connected via a non-actual IP address and is switched to config mode. |
10 |
13.00 |
In the config mode of Cluster WebUI, a group can now be deleted with the group resource registered. |
11 |
13.00 |
Changed the content of the error message that a communication timeout occurred in Cluster WebUI. |
12 |
13.00 |
Added a function to copy a group, group resource, or monitor resource registered in the config mode of Cluster WebUI. |
13 |
13.00 |
Added a function to move a group resource registered in the config mode of Cluster WebUI, to another group. |
14 |
13.00 |
The settings can now be changed at the group resource list of [Group Properties] in the config mode of Cluster WebUI. |
15 |
13.00 |
The settings can now be changed at the monitor resource list of [Monitor Common Properties] in the config mode of Cluster WebUI. |
16 |
13.00 |
The dependency during group resource deactivation is now displayed in the config mode of Cluster WebUI. |
17 |
13.00 |
Added a function to display a dependency diagram at the time of group resource activation/deactivation in the config mode of Cluster WebUI. |
18 |
13.00 |
Added a function to narrow down a range of display by type or resource name of a group resource or monitor resource on the status screen of Cluster WebUI. |
19 |
13.00 |
The online manual of Cluster WebUI now supports EXPRESSCLUSTER X SingleServerSafe. |
20 |
13.00 |
An intermediate certificate can now be used as a certificate file when HTTPS is used for communication in the WebManager service. |
21 |
13.00 |
Added the clpcfconv command, which changes the cluster configuration data file from the old version to the current one. |
22 |
13.00 |
Added a function to delay the start of the cluster service for starting the OS. |
23 |
13.00 |
Details such as measures can now be displayed for error results of checking cluster configuration data in Cluster WebUI. |
24 |
13.00 |
The OS type can be specified for specifying the create option of the clpcfset command. |
25 |
13.00 |
Added a function to delete a resource or parameter from cluster configuration data, which is enabled by adding the del option to the clpcfset command. |
26 |
13.00 |
Added the clpcfadm.py command, which enhances the interface for the clpcfset command. |
27 |
13.00 |
The start completion timing of an AWS DNS resource has been changed to the timing before which the following is confirmed: The record set was propagated to AWS Route 53. |
28 |
13.00 |
Changed the default value for [Wait Time to Start Monitoring] of AWS DNS monitor resources to 300 seconds. |
29 |
13.00 |
The clpstat command can now be run duplicately. |
30 |
13.00 |
Added the Node Manager service. |
31 |
13.00 |
Added a function for statistical information on heartbeat. |
32 |
13.00 |
HTTP monitor resources now support digest authentication. |
33 |
13.00 |
The FTP server that uses FTPS for the FTP monitor resource can now be monitored. |
34 |
13.00 |
Multiple system monitor resources can now be registered. |
35 |
13.00 |
Multiple process resource monitor resources can now be registered. |
36 |
13.00 |
Added a function to target only specific processes for a process resource monitor resource. |
37 |
13.00 |
A single service monitor resource alone can now monitor any service. |
38 |
13.02 |
JVM monitor resource supports Apache Tomcat 10.0. |
39 |
13.10 |
Added protection against vulnerabilities (CVE-2022-34824 and CVE-2022-34825): a feature for appropriately giving permission to the installation folder during installation. |
40 |
13.10 |
Added SMTPS and STARTTLS support for the mail reporting function. |
41 |
13.10 |
Allowed specifying a log-file storage period. |
42 |
13.10 |
Expanded the check items of cluster configuration data. |
43 |
13.10 |
Added a feature for setting as a warning a value returned from the specified script, to custom monitor resources. |
44 |
13.10 |
Added support for SQL Server 2022 for SQL Server monitor resources. |
45 |
13.10 |
Added support for PostgreSQL 15.1 for PostgreSQL monitor resources. |
46 |
13.10 |
Allowed using Cluster WebUI to specify environment variables for AWS-related features to access instance metadata and the AWS CLI. |
47 |
13.10 |
Added a feature for specifying command line options for the AWS CLI accessed by AWS-related features. |
48 |
13.10 |
Added support for WebSAM SVF PDF Enterprise 10.1 for JVM monitor resources. |
49 |
13.10 |
Added support for WebSAM RDE SUITE 10.1 for JVM monitor resources. |
50 |
13.10 |
Added support for WebSAM SVF Connect SUITE Standard 10.1 for JVM monitor resources. |
51 |
13.10 |
Added a feature for outputting process resource statistics. |
52 |
13.10 |
Added support for client authentication for HTTP monitor resources. |
53 |
13.10 |
Added support for OpenSSL 3.0 for FTP monitor resources. |
54 |
13.10 |
Added a feature for JVM monitor resources to output retry count information to the operation log. |
55 |
13.10 |
Added support for Java 17 for JVM monitor resources. |
56 |
13.10 |
Subtracted support for Java 7 for JVM monitor resources. |
57 |
13.10 |
Added an option in the clpcfadm.py command to create a backup file of existing cluster configuration data. |
58 |
13.10 |
Allowed Cluster WebUI to display its operation log. |
59 |
13.10 |
Added support for OpenSSL 3.0 for Cluster WebUI. |
60 |
13.10 |
Disabled TLS 1.1 for the HTTPS connection of Cluster WebUI. |
61 |
13.10 |
Added a feature for the status screen of Cluster WebUI to list settings with which cluster operation is disabled. |
62 |
13.10 |
Added features for the config mode of Cluster WebUI to display or hide and to sort the following:
- Group resource list in [Group Properties]
- Monitor resource list in [Monitor Resources Common Properties]
|
63 |
13.10 |
Made the following changes for [Accessible number of clients] of cluster properties: its name to [Number of sessions which can be established simultaneously], and its lower limit value. |
64 |
13.10 |
Hid [Received time] by default in the Alert logs of Cluster WebUI. |
65 |
13.10 |
Changed the description of the [Restart the manager] button on the status screen of Cluster WebUI to "Restart WebManager service". |
66 |
13.10 |
Allowed [Copy the group] in the config mode of Cluster WebUI to copy group resources' dependency on a case-by-case basis as well. |
67 |
13.10 |
Implemented safeguards in Cluster WebUI to prevent configuration errors with [Monitor Type] of custom monitor resources set to [Asynchronous]. |
68 |
13.11 |
Added support for OpenSSL 3.0 for RESTful API. |
69 |
13.12 |
Added support for OpenSSL 3.1 for the following functions:
- Cluster WebUI
- RESTful API
- Mirror disk resources
- Hybrid disk resources
- FTP monitor resources
- Mail report
|
5.3. Corrected information
Modification has been performed on the following minor versions.
Critical level:
- L
- M
- S
No.
|
Version in which the problem has been solved
/ Version in which the problem occurred
|
Phenomenon
|
Level
|
Occurrence condition/
Occurrence frequency
|
|---|---|---|---|---|
1 |
13.00
/ 12.10 to 12.32
|
In the config mode of Cluster WebUI, modifying a comment on a group resource may not be applied. |
S |
This problem occurs in the following case: A comment on a group resource is modified, the [Apply] button is clicked, the change is undone, and then the [OK] button is clicked. |
2 |
13.00
/ 12.10 to 12.32
|
In the config mode of Cluster WebUI, modifying a comment on a monitor resource may not be applied. |
S |
This problem occurs in the following case: A comment on a monitor resource is modified, the [Apply] button is clicked, the change is undone, and then the [OK] button is clicked. |
3 |
13.00
/ 12.10 to 12.32
|
In the config mode of Cluster WebUI, the [Install Path] item is not required to be entered in the [Monitor (special)] tab of a WebLogic monitor resource. |
S |
This problem always occurs. |
4 |
13.00
/ 12.00 to 12.32
|
In the status screen of Cluster WebUI, a communication timeout during the operation of a cluster causes a request to be repeatedly issued. |
M |
This problem always occurs when a communication timeout occurs between Cluster WebUI and a cluster server. |
5 |
13.00
/ 12.30 to 12.32
|
An error of update failure may occur when [Update Server Info] is executed in the config mode of Cluster WebUI. |
S |
This problem occurs when [Device Info] in [Update Server Info] is obtained. |
6 |
13.00
/ 11.10 to 12.32
|
In the alert log for a delay warning of a monitor resource, the response time may read zero (0). |
S |
This problem may occur when the alert log for a delay warning of a monitor resource is outputted. |
7 |
13.00
/ 12.00 to 12.32
|
A monitor resource may mistakenly detect a monitoring timeout. |
M |
This problem very rarely occurs when a monitoring process is executed by a monitor resource. |
8 |
13.00
/ 12.20 to 12.32
|
The OS start time is targeted for checking a cluster configuration.
|
S |
This problem always occurs in checking a cluster configuration. |
9 |
13.00
/ 12.00 to 12.32
|
In [Monitoring usage of memory] for process resource monitor resources, [Duration time (min)] has been replaced with [Maximum Refresh Count (time)]. |
S |
This problem occurs when the properties are displayed with Cluster WebUI or the clpstat command. |
10 |
13.00
/ 12.00 to 12.32
|
In an HTTP monitor resource, a warning instead of an error is issued in the following case: The status code of a response to an issued HEAD request is in the 400s or 500s, and a non-default URI is specified as the monitor URI. |
S |
This problem occurs in the following case: The status code of a response to an issued HEAD request is in the 400s or 500s, and a non-default URI is specified as the monitor URI. |
11 |
13.00
/ 12.10 to 12.32
|
In a custom monitor resource, when the process of a script to be monitored is cleared, the corresponding monitor resource name is not outputted to the alert message. |
S |
This problem occurs when the process of a script to be monitored is cleared in a custom monitor resource. |
12 |
13.00
/ 12.20 to 12.32
|
The EXPRESSCLUSTER Information Base service may abend. |
S |
This problem very rarely occurs when one of the following is performed:
- Cluster startup
- Cluster stop
- Cluster suspension
- Cluster resumption
|
13 |
13.01
/ 9.00 to 12.32,13.00
|
The vulnerabilities of CVE-2021-20700 to 20707 may cause the following acts by third parties:
- Execution of an arbitrary code
- Upload of an arbitrary file
- Reading of an arbitrary file
|
L |
These problems occur when a specific process in EXPRESSCLUSTER receives a packet crafted by a malicious third party against the internal protocol of EXPRESSCLUSTER. |
14 |
13.01
/ 13.00
|
For the clprexec command, the --script option does not work. |
S |
This problem occurs when the clprexec command is executed with the --script option specified. |
15 |
13.02
/ 13.00 to 13.01
|
The EXPRESSCLUSTER Node Manager service starts without waiting for a service startup delay time. |
S |
This problem occurs with [Service Startup Delay Time] set to a value larger than zero seconds. |
16 |
13.02
/ 13.01
|
Update installation registers the EXPRESSCLUSTER Old API Support service. |
S |
This problem occurs with the internal version 13.00 updated to 13.01. |
17 |
13.02
/ 13.00 to 13.01
|
The STOP error may occur during the application of cluster configuration data including a mirror/hybrid disk resource. |
M |
This problem occurs with the mirror/hybrid disk resource named with eight or more characters. |
18 |
13.02
/ 13.00 to 13.01
|
A monitor resource may detect a monitoring timeout by mistake. |
S |
This problem occurs on very rare occasions during a monitoring process by the monitor resource. |
19 |
13.02
/ 13.00 to 13.01
|
When [Recovery Action tab] for a monitor resource is set with [Generate an intentional stop error], the recovery action may not be performed. |
S |
This problem occurs on rare occasions when the recovery action is tried. |
20 |
13.02
/ 13.00 to 13.01
|
An initialization error may occur in a kernel mode LAN heartbeat resource during a cluster service start. |
M |
This problem occurs when the kernel mode LAN heartbeat resource starts up with the network device yet to become available. |
21 |
13.02
/ 12.00 to 13.01
|
A cluster service stop as an action at NP occurrence is not completed. |
M |
This problem occurs with [Action at NP Occurrence] set to [Stop the cluster service]. |
22 |
13.02
/ 9.00 to 13.01
|
An application error may occur with the clpstat command. |
S |
This problem occurs in an environment where a failover group is set with no group resources registered. |
23 |
13.02
/ 13.00 to 13.01
|
With a cluster suspended, Cluster WebUI or the clpstat command may show the server status as stopped. |
S |
This problem occurs when both of the following services are restarted with the cluster suspended:
- EXPRESSCLUSTER Node Manager
- EXPRESSCLUSTER Information Base
|
24 |
13.02
/ 13.00 to 13.01
|
A group/monitor resource status may be incorrectly shown. |
S |
This problem occurs with something wrong in the internal processing of cluster services during OS startup. |
25 |
13.02
/ 9.00 to 13.01
|
A STOP error may occur during OS startup or OS shutdown. |
M |
This problem occurs on very rare occasions during OS startup or OS shutdown. |
26 |
13.02
/ 9.00 to 13.01
|
The vulnerabilities of CVE-2022-34822 to 34823 may cause the following acts by third parties:
- Reading of an arbitrary file
- Execution of an arbitrary code
|
L |
These problems occur when a specific process in EXPRESSCLUSTER receives a packet crafted by a malicious third party against the internal protocol of EXPRESSCLUSTER. |
27 |
13.10
/ 13.00 to 13.02
|
The clpnm.exe process may abend, leading to an OS restart. |
M |
This problem occurs on very rare occasions. |
28 |
13.10
/ 13.00 to 13.02
|
After a cluster service is started up, an alert may be put out due to abnormal heartbeat. |
S |
This problem occurs on rare occasions after a cluster service is started up. |
29 |
13.10
/ 12.00 to 13.02
|
A cluster may not be started up, due to a corrupted license file. |
S |
This problem occurs on rare occasions in the following case: While a cluster is being started up, its server is de-energized. |
30 |
13.10
/ 12.00 to 13.02
|
Instead of a product version license, a fixed-term license may become active despite its expiration. |
S |
This problem occurs with both an unused fixed-term license and a product version license registered, when the former expires. |
31 |
13.10
/ 9.00 to 13.02
|
Failure in resuming a cluster may lead to its abend. |
M |
This problem occurs when a cluster is repeatedly suspended and resumed in the following environment: Two or more monitor resources are registered and each of their names consists of only one letter. |
32 |
13.10
/ 12.10 to 13.02
|
A recovery script for a monitor resource may not be run. |
S |
This problem occurs in the following case: With [Execute Script before Recovery Action] on in Cluster WebUI, the user does not edit the script or simultaneously changes the script and something else. |
33 |
13.10
/ 9.00 to 13.02
|
A monitor resource, configured to perform continuous monitoring, may not work. |
S |
This problem occurs in a monitor resource with the setting of [Monitor Timing] changed from [Active] to [Always]. |
34 |
13.10
/ 9.00 to 13.02
|
With [Service Name] of a service resource or service monitor resource set to the service display name of the service, the monitoring process may fail. |
M |
This problem occurs with a failure in obtaining the service name from the service display name. |
35 |
13.10
/ 12.10 to 13.02
|
[JVM Monitor Resource Tuning Properties] does not allow specifying a usage threshold for [Metaspace]. |
S |
This problem always occurs. |
36 |
13.10
/ 9.00 to 13.02
|
Hostname resolution may fail if the host is accessible from HTTP monitor resources. |
S |
This problem may occur when the hostname (not the IP address) is specified as a connection destination. |
37 |
13.10
/ 12.30 to 13.02
|
After the clpcfset command is executed to create cluster configuration data, its XML attribute value may be wrong. |
S |
This problem occurs when an ID attribute node is added by executing the clpcfset command. |
38 |
13.10
/ 13.00 to 13.02
|
After the clpcfset command is executed to create cluster configuration data, its object count may be wrong. |
S |
This problem occurs when, by executing the clpcfset command, the object count is added to or deleted from the cluster configuration data including a forced stop resource. |
39 |
13.10
/ 13.00 to 13.02
|
The clpcfadm.py command may not be correctly executed. |
S |
This problem occurs in the following case: Cluster WebUI executes the clpcfadm.py command on cluster configuration data from which all failover groups were deleted. |
40 |
13.10
/ 13.00 to 13.02
|
The clpcfadm.py command may allow an invalid monitor resource to be configured. |
S |
This problem occurs in the following case: When the clpcfadm.py command is used to add a monitor resource, jra is specified as the type of monitor resource. |
41 |
13.10
/ 13.00 to 13.02
|
After the clpcfadm.py command is executed to create cluster configuration data, its resource activation/deactivation timeout value may be wrong. |
S |
This problem occurs when executing the clpcfadm.py command changes the parameter requiring the calculation of the resource activation/deactivation timeout value. |
42 |
13.10
/ 12.20 to 13.02
|
For a cluster with a RESTful API, obtaining its status may fail. |
S |
This problem may occur with the EXPRESSCLUSTER Information Base service restarted. |
43 |
13.10
/ 12.20 to 13.02
|
A RESTful API may fail to collect information. |
S |
This problem occurs on rare occasions in the following case: An API for collecting information is executed just after an API for operation is executed. |
44 |
13.10
/ 12.22 to 13.02
|
In group information retrieval with a RESTful API, an incorrect response to an exception may occur. |
S |
This problem may occur when a cluster server encounters an internal error. |
45 |
13.10
/ 12.30 to 13.02
|
Cluster WebUI may fail to obtain cloud environment information. |
S |
This problem occurs with Cluster WebUI connected via a proxy server. |
46 |
13.10
/ 12.00 to 13.02
|
After [TTL] is changed for an Azure DNS resource in the config mode of Cluster WebUI, the change is not applied to the record. |
S |
This problem always occurs. |
47 |
13.10
/ 12.10 to 13.02
|
When configuring strings like a resource name on the Cluster WebUI, consecutive spaces of two or more bytes are reduced to a single byte. |
S |
This problem occurs when the setting of cluster configuration data is changed while two or more bytes of spaces are input consecutively. |
48 |
13.11
/ 12.20 to 13.10
|
Applying cluster configuration data may fail. |
S |
This problem may occur when applying cluster configuration data repeatedly in the config mode of the Cluster WebUI. |
49 |
13.11
/ 11.10 to 13.10
|
A SQL Server monitor resource may not detect an error. |
S |
This problem occurs when [Monitor Level] is 0. |
50 |
13.11
/ 13.10
|
Mail reporting function may not work. |
S |
This problem occurs when the version is upgraded from X 5.0.2 or earlier to X 5.1.0 while mail reporting function is configured. |
51 |
13.11
/ 13.00 to 13.10
|
When a cluster is configured with ESMPRO/ARC, the process of waiting for a shared disk to power on does not work. |
S |
This problem occurs when a cluster is started. |
52 |
13.11
/ 9.00 to 13.10
|
EXPRESSCLUSTER system services may not be started, due to a failure of applying cluster configuration data. |
S |
This problem very rarely occurs when applying cluster configuration data. |
53 |
13.11
/ 13.00
|
In the config mode of the Cluster WebUI, a service monitor resource may not be registered. |
S |
This problem occurs in the following case: A service monitor resource is registered while there are no group resources registered. |
54 |
13.12
/ 13.11
|
A cluster may not start due to an incorrect cluster server status. |
M |
This problem may occur after a cluster service is stopped. |
55 |
13.12
/ 13.00 to 13.11
|
An alert that a restart count has been reset may appear when a monitor resource executes the recovery action. |
S |
This problem occurs when a monitor resource executes one of the following recovery actions.
- Stop the cluster service and shutdown OS
- Stop the cluster service and reboot OS
- Generate an intentional stop error
|
56 |
13.12
/ 13.10 to 13.11
|
The screen may not display when connecting to Cluster WebUI via HTTPS. |
S |
This problem occurs rarely with OpenSSL 3.0 or later. |
57 |
13.12
/ 9.00 to 13.11
|
It takes long time to apply a cluster configuration data file on Cluster WebUI. |
S |
This problem always occurs. |
58 |
13.12
/ 9.00 to 13.11
|
The vulnerabilities of CVE-2023-39544 to 39548 may cause the following acts by third parties:
- Execution of an arbitrary code
- Uploading of an arbitrary file
- Skimming a cluster configuration data file
|
L |
These problems occur when a specific process in EXPRESSCLUSTER receives a packet crafted by a malicious third party against the internal protocol of EXPRESSCLUSTER. |
6. Additional information
This chapter provides tips on installing EXPRESSCLUSTER X SingleServerSafe.
This chapter covers:
6.1. EXPRESSCLUSTER X SingleServerSafe services
EXPRESSCLUSTER X SingleServerSafe consists of the system services listed below.
System Service Name |
Explanation |
|---|---|
EXPRESSCLUSTER |
EXPRESSCLUSTER |
EXPRESSCLUSTER Disk Agent |
Not used for EXPRESSCLUSTER X SingleServerSafe |
EXPRESSCLUSTER API |
EXPRESSCLUSTER Restful API control |
EXPRESSCLUSTER Event |
Event log output |
EXPRESSCLUSTER Information Base |
Cluster information management |
EXPRESSCLUSTER Java Resource Agent |
Java Resource Agent |
EXPRESSCLUSTER Manager |
WebManager Server |
EXPRESSCLUSTER Node Manager |
Control of heartbeat and network partition resolution |
EXPRESSCLUSTER X Server |
EXPRESSCLUSTER Server |
EXPRESSCLUSTER SingleServerSafe |
SingleServerSafe process |
EXPRESSCLUSTER System Resource Agent |
System Resource Agent |
EXPRESSCLUSTER Transaction |
Communication process |
EXPRESSCLUSTER Web Alert |
Alert synchronization |
6.2. Using the License Manager
The Start menu contains the menu for EXPRESSCLUSTER SingleServerSafe. You can start the License Manager from this menu.
6.2.1. Registering a license by specifying a license file
When using a trial license, obtain a license file instead of a license sheet. The following procedure describes how to register a license by specifying a license file.
Note
To register a license, use an account that has administrator privileges.
On the Start menu, click License Manager of NEC EXPRESSCLUSTER SingleServerSafe.
The License Manager dialog box is displayed. Click Register.
A dialog box is displayed for selecting the license registration method. Click Register with License File.
The License File Specification dialog box is displayed. In the License File Specification dialog box, select the license file to be registered and then click Open.
The message confirming registration of the license is displayed. Click OK.
Click Finish to close the license manager.
6.2.2. Referencing or deleting a registered license
The following procedure describes how to refer to and delete the registered license.
On the Start menu, click License Manager of NEC EXPRESSCLUSTER SingleServerSafe.
The License Manager dialog box is displayed. Click Refer/Delete.
The registered licenses are listed.
Select the license to delete and click Delete.
The confirmation message to delete the license is displayed. Click OK.
6.2.3. Switching from the trial license to the product license
When registering the official license to a server running with the trial license, you can add the official license without deleting the trial license. When you list the registered licenses, both the official and trial licenses are shown, but there is no problem.
7. Notes and Restrictions
This chapter provides information on known problems and how to troubleshoot the problems.
This chapter covers:
7.1. Before installing EXPRESSCLUSTER X SingleServerSafe
Consideration after installing an operating system, when configuring OS and disks are described in this section.
7.1.1. File system
Use NTFS as the file system for the partition on which to install the OS.
7.2. Upgrading EXPRESSCLUSTER X SingleServerSafe
This section describes notes on upgrading or updating EXPRESSCLUSTER X SingleServerSafe after starting the cluster operation.
7.2.1. Changed functions
The following describes the functions changed for each of the versions:
Internal Version 12.00
Internal Version 12.10
Internal Version 12.30
7.2.2. Removed Functions
The following describes the functions removed for each of the versions:
The following describes the functions removed for each of the versions:
Internal Version 12.00
WebManager Mobile
OfficeScan CL monitor resource
OfficeScan SV monitor resource
OracleAS monitor resource
Important
Internal Version 13.00
Function
Action
WebManager/Builder
BMC linkage
Delete relevant message reception monitor resources.
Compatible commands
Script resources
Custom monitor resources
Scripts before final action
Scripts before and after activation/deactivation
Recovery scripts
Pre-recovery action scripts
Forced-stop scripts
Other scripts configured with EXPRESSCLUSTER
If any of these scripts includes a compatible command, modify the script by excluding the command.
Example
To start or stop services controlled with the armload command, use the sc command instead.To monitor services, use service monitor resources instead.
7.2.3. Removed Parameters
The following tables show the parameters configurable with Cluster WebUI but removed for each of the versions:
Internal Version 12.00
Cluster
Parameters
Default
Cluster Properties
WebManager Tab
Enable WebManager Mobile Connection
Off
WebManager Mobile Password
Password for Operation
-
Password for Reference
-
JVM monitor resource
Parameters
Default
JVM Monitor Resource Properties
Monitor (special) Tab
Memory Tab (when Oracle Java is selected for JVM type)
Monitor Virtual Memory Usage
2048 MB
Memory Tab (when Oracle Java(usage monitoring) is selected for JVM Type)
Monitor Virtual Memory Usage
2048 MB
User mode monitor resource
Parameters
Default
User mode Monitor Resource Properties
Monitor (special) Tab
Use Heartbeat Interval/Timeout
On
Internal Version 12.10
Cluster
Parameters
Default
Cluster Properties
WebManager Tab
WebManager Tuning Properties
Behavior Tab
Max. Number of Alert Records on the Viewer
300
Client Data Update Method
Real Time
Internal Version 13.00
Cluster
Parameters
default values
Server Properties
Info Tab
Virtual Machine
Off
Type
vSphere
7.2.4. Changed Default Values
The following tables show the parameters which are configurable with Cluster WebUI but whose defaults have been changed for each of the versions:
To continue using a "Default value before update" after the upgrade, change the corresponding "Default value after update" to the desired one.
Any setting other than a "Default value before update" is inherited to the upgraded version and therefore does not need to be restored.
Internal Version 12.00
Cluster
Parameters
Default value before update
Default value after update
Remarks
Cluster Properties
JVM monitor Tab
Maximum Java Heap Size
7 MB
16 MB
Application monitor resource
Parameters
Default value before update
Default value after update
Remarks
Application Monitor Resource Properties
Monitor (common) Tab
Wait Time to Start Monitoring
0 sec
3 sec
Do Not Retry at Timeout Occurrence
Off
On
Do not Execute Recovery Action at Timeout Occurrence
Off
On
NIC Link Up/Down monitor resource
Parameters
Default value before update
Default value after update
Remarks
NIC Link Up/Down Monitor Resource Properties
Monitor (common) Tab
Timeout
60 sec
180 sec
Do Not Retry at Timeout Occurrence
Off
On
Do not Execute Recovery Action at Timeout Occurrence
Off
On
Service monitor resource
Parameters
Default value before update
Default value after update
Remarks
Service Monitor Resource Properties
Monitor (common) Tab
Wait Time to Start Monitoring
0 sec
3 sec
Do Not Retry at Timeout Occurrence
Off
On
Do not Execute Recovery Action at Timeout Occurrence
Off
On
Custom monitor resource
Parameters
Default value before update
Default value after update
Remarks
Custom Monitor Resource Properties
Monitor (common) Tab
Wait Time to Start Monitoring
0 sec
3 sec
Process Name monitor resource
Parameters
Default value before update
Default value after update
Remarks
Process Name Monitor Properties
Monitor (common) Tab
Wait Time to Start Monitoring
0 sec
3 sec
Do Not Retry at Timeout Occurrence
Off
On
Do not Execute Recovery Action at Timeout Occurrence
Off
On
SQL Server monitor resource
Parameters
Default value before update
Default value after update
Remarks
SQL Server Monitor Resource Properties
Monitor (special) Tab
ODBC Driver Name
SQL Native Client
ODBC Driver 13 for SQL Server
WebLogic monitor resource
Parameters
Default value before update
Default value after update
Remarks
WebLogic Monitor Resource Properties
Monitor (special) Tab
Install Path
C:\bea\weblogic92
JVM monitor resource
Parameters
Default value before update
Default value after update
Remarks
JVM Monitor Resource Properties
Monitor (common) Tab
Timeout
120 sec
180 sec
Internal Version 12.10
Script resource
Parameters
Default value before update
Default value after update
Remarks
Script Resource Properties
Details Tab
Script Resource Tuning Properties
Parameter Tab
Allow to Interact with Desktop
On
Off
Internal Version 12.20
Service resource
Parameters
Default value before update
Default value after update
Remarks
Service Resource Properties
Recovery Operation tab
Retry Count
0 times
1 time
Internal Version 12.30
Cluster
Parameters
Default value before update
Default value after update
Remarks
Cluster Properties
API tab
Communication Method
HTTP
HTTPS
Internal Version 13.10
Cluster
Parameters
Default value before update
Default value after update
Remarks
Cluster Properties
WebManager Tab
Output Cluster WebUI Operation Log
Off
On
7.2.5. Moved Parameters
The following table shows the parameters which are configurable with Cluster WebUI but whose controls have been moved for each of the versions:
Internal Version 12.00
Before the change
After the change
[Cluster Properties] - [Recovery Tab] - [Max Reboot Count]
[Cluster Properties] - [Extension Tab] - [Max Reboot Count]
[Cluster Properties] - [Recovery Tab] - [Max Reboot Count Reset Time]
[Cluster Properties] - [Extension Tab] - [Max Reboot Count Reset Time]
[Cluster Properties] - [Recovery Tab] - [Use Forced Stop]
[Cluster Properties] - [Extension Tab] - [Use Forced Stop]
[Cluster Properties] - [Recovery Tab] - [Forced Stop Action]
[Cluster Properties] - [Extension Tab] - [Forced Stop Action]
[Cluster Properties] - [Recovery Tab] - [Forced Stop Timeout]
[Cluster Properties] - [Extension Tab] - [Forced Stop Timeout]
[Cluster Properties] - [Recovery Tab] - [Virtual Machine Forced Stop Setting]
[Cluster Properties] - [Extension Tab] - [Virtual Machine Forced Stop Setting]
[Cluster Properties] - [Recovery Tab] - [Execute Script for Forced Stop]
[Cluster Properties] - [Extension Tab] - [Execute Script for Forced Stop]
[Cluster Properties] - [Auto Recovery Tab] - [Auto Return]
[Cluster Properties] - [Extension Tab] - [Auto Return]
[Cluster Properties]-[Recovery Tab]-[Disable Recovery Action Caused by Monitor Resource Error]
[Cluster Properties]-[Extension Tab]-[Disable cluster operation]-[Recovery Action when Monitor Resource Failure Detected]
Internal Version 13.10
Before the change
After the change
[Cluster Properties]-[Monitor Tab]
[Cluster Properties]-[Statistics Tab]
[Cluster Properties]-[Extension Tab]-[Cluster Statistics]
[Cluster Properties]-[Statistics Tab]-[Cluster Statistics]
8. Troubleshooting
When installing EXPRESSCLUSTER X SingleServerSafe
Behavior and Message
Cause
Solution
Licensing
Behavior and Message
Cause
Solution