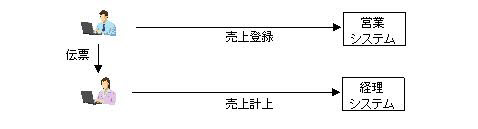
図1.1-1
Caution
このチュートリアルを実行する前に、WebOTX
Developer(Windows版)とWebOTX Enterprise Service
Busをインストールした環境を用意してください。
図1.1-1
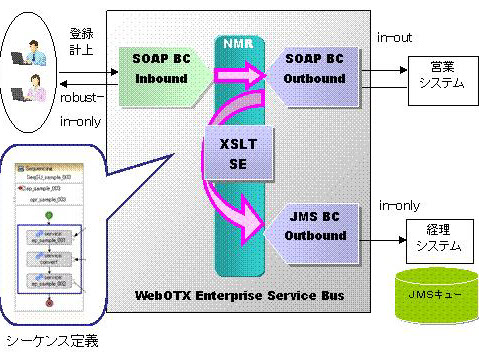
図1.1-2
Memo
Inboundはサービスを受け付ける側で、Outboundは外部サービスを呼び出す側です。
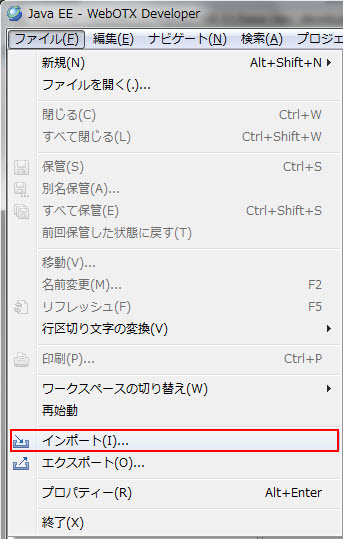
図1.2.1-1
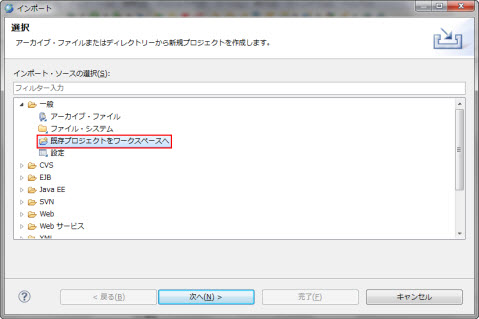
図1.2.1-2

図1.2.1-3
Memo
proj_05_JMSQueue.zipは、こちらからダウンロードできます。
まずWebOTXのインストールディレクトリパスの設定を行います。メニューからウィンドウ > 設定を選択します。左側のツリーからJava > ビルド・パス > クラスパス変数を選択します。新規ボタンを押し、名前をAS_INSTALLとしてパスにはWebOTXをインストールしたディレクトリ(例 C:\WebOTX)を指定します。
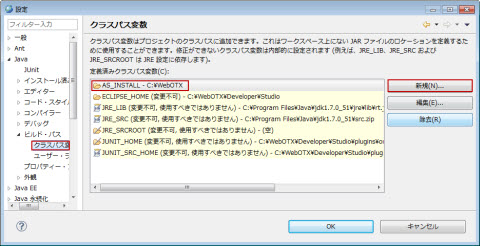
図1.2.1-4
次いでJREシステム・ライブラリーパスの設定を行います。パッケージエクスプローラから、proj_05_JMSQueueを右クリックしプロパティーを選択します。左側メニューからJavaのビルド・パスを選択し、右上タブからライブラリーを選択します。JREシステム・ライブラリーのアイコンを確認し、赤い×アイコンが表示されている場合は、編集ボタンを押し、ワークスペースのデフォルトJREを選択します。×アイコンが表示されていない場合は、編集は必要ありません。
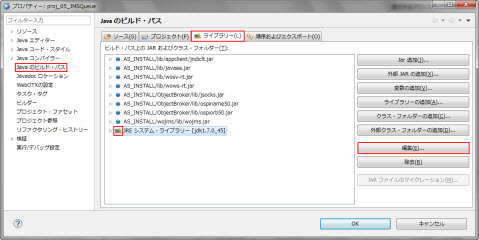
図1.2.1-5
|
要求送信先 |
応答用送信先 |
|
|---|---|---|
|
物理的送信先名 |
MyQueue |
JMSBCReplyQueue |
|
送信先リソースJNDI名 |
MyQueue |
jms/JMSBCReplyQueue |
|
コネクションファクトリリソースJNDI名 |
MyQCF |
jms/JMSBCReplyQueueConnectionFactory |
> otxadmindomain1が起動していることを確認します。起動していれば、runningと表示されます。起動していない場合、domain1を起動します。
otxadmin> list-domainsdomain1にログインします。domain1はWebOTXインストール時に生成済みのドメインです。ユーザ名とパスワードにはドメインログインに使用するユーザ名とパスワードを入力します。
otxadmin> login --user ユーザ名 --password パスワード --port 6212要求用キューを以下のコマンドによる作成します。使用するキューの物理的送信先をotxadmin create-jmsdest コマンドで作成します。
otxadmin> create-jmsdest --desttype queue MyQueueこのクライアントアプリケーションからJNDI を通してキューをルックアップするために必要な送信先リソースを作成します。
otxadmin> create-jms-resource --restype javax.jms.Queue --wojmsDestinationName=MyQueue MyQueueJMS サーバへの接続に必要なQueueConnectionFactory を作成します。QueueConnectionFactoryも、クライアントアプリケーションからJNDI を通してキューをルックアップするために必要なコネクションファクトリリソースを作成します。
otxadmin> create-jms-resource --restype javax.jms.QueueConnectionFactory MyQCF
Memo
WebOTX
Standard / Enterprise
のアドバンスドモードで既にプロセスグループを作成している場合は、プロセスグループを再起動してください。
図1.2.2-1
図1.2.2-2
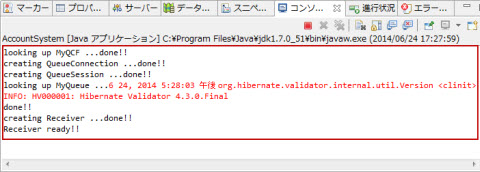
図1.2.2-3
> runAccountSystem.bat(UNIX環境の場合) runAccountSystem.shの環境変数 AS_INSTALL と ObjectSpinner_INSTALL を確認します。 WebOTXのインストールディレクトリが /opt/WebOTX ではない場合、および ObjectSpinnerのインストールディレクトリが /opt/ObjectSpinner ではない場合は、 それぞれ適切に修正してください。確認した後 runAccountSystem.sh を実行します。
 > chmod 777 runAccountSystem.sh
 > ./runAccountSystem.sh
looking up MyQCF ...done!!
creating QueueConnection ...done!!
creating QueueSession ...done!!
looking up MyQueue ...done!!
creating Receiver ...done!!
Receiver ready!!
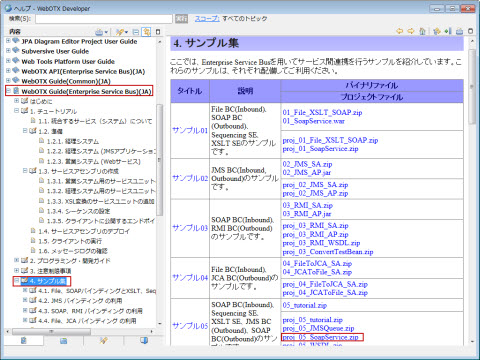
図1.2.3-1
> otxadmindomain1が起動していることを確認します。起動されていれば、runningと表示されます。
otxadmin> list-domains
otxadmin> login --user ユーザ名 --password パスワード--port 6212
otxadmin> deploy --apgroup <アプリケーショングループ名> --pgroup <プロセスグループ名> <05_SoapService.warへのパス>・WebOTX Express または WebOTX Standard / Enterprise のスタンダードモードの場合
otxadmin> deploy <05_SoapService.warへのパス>
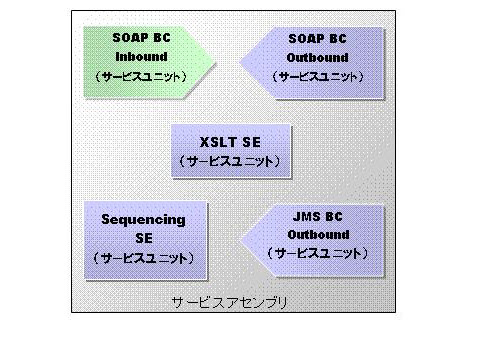
図1.3-1
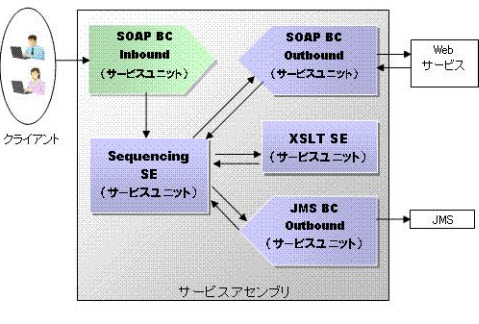
図1.3-2
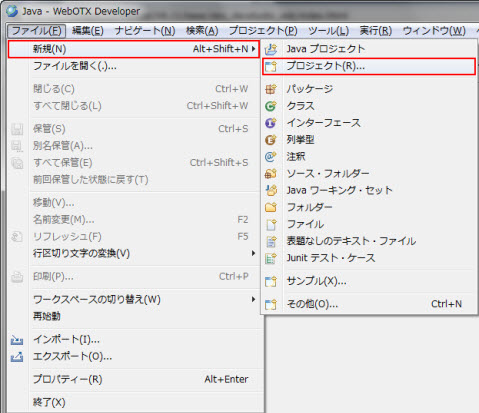
図1.3-3
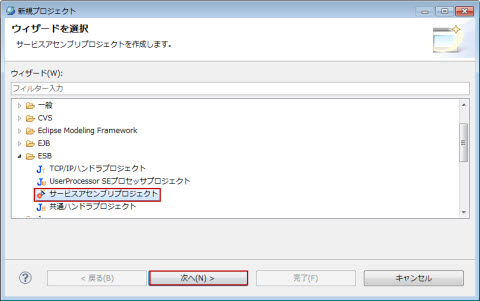
図1.3-4
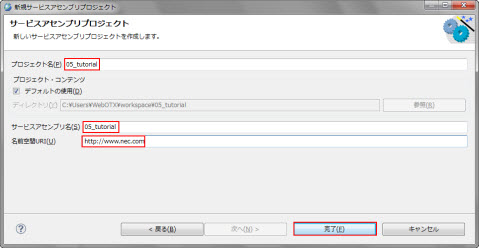
図1.3-5
図1.3-6
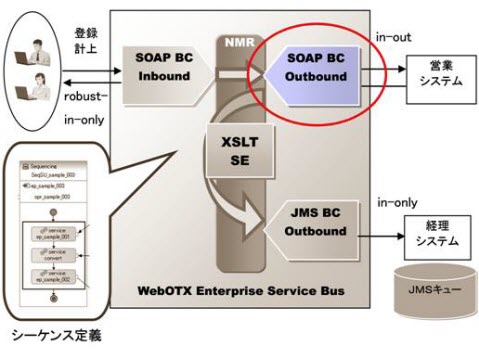
図1.3.1-1
図1.3.1-2
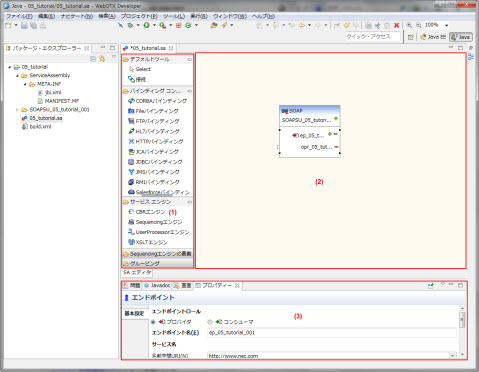
図1.3.1-3
図1.3.1-4
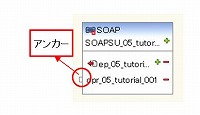
図1.3.1-5
Memo
エンドポイント名はデフォルトで「ep_05_tutorial_XXX」(XXXは連番)が設定されます。営業システムでは、例として連番001を用います。
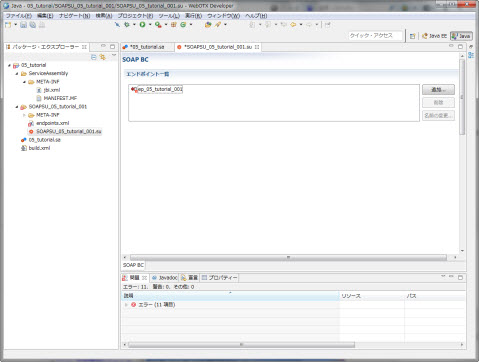
図1.3.1-6
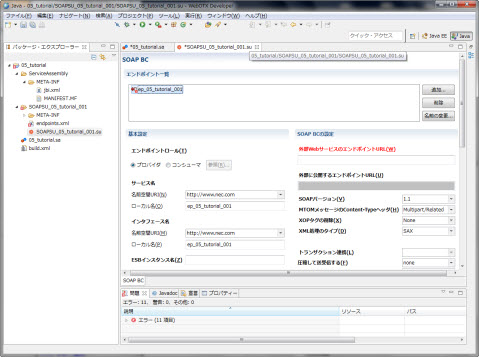
図1.3.1-7
|
設定名 |
設定値 |
備考 |
|---|---|---|
|
エンドポイントロール |
プロバイダ |
|
|
サービス名 (名前空間URI) |
http://www.nec.com |
デフォルトで設定されます。 |
|
サービス名 (ローカル名) |
ep_05_tutorial_001 |
デフォルトで設定されます。 |
|
インタフェース名 (名前空間URI) |
http://www.nec.com |
デフォルトで設定されます。 |
|
インタフェース名 (ローカル名) |
ep_05_tutorial_001 |
デフォルトで設定されます。 |
|
外部Webサービスの エンドポイントURL |
http://localhost/05_SoapService/05_echo |
ホスト名、ポート番号は05_SoapService.warを配備した場所に合わせます。 |
Memo
サービス名とインタフェース名のローカル名は、エンドポイント名に指定した名前がデフォルトで設定されます。
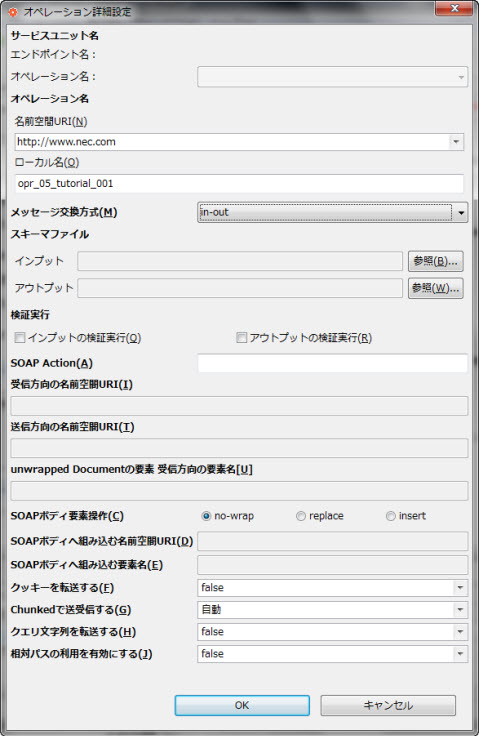
図1.3.1-8
|
設定名 |
設定値 |
備考 |
|
|---|---|---|---|
|
オペレーション名 |
名前空間URI |
http://www.nec.com |
デフォルトで設定されます。 |
|
ローカル名 |
opr_05_tutorial_001 |
||
|
メッセージ交換モデル |
in-out |
|
|
|
SOAP Action |
|
空欄です。 |
|
|
受信方向の名前空間URI |
|
空欄です。 |
|
|
送信方向の名前空間URI |
|
空欄です。 |
|
|
Unwrapped Documentの要素 受信方向の要素名 |
|
空欄です。 |
|
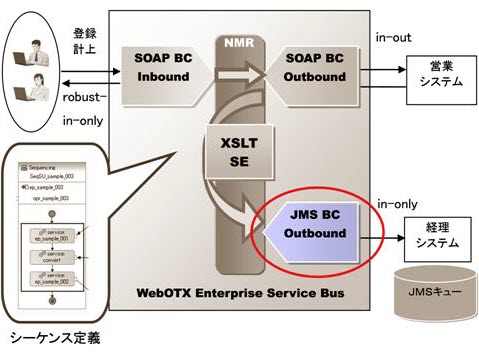
図1.3.2-1
図1.3.2-2
図1.3.2-3
Memo
経理システムでは、例として連番002を用います。
図1.3.2-4
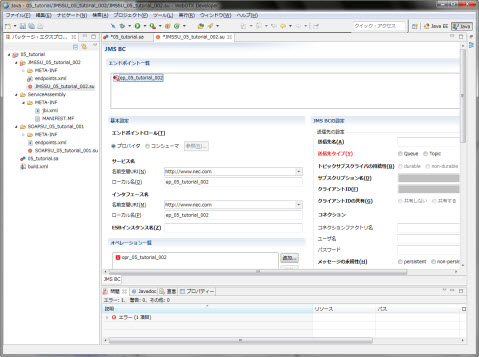
図1.3.2-5
|
設定名 |
設定値 |
備考 |
|---|---|---|
|
エンドポイントロール |
プロバイダ |
|
|
サービス名 (名前空間URI) |
http://www.nec.com |
デフォルトで設定されます。 |
|
サービス名 (ローカル名) |
ep_05_tutorial_002 |
デフォルトで設定されます。 |
|
インタフェース名 (名前空間URI) |
http://www.nec.com |
デフォルトで設定されます。 |
|
インタフェース名 (ローカル名) |
ep_05_tutorial_002 |
デフォルトで設定されます。 |
|
送信先名 |
MyQueue |
経理システムとのやり取りに使うキューのJMSリソース作成時に指定したJNDI名を指定します。 |
|
送信先タイプ |
Queue |
経理システム側は単数のJMSクライアントなのでQueueを選択します。 |
|
コネクション (コネクションファクトリ名) |
MyQCF |
JMSのコネクションファクトリ名を指定します。 |
|
コネクション (ユーザ名) |
空欄です。 |
|
|
コネクション (パスワード) |
空欄です。 |
|
|
メッセージの永続性 |
persistent |
|
|
トランザクション |
no-transaction |
|
|
メッセージセレクタ |
空欄です。 |
|
|
メッセージ有効期限 |
空欄です。 |
|
|
優先度 |
空欄です。 |
|
|
タイプ |
空欄です。 |
|
|
相関方法 |
JMSCorrelationID |
|
|
タイムアウト |
空欄です。 |
|
|
応答用送信先名 |
空欄です。 |
|
|
応答用コネクション (コネクションファクトリ名) |
空欄です。 |
|
|
応答用コネクション (ユーザ名) |
空欄です。 |
|
|
応答用コネクション (パスワード) |
空欄です。 |
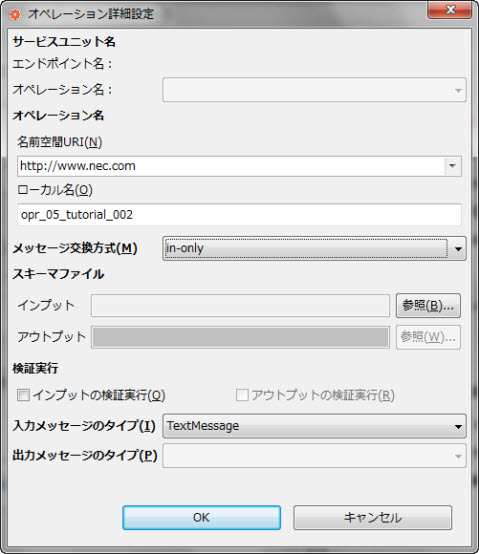
図1.3.2-6
|
設定名 |
設定値 |
備考 |
|---|---|---|
|
オペレーション名 (名前空間URI) |
http://www.nec.com |
デフォルトで設定されます。 |
|
オペレーション名 (ローカル名) |
opr_05_tutorial_001 |
デフォルト値(opr_05_tutorial_002)からopr_05_tutorial_001に変更してください。 |
|
メッセージ交換モデル |
in-only |
経理システムは非同期でメッセージを受け取るだけという仕様なのでin-onlyを選択します。 |
|
入力メッセージのタイプ |
TextMessage |
ノーマライズメッセージのコンテント(in側)の内容をJMSで送るのでTextMessageを選択します。 BytesMessageは添付ファイルを送る場合に選択します。 |
Memo
JMS
BCは、ノーマライズメッセージのコンテントの内容(XML)をTextMessageとして送信します。また、添付ファイルはBytesMessageとしてbyte配列で送信します。
従って、経理システムはTextMessageの形式で送られてくるXMLメッセージを処理できるアプリケーションになっています。
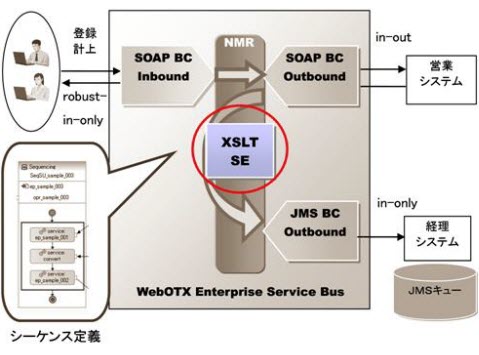
図1.3.3-1
  <?xml version="1.0" encoding="UTF-8"?>
  <xs:schema xmlns:xs="http://www.w3.org/2001/XMLSchema" targetNamespace="http://www.nec.com" xmlns:otx="http://www.nec.com">
  <xs:element name="opr_05_tutorial_001Response">
    <xs:complexType>
      <xs:sequence>
        <xs:element name="ProductData">
          <xs:complexType>
            <xs:sequence>
              <xs:element name="id"/>
                <xs:element name="registDate" type="otx:dateType"/>
                <xs:element name="deliveryDate" type="otx:dateType"/>
                <xs:element name="registerName" type="xs:string"/>
                <xs:element name="productNumber" type="xs:int"/>
                <xs:element name="productName" type="xs:string"/>
                <xs:element name="price" type="xs:int"/>
                <xs:element name="suryo" type="xs:int"/>
              </xs:sequence>
            </xs:complexType>
          </xs:element>
        </xs:sequence>
      </xs:complexType>
    </xs:element>
    <xs:complexType name="dateType">
      <xs:sequence>
        <xs:element name="year" type="xs:int"/>
        <xs:element name="month" type="xs:int"/>
        <xs:element name="date" type="xs:int"/>
        <xs:element name="hour" type="xs:int"/>
        <xs:element name="minute" type="xs:int"/>
        <xs:element name="second" type="xs:int"/>
      </xs:sequence>
    </xs:complexType>
  </xs:schema>
Memo
source.xsdはソーススキーマファイルです。こちらからダウンロードできます。
  <?xml version="1.0" encoding="UTF-8"?>
  <xs:schema xmlns:xs="http://www.w3.org/2001/XMLSchema" targetNamespace="http://www.nec.com" xmlns:otx="http://www.nec.com">
    <xs:element name="opr_05_tutorial_001">
      <xs:complexType>
        <xs:sequence>
          <xs:element name="ProductData">
            <xs:complexType>
              <xs:sequence>
                <xs:element name="id"/>
                <xs:element name="productNumber" type="xs:int"/>
                <xs:element name="productName" type="xs:string"/>
                <xs:element name="price" type="xs:int"/>
                <xs:element name="suryo" type="xs:int"/>
                <xs:element name="shoukei" type="xs:int"/>
              </xs:sequence>
            </xs:complexType>
          </xs:element>
        </xs:sequence>
      </xs:complexType>
    </xs:element>
  </xs:schema>
Memo
target.xsdはターゲットスキーマファイルです。こちらからダウンロードできます。
図1.3.3-2
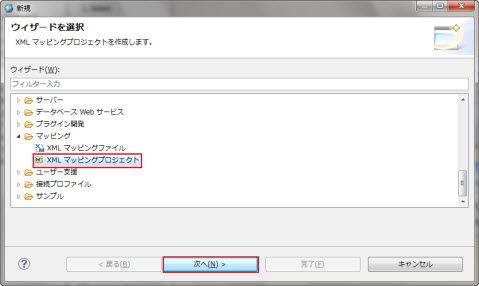
図1.3.3-3
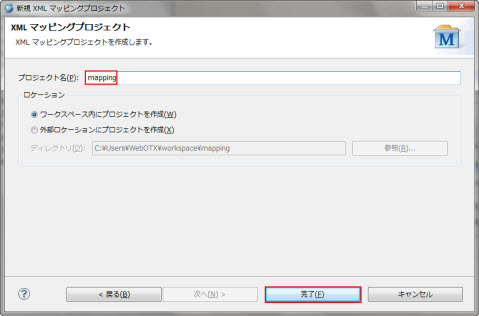
図1.3.3-4
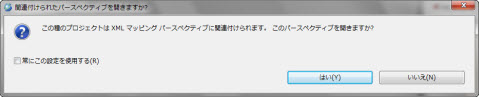
図1.3.3-5
図1.3.3-6
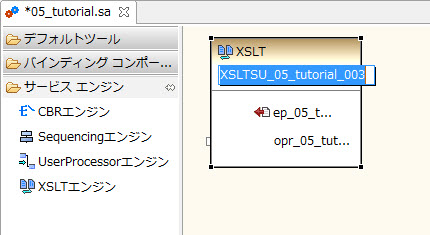
図1.3.3-7
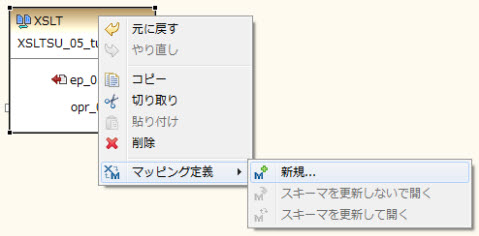
図1.3.3-8
図1.3.3-9
図1.3.3-10
図1.3.3-11
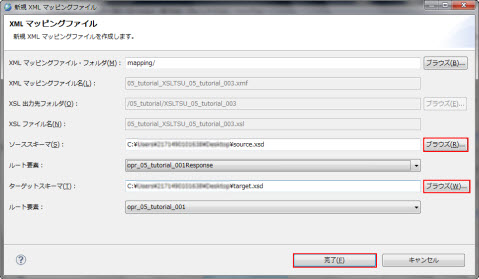
図1.3.3-12
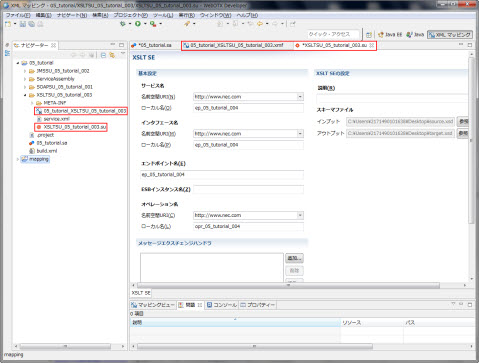
図1.3.3-13
ノード間の結線は以下の手順で行います。(1)結線元の矢印をクリック、(2)結線先の矢印をクリック、(3)結線アイコンをクリック。
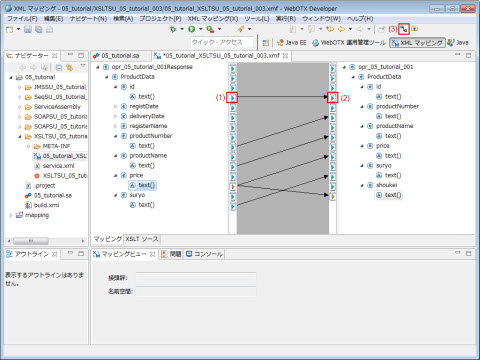
図1.3.3-14
|
ソーススキーマノード |
ターゲットスキーマノード |
|---|---|
|
opr_05_tutorial_001Response | ProductData | id |
text() |
opr_05_tutorial_001 | ProductData | id |
text() |
|
opr_05_tutorial_001Response | ProductData |
productNumber | text() |
opr_05_tutorial_001 | ProductData | productNumber
| text() |
|
opr_05_tutorial_001Response | ProductData |
productName | text() |
opr_05_tutorial_001 | ProductData | productName |
text() |
|
opr_05_tutorial_001Response | ProductData | price
| text() |
opr_05_tutorial_001 | ProductData | price |
text(), opr_05_tutorial_001 | ProductData | shoukei | text() |
|
opr_05_tutorial_001Response | ProductData | suryo
| text() |
opr_05_tutorial_001 | ProductData | suryo |
text() |
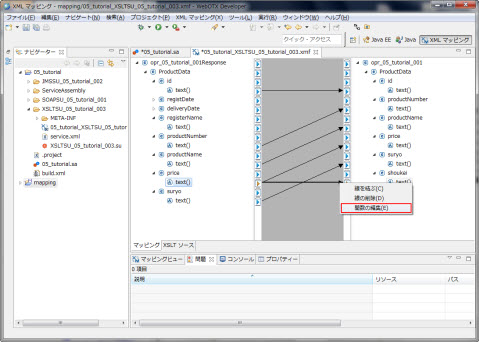
図1.3.3-15
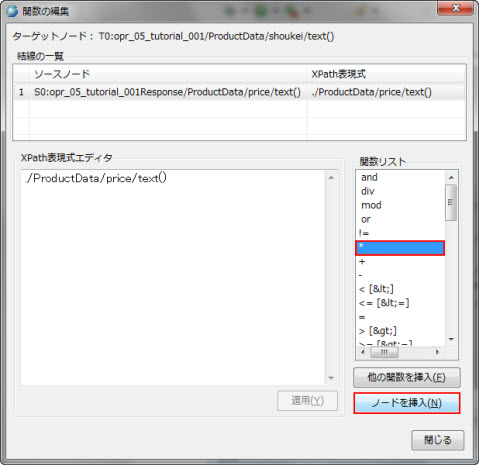
図1.3.3-16
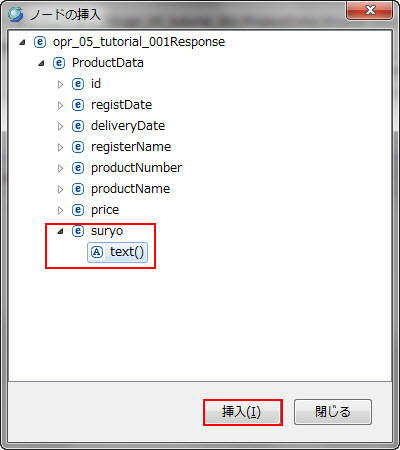
図1.3.3-17
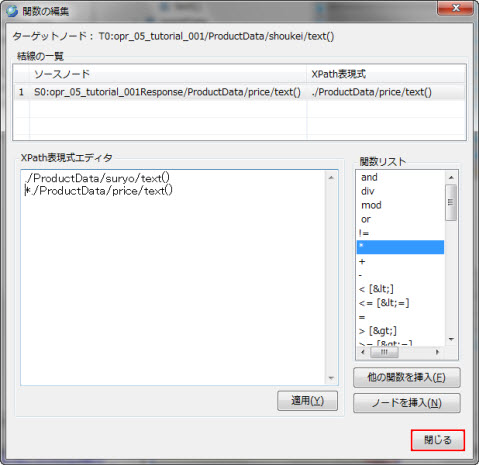
図1.3.3-18
図1.3.3-19

図1.3.3-20
図1.3.3-21

図1.3.3-22
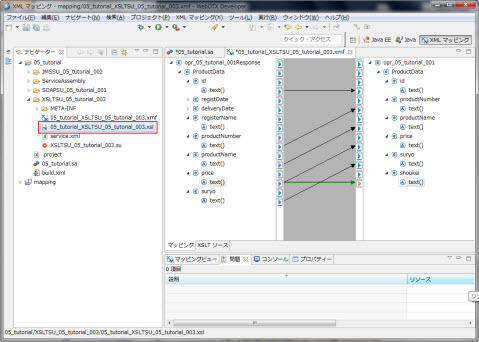
図1.3.3-23
<?xml version="1.0"?>
<xsl:stylesheet xmlns:xsl="http://www.w3.org/1999/XSL/Transform" xmlns:S0="http://www.nec.com" xmlns:T0="http://www.nec.com" xmlns:java="http://xml.apache.org/xalan/java" exclude-result-prefixes="java" version="1.0">
  <xsl:output method="xml" version="1.0" omit-xml-declaration="no" encoding="UTF-8" indent="yes"/>
  <xsl:template match="/">
    <xsl:for-each select="S0:opr_05_tutorial_001Response">
      <xsl:call-template name="node1"/>
    </xsl:for-each>
  </xsl:template>
  <!--template for node /opr_05_tutorial_001-->
  <xsl:template name="node1">
    <T0:opr_05_tutorial_001>
      <xsl:call-template name="node2"/>
    </T0:opr_05_tutorial_001>
  </xsl:template>
  <!--template for node /opr_05_tutorial_001/ProductData-->
  <xsl:template name="node2">
    <ProductData>
      <xsl:call-template name="node3"/>
      <xsl:call-template name="node4"/>
      <xsl:call-template name="node5"/>
      <xsl:call-template name="node6"/>
      <xsl:call-template name="node7"/>
      <xsl:call-template name="node8"/>
    </ProductData>
  </xsl:template>
  <!--template for node /opr_05_tutorial_001/ProductData/id-->
  <xsl:template name="node3">
    <id>
      <xsl:call-template name="node9"/>
    </id>
  </xsl:template>
  <!--template for node /opr_05_tutorial_001/ProductData/productNumber-->
  <xsl:template name="node4">
    <productNumber>
      <xsl:call-template name="node10"/>
    </productNumber>
  </xsl:template>
  <!--template for node /opr_05_tutorial_001/ProductData/productName-->
  <xsl:template name="node5">
    <productName>
      <xsl:call-template name="node11"/>
    </productName>
  </xsl:template>
  <!--template for node /opr_05_tutorial_001/ProductData/price-->
  <xsl:template name="node6">
    <price>
      <xsl:call-template name="node12"/>
    </price>
  </xsl:template>
  <!--template for node /opr_05_tutorial_001/ProductData/suryo-->
  <xsl:template name="node7">
    <suryo>
      <xsl:call-template name="node13"/>
    </suryo>
  </xsl:template>
  <!--template for node /opr_05_tutorial_001/ProductData/shoukei-->
  <xsl:template name="node8">
    <shoukei>
      <xsl:call-template name="node14"/>
    </shoukei>
  </xsl:template>
  <!--template for node /opr_05_tutorial_001/ProductData/id/text()-->
  <xsl:template name="node9">
    <xsl:value-of select="./ProductData/id/text()"/>
  </xsl:template>
  <!--template for node /opr_05_tutorial_001/ProductData/productNumber/text()-->
  <xsl:template name="node10">
    <xsl:value-of select="./ProductData/productNumber/text()"/>
  </xsl:template>
  <!--template for node /opr_05_tutorial_001/ProductData/productName/text()-->
  <xsl:template name="node11">
    <xsl:value-of select="./ProductData/productName/text()"/>
  </xsl:template>
  <!--template for node /opr_05_tutorial_001/ProductData/price/text()-->
  <xsl:template name="node12">
    <xsl:value-of select="./ProductData/price/text()"/>
  </xsl:template>
  <!--template for node /opr_05_tutorial_001/ProductData/suryo/text()-->
  <xsl:template name="node13">
    <xsl:value-of select="./ProductData/suryo/text()"/>
  </xsl:template>
  <!--template for node /opr_05_tutorial_001/ProductData/shoukei/text()-->
  <xsl:template name="node14">
    <xsl:value-of select="./ProductData/price/text()*./ProductData/suryo/text()"/>
  </xsl:template>
</xsl:stylesheet>
次に、05_tutorialプロジェクトのXSLTSU_05_tutorial_003 >
XSLTSU_05_tutorial_003.su を開き、設定を行います。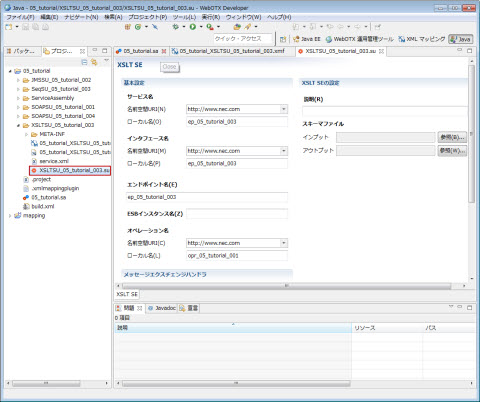
図1.3.3-24
|
設定名 |
設定値 |
備考 |
|---|---|---|
|
サービス名 (名前空間URL) |
http://www.nec.com |
デフォルトで設定されます。 |
|
サービス名 (ローカル名) |
ep_05_tutorial_003 |
デフォルトで設定されます。 |
|
インタフェース名 (名前空間URL) |
http://www.nec.com |
デフォルトで設定されます。 |
|
インタフェース名 (ローカル名) |
ep_05_tutorial_003 |
デフォルトで設定されます。 |
|
エンドポイント名 |
ep_05_tutorial_003 |
デフォルトで設定されます。 |
|
オペレーション名 (名前空間URL) |
http://www.nec.com |
デフォルトで設定されます。 |
|
オペレーション名 (ローカル名) |
opr_05_tutorial_001 |
デフォルト値からopr_05_tutorial_001に変更してください。 |
|
説明 |
空欄です。 |
|
|
サービスID |
デフォルトで設定される値を使用してください。 |
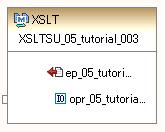
図1.3.3-25
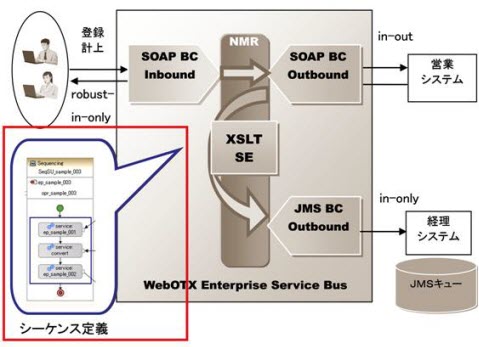
図1.3.4-1
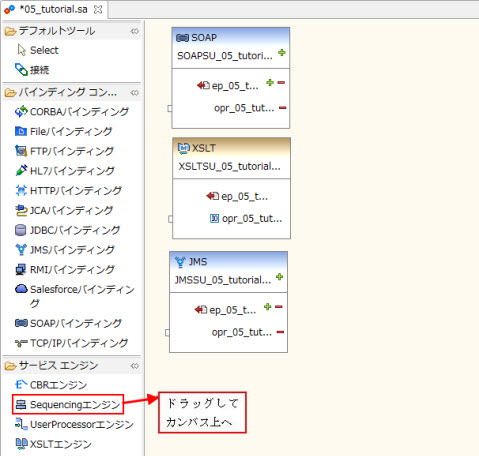
図1.3.4-2
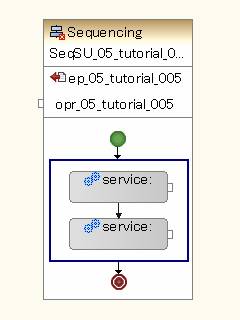
図1.3.4-3
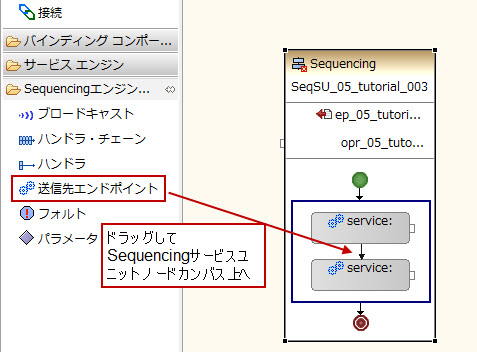
図1.3.4-4
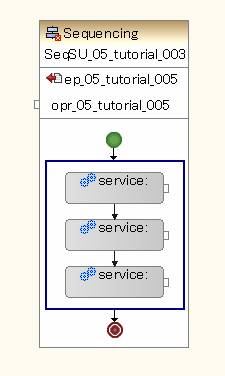
図1.3.4-5
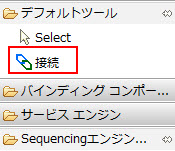
図1.3.4-6
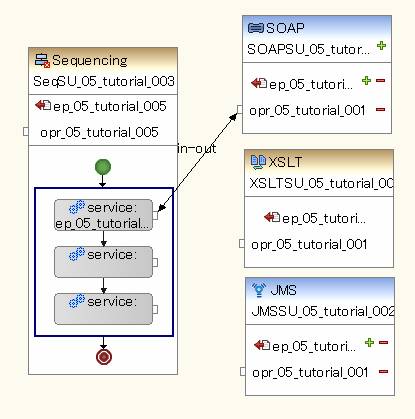
図1.3.4-7
図1.3.4-8

図1.3.4-9
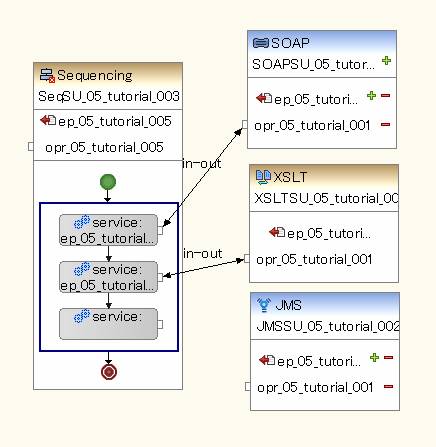
図1.3.4-10
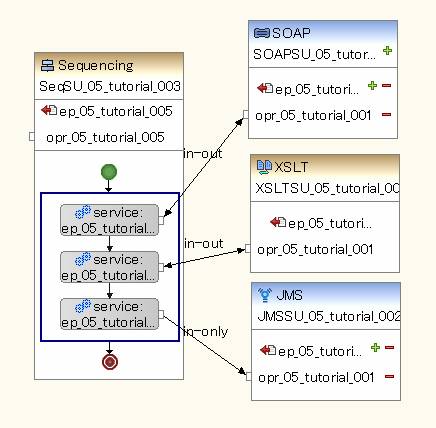
図1.3.4-11
図1.3.4-12
Memo
シーケンスでは、例として連番005を用います。
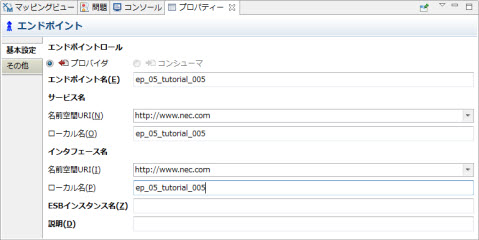
図1.3.4-13
|
設定名 |
設定値 |
備考 |
||
|---|---|---|---|---|
|
一般 |
エンドポイント名 |
ep_05_tutorial_005 |
デフォルトで設定されます。 |
|
|
サービス名 |
名前空間URI |
http://www.nec.com |
デフォルトで設定されます。 |
|
|
ローカル名 |
ep_05_tutorial_005 |
デフォルトで設定されます。 |
||
|
インタフェース名 |
名前空間URI |
http://www.nec.com |
デフォルトで設定されます。 |
|
|
ローカル名 |
ep_05_tutorial_005 |
デフォルトで設定されます。 |
||
|
その他 |
説明 |
空欄で構いません。 |
||
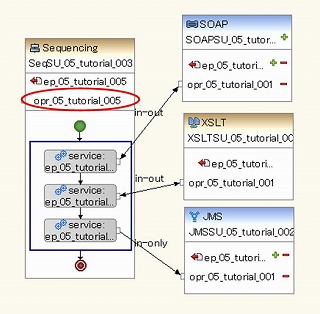
図1.3.4-14
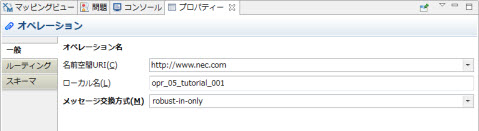
図1.3.4-15
|
設定名 |
設定値 |
備考 |
||
|---|---|---|---|---|
|
一般 |
オペレーション名 |
名前空間URI |
http://www.nec.com |
デフォルトで設定されます。 |
|
ローカル名 |
opr_05_tutorial_001 |
デフォルト値からopr_05_tutorial_001に変更してください。 |
||
|
メッセージ交換方式 |
robust-in-only |
|||
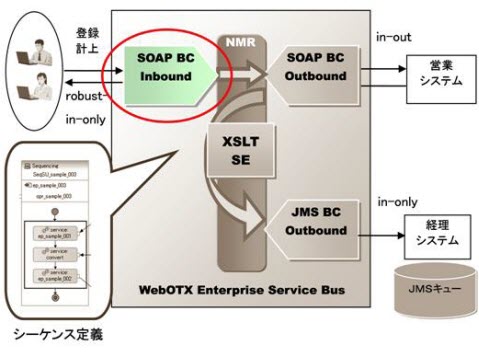
図1.3.5-1
図1.3.5-2
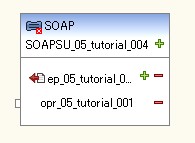
図1.3.5-3
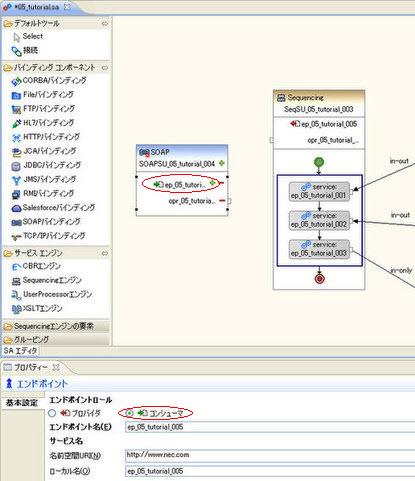
図1.3.5-4
図1.3.5-5
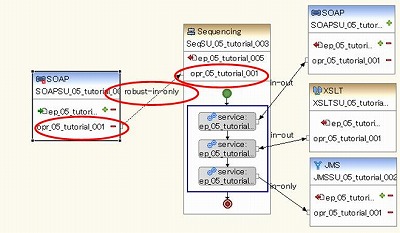
図1.3.5-6

図1.3.5-7
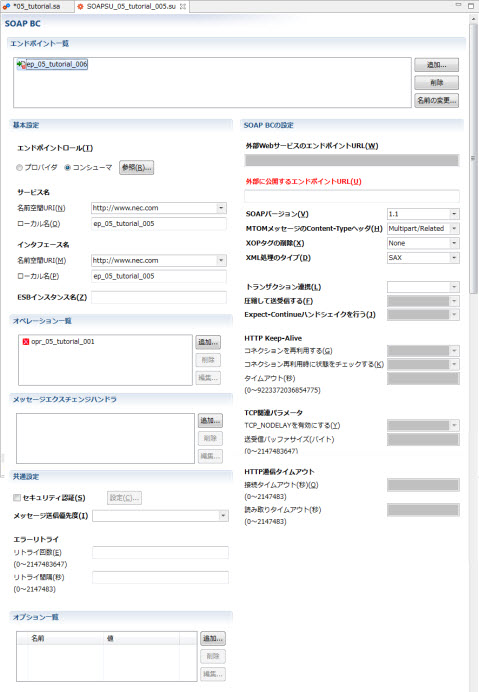
図1.3.5-8
|
設定名 |
設定値 |
備考 |
|---|---|---|
|
エンドポイントロール |
コンシューマ |
|
|
サービス名 (名前空間URI) |
http://www.nec.com |
接続により自動で設定されます。 |
|
サービス名 (ローカル名) |
ep_05_tutorial_005 |
接続により自動で設定されます。 |
|
インタフェース名 (名前空間URI) |
http://www.nec.com |
接続により自動で設定されます。 |
|
インタフェース名 (ローカル名) |
ep_05_tutorial_005 |
接続により自動で設定されます。 |
|
外部に公開する エンドポイントURL |
http://localhost/soapbc/05_account |
ホスト名、ポート番号はsoap_inbound_servlet.warを配備した場所に合わせます。 |
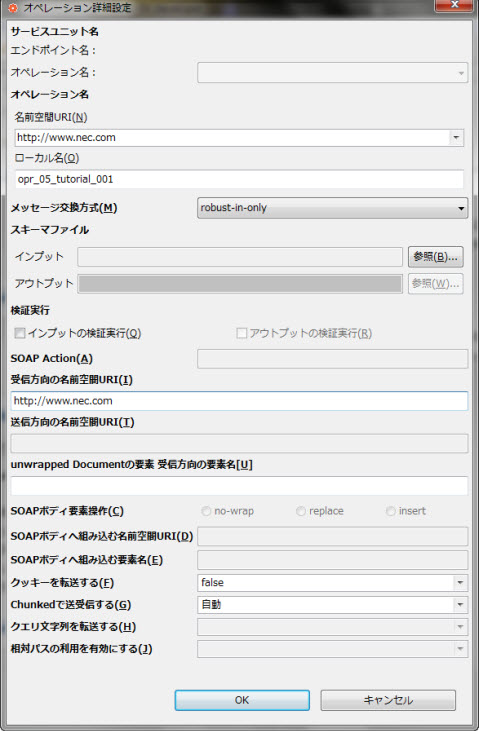
図1.3.5-9
|
設定名 |
設定値 |
備考 |
|
|---|---|---|---|
|
オペレーション名 |
名前空間URI(N)[必須] |
http://www.nec.com |
デフォルトで設定されます。 |
|
ローカル名(O)[必須] |
opr_05_tutorial_001 |
接続により自動で設定されます。 |
|
|
メッセージ交換モデル |
robust-in-only |
クライアントがESBから受け取るべきメッセージの内容はありませんが、ESBでエラーや例外が起こった内容については受け取りたいためrobust-in-onlyに設定します。 |
|
|
SOAP Action |
空欄です。 |
||
|
受信方向の名前空間URI |
http://www.nec.com |
||
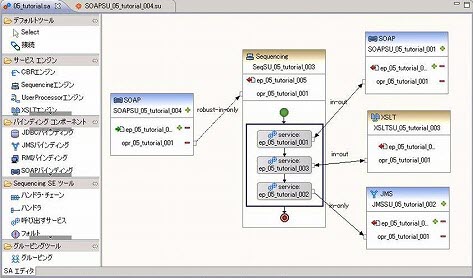
図1.3.5-10
図1.4-1
図1.4-2
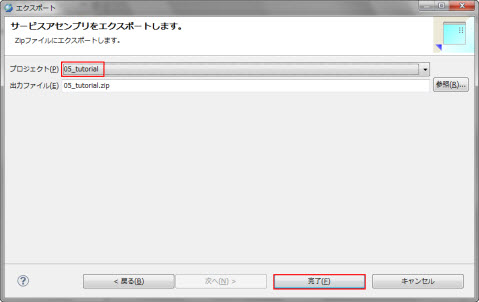
図1.4-3
otxadmin> deploy-jbi-service-assembly --apgroup <アプリケーショングループ名> --pgroup <プロセスグループ名> <05_tutorial.zipまでのパス>\05_tutorial.zip・WebOTX Express または WebOTX Standard / Enterprise のスタンダードモードの場合
otxadmin> deploy-jbi-service-assembly <05_tutorial.zipまでのパス>\05_tutorial.zipサービスアセンブリを起動します。
otxadmin > start-jbi-service-assembly 05_tutorial
<?xml version="1.0" encoding="utf-8" ?>
<registry></registry>
内容を確認したら、一旦編集画面を閉じます。
図1.5-1
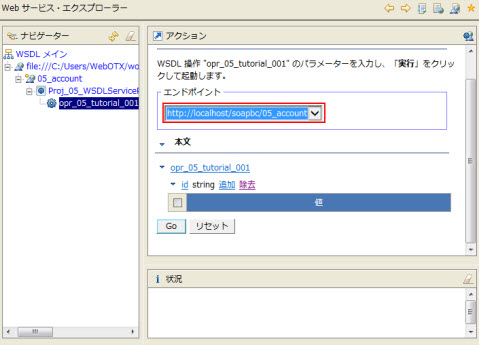
図1.5-2
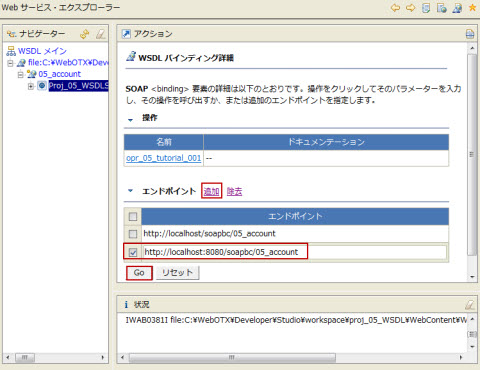
図1.5-3
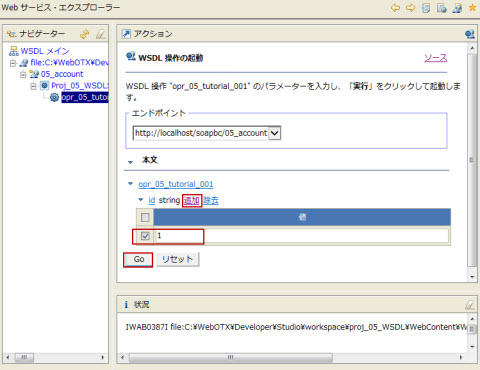
図1.5-4
図1.5-5
<?xml version="1.0" encoding="utf-8"?>
<registry>
  <ProductData>
    <id>1</id>
    <keijyouDate>
      <year>2010</year>
      <month>4</month>
      <date>1</date>
      <hour>12</hour>
      <minute>30</minute>
      <second>0</second>
    </keijyouDate>
    <productNumber>1</productNumber>
    <productName>Product_A</productName>
    <price>1500</price>
    <suryo>1000</suryo>
    <shoukei>1500000</shoukei>
  </ProductData>
</registry>
(2) Developerが利用できない場合> run.bat(UNIX環境の場合) run.shの環境変数 AS_INSTALL と URL を確認します。WebOTXのインストールディレクトリが /opt/WebOTX ではない場合、および WebOTXのWebサーバのポートが8080ではない場合は適切に修正してください。
 > chmod 777 run.sh
 > ./run.sh
******************************************
************  successful  ****************
******************************************
Memo
本章はテスト用サーバ環境のみの手順です。
メッセージログ機能を設定していない場合や、メッセージログ機能の詳細については2.16. メッセージログ機能の利用を参照してください。
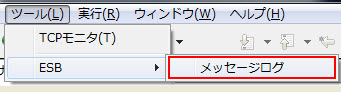
図1.6-1
図1.6-2
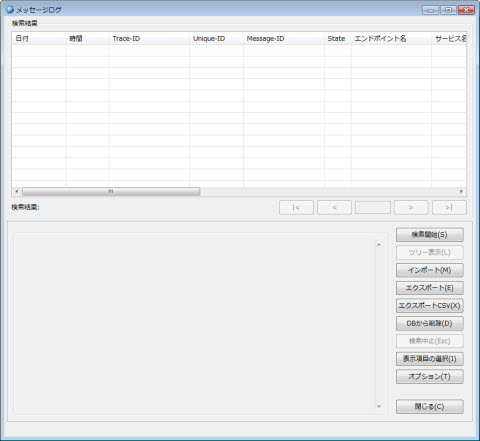
図1.6-3
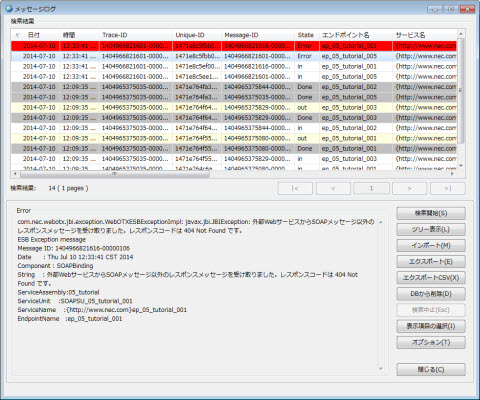
図1.6-4