1. Preface
1.1. Who Should Use This Guide
The EXPRESSCLUSTER X SingleServerSafe for Linux Installation Guide is intended for system engineers who intend to introduce a system using EXPRESSCLUSTER X SingleServerSafe and system administrators who will operate and maintain the introduced system. This guide describes how to install EXPRESSCLUSTER X SingleServerSafe.
1.2. How This Guide Is Organized
2. About EXPRESSCLUSTER X SingleServerSafe: Explains the functions and requirements of EXPRESSCLUSTER X SingleServerSafe.
3. Installing EXPRESSCLUSTER X SingleServerSafe: Describes how to install EXPRESSCLUSTER X SingleServerSafe.
4. Updating, uninstalling, reinstalling or upgrading: Describes how to install EXPRESSCLUSTER X SingleServerSafe.
5. Latest version information: Provides the latest information about EXPRESSCLUSTER X SingleServerSafe.
6. Additional information: Provides tips on installing EXPRESSCLUSTER X SingleServerSafe.
7. Notes and Restrictions: Provides notes and restrictions you need to know before starting the actual operation of EXPRESSCLUSTER X SingleServerSafe.
8. Troubleshooting: Describes problems you might experience when installing or setting up EXPRESSCLUSTER X SingleServerSafe and how to resolve them.
1.3. Terms Used in This Guide
EXPRESSCLUSTER X SingleServerSafe, which is described in this guide, uses windows and commands common to those of the clustering software EXPRESSCLUSTER X SingleServerSafe to ensure high compatibility with EXPRESSCLUSTER X SingleServerSafe in terms of operation and other aspects. Therefore, cluster-related terms are used in parts of the guide.
The terms used in this guide are defined below.
- Cluster, cluster system
A single server system using EXPRESSCLUSTER X SingleServerSafe
- Cluster shutdown, reboot
Shutdown or reboot of a system using EXPRESSCLUSTER X SingleServerSafe
- Cluster resource
A resource used in EXPRESSCLUSTER X SingleServerSafe
- Cluster object
A resource object used in EXPRESSCLUSTER X SingleServerSafe
- Failover group
A group of group resources (such as applications and services) used in EXPRESSCLUSTER X SingleServerSafe
1.4. EXPRESSCLUSTER X SingleServerSafe Documentation Set
The EXPRESSCLUSTER X SingleServerSafe documentation consists of the three guides below. The title and purpose of each guide is described below:
EXPRESSCLUSTER X SingleServerSafe Installation Guide
This guide is intended for system engineers who intend to introduce a system using EXPRESSCLUSTER X SingleServerSafe and describes how to install EXPRESSCLUSTER X SingleServerSafe.
EXPRESSCLUSTER X SingleServerSafe Configuration Guide
This guide is intended for system engineers who intend to introduce a system using EXPRESSCLUSTER X SingleServerSafe and system administrators who will operate and maintain the introduced system. It describes how to set up EXPRESSCLUSTER X SingleServerSafe.
EXPRESSCLUSTER X SingleServerSafe Operation Guide
This guide is intended for system administrators who will operate and maintain an introduced system that uses EXPRESSCLUSTER X SingleServerSafe. It describes how to operate EXPRESSCLUSTER X SingleServerSafe.
1.5. Conventions
In this guide, Note, Important, See also are used as follows:
Note
Used when the information given is important, but not related to the data loss and damage to the system and machine.
Important
Used when the information given is necessary to avoid the data loss and damage to the system and machine.
See also
Used to describe the location of the information given at the reference destination.
The following conventions are used in this guide.
Convention |
Usage |
Example |
|---|---|---|
Bold
|
Indicates graphical objects, such as fields, list boxes, menu selections, buttons, labels, icons, etc.
|
In User Name, type your name.
On the File menu, click Open Database.
|
Angled bracket within the command line |
Indicates that the value specified inside of the angled bracket can be omitted. |
|
# |
Prompt to indicate that a Linux user has logged in as root user. |
|
Monospace |
Indicates path names, commands, system output (message, prompt, etc), directory, file names, functions and parameters. |
|
bold
|
Indicates the value that a user actually enters from a command line.
|
Enter the following:
clpcl -s -a
|
italic |
Indicates that users should replace italicized part with values that they are actually working with.
|
rpm -i expressclssss-<version_number> -<release_number>.x86_64.rpm |
 In the figures of this guide, this icon represents EXPRESSCLUSTER X SingleServerSafe.
1.6. Contacting NEC
For the latest product information, visit our website below:
2. About EXPRESSCLUSTER X SingleServerSafe
2.2. Checking system requirements for EXPRESSCLUSTER X SingleServerSafe
2.3. Preparing and verifying the server environment before installation
2.1. What is EXPRESSCLUSTER X SingleServerSafe?
EXPRESSCLUSTER X SingleServerSafe is set up on a server. It monitors for application errors and hardware failures on the server and, upon detecting an error or failure, restarts the failed application or reboots the server so as to ensure greater server availability.
Occurrence of application failure

Fig. 2.1 Occurrence of failure

Fig. 2.2 Recovery from failure (Application restart)
Occurrence of hardware failure

Fig. 2.3 Occurrence of failure

Fig. 2.4 Recovery from failure (Server restart)
See also
For details about EXPRESSCLUSTER X SingleServerSafe, refer to "EXPRESSCLUSTER X SingleServerSafe" in the "EXPRESSCLUSTER X SingleServerSafe Configuration Guide".
2.1.1. EXPRESSCLUSTER X SingleServerSafe software configuration
EXPRESSCLUSTER X SingleServerSafe consists of following two software applications:
- EXPRESSCLUSTER SingleServerSafe (Main module)The main module of EXPRESSCLUSTER X SingleServerSafe. Install it on the server.
- Cluster WebUIA tool to manage EXPRESSCLUSTER X SingleServerSafe operations.It uses a Web browser as a user interface.
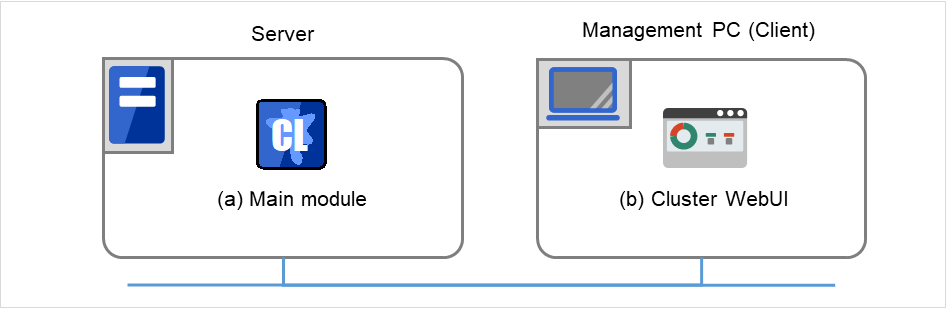
Fig. 2.5 Software configuration
2.2. Checking system requirements for EXPRESSCLUSTER X SingleServerSafe
2.2.1. Hardware
EXPRESSCLUSTER X SingleServerSafe runs on a server that has either of the following architectures:
x86_64
2.2.2. Required specifications
Required specifications for EXPRESSCLUSTER SingleServerSafe are the following:
Ethernet port:
DVD-ROM drive
2.2.3. Software
EXPRESSCLUSTER X SingleServerSafe consists of twomodules: EXPRESSCLUSTER SingleServerSafe and Cluster WebUI. Check configuration and operation requirements of each machine where these modules will be installed. The following describes the basic system requirements for EXPRESSCLUSTER X SingleServerSafe 5.0 for Linux.
Details on operating system supporting EXPRESSCLUSTER SingleServerSafe.
The following provides the system requirements for each module:
EXPRESSCLUSTER X SingleServerSafe
Machine on which the EXPRESSCLUSTER X SingleServerSafe can be installed
PC that supports one of the following operating systems.
Supported operating systems
Refer to "Supported distributions and kernel versions" below
Required memory size
User mode
200MB 1
Kernel mode
When the keepalive driver is used: 8MB
Required disk size
Right after installation
300MB
during operation
2.0GB
- 1
excepting for optional products.
Cluster WebUI
Supported browsers
Internet Explorer 11Internet Explorer 10FirefoxGoogle ChromeMicrosoft Edge (Chromium)Memory size
User mode 500 MB
Note
When accessing Cluster WebUI with Internet Explorer 11, the Internet Explorer may stop with an error. In order to avoid it, please upgrade the Internet Explorer into KB4052978 or later.Additionally, in order to apply KB4052978 or later to Windows 8.1/Windows Server 2012R2, apply KB2919355 in advance. For details, see the information released by Microsoft.Note
No mobile devices, such as tablets and smartphones, are supported.
2.2.4. Supported distributions and kernel versions
The environments where EXPRESSCLUSTER X SingleServerSafe can run depend on the kernel module versions because there are kernel modules specific to EXPRESSCLUSTER X SingleServerSafe.
Kernel versions which has been verified are listed below.
About newest information, see the web site as follows:
EXPRESSCLUSTER website->System Requirements->EXPRESSCLUSTER X SingleServerSafe for Linux
Note
For the kernel version of Cent OS supported by EXPRESSCLUSTER, see the supported kernel version of Red Hat Enterprise Linux.
2.2.5. Applications supported by the monitoring options
Version information of the applications to be monitored by the monitor resources is described below.
x86_64
Monitor resource
Application to be monitored
Remarks
Oracle monitor
Oracle Database 19c (19.3)
5.0.0-1 or later
DB2 monitor
DB2 V11.5
5.0.0-1 or later
PostgreSQL monitor
PostgreSQL 14.1
5.0.0-1 or later
PowerGres on Linux 13.5
5.0.0-1 or later
MySQL monitor
MySQL 8.0
5.0.0-1 or later
MariaDB 10.5
5.0.0-1 or later
SQL Server monitor
SQL Server 2019
5.0.0-1 or later
Samba monitor
Samba 3.3
4.0.0-1 or later
Samba 3.6
4.0.0-1 or later
Samba 4.0
4.0.0-1 or later
Samba 4.1
4.0.0-1 or later
Samba 4.2
4.0.0-1 or later
Samba 4.4
4.0.0-1 or later
Samba 4.6
4.0.0-1 or later
Samba 4.7
4.1.0-1 or later
Samba 4.8
4.1.0-1 or later
Samba 4.13
4.3.0-1 or later
NFS monitor
nfsd 2 (udp)
4.0.0-1 or later
nfsd 3 (udp)
4.0.0-1 or later
nfsd 4 (tcp)
4.0.0-1 or later
mountd 1 (tcp)
4.0.0-1 or later
mountd 2 (tcp)
4.0.0-1 or later
mountd 3 (tcp)
4.0.0-1 or later
HTTP monitor
No Specified version
4.0.0-1 or later
SMTP monitor
No Specified version
4.0.0-1 or later
pop3 monitor
No Specified version
4.0.0-1 or later
imap4 monitor
No Specified version
4.0.0-1 or later
ftp monitor
No Specified version
4.0.0-1 or later
Tuxedo monitor
Tuxedo 12c Release 2 (12.1.3)
4.0.0-1 or later
WebLogic monitor
WebLogic Server 11g R1
4.0.0-1 or later
WebLogic Server 11g R2
4.0.0-1 or later
WebLogic Server 12c R2 (12.2.1)
4.0.0-1 or later
WebLogic Server 14c (14.1.1)
4.2.0-1 or later
WebSphere monitor
WebSphere Application Server 8.5
4.0.0-1 or later
WebSphere Application Server 8.5.5
4.0.0-1 or later
WebSphere Application Server 9.0
4.0.0-1 or later
WebOTX monitor
WebOTX Application Server V9.1
4.0.0-1 or later
WebOTX Application Server V9.2
4.0.0-1 or later
WebOTX Application Server V9.3
4.0.0-1 or later
WebOTX Application Server V9.4
4.0.0-1 or later
WebOTX Application Server V10.1
4.0.0-1 or later
WebOTX Application Server V10.3
4.3.0-1 or later
JVM monitor
WebLogic Server 11g R1
4.0.0-1 or later
WebLogic Server 11g R2
4.0.0-1 or later
WebLogic Server 12c
4.0.0-1 or later
WebLogic Server 12c R2 (12.2.1)
4.0.0-1 or later
WebLogic Server 14c (14.1.1)
4.2.0-1 or later
WebOTX Application Server V9.1
4.0.0-1 or later
WebOTX Application Server V9.2
4.0.0-1 or later
WebOTX update is required to monitor process groups
WebOTX Application Server V9.3
4.0.0-1 or later
WebOTX Application Server V9.4
4.0.0-1 or later
WebOTX Application Server V10.1
4.0.0-1 or later
WebOTX Application Server V10.3
4.3.0-1 or later
WebOTX Enterprise Service Bus V8.4
4.0.0-1 or later
WebOTX Enterprise Service Bus V8.5
4.0.0-1 or later
WebOTX Enterprise Service Bus V10.3
4.3.0-1 or later
JBoss Enterprise Application Platform 7.0
4.0.0-1 or later
JBoss Enterprise Application Platform 7.3
4.3.2-1 or later
Apache Tomcat 8.0
4.0.0-1 or later
Apache Tomcat 8.5
4.0.0-1 or later
Apache Tomcat 9.0
4.0.0-1 or later
WebSAM SVF for PDF 9.0
4.0.0-1 or later
WebSAM SVF for PDF 9.1
4.0.0-1 or later
WebSAM SVF for PDF 9.2
4.0.0-1 or later
WebSAM Report Director Enterprise 9.0
4.0.0-1 or later
WebSAM Report Director Enterprise 9.1
4.0.0-1 or later
WebSAM Report Director Enterprise 9.2
4.0.0-1 or later
WebSAM Universal Connect/X 9.0
4.0.0-1 or later
WebSAM Universal Connect/X 9.1
4.0.0-1 or later
WebSAM Universal Connect/X 9.2
4.0.0-1 or later
System monitor
No specified version
4.0.0-1 or later
Process resource monitor
No specified version
4.0.0-1 or later
Note
To use monitoring options in x86_64 environments, applications to be monitored must be x86_64 version.
2.2.6. Operation environment for JVM monitor resource
The use of the JVM monitor requires a Java runtime environment. Also, monitoring a domain mode of JBoss Enterprise Application Platform requires Java(TM) SE Development Kit.
Java(TM) Runtime Environment |
Version 7.0 Update 6 (1.7.0_6) or later |
Java(TM) SE Development Kit |
Version 7.0 Update 1 (1.7.0_1) or later |
Java(TM) Runtime Environment |
Version 8.0 Update 11 (1.8.0_11) or later |
Java(TM) SE Development Kit |
Version 8.0 Update 11 (1.8.0_11) or later |
Java(TM) Runtime Environment |
Version 9.0 (9.0.1) or later |
Java(TM) SE Development Kit |
Version 9.0 (9.0.1) or later |
Java(TM) SE Development Kit |
Version 11.0 (11.0.5) or later |
Open JDK |
Version 7.0 Update 45 (1.7.0_45) or later
Version 8.0 (1.8.0) or later
Version 9.0 (9.0.1) or later
|
2.3. Preparing and verifying the server environment before installation
After installing the hardware, verify the following:
2.3.1. Verifying the network settings (Required)
Check the following network settings by using the ifconfig and ping commands.
IP Address
Host name
2.3.2. Verifying the firewall settings (Required)
By default, EXPRESSCLUSTER X SingleServerSafe uses the port numbers below. You can change these port numbers by using the Cluster WebUI. Do not access any of these port numbers from a program other than EXPRESSCLUSTER X SingleServerSafe. When setting up a firewall, set up EXPRESSCLUSTER X SingleServerSafe so that it can access the port numbers below.
After installing EXPRESSCLUSTER, you can use the clpfwctrl command to configure a firewall. For more information, see "EXPRESSCLUSTER X SingleServerSafe Operation Guide" -> "EXPRESSCLUSTER X SingleServerSafe command reference" -> "Adding a firewall rule (clpfwctrl command)". Ports to be set with the clpfwctrl command are marked with ✓ in the clpfwctrl column of the table below.
Internal processing in the local server
From
To
Remarks
clpfwctrl
Server
Automatic allocation 2
Server
29001/TCP
Internal communication
✓
Server
Automatic allocation
Server
29002/TCP
Data transfer
✓
Server
Automatic allocation
Server
29002/UDP
Heartbeat
✓
Server
Automatic allocation
Server
29003/UDP
Alert synchronization
✓
Server
Automatic allocation
Server
29008/TCP
Cluster information management
✓
Server
Automatic allocation
Server
29010/TCP
Restful API internal communication
✓
Server
Automatic allocation
Server
XXXX3/UDP
Internal communication for log
✓
From the client to the server
From
To
Remarks
clpfwctrl
Restful API client
Automatic allocation
Server
29009/TCP
HTTP communication
✓
From the Cluster WebUI to the server
From
To
Remarks
clpfwctrl
Cluster WebUI
Automatic allocation
Server
29003/TCP
http communication
✓
Others
From
To
Remarks
clpfwctrl
Server
Automatic allocation
Server
Management port number set by the Cluster WebUI
JVM monitor
✓
Server
Automatic allocation
Monitoring target
Connection port number set by the Cluster WebUI
JVM monitor
2.3.3. Setup of OpenSSL (Optional)
Encrypted communication via HTTPS connection can be performed by using the following functions:
Cluster WebUI
Witness heartbeat
HTTP network partition resolution resource
Set up OpenSSL, and prepare a certificate file and a private key file.
The prepared files will be used for configuring the settings in the config mode of Cluster WebUI: the "Encryption tab" of "Cluster properties" in "Details of other settings" in the "EXPRESSCLUSTER X SingleServerSafe Configuration Guide".
2.3.4. SELinux settings (Required)
Note
Check if SELinux is enabled or disabled.
# getenforce
Enforcing
One of the following words appears, each of which means:
Enforcing : Enabled (SELinux security policy is enforced.)
Permissive : SELinux prints warnings instead of enforcing.
Disabled : Disabled (No SELinux policy is loaded.)
- To disable SELinux: In the /etc/selinux/config file, edit the SELINUX=enforcing line by changing the value from enforcing to disabled or permissive.To enable SELinux, specify enforcing.The values to be specified after SELINUX= mean:
enforcing : Enabled (SELinux security policy is enforced.)
permissive : SELinux prints warnings instead of enforcing.
disabled : Disabled (No SELinux policy is loaded.)
# vi /etc/selinux/configIf you have changed the setting, reboot the server to apply it.
# reboot - On EXPRESSCLUSTER X SingleServerSafe with SELinux enabled (with enforcing specified), loading the drivers of EXPRESSCLUSTER X SingleServerSafe requires configuring permission beforehand.In this case, complete the following steps 4 to 9:
Install the following packages:
For RHEL 8-based systems:
# dnf -y install selinux-policy-mls
# dnf -y install selinux-policy-devel
For RHEL 7-based systems:
# yum -y install selinux-policy-mls
# yum -y install selinux-policy-devel
Create a working directory, then move there.
# mkdir -p /tmp/te
# cd       /tmp/te
Create a .te file for the clpka.ko driver.
# vi clpka.teContents of the clpka.te file:
# clpka.te
module clpka 1.0;

require {
        type unconfined_service_t;
        type usr_t;
        class system module_load;
}

#============= unconfined_service_t ==============
allow unconfined_service_t usr_t:system module_load;
Create a .te file for the clpkhb.ko driver.
# vi clpkhb.teContents of the clpkhb.te file:
# clpkhb.te
module clpkhb 1.0;

require {
        type unconfined_service_t;
        type usr_t;
        class system module_load;
}

#============= unconfined_service_t ==============
allow unconfined_service_t usr_t:system module_load;
- Execute the following command.This creates and installs package policy files.
# make -f /usr/share/selinux/devel/Makefile
# semodule -i clpka.pp clpkhb.pp
Check if all the two package policy files have been installed.
# semodule -l | grep clp
clpka
clpkhb
Note
You can delete the working directory.
After creating a cluster, check that the necessary drivers are loaded.
- clpka, as a method for user mode monitor resources, is loaded in starting the cluster with "keepalive" specified.The driver, as a method for the shutdown monitor, is loaded in starting shutdown monitoring with "keepalive" specified.
clpkhb is loaded for using clpka.
# lsmod | grep clp
clpka
clpkhb
3. Installing EXPRESSCLUSTER X SingleServerSafe
This chapter describes how to install EXPRESSCLUSTER X SingleServerSafe. To install EXPRESSCLUSTER X SingleServerSafe, install the EXPRESSCLUSTER X SingleServerSafe, which is the main module of EXPRESSCLUSTER SingleServerSafe.
This chapter covers:
3.1. Steps from installing EXPRESSCLUSTER X SingleServerSafe to setting up the server
- Installing the EXPRESSCLUSTER X SingleServerSafeInstall the EXPRESSCLUSTER X SingleServerSafe, which is the core EXPRESSCLUSTER X SingleServerSafe module, on each target server.
- Registering the licenseRegister the license by running the clplcnsc command.
- Creating the configuration data by using the Cluster WebUICreate the configuration data by using the Cluster WebUI.Refer to "Creating configuration data" in the "EXPRESSCLUSTER X SingleServerSafe Configuration Guide".
- Setting up a serverApply the configuration data created using the Cluster WebUI to set up a server.When using the Cluster WebUI, Apply the configulation date by using it or clpcfctrl command.Refer to "Creating configuration data" in the "EXPRESSCLUSTER X SingleServerSafe Configuration Guide".
- Verifying the cluster status using the Cluster WebUICheck the status of the server by using the Cluster WebUI.Refer to "Checking the cluster system" in the "EXPRESSCLUSTER X SingleServerSafe Configuration Guide".
See also
Refer to the "EXPRESSCLUSTER X SingleServerSafe Configuration Guide" as you proceed in accordance with the procedures in this guide. For the latest information on the system requirements and release information, see "2. About EXPRESSCLUSTER X SingleServerSafe" and "5. Latest version information" in this guide.
3.2. Installing the EXPRESSCLUSTER X SingleServerSafe
3.2.1. Installing EXPRESSCLUSTER X SingleServerSafe for the first time
To install EXPRESSCLUSTER X SingleServerSafe, follow the procedure below.
Note
Log in as a root user when installing the EXPRESSCLUSTER X SingleServerSafe RPM / deb package.
Mount (mount) the installation DVD-ROM.
- Run the rpm / dpkg command to install the package file.The installation RPM / deb package varies depending on the products.
Navigate to the folder, /Linux/5.0/en/server, in the DVD-ROM and run the following:
rpm -i expressclssss-version.x86_64.rpm
For Ubuntu, run the following
dpkg -i expressclssss-version.amd64.deb
The installation starts.
Note
EXPRESSCLUSTER X SingleServerSafe will be installed in the following directory. You will not be able to uninstall the EXPRESSCLUSTER if you change this directory.Installation directory: /opt/nec/clusterpro When the installation is completed, unmount (umount) the installation DVD-ROM.
Remove the installation DVD-ROM.
See also
3.2.2. Setting up the SNMP linkage function
Note
If you only use the SNMP trap transmission function, this procedure is not required.
To handle information acquisition requests on SNMP, Net-SNMP must be installed separately and the SNMP linkage function must be registered separately.
Follow the procedure below to set up the SNMP linkage function.
Note
To set up the SNMP linkage function, you must log in as the root user.
The description related to Net-SNMP in the installation procedure may vary depending on the distribution.
Install Net-SNMP.
- Check the snmpd version.Run the following command:
snmpd -v
Stop the snmpd daemon.
Note
The daemon can usually be stopped by the following command:
For an init.d environment:
/etc/init.d/snmpd stop
For a systemd environment:
systemctl stop snmpd
- Register the SNMP linkage function of EXPRESSCLUSTER in the configuration file for the snmpd daemon.Open the configuration file with a text editor.Add the following description to the end of the file according to the snmpd version.
If the snmpd version is earlier than 5.7:
dlmod clusterManagementMIB /opt/nec/clusterpro/lib/libclpmgtmib.so
If the snmpd version is 5.7 or later:
dlmod clusterManagementMIB /opt/nec/clusterpro/lib/libclpmgtmib2.so
Note
The configuration file for the Net-SNMP snmpd daemon is usually located in the following directory:
/etc/snmp/snmpd.conf
- Add the OID of EXPRESSCLUSTER in the MIB view (view definition by snmpd.conf) permitted by the snmpd daemon.The OID of EXPRESSCLUSTER is ".1.3.6.1.4.1.119.2.3.207".
- Create symbolic links to libraries needed by the SNMP linkage function.The following three symbolic links are needed.libnetsnmp.solibnetsnmpagent.solibnetsnmphelpers.soFollow the procedure below to create the symbolic links.
5-1.
Confirm the presence of the symbolic links.Change to following directory.If those symbolic links exist in the following directory, proceed to step 6./usr/lib645-2.
Create symbolic links.Run the following commands.ln -s libnetsnmp.so.X libnetsnmp.so ln -s libnetsnmpagent.so.X libnetsnmpagent.so ln -s libnetsnmphelpers.so.X libnetsnmphelpers.so
Substitute a numeric value for X according to the environment. Start the snmpd daemon.
Note
The daemon can usually be started by the following command:
For an init.d environment:
/etc/init.d/snmpd start
For a systemd environment:
systemctl start snmpd
See also
You must cancel the settings of the SNMP function when uninstalling the EXPRESSCLUSTER Server. For how to cancel the settings of the SNMP linkage function, see "4.2.2. Canceling the SNMP linkage function settings".
Note
The settings required for SNMP communication are to be made on the SNMP agent.
3.3. Registering the license
3.3.1. Registering the CPU license
You must register the CPU license to run the system you create.
See also
The names of the products to which the CPU license applies are listed below.
License product name |
|---|
EXPRESSCLUSTER X SingleServerSafe 5.0 for Linux |
There are two ways of license registration; using the information on the license sheet and specifying the license file. These two ways are described for both the product and trial versions.
Product version
- Specify the license file as the parameter of the license management command.
- Register the license by running the license management command and interactively entering the license information that comes with the licensed product.
Trial version
- Specify the license file as the parameter of the license management command.
3.3.2. Registering the license by specifying the license file (for both the product version and trial version)
You can log on as a root user to the server on which you are going to set up a system.
Log on to the server you are going to set up as a root user, and then run the following command:
# clplcnsc -i filepath
Specify the path to the license file for filepath specified by the -i option.When the command is successfully executed, the message "License registration succeeded." is displayed in the console. If another message is displayed, refer to "EXPRESSCLUSTER X SingleServerSafe command reference" in the "EXPRESSCLUSTER X SingleServerSafe Operation Guide".Run the following command to verify the licenses registered.
# clplcnsc -l -a
When an optional product is not used, proceed to "3.3.7. Registering the node license".
- When not using any optional products, restart the server by using the OS shutdown command to validate the license registration and run the server.After restarting, proceed to "Creating configuration data" in the "EXPRESSCLUSTER X SingleServerSafe Configuration Guide", and follow the procedure.
3.3.3. Registering the license interactively from the command line (product version)
You have the license sheet you officially obtained from the sales agent. The license sheet is sent to you when you purchase the product. The values on this license sheet are used for registration.
You can log on to the server on which you are going to set up a system as a root user.
See also
The clplcnsc command is used in the following procedures. For details about how to use the clplcnsc command, refer to "EXPRESSCLUSTER X SingleServerSafe command reference" in the "EXPRESSCLUSTER X SingleServerSafe Operation Guide".
- Have the license sheet.The instruction here is given using the values in the following license sheet as an example. When actually entering the values, modify them according to the information on your license sheet.
Product EXPRESSCLUSTER X SingleServerSafe 5.0 for Linux
License information:
Type Product version
License Key A1234567-B1234567-C1234567-D1234567
Serial Number AAAAAAAA000000
Number of Licensed CPUs 2
Log on to the server you are going to set up as a root user, and then run the following command:
# clplcnsc -i
The text that prompts you to enter the license version is displayed. Enter 1 when using a product version:
Selection of License Version.
1 Product version
2 Trial version
e Exit
Select License Version [1, 2, e (default:1)]... 1
The text that prompts you to enter the serial number is displayed. Enter the serial number written in your license sheet. Note this is case sensitive.
Enter serial number [Ex. XXXXXXXX000000]... AAAAAAAA000000
The text that prompts you to enter the license key is displayed. Enter the license key written in your license sheet. Note this is case sensitive.
Enter license key
[XXXXXXXX-XXXXXXXX-XXXXXXXX-XXXXXXXX]...
A1234567-B1234567-C1234567-D1234567
When the command is successfully executed, the message "License registration succeeded." is displayed in the console. If another message is displayed, refer to "EXPRESSCLUSTER X SingleServerSafe command reference" in the "EXPRESSCLUSTER X SingleServerSafe Operation Guide".Run the following command to verify the licenses registered.
# clplcnsc -l -a
When an optional product is used, proceed to "Registering the node license" in this chapter.
- If no optional product is used, run the OS shutdown command to reboot the server.After rebooting the server, proceed to "Checking the cluster system" in the "EXPRESSCLUSTER X SingleServerSafe Configuration Guide", and follow the procedure.
3.3.4. Registering the VM node license
When the virtual server exists in the cluster system to be constructed, VM node license can be used not CPU license for the virtual server.
There are two ways of license registration; using the information on the license sheet and specifying the license file.
The names of the products to which the VM node license applies are listed below.
License Product Name |
|---|
EXPRESSCLUSTER X SingleServerSafe 5.0 for Linux VM |
Product version
Specify the license file as the parameter of the license management command. Refer to "3.3.5. Registering the VM node license by specifying the license file (Product version).."
Register the license by running the license management command and interactively entering the license information that comes with the licensed product. Refer to "3.3.6. Registering the VM node license interactively from the command line (Product version)".
3.3.5. Registering the VM node license by specifying the license file (Product version).
You can log on as a root user to the server on which you are going to set up a system.
Among the servers that you intend to use to build a cluster, log on to the virtual server as root user and run the following command.
# clplcnsc -i filepath
Specify the path to the license file for filepath specified by the -i option.When the command is successfully executed, the message "License registration succeeded." is displayed on the console. When a message other than this is displayed, see "EXPRESSCLUSTER X SingleServerSafe command reference" in the "EXPRESSCLUSTER X SingleServerSafe Operation Guide".Run the following command to verify the licenses registered.
# clplcnsc -l -a
When using option products, see "3.3.7. Registering the node license".
- When not using option products, run the OS shutdown command to reboot the server. By doing this, the license registration becomes effective and you can start using the cluster.After rebooting the server, proceed to "Checking the cluster system" in the "EXPRESSCLUSTER X SingleServerSafe Configuration Guide".
3.3.6. Registering the VM node license interactively from the command line (Product version)
Have the official license sheet that comes with the product. The license sheet is sent to you when you purchase the product. You will enter the values on the license sheet.
Be allowed to logon as root user to the virtual servers of servers constituting the system.
See also
The clplcnsc command is used in the following procedures. For more information on how to use the clplcnsc command, see "EXPRESSCLUSTER X SingleServerSafe command reference" in the "EXPRESSCLUSTER X SingleServerSafe Operation Guide".
- Have the license sheet.The instruction here is given using the values in the following license sheet as an example. When actually entering the values, modify them according to the information on your license sheet.
Product name: EXPRESSCLUSTER X SingleServerSafe 5.0 for Linux VM
License information:
Type Product Version
License Key A1234567-B1234567-C1234567-D1234567
Serial Number AAAAAAAA000000
Number of License Server 1
A virtual server of which you intend to construct a cluster, log on to the server as root user and run the following command.
# clplcnsc -i
The text that prompts you to enter the license version is displayed. Enter 1 since it is a product version:
Selection of License Version.
1 Product version
2 Trial version
e Exit
Select License Version. [1, 2, or e (default:1)]... 1
The text that prompts you to enter the serial number is displayed. Enter the serial number written in your license sheet. Note this is case sensitive.
Enter serial number [Ex. XXXXXXXX000000]... AAAAAAAA000000
The text that prompts you to enter the license key is displayed. Enter the license key written in your license sheet. Note this is case sensitive.
Enter license key
[XXXXXXXX-XXXXXXXX-XXXXXXXX-XXXXXXXX]...
A1234567-B1234567-C1234567-D1234567
When the command is successfully executed, the message "License registration succeeded." is displayed on the console. When a message other than this is displayed, see "EXPRESSCLUSTER X SingleServerSafe command reference" in the "EXPRESSCLUSTER X SingleServerSafe Operation Guide".Run the following command to verify the licenses registered.
# clplcnsc -l -a
When using option products, see "3.3.7. Registering the node license".
- When not using option products, run the OS shutdown command to reboot the server.After rebooting the server, proceed to next "Checking the cluster system" in the "EXPRESSCLUSTER X SingleServerSafe Configuration Guide".
3.3.7. Registering the node license
License product name |
|---|
EXPRESSCLUSTER X Database Agent 5.0 for Linux |
EXPRESSCLUSTER X Internet Server Agent 5.0 for Linux |
EXPRESSCLUSTER X File Server Agent 5.0 for Linux |
EXPRESSCLUSTER X Application Server Agent 5.0 for Linux |
EXPRESSCLUSTER X Alert Service 5.0 for Linux |
EXPRESSCLUSTER X Java Resource Agent 5.0 for Linux |
EXPRESSCLUSTER X System Resource Agent 5.0 for Linux |
Register the node license for the set up server on which to use optional products. There are two ways of license registration; using the information on the license sheet and specifying the license file. These two ways are described for both the product and trial versions.
Product version
- Specify the license file as the parameter of the license management command.
- Register the license by running the license management command and interactively entering the license information that comes with the licensed product.
Trial version
- Specify the license file as the parameter of the license management command.
3.3.8. Registering the license by specifying the license file (for both the product version and trial version)
You can log on as a root user to the server on which you are going to use an optional product.
- Of the servers you are going to set up, log on to the server on which the optional product is to be used as a root user, and then run the following command:
# clplcnsc -i filepath
Specify the path to the license file for filepath specified by the -i option.When the command is successfully executed, the message "License registration succeeded." is displayed in the console. If another message is displayed, see "EXPRESSCLUSTER X SingleServerSafe command reference" in the "EXPRESSCLUSTER X SingleServerSafe Operation Guide". Run the following command to verify the licenses registered.
# clplcnsc -l -a
- Restart the server by using the OS shutdown command to validate the license registration and run the server.After restarting, proceed to "Creating configuration data" in the "EXPRESSCLUSTER X SingleServerSafe Configuration Guide", and follow the procedure.
3.3.9. Registering the node license interactively from the command line (product version)
You have the license sheet you officially obtained from the sales agent. The license sheet is sent to you when you purchase the product. The number of license sheets you need is as many as the number of servers on which the option product will be used. The values on this license sheet are used for registration.
Of the servers you are going to set up, you can log on to the server on which the optional product is to be used as a root user.
See also
The clplcnsc command is used in the following procedures. For details about how to use the clplcnsc command, refer to "EXPRESSCLUSTER X SingleServerSafe command reference" in the "EXPRESSCLUSTER X SingleServerSafe Operation Guide".
- Have the license sheet.The instruction here is given using the values in the following license sheet (Database Agent) as an example. When actually entering the values, modify them according to the information on your license sheet.
Product EXPRESSCLUSTER X Database Agent 5.0 for Linux
License information:
Type Product version
License Key A1234567- B1234567- C1234567- D1234567
Serial Number AAAAAAAA000000
Number of nodes 1
Of the servers you are going to set up, log on to the server on which the optional product is to be used as the root user, and then run the following command:
# clplcnsc -i
The text that prompts you to enter the license version is displayed. Enter 1 since it is a product version:
Selection of License Version.
1 Product Version
2 Trial Version
e Exit
Select License Version [1, 2, or e (default:1)]... 1
The text that prompts you to enter the serial number is displayed. Enter the serial number written in your license sheet. Note this is case sensitive.
Enter serial number [Ex. XXXXXXXX000000]... AAAAAAAA000000
The text that prompts you to enter the license key is displayed. Enter the license key written in your license sheet. Note this is case sensitive.
Enter license key
[XXXXXXXX-XXXXXXXX-XXXXXXXX-XXXXXXXX]...
A1234567-B1234567-C1234567-D1234567
When the command is successfully executed, the message "License registration succeeded." is displayed in the console. If another message is displayed, refer to "EXPRESSCLUSTER X SingleServerSafe command reference" in the "EXPRESSCLUSTER X SingleServerSafe Operation Guide".Run the following command to verify the licenses registered.
# clplcnsc -l -a
- Restart the server by using the OS shutdown command to validate the license registration and run the server.After restarting, proceed to "Creating configuration data" in the "EXPRESSCLUSTER X SingleServerSafe Configuration Guide", and follow the procedure.
3.3.10. Registering the fixed term license
The names of the products to which the fixed term license applies are listed below.
License product name |
|---|
Main product |
EXPRESSCLUSTER X SingleServerSafe 5.0 for Linux |
Optional Products |
EXPRESSCLUSTER X Database Agent 5.0 for Linux |
EXPRESSCLUSTER X Internet Server Agent 5.0 for Linux |
EXPRESSCLUSTER X File Server Agent 5.0 for Linux |
EXPRESSCLUSTER X Application Server Agent 5.0 for Linux |
EXPRESSCLUSTER X Alert Service 5.0 for Linux |
EXPRESSCLUSTER X Java Resource Agent 5.0 for Linux |
EXPRESSCLUSTER X System Resource Agent 5.0 for Linux |
A License is registered by specifying the license file.
3.3.11. Registering the fixed term license by specifying the license file
You can log on as a root user to the server on which you are going to set up a system.
Follow the following steps to register all the license files for the products to be used.
Log on to the server you are going to set up as a root user, and then run the following command:
# clplcnsc -i filepath
Specify the path to the license file for filepath specified by the -i option.When the command is successfully executed, the message "License registration succeeded." is displayed in the console. If another message is displayed, refer to "EXPRESSCLUSTER X SingleServerSafe command reference" in the "EXPRESSCLUSTER X SingleServerSafe Operation Guide".If you have two or more license files for the same product in preparation for the expiration, execute the command to register the extra license files in the same way as above.If there are other products you intend to use, repeat the step 1.
Run the following command to verify the licenses registered.
# clplcnsc -l -a
- Rstart the server by using the OS shutdown command to validate the license registration and run the server.After restarting, proceed to "Creating configuration data" in the "EXPRESSCLUSTER X SingleServerSafe Configuration Guide", and follow the procedure.
4. Updating, uninstalling, reinstalling or upgrading
This chapter describes how to update EXPRESSCLUSTER X SingleServerSafe, uninstall and reinstall EXPRESSCLUSTER X SingleServerSafe, and upgrade to EXPRESSCLUSTER X.
This chapter covers:
4.1. Updating EXPRESSCLUSTER X SingleServerSafe
An older version of EXPRESSCLUSTER X SingleServerSafe can be updated to the latest version.
4.1.1. Updating the EXPRESSCLUSTER X SingleServerSafe RPM
Before starting the update, read the following notes.
The upgrade procedure described in this section is valid for EXPRESSCLUSTER X SingleServerSafe 3.3 for Linux (internal version 3.3.5-1) for Linux or later.
- In EXPRESSCLUSTER X SingleServerSafe 4.2 for Linux or later, port numbers for EXPRESSCLUSTER have been added. If you upgrade from EXPRESSCLUSTER X SingleServerSafe 4.1 for Linux or earlier, make necessary ports accessible beforehand.For information on port numbers for EXPRESSCLUSTER, refer to"2.3.2. Verifying the firewall settings (Required)".
To update, use an account that has root privileges.
See also
For the procedure of updating between the different versions of the same major version, refer to the "Update Procedure Manual".
The following procedures explain how to upgrade from EXPRESSCLUSTER X SingleServerSafe 3.3 or 4.x to EXPRESSCLUSTER X SingleServerSafe 5.0.
Make sure that the server and all the resources are in the normal status by using the Cluster WebUI, WebManager or clpstat command.
Save the current cluster configuration file with the Cluster WebUI, Builder or clpcfctrl command. For details about saving the cluster configuration file with clpcfctrl command, refer to "Applying and backing up configuration data (clpcfctrl command)" in " Backing up the configuration data (clpcfctrl --pull)" - "EXPRESSCLUSTER X SingleServerSafe command reference" in the "EXPRESSCLUSTER X SingleServerSafe Operation Guide".
Uninstall EXPRESSCLUSTER X SingleServerSafe from the server. For details about the uninstallation procedure, refer to "4.2. Uninstalling EXPRESSCLUSTER X SingleServerSafe" in this chapter.
Install the EXPRESSCLUSTER X 5.0 SingleServerSafe on the server. For details about the installation procedure, refer to "3.2. Installing the EXPRESSCLUSTER X SingleServerSafe" and "3.3. Registering the license" in this guide.
On the server with EXPRESSCLUSTER X SingleServerSafe installed as above, execute the command for converting configuration data.
Move to the work directory (such as /tmp) in which the conversion command is to be executed.
- To the moved work directory, copy and deploy the cluster configuration data backed up in step 2.Deploy clp.conf and the scripts directory.
Note
If backed up on Cluster WebUI, the cluster configuration data is zipped.Unzip the file, and clp.conf and the scripts directory will be extracted. Execute the following command to convert the cluster configuration data:
# clpcfconv.sh -i .
Under the work directory, zip the cluster configuration data (clp.conf) and the scripts directory.
Note
Create the zip file so that when unzipped, the clp.conf file and scripts directory are created.
- Open the config mode of Cluster WebUI, and click Import.Import the cluster configuration data zipped in step 5.
- Of the cluster configuration data, manually update its items if necessary.See "7.3.2. Removed Functions". Then, if you have used any of the functions with its corresponding action described in the Action column of the table, change the cluster configuration data according to the described action.
Click Export of the Cluster WebUI to apply the configuration data.
Open the operation mode of Cluster WebUI, and start the cluster.
Updating completes. Check that the server is operating normally by the clpstat command or Cluster WebUI.
4.2. Uninstalling EXPRESSCLUSTER X SingleServerSafe
4.2.1. Uninstalling EXPRESSCLUSTER Server
Note
You must log on as a root user to uninstall EXPRESSCLUSTER X SingleServerSafe.
To uninstall EXPRESSCLUSTER Server, follow the procedure below.
If the SNMP linkage function has been used, you must cancel the linkage before uninstalling EXPRESSCLUSTER Server. For how to cancel the settings of the SNMP linkage function, see "Canceling the SNMP linkage function settings".
- Disable the services by running the following command.
clpsvcctrl.sh --disable -a
Shut down the server by using the Cluster WebUI or clpstdn command, and then restart it.
- Run the rpm -e expressclssss command.For Ubuntu, run the dpkg -r expressclssss command.
Note
Do not specify other options than the one stated above.
4.2.2. Canceling the SNMP linkage function settings
Note
To cancel the SNMP linkage function settings, you must log in as the root user.
Note
The description related to Net-SNMP in the uninstallation procedure may vary depending on the distribution.
Stop the snmpd daemon.
Note
The daemon can usually be stopped by the following command:
For an init.d environment:
/etc/init.d/snmpd stop
For a systemd environment:
systemctl stop snmpd
Cancel registration of the SNMP linkage function in the configuration file for the snmpd daemon.
Open the configuration file with a text editor.Delete the following line from the file.dlmod clusterManagementMIB /opt/nec/clusterpro/lib/libclpmgtmib.so dlmod clusterManagementMIB /opt/nec/clusterpro/lib/libclpmgtmib2.so
Note
The configuration file for the snmpd daemon is usually located in the following directory:
/etc/snmp/snmpd.conf
Note
Delete the OID of EXPRESSCLUSTER from the MIB view (view definition by snmpd.conf) permitted by the snmpd daemon.The OID of EXPRESSCLUSTER is ".1.3.6.1.4.1.119.2.3.207".If you created symbolic links at "3.2.2. Setting up the SNMP linkage function ", delete them.
Start the snmpd daemon.
Note
The daemon can usually be started by the following command:
For an init.d environment:
/etc/init.d/snmpd start
For a systemd environment:
systemctl start snmpd
4.3. Reinstalling EXPRESSCLUSTER X SingleServerSafe
4.3.1. Reinstalling the EXPRESSCLUSTER SingleServerSafe
To re-install the EXPRESSCLUSTER X SingleServerSafe, you have to prepare the cluster configuration data created by the Cluster WebUI.
If you do not have the cluster configuration data created by the Cluster WebUI at hand, you can back up the data with the clpcfctrl command. Refer to "Applying and backing up configuration data (clpcfctrl command)" in " Backing up the configuration data (clpcfctrl --pull)" - "EXPRESSCLUSTER X SingleServerSafe command reference" in the "EXPRESSCLUSTER X SingleServerSafe Operation Guide".
To reinstall the EXPRESSCLUSTER X, follow the procedures below:
- Uninstall the EXPRESSCLUSTER X SingleServerSafe.For details about the uninstallation procedure, see "4.2.1. Uninstalling EXPRESSCLUSTER Server" in this chapter.
- Install the EXPRESSCLUSTER X SingleServerSafe and re-create the servers.For details about the installation procedure, see "3. Installing EXPRESSCLUSTER X SingleServerSafe" in this guide.
4.4. Upgrading to EXPRESSCLUSTER X
To upgrade EXPRESSCLUSTER X SingleServerSafe to EXPRESSCLUSTER X, follow the procedure below.
Back up the configuration data.
Uninstall EXPRESSCLUSTER X SingleServerSafe from the server for which to perform the upgrade. For details about the uninstallation procedure, see "4.2.1. Uninstalling EXPRESSCLUSTER Server" in this chapter.
Shut down the OS when uninstalling the EXPRESSCLUSTER X SingleServerSafe is completed.
Install EXPRESSCLUSTER X, and set up its environment. You can use the backup configuration data for this process. For details about how to set up EXPRESSCLUSTER X, see the EXPRESSCLUSTER X manual.
Note
For EXPRESSCLUSTER X, register the following licenses:EXPRESSCLUSTER X SingleServerSafe (two-CPU license)
- EXPRESSCLUSTER X SingleServerSafe upgrade license
These licenses can be used for EXPRESSCLUSTER X (two-CPU license).
5. Latest version information
The latest information on the upgraded and improved functions is described in details. The latest information on the upgraded and improved functions is described in details.
This chapter covers:
5.1. EXPRESSCLUSTER X SingleServerSafe version and corresponding manual editions
This guide assumes the version of EXPRESSCLUSTER X SingleServerSafe below for its descriptions. Note the version of EXPRESSCLUSTER X SingleServerSafe and corresponding manual edition.
EXPRESSCLUSTER X SingleServerSafe Internal Version |
Manual |
Edition |
Remarks |
|---|---|---|---|
5.0.1-1 |
Installation Guide |
2nd Edition |
|
Configuration Guide |
1st Edition |
||
Operation Guide |
1st Edition |
5.2. New features and improvements
The following features and improvements have been released.
No. |
Internal Version |
Contents |
|---|---|---|
1 |
5.0.0-1 |
The newly released kernel is now supported. |
2 |
5.0.0-1 |
Ubuntu 20.04.3 LTS is now supported. |
3 |
5.0.0-1 |
SUSE LINUX Enterprise Server 12 SP3 is now supported. |
4 |
5.0.0-1 |
Along with the major upgrade, some functions have been removed. For details, refer to the list of removed functions. |
5 |
5.0.0-1 |
Added a function to give a notice in an alert log that the server restart count was reset as the final action against the detected activation error or deactivation error of a group resource or against the detected error of a monitor resource. |
6 |
5.0.0-1 |
Added the clpfwctrl command for adding a firewall rule. |
7 |
5.0.0-1 |
Added a function to collectively change actions (followed by OS shutdowns such as a recovery action following an error detected by a monitor resource) into OS reboots. |
8 |
5.0.0-1 |
Improved the alert message regarding the wait process for start/stop between groups. |
9 |
5.0.0-1 |
The display option for the clpstat configuration information has allowed displaying the setting value of the resource start attribute. |
10 |
5.0.0-1 |
The clpcl/clpstdn command has allowed specifying the -h option even when the local server belongs to a stopped cluster. |
11 |
5.0.0-1 |
A warning message is now displayed when Cluster WebUI is connected via a non-actual IP address and is switched to config mode. |
12 |
5.0.0-1 |
In the config mode of Cluster WebUI, a group can now be deleted with the group resource registered. |
13 |
5.0.0-1 |
Changed the content of the error message that a communication timeout occurred in Cluster WebUI. |
14 |
5.0.0-1 |
Added a function to copy a group, group resource, or monitor resource registered in the config mode of Cluster WebUI. |
15 |
5.0.0-1 |
Added a function to move a group resource registered in the config mode of Cluster WebUI, to another group. |
16 |
5.0.0-1 |
The settings can now be changed at the group resource list of [Group Properties] in the config mode of Cluster WebUI. |
17 |
5.0.0-1 |
The settings can now be changed at the monitor resource list of [Monitor Common Properties] in the config mode of Cluster WebUI. |
18 |
5.0.0-1 |
The dependency during group resource deactivation is now displayed in the config mode of Cluster WebUI. |
19 |
5.0.0-1 |
Added a function to display a dependency diagram at the time of group resource activation/deactivation in the config mode of Cluster WebUI. |
20 |
5.0.0-1 |
Added a function to narrow down a range of display by type or resource name of a group resource or monitor resource on the status screen of Cluster WebUI. |
21 |
5.0.0-1 |
The online manual of Cluster WebUI now supports EXPRESSCLUSTER X SingleServerSafe. |
22 |
5.0.0-1 |
User mode monitor resources and dynamic DNS monitor resources now support the function for collecting cluster statistics information. |
23 |
5.0.0-1 |
An intermediate certificate can now be used as a certificate file when HTTPS is used for communication in the WebManager service. |
24 |
5.0.0-1 |
Added the clpcfconv.sh command, which changes the cluster configuration data file from the old version to the current one. |
25 |
5.0.0-1 |
Added a function to delay the start of the cluster service for starting the OS. |
26 |
5.0.0-1 |
Increased the items of cluster configuration data to be checked. |
27 |
5.0.0-1 |
Details such as measures can now be displayed for error results of checking cluster configuration data in Cluster WebUI. |
28 |
5.0.0-1 |
The OS type can be specified for specifying the create option of the clpcfset command. |
29 |
5.0.0-1 |
Added a function to delete a resource or parameter from cluster configuration data, which is enabled by adding the del option to the clpcfset command. |
30 |
5.0.0-1 |
Added the clpcfadm.py command, which enhances the interface for the clpcfset command. |
31 |
5.0.0-1 |
The start completion timing of an AWS DNS resource has been changed to the timing before which the following is confirmed: The record set was propagated to AWS Route 53. |
32 |
5.0.0-1 |
Changed the default value for [Wait Time to Start Monitoring] of AWS DNS monitor resources to 300 seconds. |
33 |
5.0.0-1 |
Improved the functionality of monitor resources not to be affected by disk IO delay as follows: When a timeout occurs due to the disk wait dormancy (D state) of the monitor process, they consider the status as a warning instead of an error. |
34 |
5.0.0-1 |
The clpstat command can now be run duplicately. |
35 |
5.0.0-1 |
Added the Node Manager service. |
36 |
5.0.0-1 |
Added a function for statistical information on heartbeat. |
37 |
5.0.0-1 |
SELinux enforcing mode is now supported. |
38 |
5.0.0-1 |
HTTP monitor resources now support digest authentication. |
39 |
5.0.0-1 |
The FTP server that uses FTPS for the FTP monitor resource can now be monitored. |
40 |
5.0.0-1 |
JBoss EAP domain mode of JVM monitor resources can now be monitored in Java 9 or later. |
5.3. Corrected information
Modification has been performed on the following minor versions.
- Critical level:
- L
- Operation may stop. Data destruction or mirror inconsistency may occur.Setup may not be executable.
- M
- Operation stop should be planned for recovery.The system may stop if duplicated with another fault.
- S
- A matter of displaying messages.Recovery can be made without stopping the system.
No.
|
Version in which the problem has been solved
/ Version in which the problem occurred
|
Phenomenon
|
Level
|
Occurrence condition/
Occurrence frequency
|
|---|---|---|---|---|
1 |
5.0.0-1
/ 4.1.0-1 to 4.3.2-1
|
In the config mode of Cluster WebUI, modifying a comment on a group resource may not be applied. |
S |
This problem occurs in the following case: A comment on a group resource is modified, the [Apply] button is clicked, the change is undone, and then the [OK] button is clicked. |
2 |
5.0.0-1
/ 4.1.0-1 to 4.3.2-1
|
In the config mode of Cluster WebUI, modifying a comment on a monitor resource may not be applied. |
S |
This problem occurs in the following case: A comment on a monitor resource is modified, the [Apply] button is clicked, the change is undone, and then the [OK] button is clicked. |
3 |
5.0.0-1
/ 4.0.0-1 to 4.3.2-1
|
In the status screen of Cluster WebUI, a communication timeout during the operation of a cluster causes a request to be repeatedly issued. |
M |
This problem always occurs when a communication timeout occurs between Cluster WebUI and a cluster server. |
4 |
5.0.0-1
/ 4.1.0-1 to 4.3.2-1
|
The config mode of Cluster WebUI does not allow specifying a timeout value for shutdown monitoring larger than that for heartbeat. |
S |
This problem always occurs. |
5 |
5.0.0-1
/ 3.1.0-1 to 4.3.2-1
|
A cluster service may not stop. |
S |
This problem very rarely occurs when stopping a cluster service is tried. |
6 |
5.0.0-1
/ 4.0.0-1 to 4.3.2-1
|
A monitor resource may mistakenly detect a monitoring timeout. |
M |
This problem very rarely occurs when a monitoring process is executed by a monitor resource. |
7 |
5.0.0-1
/ 4.2.0-1 to 4.3.2-1
|
Executing the clpcfchk command as follows causes a mixture of the current check results and the previous ones: The -o option is used to specify a directory where a file of the previous check results exists. |
S |
This problem occurs when a directory specified with the -o option of the clpcfchk command includes a file of the previous check results (cfchk_result.csv). |
8 |
5.0.0-1
/ 4.3.0-1 to 4.3.2-1
|
In checking a cluster configuration, a check for fstab may fail. |
S |
This problem occurs with a slash (/) placed after a device name or mount point written into the /etc/fstab file. |
9 |
5.0.0-1
/ 4.2.0-1 to 4.3.2-1
|
The OS start time is targeted for checking a cluster configuration. |
S |
This problem always occurs in checking a cluster configuration. |
10 |
5.0.0-1
/ 4.3.0-1 to 4.3.2-1
|
The clpcfset command may abend. |
S |
This problem occurs when an empty string is specified as an attribute value. |
11 |
5.0.0-1
/ 4.0.0-1 to 4.3.2-1
|
In an AWS environment, a forced stop script may time out. |
S |
This problem may occur when a forced stop script is run In an AWS environment. |
12 |
5.0.0-1
/ 4.0.0-1 to 4.3.2-1
|
In the WebManager service, [Client Session Timeout] may not work. |
S |
This problem occurs in the following case: Before the time specified in [Client Session Timeout] passes, the next request is not issued. |
13 |
5.0.0-1
/ 4.0.0-1 to 4.3.2-1
|
When a monitoring process by a monitor resource times out, detecting a monitoring error may take time. |
S |
This problem very rarely occurs when a monitoring process by a monitor resource times out. |
14 |
5.0.0-1
/ 4.0.0-1 to 4.3.2-1
|
In [Monitoring usage of memory] for process resource monitor resources, [Duration time (min)] has been replaced with [Maximum Refresh Count (time)]. |
S |
This problem occurs when the properties are displayed with Cluster WebUI or the clpstat command. |
15 |
5.0.0-1
/ 1.0.0-1 to 4.3.2-1
|
Deactivating a disk resource may fail with its disk type set to [raw]. |
S |
This problem occurs in the following case: During the deactivation of a disk resource with its disk type set to [raw], a process exists accessing the device. |
16 |
5.0.0-1
/ 4.2.0-1 to 4.3.2-1
|
The EXPRESSCLUSTER Information Base service may abend. |
S |
This problem very rarely occurs when one of the following is performed:
- Cluster startup
- Cluster stop
- Cluster suspension
- Cluster resumption
|
17 |
5.0.1-1
/ 5.0.0-1
|
In Ubuntu environments, the clpcfconv.sh command (for converting cluster configuration data files) fails to be executed. |
S |
This problem occurs in Ubuntu environments. |
18 |
5.0.1-1
/ 5.0.0-1
|
For the clprexec command, the --script option does not work. |
S |
This problem occurs when the clprexec command is executed with the --script option specified. |
19 |
5.0.1-1
/ 4.3.2-1 , 5.0.0-1
|
For Oracle monitor resources: When the monitoring times out, the retrying process may not work normally. |
M |
This problem occurs with an Oracle monitor resource when the monitoring process times out. |
6. Additional information
6.1. EXPRESSCLUSTER X SingleServerSafe services
EXPRESSCLUSTER X SingleServerSafe consists of the system services listed below.
System Service Name |
Explanation |
|---|---|
clusterpro
|
EXPRESSCLUSTER daemon:
Main EXPRESSCLUSTER service
|
clusterpro_evt
|
EXPRESSCLUSTER event:
Service for controlling syslog and logs output by EXPRESSCLUSTER
|
clusterpro_trn
|
EXPRESSCLUSTER data transfer:
Service for controlling license synchronization and configuration data transfers
|
clusterpro_ib
|
EXPRESSCLUSTER Information Base:
Service for managing EXPRESSCLUSTER information.
|
clusterpro_api
|
EXPRESSCLUSTER API:
Service for controlling the EXPRESSCLUSTER Restful API features.
|
clusterpro_alertsync
|
EXPRESSCLUSTER alert synchronization:
Service for alert synchronization
|
clusterpro_webmgr
|
EXPRESSCLUSTER WebManager:
WebManager Server service
|
6.2. Migration from the trial license to the official license
7. Notes and Restrictions
7.1. Before and at the time of installing operating system
Notes on parameters to be determined when installing an operating system, allocating resources, and naming rules are described in this section.
7.1.1. /opt/nec/clusterpro file system
It is recommended to use a file system that is capable of journaling to avoid system failure. Linux (kernel version 2.6 or later) supports file systems such as ext3, ext4, JFS, ReiserFS, and XFS as a journaling file system. If a file system that is not capable of journaling is used, you must run an interactive command (fsck for the root file system) when rebooting the server after server or OS stop (when normal shutdown could not be done).
7.1.3. Dependent driver
softdog
This driver is necessary when softdog is used to monitor user mode monitor resource.
Configure a loadable module. Static driver cannot be used.
7.1.4. Required package
When you install the OS, install the following packages as well:
tar
NetworkManager-config-server
7.1.5. SELinux settings
- If you want to use a system monitor resource or process resource monitor resource, specify permissive or disabled for SELinux.If you set enforcing, communication required in EXPRESSCLUSTER X SingleServerSafe may not be achieved.
If you want to load the drivers of EXPRESSCLUSTER with enforcing specified for SELinux, complete the procedure as described in the following: "SELinux settings (Required)"
7.1.6. EXPRESSCLUSTER X Alert Service
The license for the EXPRESSCLUSTER X Alert Service allows you to use the mail report function, but not the warning light function.
7.1.7. Secure Boot settings
Disable the Secure Boot settings.
7.2. Before installing EXPRESSCLUSTER X SingleServerSafe
Notes after installing an operating system, when configuring OS and disks are described in this section.
7.2.1. Communication port number
Server
From
To
Remarks
Server
Automatic allocation 4
Server
29001/TCP
Internal communication
Server
Automatic allocation 4
Server
29002/TCP
Data transfer
Server
Automatic allocation 4
Server
29002/UDP
Heartbeat
Server
Automatic allocation 4
Server
29003/UDP
Alert synchronization
Server
Automatic allocation 4
Server
29008/TCP
Cluster information management
Server
Automatic allocation 4
Server
29010/TCP
Restful API internal communication
Server
Automatic allocation 4
Server
XXXX 5/UDP
Internal communication for log
Server - Client
From
To
Remarks
Restful API client
Automatic allocation 4
Server
29009/TCP
HTTP communication
Server - Cluster WebUI
From
To
Remarks
Cluster WebUI
Automatic allocation 4
Server
29003/TCP
http communication
Others
From
To
Remarks
Server
snmp trap
Monitoring target
162/UDP
Monitoring target of the external linkage monitor configured for BMC linkage
Server
icmp
Monitoring target
icmp
IP monitor
Server
Automatic allocation 4
Server
Management port number set by the Cluster WebUI 6
JVM monitor
Server
Automatic allocation 4
Monitoring target
Connection port number set by the Cluster WebUI 6
JVM monitor
- 4(1,2,3,4,5,6,7,8,9,10,11)
An available port number at the time is automatically assigned.
- 5
In the Port Number (log) tab in Cluster Properties, select UDP for log communication, and use the port number configured at Port Number. The default log communication method, UNIX Domain, does not use a communication port.
- 6(1,2)
The JVM monitor resource uses the following two port numbers.
A management port number is a port number that the JVM monitor resource internally uses. To set this number, use the Connection Setting dialog box opened from the JVM monitor tab in Cluster Properties of the Cluster WebUI. For details, refer to "Details of other settings" in the "EXPRESSCLUSTER X SingleServerSafe Configuration Guide".
A connection port number is used to establish a connection to the target Java VM (WebLogic Server or WebOTX). To set this number, use the Monitor (special) tab in Properties of the Cluster WebUI for the corresponding JVM monitor resource. For details, refer to "Monitor resource details" in the "EXPRESSCLUSTER X SingleServerSafe Configuration Guide".
7.2.2. Changing the range of automatic allocation for the communication port numbers
The range of automatic allocation for the communication port numbers managed by the OS might overlap the communication port numbers used by EXPRESSCLUSTER X SingleServerSafe.
Change the OS settings to avoid duplication when the range of automatic allocation for the communication numbers managed by OS and the communication numbers used by EXPRESSCLUSTER X SingleServerSafe are duplicated.
Examples of checking and displaying OS setting conditions.
The range of automatic allocation for the communication port numbers depends on the distribution.
# cat /proc/sys/net/ipv4/ip_local_port_range
1024 65000
This is the condition to be assigned for the range from 1024 to 65000 when the application requests automatic allocation for the communication port numbers to the OS.
# cat /proc/sys/net/ipv4/ip_local_port_range
32768 61000
This is the condition to be assigned for the range from 32768 to 61000 when the application requests automatic allocation for the communication port numbers to the OS.
Examples of OS settings change
Add the line below to /etc/sysctl.conf. (When changing to the range from 30000 to 65000)
net.ipv4.ip_local_port_range = 30000 65000
7.2.3. Checking the network settings
Check the network settings by using the ifconfig and ping commands.
Public LAN (used for communication with all the other machines)
Host name
7.2.4. OpenIPMI
The following functions use OpenIPMI:
Final Action at Activation Failure / Deactivation Failure
Monitor resource action upon failure
User mode monitor resource
Shutdown monitoring
When the monitor method is ipmi, OpenIPMI is used.
EXPRESSCLUSTER X SingleServerSafe does not come with ipmiutil. The user is required to install the rpm file for OpenIPMI separately.
Check whether your servers (hardware) support OpenIPMI in advance.
Note that hardware conforming to the IPMI specifications might not be able to run OpenIPMI.
- When server monitoring software provided by another server vendor is used, do not select IPMI for the monitoring method of user-mode monitor resources and shutdown monitoring.Such server monitoring software and OpenIPMI both use BMC (Baseboard Management Controller) on the server, which causes a conflict and makes monitoring impossible.
7.2.5. User mode monitor resource, shutdown monitoring(monitoring method: softdog)
- When softdog is selected as a monitoring method, use the soft dog driver.Make sure not to start the features that use the softdog driver except EXPRESSCLUSTER.Examples of such features are as follows:
Heartbeat feature that comes with OS
i8xx_tco driver
iTCO_WDT driver
watchdog feature and shutdown monitoring feature of systemd
When softdog is set up as the monitoring method, disable the heartbeat function of the operating system.
For SUSE LINUX 11, the softdog monitoring method cannot be set up when the i8xx_tco driver is in use. If you do not intend to use the i8xx_tco driver, set up the system so that the driver is not loaded.
7.2.6. Collecting logs
- For SUSE LINUX 11, when the log collection function of EXPRESSCLUSTER X SingleServerSafe is used for OS syslog acquisition, the suffixes of syslog (message) files are rotated and changed, so the function for specifying syslog generation does not operate.To make the syslog generation specifiable for the log collection function, change the syslog rotation setting as described below.
Comment out compress and dateext in the /etc/logrotate.d/syslog file
7.2.7. nsupdate and nslookup
The following functions use nsupdate and nslookup.
Dynamic DNS monitor resource of monitor resource (ddnsw)
EXPRESSCLUSTER X SingleServerSafe does not include nsupdate and nslookup. Therefore, install the rmp files of nsupdate and nslookup, in addition to the EXPRESSCLUSTER X SingleServerSafe installation.
NEC does not support the items below regarding nsupdate and nslookup. Use nsupdate and nslookup at your own risk.
Inquiries about nsupdate and nslookup
Guaranteed operations of nsupdate and nslookup
Malfunction of nsupdate or nslookup or failure caused by such a malfunction
Inquiries about support of nsupdate and nslookup on each server
7.2.8. FTP monitor resources
If a banner message to be registered to the FTP server or a message to be displayed at connection is long or consists of multiple lines, a monitor error may occur. When monitoring by the FTP monitor resource, do not register a banner message or connection message.
7.2.9. Notes on using Red Hat Enterprise Linux 7
The shutdown monitor function cannot be used.
In mail reporting function takes advantage of the [mail] command of OS provides. Because the minimum composition is [mail] command is not installed, please execute one of the following.
Select the [SMTP] by the Mail Method on the Alert Service tab of Cluster Properties.
Installing mailx.
7.2.10. Notes on using Ubuntu
To execute EXPRESSCLUSTER X SingleServerSafe -related commands, execute them as the root user.
Only a WebSphere monitor resource is supported in Application Server Agent. This is because other Application Server isn't supporting Ubuntu.
In mail reporting function takes advantage of the [mail] command of OS provides. Because the minimum composition is [mail] command is not installed, please execute one of the following.
Select the [SMTP] by the Mail Method on the Alert Service tab of Cluster Properties.
Installing mailutils.
Information acquisition by SNMP cannot be used.
7.2.11. Samba monitor resources
In order to support SMB protocol version 2.0 or later, NTLM authentication, and SMB signature, Samba monitor resources use a shared library 'libsmbclient.so.0' for the internal version 4.1.0-1 or later. Confirm that it is installed since libsmbclient.so.0 is included in libsmbclient package.
If the version of libsmbclient is 3 or earlier (for example, libsmbclient included in RHEL 6), .you can specify only either 139 or 445 for Port Number. Specify the port number included in smb ports of smb.conf.
The version of SMB protocol supported by Samba monitor resource depends on the installed libsmbclient. You can confirm whether to receive supports from libsmbclient by testing a connection to shared area of the monitoring target by using the smbclient command which each distributer provides.
7.3. Upgrading EXPRESSCLUSTER X SingleServerSafe
This section describes notes on upgrading EXPRESSCLUSTER X SingleServerSafe after starting cluster operation.
7.3.1. Changed functions
The following describes the functions changed for each of the versions:
Internal Version 4.0.0-1
- Management toolThe default management tool has been changed to Cluster WebUI. If you want to use the conventional WebManager as the management tool, specify "http://management IP address of management group or actual IP address:port number of the server in which EXPRESSCLUSTER Server is installed/main.htm" in the address bar of a web browser.
Internal Version 4.1.0-1
- Configuration toolThe default configuration tool has been changed to Cluster WebUI, which allows you to manage and configure clusters with Cluster WebUI.
- Cluster statistical information collection functionBy default, the cluster statistical information collection function saves statistics information files under the installation path. To avoid saving the files for such reasons as insufficient disk capacity, disable the cluster statistical information collection function. For more information on settings for this function, refer to "Details of other settings" in the "EXPRESSCLUSTER X SingleServerSafe Configuration Guide".
- System monitor resourceThe System Resource Agent process settings part of the system monitor resource has been separated to become a new monitor resource. Therefore, the conventional monitor settings of the System Resource Agent process settings are no longer valid. To continue the conventional monitoring, configure it by registering a new process resource monitor resource after upgrading EXPRESSCLUSTER. For more information on monitor settings for Process resource monitor resources, refer to "Setting up Process resource monitor resources" - "Monitor resource details" in the "EXPRESSCLUSTER X SingleServerSafe Configuration Guide".
Internal Version 4.3.0-1
- Weblogic monitor resourceREST API has been added as a new monitoring method. From this version, REST API is the default value for the monitoring method. At the version upgrade, reconfigure the monitoring method.The default value of the password has been changed. If you use weblogic that is the previous default value, reset the password default value.
7.3.2. Removed Functions
The following describes the functions removed for each of the versions: Internal Version 4.0.0-1
WebManager Mobile
OracleAS monitor resource
Important
Internal Version 5.0.0-1
Function
Action
WebManager/Builder
You cannot move configuration data (for a host cluster) which involves virtual machine groups.
BMC linkage
Delete relevant message reception monitor resources.
7.3.3. Removed Parameters
The following tables show the parameters configurable with Cluster WebUI but removed for each of the versions:
Internal Version 4.0.0-1
Cluster
Parameters
Default
Cluster Properties
Alert Service Tab
Use Alert Extension
Off
WebManager Tab
Enable WebManager Mobile Connection
Off
Web Manager Mobile Password
Password for Operation
-
Password for Reference
-
JVM monitor resource
Parameters
Default
JVM Monitor Resource Properties
Monitor(special) Tab
Memory Tab (when Oracle Java is selected for JVM Type)
Monitor Virtual Memory Usage
2048 MB
Memory Tab (when Oracle JRockit is selected for JVM Type)
Monitor Virtual Memory Usage
2048 MB
Memory Tab(when Oracle Java(usage monitoring) is selected for JVM Type)
Monitor Virtual Memory Usage
2048 MB
Internal Version 4.1.0-1
Cluster
Parameters
Default
Cluster Properties
WebManager Tab
WebManager Tuning Properties
Behavior Tab
Max. Number of Alert Records on Viewer
300
Client Data Update Method
Real Time
Internal Version 5.0.0-1
Cluster
Parameters
default values
Server Properties
Info Tab
Virtual Machine
Off
Type
vSphere
7.3.4. Changed Default Values
The following tables show the parameters which are configurable with Cluster WebUI but whose defaults have been changed for each of the versions:
To continue using a "Default value before update" after the upgrade, change the corresponding "Default value after update" to the desired one.
Any setting other than a "Default value before update" is inherited to the upgraded version and therefore does not need to be restored.
Internal Version 4.0.0-1
Cluster
Parameters
Default value before update
Default value after update
Cluster Properties
Monitor Tab
Method
softdog
keepalive
JVM monitor Tab
Maximum Java Heap Size
7 MB
16 MB
PID monitor resource
Parameters
Default value before update
Default value after update
PID Monitor Resource Properties
Monitor(common)Tab
Wait Time to Start Monitoring
0 sec
3 sec
Do Not Retry at Timeout Occurrence
Off
On
Do not Execute Recovery Action at Timeout Occurrence
Off
On
User mode monitor resource
Parameters
Default value before update
Default value before update
User mode Monitor Resource Properties
Monitor(special) Tab
Method
softdog
keepalive
NIC Link Up/Down monitor resource
Parameters
Default value before update
Default value before update
NIC Link Up/Down Monitor Resource Properties
Monitor(common) Tab
Timeout
60 sec
180 sec
Do Not Retry at Timeout Occurrence
Off
On
Do not Execute Recovery Action at Timeout Occurrence
Off
On
Process name monitor resource
Parameters
Default value before update
Default value before update
Process Monitor Resource Properties
Monitor(common) tab
Wait Time to Start Monitoring
0 sec
3 sec
Do Not Retry at Timeout Occurrence
Off
On
Do not Execute Recovery Action at Timeout Occurrence
Off
On
DB2 monitor resource
Parameters
Default value before update
Default value before update
DB2 Monitor Resource Properties
Monitor(special) Tab
Password
ibmdb2
-
Library Path
/opt/IBM/db2/V8.2/lib/libdb2.so
/opt/ibm/db2/V11.1/lib64/libdb2.soMySQL monitor resource
Parameters
Default value before update
Default value before update
MySQL Monitor Resource Properties
Monitor(special) Tab
Storage Engine
MyISAM
InnoDB
Library Path
/usr/lib/mysql/libmysqlclient.so.15
/usr/lib64/mysql/libmysqlclient.so.20Oracle monitor resource
Parameters
Default value before update
Default value before update
Oracle Monitor Resource Properties
Monitor(special) Tab
Password
change_on_install
-
Library Path
/opt/app/oracle/product/10.2.0/db_1/lib/libclntsh.so.10.1
/u01/app/oracle/product/12.2.0/dbhome_1/lib/libclntsh.so.12.1PostgreSQL monitor resource
Parameters
Default value before update
Default value before update
PostgreSQL Monitor Resource Properties
Monitor(special) Tab
Library Path
/usr/lib/libpq.so.3.0
/opt/PostgreSQL/10/lib/libpq.so.5.10Tuxedo monitor resource
Parameters
Default value before update
Default value before update
Tuxedo Monitor Resource Properties
Monitor(special) Tab
Library Path
/opt/bea/tuxedo8.1/lib/libtux.so
/home/Oracle/tuxedo/tuxedo12.1.3.0.0/lib/libtux.soWeblogic monitor resource
Parameters
Default value before update
Default value before update
Weblogic Monitor Resource Properties
Monitor(special) Tab
Domain Environment File
/opt/bea/weblogic81/samples/domains/examples/setExamplesEnv.sh
/home/Oracle/product/Oracle_Home/user_projects/domains/base_domain/bin/setDomainEnv.shJVM monitor resource
Parameters
Default value before update
Default value before update
JVM Monitor Resource Properties
Monitor(common) Tab
Timeout
120 sec
180 sec
Internal Version 4.3.0-1
NFS monitor resource
Parameters
Default value before update
Default value before update
NFS Monitor Resource Properties
Monitor(special) Tab
NFS Version
v2
v4
Weblogic monitor resource
Parameters
Default value before update
Default value after update
Weblogic Monitor Resource Properties
Monitor(special) Tab
Password
weblogic
None
7.3.5. Moved Parameters
The following table shows the parameters which are configurable with Cluster WebUI but whose controls have been moved for each of the versions:
Internal Version 4.0.0-1
Before the change
After the change
[Cluster Properties] - [Recovery Tab] - [Max Reboot Count]
[Cluster Properties] - [Extension Tab] - [Max Reboot Count]
[Cluster Properties] - [Recovery Tab] - [Max Reboot Count Reset Time]
[Cluster Properties] - [Extension Tab] - [Max Reboot Count Reset Time]
[Cluster Properties] - [Recovery Tab] - [Use Forced Stop]
[Cluster Properties] - [Extension Tab] - [Use Forced Stop]
[Cluster Properties] - [Recovery Tab] - [Forced Stop Action]
[Cluster Properties] - [Extension Tab] - [Forced Stop Action]
[Cluster Properties] - [Recovery Tab] - [Forced Stop Timeout]
[Cluster Properties] - [Extension Tab] - [Forced Stop Timeout]
[Cluster Properties] - [Recovery Tab] - [Virtual Machine Forced Stop Setting]
[Cluster Properties] - [Extension Tab] - [Virtual Machine Forced Stop Setting]
[Cluster Properties] - [Recovery Tab] - [Execute Script for Forced Stop]
[Cluster Properties] - [Extension Tab] - [Execute Script for Forced Stop]
[Cluster Properties] - [Recovery Tab] - [Start Automatically After System Down]
[Cluster Properties] - [Extension Tab] - [Start Automatically After System Down]
[Cluster Properties] - [Exclusion Tab] - [Mount/Unmount Exclusion]
[Cluster Properties] - [Extension Tab] - [Exclude Mount/Unmount Commands]
[Cluster Properties]-[Recovery Tab]-[Disable Recovery Action Caused by Monitor Resource Error]
[Cluster Properties]-[Extension Tab]-[Disable cluster operation]-[Recovery Action when Monitor Resource Failure Detected]
8. Troubleshooting
8.1. Error messages when installing the EXPRESSCLUSTER X SingleServerSafe
Behavior and Message |
Cause |
Solution |
|---|---|---|
failed to open /var/lib/rpm/packages.rpm error: cannot open /var/lib/rpm/packages.rpm |
The user logged on is not a root user. |
Log on as a root user. |
error: package expressclssss-* is already installed |
The EXPRESSCLUSTER X SingleServerSafe is already installed. |
Uninstall the EXPRESSCLUSTER X SingleServerSafe and reinstall it. |
8.2. Error messages when uninstalling the EXPRESSCLUSTER X SingleServerSafe
Behavior and Message |
Cause |
Solution |
|---|---|---|
failed to open /var/lib/rpm/packages.rpm
error: cannot open /var/lib/rpm/packages.rpm
|
The user logged on is not a root user. |
Log on as a root user. |
error: expressclssss is running |
The EXPRESSCLUSTER X SingleServerSafe is active. |
Disable Auto Startup of services, restart the server, and uninstall the EXPRESSCLUSTER SingleServerSafe again. |
8.3. Licensing
Behavior and Message |
Cause |
Solution |
|---|---|---|
When the command was executed, the following message appeared in the console:
Log in as root.
|
The command was executed by a general user.
|
Log on as root user or log on again after changing to root user with su -.
|
When the configuration data created by the Cluster WebUI was distributed to all servers and then the server was shut down and rebooted, the Cluster WebUI showed the following message on the alert log and the server stopped:
The license is not registered. (Product name:%1)
%1: Product name
|
The server was shut down and rebooted without registering a license.
|
Register the license from the server.
|
After the configuration data created by the Cluster WebUI was distributed to all servers and the server is shut down and rebooted, the Cluster WebUI showed the following message on the alert log but the server is operating normally:
The number of licenses is insufficient. The number of insufficient licenses is %1. (Product name:%2)
%1: The number of licenses in short of supply
%2: Product name
|
Licenses are insufficient.
|
Obtain a license and register it.
|
While the servers were operated using the trial license, the following message was displayed and the servers stopped:
The trial license has expired in %1. (Product name:%2)
%1: Trial end date
%2: Product name
|
The license has already expired.
|
Ask your sales agent for extension of the trial version license, or obtain and register the product version license.
|
While the cluster was operated on the fixed term license, the following message appeared.
The fixed term license has expired in %1. (Product name:%2)
%1: Fixed term end date
%2: Product name
|
The license has already expired.
|
Obtain the license for the product version from the vendor, and then register the license.
|