1. Preface
1.1. Who Should Use This Guide
The EXPRESSCLUSTER X Legacy Feature Guide describes EXPRESSCLUSTER X 4.0 WebManager, Builder, and EXPRESSCLUSTER Ver 8.0 compatible commands.
1.2. How This Guide is Organized
2. Functions of the WebManager: Provides information on function of the EXPRESSCLUSTER WebManager.
3. Function of the Builder: Provides information on function of the EXPRESSCLUSTER Builder.
4. Compatible command reference: Provides information on the commands that are compatible to the commands used in the older versions of EXPRESSCLUSTER.
1.3. EXPRESSCLUSTER X Documentation Set
The EXPRESSCLUSTER X manuals consist of the following six guides. The title and purpose of each guide is described below:
This guide is intended for all users. The guide covers topics such as product overview, system requirements, and known problems.
Installation and Configuration Guide
This guide is intended for system engineers and administrators who want to build, operate, and maintain a cluster system. Instructions for designing, installing, and configuring a cluster system with EXPRESSCLUSTER are covered in this guide.
This guide is intended for system administrators. The guide covers topics such as how to operate EXPRESSCLUSTER, function of each module and troubleshooting. The guide is supplement to the "Installation and Configuration Guide".
This guide is intended for administrators and for system administrators who want to build, operate, and maintain EXPRESSCLUSTER-based cluster systems. The guide describes maintenance-related topics for EXPRESSCLUSTER.
This guide is intended for administrators and for system engineers who want to build EXPRESSCLUSTER-based cluster systems. The guide describes features to work with specific hardware, serving as a supplement to the "Installation and Configuration Guide".
Legacy Feature Guide
This guide is intended for administrators and for system engineers who want to build EXPRESSCLUSTER-based cluster systems. The guide describes EXPRESSCLUSTER X 4.0 WebManager, Builder, and EXPRESSCLUSTER Ver 8.0 compatible commands.
1.4. Conventions
In this guide, Note, Important, See also are used as follows:
Note
Used when the information given is important, but not related to the data loss and damage to the system and machine.
Important
Used when the information given is necessary to avoid the data loss and damage to the system and machine.
See also
Used to describe the location of the information given at the reference destination.
The following conventions are used in this guide.
Convention |
Usage |
Example |
|---|---|---|
Bold |
Indicates graphical objects, such as fields, list boxes, menu selections, buttons, labels, icons, etc. |
In User Name, type your name.
On the File menu, click Open Database.
|
Angled bracket within the command line |
Indicates that the value specified inside of the angled bracket can be omitted. |
|
Monospace (courier) |
Indicates path names, commands, system output (message, prompt, etc), directory, file names, functions and parameters. |
|
Monospace bold (courier) |
Indicates the value that a user actually enters from a command line. |
Enter the following:
clpcl -s -a
|
Monospace italic
(courier)
|
Indicates that users should replace italicized part with values that they are actually working with. |
|
1.5. Contacting NEC
For the latest product information, visit our website below:
2. Functions of the WebManager
This chapter describes the functions of the WebManager.
This chapter covers:
2.3. Checking the status of each object in the tree view of WebManager
2.4. Checking the cluster status by the WebManager list view
2.9. Setting limitations on the connection and operation of the WebManager
2.1. Starting up the WebManager
Accessing to the WebManager is required to create cluster configuration data. In this section, the overview of the WebManager is explained. After that, access to the WebManager. How to create cluster configuration data is explained.
Note
You cannot configure or display functions that have been added to or changed in versions later than EXPRESSCLUSTER X 4.0.
See also
For the system requirements of the WebManager, see the corresponding web page.
2.1.1. What is WebManager?
The WebManager is a function to start the Builder, set up the cluster, monitor the cluster status, start up and stop servers and groups, and collect cluster operation logs through a Web browser. The overview of the WebManager is shown in the following figures.
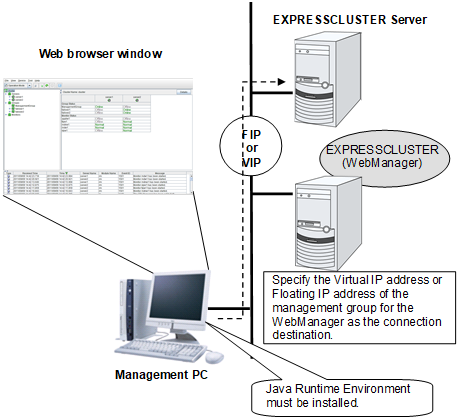
The WebManager in EXPRESSCLUSTER Server is configured to start up at the time when the operating system starts up.
Specify the floating IP address or virtual IP address for accessing WebManager for the URL when connecting from a Web browser of the management PC. These addresses are registered as the resources of the management group. When the management group does not exist, you can specify the address of one of servers configuring the cluster (fixed address allocated to the server) to connect management PC with the server. In this case, the WebManager cannot acquire the status of the cluster if the server to be connected is not working.
2.1.2. Setting up Java Runtime Environment
2.1.3. Starting the WebManager
The following procedure describes how to start the WebManager.
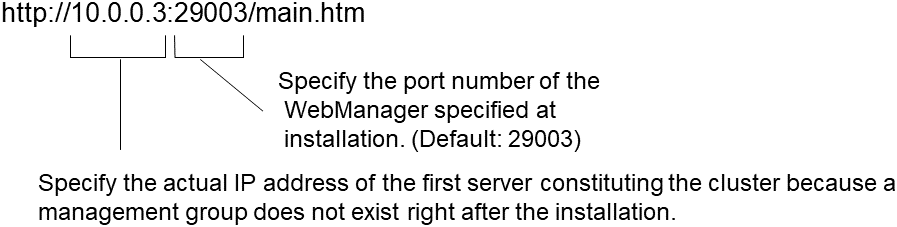
Start your Web browser.
Enter the actual IP address and port number of the server where the EXPRESSCLUSTER Server is installed in the Address bar of the browser.
Note
In Java Runtime Enviroment Version 9.0 or later, WebManager can be launched by using Java Web Start. When starting the Java WebManager, change "main.htm" of the URL above to "main.jnlp" and then enter the modified URL in the Address bar.Example: http://10.0.0.11:29003/main.jnlp- The WebManager starts up.
See also
2.2. Window of the WebManager
This chapter provides information about the WebManager window.
Note
For the language used on the WebManager screen, see " 3.13.1. Info tab" in "3.11., Cluster properties" in "3. Function of the Builder" in this guide.
2.2.1. Main window of the WebManager
The WebManager window consists of two bars and three views.
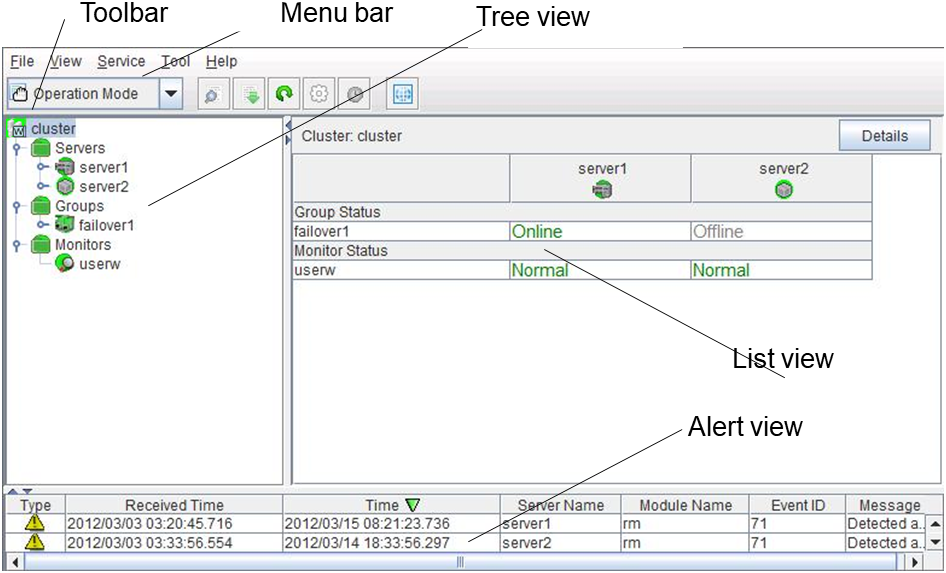
Menu bar
The menu bar has the five menus described below. The contents of these menus differ depending on the config mode and operation/reference mode. The menu items displayed in the operation/reference mode are described later in this chapter. For details about the menus displayed in the config mode, see the next chapter.
File menu
View menu
Service menu
Tool menu
Help menu
Toolbar
If you click one of the five icons or the drop-down menu on the toolbar, you can perform the same operation as when selecting the corresponding item on the menu bar.
Icon/menu
Description
Refer to:
Changes the WebManager to the verification mode. This is the same as clicking View on the menu bar and then selecting Verification mode.
Collects logs. This is the same as clicking Tool on the menu bar and then selecting Collect Cluster Logs.
Performs reloading. This is the same as clicking Tool on the menu bar and then selecting Reload.
Displays the option. This is the same as clicking Tool on the menu bar and then selecting Option.

Displays Integrated WebManager. This is the same as clicking Tool on the menu bar and then selecting Integrated WebManager.


Tree view
Allows you to see a status of each cluster's resources such as server and group resources. For more information, refer to "2.3. Checking the status of each object in the tree view of WebManager".
List view
The upper part of the view provides information on each cluster resource selected in the tree view. The lower part lists the start/stop statuses and comments of each server, group resource, and monitor resource. If you click Details located on the upper right of the view, further information will be displayed in a dialog. For more information, see "2.4. Checking the cluster status by the WebManager list view".
Alert view
Shows messages describing EXPRESSCLUSTER operating status. For further information, see "2.5. Checking alerts using the WebManager".
2.2.2. Changing the WebManager operation mode
The WebManager has the following four operation modes.
- Operation modeThis mode allows the user to see the status of and operate the cluster.Select Operate Mode on the View menu or the toolbar to switch to the operation mode. However, if you used the reference mode password for login when starting the WebManager or connected to the WebManager from a client that is not allowed to perform operations, it is not possible to switch to the operation mode.
- Reference modeThis mode allows the user to see the cluster status, but not to operate the cluster.Select Reference Mode on the View menu or the toolbar to switch to the operation mode.
- Config modeThis mode allows the user to set up the cluster and change the settings. The WebManager in the config mode is called Builder (online version). For details about operations in the config mode, see the next chapter. Select Config Mode on the View menu or the toolbar to switch to the Config Mode. However, if you connected to the WebManager from a client that is not allowed to perform operations, it is not possible switch to the Config Mode.
- Verification modeThis mode allows the user to generate a simulated fault in specified monitor resources.Select Verification mode on the View menu or the toolbar to switch to the Verification mode. However, if you connected to the WebManager from a client that is not allowed to perform operations, it is not possible to switch to verification mode.If you switch from the verification mode to another mode, a dialog box asks if you want to cancel the simulated fault status of all the monitor resources. Select Yes to place all the monitor resources in the simulated fault status back in the normal monitored status. Select No to switch to another mode while keeping the monitor resources in the simulated fault status.
Note
When the pop-up window is displayed for Operation Mode, Reference Mode, or Verification Mode in the WebManager, and if switching to Config Mode is performed, the open pop-up window closes.The operation performed on the pop-up window continues.
2.2.3. Searching for an alert by using the WebManager
You can search for an alert by using the WebManager. Searching in this method is useful to view only a specific type alert.
Note
For the information on alert logs, see "2.5. Checking alerts using the WebManager".
To search for an alert, click on the Tool menu or click the alert search icon [] on the toolbar. The window for specifying alert log search conditions is displayed.
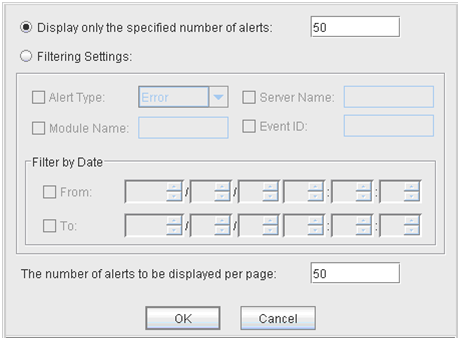
To search only the specified number of past alert logs:
Select Display only the specified number of alerts.
Enter the number of past alert logs to search, and click OK. Past alert logs are displayed as many as you have specified.
Note
The maximum value to enter is the number configured in Max Number to Save Alert Records. To configure Max Number to Save Alert Records, right-click the cluster icon in the Builder and click Properties on the shortcut menu. In the properties dialog box click the Alert Log tab.
To search by specifying search conditions:
Click Select the filter option.
Enter the search conditions in each field and start searching.
Alert Type: Select the type of alerts.
Module Name
Category
pm
Whole EXPRESSCLUSTER
rc
Group/resource related
rm
Monitor resource related
nm
Heartbeat resource related
lankhb
Kernel mode LAN heartbeat resource
bmchb
BMC heartbeat resource
disknp
DISK network partition resolution resource
fip
Floating IP resource
vcom
Virtual computer name resource
ddns
Dynamic DNS resources
ddnsw
Dynamic DNS monitor resources
vip
Virtual IP resource
cifs
CIFS resource
diskw
Disk RW monitor resource
sdw
Disk TUR monitor resource
hdtw
Hybrid disk TUR monitor resource
db2
DB2 monitor resources
db2w
DB2 monitor resources
ftp
FTP monitor resources
ftpw
FTP monitor resources
http
HTTP monitor resources
httpw
HTTP monitor resources
imap4
IMAP4 monitor resources
imap4w
IMAP4 monitor resources
odbc
ODBC monitor resources
odbcw
ODBC monitor resources
oracle
Oracle monitor resources
oraclew
Oracle monitor resources
otx
WebOTX monitor resource
otxw
WebOTX monitor resource
pop3
POP3 monitor resources
pop3w
POP3 monitor resources
psql
PostgreSQL monitor resources
psqlw
PostgreSQL monitor resources
smtp
SMTP monitor resources
smtpw
SMTP monitor resources
sqlserver
SQL Server monitor resources
sqlserverw
SQL Server monitor resources
tux
Tuxedo monitor resources
tuxw
Tuxedo monitor resources
was
WebSphere monitor resources
wasw
WebSphere monitor resources
wls
WebLogic monitor resources
wlsw
WebLogic monitor resources
jra
JVM monitor resources
jraw
JVM monitor resources
sraw
System monitor resources
psw
Process name monitor resources
diskperf
Disk performance information management module
diskagent
Disk agent monitor resource
sdfunc
Disk function related
mdadmn
Mirror disk related
hdadmn
Hybrid disk related
armcmd
Compatible commands
event
Event log
lcns
License related
logcmd
Message output command
ptun
Parameter tuning related
lamp
Network warning light alert related
Mail alert related
userw
User space monitor resources
Server Name Type in the name of a server whose alerts you want to see.
Start Time, Stop Time: Specify the Start Time and Stop Time to narrow down the search condition using the time of the event occurrence.
Enter the number of alerts to display on one page in The number of alerts to be displayed per page and click OK. Research results are displayed based on the time an alert occurred.
If the results of research are displayed on more than one page, move the page by clicking Back, Next, and Jump.
2.2.4. Collecting logs by using the WebManager
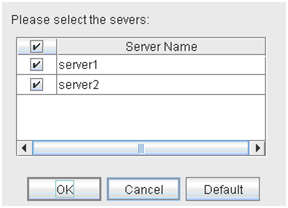
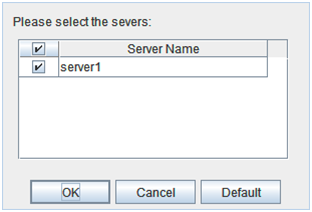
Clicking Collect Cluster Logs on the Tool menu or clicking the Collect Cluster Logs icon [ ] on the toolbar opens the log collection dialog box.
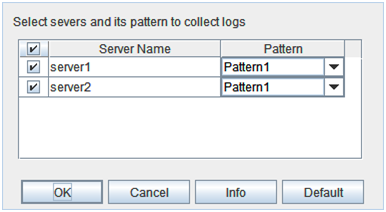
Check box
Select check boxes of the servers that have the logs you want to collect.
Pattern
Select the information to be collected. Specify one of Type 1 to Type 4 as the log collection pattern.
Type 1
Type 2
Type 3
Type 4
Default collection information
✓
✓
✓
n/a
Event log
✓
✓
✓
✓
Windows error report
✓
✓
✓
✓
User dump
✓
✓
n/a
n/a
Diagnosis program report
✓
✓
n/a
n/a
Registry
✓
✓
✓
n/a
Script
✓
✓
✓
n/a
Logs of ESMPRO/AC and ESMPRO/UPSC
✓
✓
✓
n/a
Logs of HA
n/a
✓
n/a
n/a
For detailed information of (1) to (9), see "Collecting logs (clplogcc command)" in "EXPRESSCLUSTER command reference" in the "Reference Guide".
OK
Starts log collection and displays the dialog box of log collection progress.
Cancel
Closes this dialog box.
Info
Displays the information for each pattern.
Default
Resets the selections of servers and collect patterns to default values.
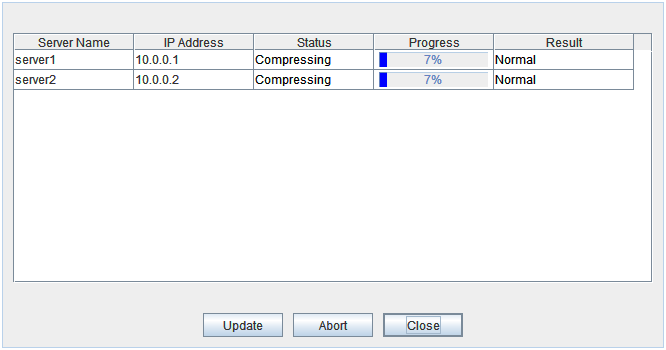
Fig. 2.1 The dialog box of the log collection progress
Update
Updates the dialog box of the log collection progress.
Abort
Aborts the log collection.
Close
Closes the Log Collection Progress dialog box. Log collection is continued.At this time, the display of Collect Logs in title view has changed to Progress. Click Progress to display the Log Collection Progress dialog box again.
Collect Logs Results
Result
Description
Normal
Log collection succeeded.
Abort
Log collection was canceled by user.
Invalid Parameters
Internal error may have occurred.
Communication Error
Connecting error occurred.
Timeout
Timeout occurred.
Busy
Server is busy.
Compression Error
Error occurred when compressing a file.
File I/O Error
File I/O failed.
Not Enough Free Space
There is not enough available space on the disk.
Unknown Error
File does not exist.
When the log collection completes, the browser displays a dialog box that asks where you want to save the logs. Download the logs to any location.
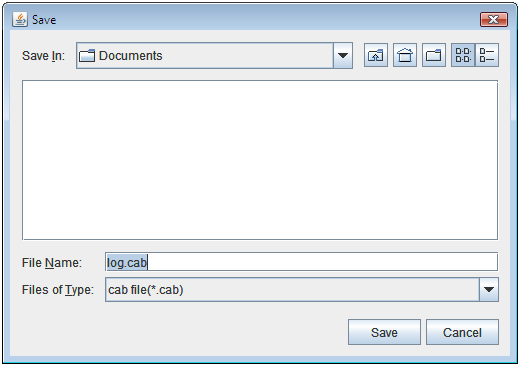
Note
Logs may not be downloaded properly if nothing is changed for more than 10 minutes.
Note
If other modal dialog is displayed while collecting logs, the file saving dialog for the log collection will not be displayed. To display the file saving dialog, close the modal dialog.
Note
If the size of the log file exceeds 2 GB, log collection may fail depending on the compression format. Adjust the log to be collected or change the log collection pattern.
2.2.5. Changing the WebManager screen layout

On the bar, click  to maximize the view. Click
  to minimize.
 ] on the tool bar.
2.2.6. Updating the WebManager information
Click Reload on the Tool menu or click the reload icon [ ] on the toolbar to update the information displayed in the WebManager.
Note
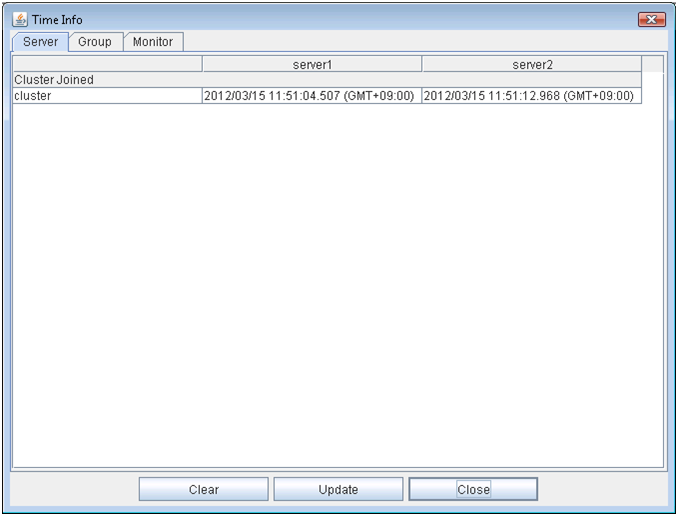
2.2.7. Checking the time information from the WebManager
Check the time information from the WebManager by clicking Time info on the Tool menu or by clicking the time information icon [ ] on the toolbar.
Time information displayed on the Server tab
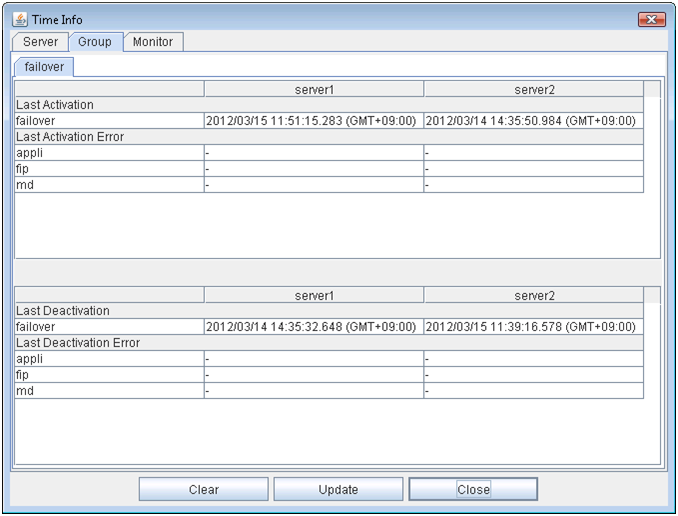
Time information displayed on the Group tab
Time information displayed on the Monitor tab
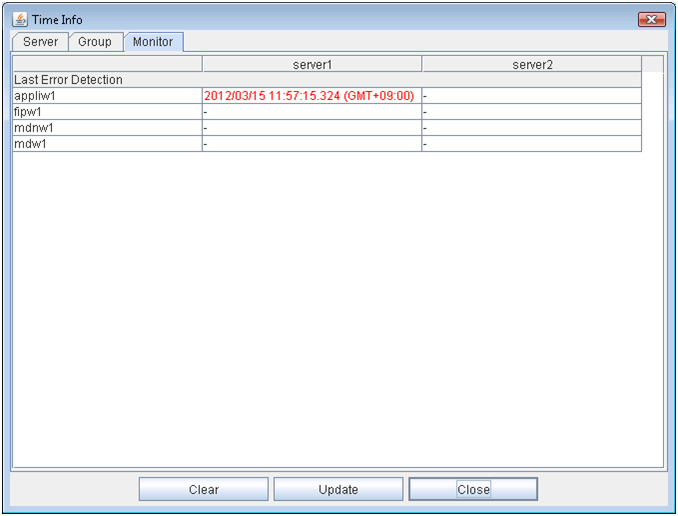
Note
Message receive monitor resources is not dealing.
Clear
Deletes the time information displayed on the current tab.
Update
Acquires the time information for all the tabs.
Close
Closes the time information dialog box.
Note
If the Client Data Update Method of the WebManager is set to Polling, when clear button was pushed , Lighting up Time info on the Tool menu. But it's no problem as cluster.
2.2.8. Executing Integrated WebManager from the WebManager
To execute Integrated WebManager from the WebManager, click Integrated WebManager on the Tool menu or Integrated WebManager icon [ ] on the tool bar.
2.2.9. Operating a cluster and cluster services on the WebManager
To operate cluster services on the WebManager, select the relevant items below from the Service menu.
- Suspend ClusterSuspends a cluster. This menu can be selected only when all the servers in a cluster are running. Upon the completion of Suspend Cluster, Suspend appears in the tree view of WebManager.
- Resume ClusterResumes a suspended cluster. This menu can be selected only when all the servers in a cluster are suspended.
- Start ClusterStarts a cluster. This menu can be selected only when a cluster is stopped.
- Stop ClusterStops a cluster. This menu can be selected only when a cluster is running. Upon the completion of Stop Cluster, Stop appears in the tree view of WebManager.
- Restart ManagerRestarts a manager.
2.2.10. Confirming the license from the WebManager
To confirm the license from the WebManager, click License Information on the Help menu.
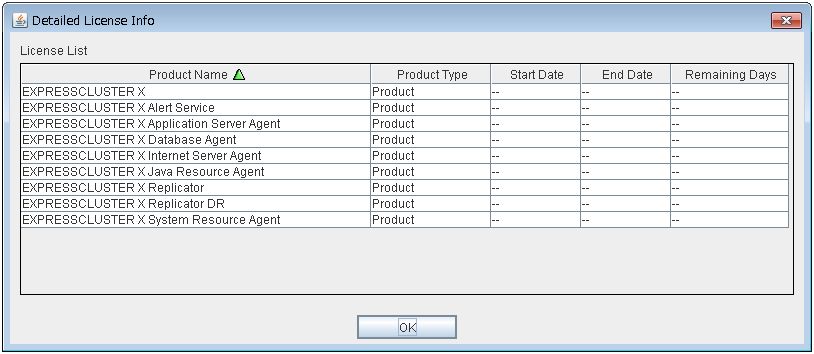
License List
Displays the licenses registered on the connection destination server.You can change the display order by selecting a specific field name on the title bar of the list.By default, the licenses are sorted in ascending order of Product Name.Note
In case of license which includes multiple licenses, all included licenses information are displayed.
OK button
Closes the Detailed License Info dialog box.
2.3. Checking the status of each object in the tree view of WebManager
You can see the status of the objects that configure the cluster on the WebManager by following the steps below.
Start the WebManager.
On the left pane of the window, a tree is displayed. Check the status by looking at each icon and object color.
Note
The configurations of the tree depend on the versions and option products of EXPRESSCLUSTER.
2.3.1. The colors of the icons displayed in the WebManager tree view
The following table shows icons and their meanings:
No. |
Icon |
Status |
Description |
|
|---|---|---|---|---|
1 |
Cluster |
|
Normal |
All servers, group resources, and monitor resources are in a normal status. |
|
Caution |
One or more servers, or group resources, or monitor resource has an error or is in a warning status. |
||
|
Error |
All servers are down or in the error status. |
||
2 |
All servers |
|
Normal |
All servers have been started. |
|
Caution |
One or more servers is down or in the pending status. |
||
|
Unknown |
No information is acquired. |
||
3 |
Individual server |
|
Online |
The server is running normally. |
|
Suspension (Network Partition Unsolved) |
The network partition cannot be solved, because the disk network partition resolution resource is in the error status. |
||
|
Suspension (Isolated) |
The server has been rebooted after it was shut down a way other than Suspend Cluster or a cluster shutdown. |
||
Offline or Unknown |
The server is not working, or no information is acquired. |
|||
4 |
Individual server (Virtual machine) |
|
Online |
The server is running normally. |
|
Suspension (Network Partition Unsolved) |
The network partition cannot be solved, because the disk network partition resolution resource is in the error status. |
||
|
Suspension (Isolated) |
The server has been rebooted after it was shut down a way other than Suspend Cluster or a cluster shutdown. |
||
Offline or Unknown |
The server is not working, or no information is acquired. |
|||
5 |
Kernel-mode LAN heartbeat resource |
|
Normal |
The resource can communicate with all servers. |
|
Caution |
One or more servers in the cluster cannot be accessed. |
||
|
Error |
The resource is not working normally. |
||
|
Unknown |
No status is acquired. |
||
|
Not Used |
The heartbeat resource is not registered. |
||
6 |
BMC heartbeat resource |
|
Normal |
The resource can communicate with all servers. |
|
Caution |
One or more servers in the cluster cannot be accessed. |
||
|
Error |
The resource is not working normally. |
||
|
Unknown |
No status is acquired. |
||
|
Not Used |
The heartbeat resource is not registered. |
||
7 |
Disk network partition resolution resource |
|
Normal |
The resource can communicate with all servers. |
|
Caution |
One or more servers in the cluster cannot be accessed. |
||
|
Error |
The resource is not working normally. |
||
|
Unknown |
No status is acquired. |
||
|
Not Used |
The disk network partition resolution resource is not registered. |
||
8 |
COM network partition resolution resource |
|
Normal |
The resource can communicate with all servers. |
|
Caution |
One or more servers in the cluster cannot be accessed. |
||
|
Error |
The resource is not working normally. |
||
|
Unknown |
No status is acquired. |
||
|
Not Used |
The network partition resolution resource is not registered. |
||
9 |
PING network partition resolution resource |
|
Normal |
The resource can communicate with all servers. |
|
Caution |
One or more servers in the cluster cannot be accessed. |
||
|
Error |
The resource is not working normally. |
||
|
Unknown |
No status is acquired. |
||
|
Not Used |
The PING network partition resolution resource is not registered. |
||
10 |
Majority Network Partition Resolution Resource |
|
Normal |
The resource can communicate with all servers. |
|
Caution |
One or more servers in the cluster cannot be accessed. |
||
|
Error |
The resource is not working normally. |
||
|
Unknown |
No status is acquired. |
||
|
Not Used |
The Majority Network Partition Resolution Resource is not registered. |
||
11 |
All groups |
|
Normal |
All groups are running normally. |
|
Caution |
One or more groups are not running normally. |
||
|
Error |
No groups are working normally. |
||
|
Unknown |
No information is acquired. |
||
12 |
Individual group |
|
Online |
The group has been started. |
|
Error |
The group has an error. |
||
|
Offline or Unknown |
The group is stopped, or no information is acquired. |
||
13 |
Application resource |
|
Online |
The application resource has been started. |
|
Error |
The application resource has an error. |
||
|
Offline or Unknown |
The application resource is stopped, or no information is acquired. |
||
14 |
Floating IP resource |
|
Online |
The floating IP resource has been started. |
|
Error |
The floating IP resource has an error. |
||
|
Offline or Unknown |
The floating IP resource is stopped/ no information is acquired. |
||
15 |
Mirror disk resource |
|
Online |
The mirror disk resource has been started. |
|
Error |
The mirror disk resource has an error. |
||
|
Offline or Unknown |
The mirror disk resource is stopped, or no information is acquired. |
||
16 |
Registry synchronization resource |
|
Online |
The registry synchronization resource has been started. |
|
Error |
The registry synchronization resource has an error. |
||
|
Offline or Unknown |
The registry synchronization resource is stopped, or no information is acquired. |
||
17 |
Script resource |
|
Online |
The script resource has been started. |
|
Error |
The script resource has an error. |
||
|
Offline or Unknown |
The script resource is stopped, or no information is acquired. |
||
18 |
Disk resource |
|
Online |
The disk resource has been started. |
|
Error |
The disk resource has an error. |
||
|
Offline or Unknown |
The disk resource is stopped, or no information is acquired. |
||
19 |
Service resource |
|
Online |
The service resource has been started. |
|
Error |
The service resource has an error. |
||
|
Offline or Unknown |
The service resource is stopped, or no information is acquired. |
||
20 |
Print spooler resource |
|
Online |
The print spooler resource has been started. |
|
Error |
The print spooler resource has an error. |
||
|
Offline or Unknown |
The print spooler resource is stopped, or no information is acquired. |
||
21 |
Virtual computer name resource |
|
Online |
The virtual computer name resource has been started. |
|
Error |
The virtual computer name resource has an error. |
||
|
Offline or Unknown |
The virtual computer name resource is stopped, or no information is acquired. |
||
22 |
Virtual IP resource |
|
Online |
The virtual IP resource has been started. |
|
Error |
The virtual IP resource has an error. |
||
|
Offline or Unknown |
The virtual IP resource is stopped, or no information is acquired. |
||
23 |
CIFS resource |
|
Online |
The CIFS resource has been started. |
|
Error |
The CIFS resource has an error. |
||
|
Offline or Unknown |
The CIFS resource is stopped, or no information is acquired. |
||
24 |
NAS resource |
|
Online |
The NAS resource has been started. |
|
Error |
The NAS resource has an error. |
||
|
Offline or Unknown |
The NAS resource is stopped, or no information is acquired. |
||
25 |
Hybrid disk resource |
|
Online |
The hybrid disk resource has been started. |
|
Error |
The hybrid disk resource has an error. |
||
|
Offline or Unknown |
The hybrid disk resource is stopped, or no information is acquired. |
||
26 |
Virtual machine resource |
|
Online |
The virtual machine resource has been started. |
|
Error |
The virtual machine resource has an error. |
||
|
Offline or Unknown |
The virtual machine resource has been stopped, or no information has been acquired. |
||
27 |
Dynamic DNS resource |
|
Online |
The dynamic DNS resource has been started. |
|
Error |
The dynamic DNS resource has an error. |
||
|
Offline or Unknown |
The dynamic DNS resource is stopped, or no information is acquired. |
||
28 |
AWS elastic ip resource |
|
Normal |
The AWS elastic ip resource is running normally. |
|
Error |
The AWS elastic ip resource has an error. |
||
|
Offline or Unknown |
The AWS elastic ip resource is stopped, or no information is acquired. |
||
29 |
AWS virtual ip resource |
|
Normal |
The AWS virtual ip resource is running normally. |
|
Error |
The AWS virtual ip resource has an error. |
||
|
Offline or Unknown |
The AWS virtual ip resource is stopped, or no information is acquired. |
||
30 |
AWS DNS resource |
|
Online |
AWS DNS resource has been started. |
|
Error |
AWS DNS resource has an error. |
||
|
Offline or Unknown |
AWS DNS resource is stopped, or no information is acqauired. |
||
31 |
Azure probe port resource |
|
Normal |
The Azure probe port resource is running normally. |
|
Error |
The Azure probe port resource has an error. |
||
|
Offline or Unknown |
The Azure probe port resource is stopped, or no information is acquired. |
||
32 |
Azure DNS resource |
|
Online |
Azure DNS resource has been started. |
|
Error |
Azure DNS resource has an error. |
||
|
Offline or Unknown |
Azure DNS resource is stopped, or no information is acquired. |
||
33 |
All monitor resources 1 |
|
Normal |
All monitor resources are running normally. |
|
Caution |
One or more monitor resources have an error, or monitoring is suspended on a server. |
||
|
Error |
All monitor resources have errors. |
||
|
Normal (Dummy Failure) |
In the normal status, dummy failure enabled. |
||
|
Caution (Dummy Failure) |
In the warning status, dummy failure enabled. |
||
|
Error (Dummy Failure) |
In the error status, dummy failure enabled. |
||
|
Normal (Recovery Action Disabled) |
In the normal status, the recovery action is inhibited. |
||
|
Caution (Recovery Action Disabled) |
In the warning status, the recovery action disabled. |
||
|
Error (Recovery Action Disabled) |
In the error status, the recovery action disabled. |
||
|
Normal (Dummy Failure and Recovery Action Disabled) |
In the normal status, the recovery action disabled and dummy failure enabled. |
||
|
Caution (Dummy Failure and Recovery Action Disabled) |
In the warning status, the recovery action disabled and dummy failure enabled. |
||
|
Error (Dummy Failure and Recovery Action Disabled) |
In the error status, the recovery action disabled and dummy failure enabled. |
||
|
Unknown |
No information is acquired. |
||
34 |
Application monitor resource 2 |
|
Normal |
The application is running normally. |
|
Caution |
There are one or more servers with application problems, or monitoring is suspended on a server. |
||
|
Error |
All servers have application errors. |
||
|
Dummy Failure |
Dummy Failure is enabled. |
||
|
Unknown |
No information is acquired. |
||
35 |
Disk RW monitor resource 2 |
|
Normal |
The disk is running normally. |
|
Caution |
There are one or more servers with disk problems, or monitoring is suspended on a server. |
||
|
Error |
All servers have disk errors. |
||
|
Dummy Failure |
Dummy Failure is enabled. |
||
|
Unknown |
No information is acquired. |
||
36 |
Floating IP monitor resource 2 |
|
Normal |
The floating IP address has no error. |
|
Caution |
One or more servers cannot communicate with the floating IP address, or monitoring is suspended on a server. |
||
|
Error |
No servers can communicate with the floating IP address. |
||
|
Dummy Failure |
Dummy Failure is enabled. |
||
|
Unknown |
No information is acquired. |
||
37 |
IP monitor resource 2 |
|
Normal |
The IP address of a target has no error. |
|
Caution |
One or more servers cannot communicate with the IP address of the target, or monitoring is suspended on a server. |
||
|
Error |
No servers can communicate with the IP address of the target. |
||
|
Dummy Failure |
Dummy Failure is enabled. |
||
|
Unknown |
No information is acquired. |
||
38 |
Mirror connect monitor resource |
|
Normal |
The mirror connect is running normally. |
|
Caution |
One of the servers has mirror connect problems, or monitoring is suspended on a server. |
||
|
Error |
A mirror connect error has occurred on both servers. |
||
|
Unknown |
No information is acquired. |
||
39 |
Mirror disk monitor resource |
|
Normal |
The mirror disk is running normally. |
|
Caution |
Mirroring is now being recovered, or monitoring is suspended on a server. |
||
|
Error |
The mirror disk has an error. Mirror recovery is needed. |
||
|
Unknown |
No information is acquired. |
||
40 |
NIC Link Up/Down monitor resource 2 |
|
Normal |
The NIC of a target has no error. |
|
Caution |
One of servers has a problem with the NIC of the target, or monitoring is suspended on a server. |
||
|
Error |
All servers have errors with the NIC of the target. |
||
|
Dummy Failure |
Dummy Failure is enabled. |
||
|
Unknown |
No information is acquired. |
||
41 |
Multi target monitor resource 2 |
|
Normal |
Multi target monitor resource is running normally. |
|
Caution |
Monitoring is suspended on a server, or one or more monitor resources registered in the multi target monitor resource have errors. |
||
|
Error |
Multi target has an error. |
||
|
Dummy Failure |
Dummy Failure is enabled. |
||
|
Unknown |
No information is acquired. |
||
42 |
Registry synchronization monitor resource 2 |
|
Normal |
The registry synchronization is running normally. |
|
Caution |
Monitoring is suspended on a server. |
||
|
Error |
The registry synchronization has an error. |
||
|
Dummy Failure |
Dummy Failure is enabled. |
||
|
Unknown |
No information is acquired. |
||
43 |
Disk TUR monitor resource 2 |
|
Normal |
The disk is running normally. |
|
Caution |
There are one or more servers with disk problems, or monitoring is suspended on a server. |
||
|
Error |
All the servers have disk errors. |
||
|
Dummy Failure |
Dummy Failure is enabled. |
||
|
Unknown |
No information is acquired. |
||
44 |
Service monitor resource 2 |
|
Normal |
The service is running normally. |
|
Caution |
Monitoring is suspended on a server. |
||
|
Error |
The service has an error. |
||
|
Dummy Failure |
Dummy Failure is enabled. |
||
|
Unknown |
No information is acquired. |
||
45 |
Print spooler monitor resource 2 |
|
Normal |
The print spooler monitor is running normally. |
|
Caution |
Monitoring is suspended on a server. |
||
|
Error |
The print spooler has an error. |
||
|
Dummy Failure |
Dummy Failure is enabled. |
||
|
Unknown |
No information is acquired. |
||
46 |
Virtual computer name monitor resource 2 |
|
Normal |
The virtual computer name is running normally. |
|
Caution |
Monitoring is suspended on a server. |
||
|
Error |
The virtual computer name has an error. |
||
|
Dummy Failure |
Dummy Failure is enabled. |
||
|
Unknown |
No information is acquired. |
||
47 |
Virtual IP monitor resource 2 |
|
Normal |
The virtual IP is running normally. |
|
Caution |
Monitoring is suspended on a server. |
||
|
Error |
The virtual IP has an error. |
||
|
Dummy Failure |
Dummy Failure is enabled. |
||
|
Unknown |
No information is acquired. |
||
48 |
CIFS monitor resource 2 |
|
Normal |
The CIFS is working normally. |
|
Caution |
Monitoring is suspended on a server. |
||
|
Error |
The CIFS has an error. |
||
|
Dummy Failure |
Dummy Failure is enabled. |
||
|
Unknown |
No information is acquired. |
||
49 |
NAS monitor resource 2 |
|
Normal |
The NAS is working normally. |
|
Caution |
Monitoring is suspended on a server. |
||
|
Error |
The NAS has an error. |
||
|
Dummy Failure |
Dummy Failure is enabled. |
||
|
Unknown |
No information is acquired. |
||
50 |
Hybrid disk monitor resource |
|
Normal |
The Hybrid disk is working normally. |
|
Caution |
Mirroring is now being recovered, or monitoring is suspended on a server. |
||
|
Error |
The hybrid disk has an error. Mirror recovery is needed. |
||
|
Unknown |
No information is acquired. |
||
51 |
Hybrid disk TUR monitor resource 2 |
|
Normal |
The disk is working normally. |
|
Caution |
One of servers has a problem with the disk, or monitoring is suspended on a server. |
||
|
Error |
All the servers have disk errors. |
||
|
Dummy Failure |
Dummy Failure is enabled. |
||
|
Unknown |
No information is acquired. |
||
52 |
Custom monitor resource 2 |
|
Normal |
No error is detected by monitor script. |
|
Caution |
There is a server where monitoring is suspended, or an error has been detected in one of the servers. |
||
|
Error |
Monitor script has detected an error. |
||
|
Dummy Failure |
Dummy Failure is enabled. |
||
|
Unknown |
No information is acquired. |
||
53 |
VM monitor resource |
|
Normal |
The VM is running normally. |
|
Caution |
The virtual machine is not working on one or more servers, or monitoring is suspended on a server. |
||
|
Error |
The VM has an error. |
||
|
Unknown |
No information is acquired. |
||
54 |
Message receive monitor resource |
|
Normal |
No error message has been received. |
|
Caution |
Change to "A server has received an error message, or monitoring is suspended on a server." |
||
|
Error |
An error message has been received. |
||
|
Unknown |
No information is acquired. |
||
55 |
DB2 monitor resource 2 |
|
Normal |
The DB2 is working normally. |
|
Caution |
Monitoring is suspended on a server. |
||
|
Error |
The DB2 has an error. |
||
|
Dummy Failure |
Dummy Failure is enabled. |
||
|
Unknown |
No information is acquired. |
||
56 |
FTP monitor resource 2 |
|
Normal |
The FTP is running normally. |
|
Caution |
Monitoring is suspended on a server. |
||
|
Error |
The FTP has an error. |
||
|
Dummy Failure |
Dummy Failure is enabled. |
||
|
Unknown |
No information is acquired. |
||
57 |
HTTP monitor resource 2 |
|
Normal |
The HTTP is running normally. |
|
Caution |
Monitoring is suspended on a server. |
||
|
Error |
The HTTP has an error. |
||
|
Dummy Failure |
Dummy Failure is enabled. |
||
|
Unknown |
No information is acquired. |
||
58 |
IMAP4 monitor resource 2 |
|
Normal |
The IMAP4 is running normally. |
|
Caution |
Monitoring is suspended on a server. |
||
|
Error |
The IMAP4 has an error. |
||
|
Dummy Failure |
Dummy Failure is enabled. |
||
|
Unknown |
No information is acquired. |
||
59 |
ODBC monitor resource 2 |
|
Normal |
The ODBC is running normally. |
|
Caution |
Monitoring is suspended on a server. |
||
|
Error |
The ODBC has an error. |
||
|
Dummy Failure |
Dummy Failure is enabled. |
||
|
Unknown |
No information is acquired. |
||
60 |
Oracle monitor resource 2 |
|
Normal |
The Oracle monitor resource is running normally. |
|
Caution |
Monitoring is suspended on a server. |
||
|
Error |
The Oracle monitor resource has an error. |
||
|
Dummy Failure |
Dummy Failure is enabled. |
||
|
Unknown |
No information is acquired. |
||
61 |
POP3 monitor resource 2 |
|
Normal |
The POP3 monitor resource is running normally. |
|
Caution |
Monitoring is suspended on a server. |
||
|
Error |
The POP3 monitor resource has an error. |
||
|
Dummy Failure |
Dummy Failure is enabled. |
||
|
Unknown |
No information is acquired. |
||
62 |
PostgreSQL monitor resource 2 |
|
Normal |
The PostgreSQL is running normally. |
|
Caution |
Monitoring is suspended on a server. |
||
|
Error |
The PostgreSQL has an error. |
||
|
Dummy Failure |
Dummy Failure is enabled. |
||
|
Unknown |
No information is acquired. |
||
63 |
SMTP monitor resource 2 |
|
Normal |
The SMTP monitor is running smoothly. |
|
Caution |
Monitoring is suspended on a server. |
||
|
Error |
The SMTP resource has an error. |
||
|
Dummy Failure |
Dummy Failure is enabled. |
||
|
Unknown |
No information is acquired. |
||
64 |
SQL Server monitor resource 2 |
|
Normal |
The SQL Server is running normally. |
|
Caution |
Monitoring is suspended on a server. |
||
|
Error |
The SQL Server has an error. |
||
|
Dummy Failure |
Dummy Failure is enabled. |
||
|
Unknown |
No information is acquired. |
||
65 |
Tuxedo monitor resource 2 |
|
Normal |
The Tuxedo is running normally. |
|
Caution |
Monitoring is suspended on a server. |
||
|
Error |
The Tuxedo has an error. |
||
|
Dummy Failure |
Dummy Failure is enabled. |
||
|
Unknown |
No information is acquired. |
||
66 |
WebSphere monitor resource 2 |
|
Normal |
The WebSphere is running normally. |
|
Caution |
Monitoring is suspended on a server. |
||
|
Error |
The WebSphere has an error. |
||
|
Dummy Failure |
Dummy Failure is enabled. |
||
|
Unknown |
No information is acquired. |
||
67 |
WebLogic monitor resource 2 |
|
Normal |
The WebLogic is running normally. |
|
Caution |
Monitoring is suspended on a server. |
||
|
Error |
The WebLogic has an error. |
||
|
Dummy Failure |
Dummy Failure is enabled. |
||
|
Unknown |
No information is acquired. |
||
68 |
WebOTX monitor resource 2 |
|
Normal |
The WebOTX is running normally. |
|
Caution |
Monitoring is suspended on a server. |
||
|
Error |
The WebOTX has an error. |
||
|
Dummy Failure |
Dummy Failure is enabled. |
||
|
Unknown |
No information is acquired. |
||
69 |
JVM monitor resource 2 |
|
Normal |
JavaVM is running normally. |
|
Caution |
Monitoring is suspended on a server. |
||
|
Error |
The load on the JavaVM exceeds the configured value. |
||
|
Dummy Failure |
Dummy Failure is enabled. |
||
|
Unknown |
No information is acquired. |
||
70 |
System monitor resource 2 |
|
Normal |
System Resource Agent is running normally. |
|
Caution |
Monitoring is suspended on a server. |
||
|
Error |
System Resource Agent has an error. |
||
|
Dummy Failure |
Dummy Failure is enabled. |
||
|
Unknown |
No information is acquired. |
||
71 |
Process name monitor resource 2 |
|
Normal |
The specified process is running normally. |
|
Caution |
Monitoring is suspended on a server. |
||
|
Error |
The specified process is suspended. |
||
|
Dummy Failure |
Dummy Failure is enabled. |
||
|
Unknown |
No information is acquired. |
||
72 |
User space monitor resource 2 |
|
Normal |
The user space is running normally. |
|
Caution |
One or more servers have an error, or monitoring is suspended on a server. |
||
|
Error |
The user space is not running normally on all servers. |
||
|
Dummy Failure |
Dummy Failure is enabled. |
||
|
Unknown |
No information is acquired. |
||
73 |
Dynamic DNS monitor resource |
|
Normal |
The dynamic DNS monitor resource is running normally. |
|
Caution |
Monitoring is suspended on a server. |
||
|
Error |
The dynamic DNS monitor resource has an error. |
||
|
Unknown |
No information is acquired. |
||
74 |
AWS elastic ip monitor resource 2 |
|
Normal |
The AWS elastic ip monitor resource is running normally. |
|
Caution |
Acquiring the AWS CLI command response failed on a server, or monitoring is suspended on a server. |
||
|
Error |
The AWS elastic ip monitor resource has an error. |
||
|
Dummy Failure |
Dummy Failure is enabled. |
||
|
Unknown |
No information is acquired. |
||
75 |
AWS virtual ip monitor resource 2 |
|
Normal |
The AWS virtual ip monitor resource is running normally. |
|
Caution |
Acquiring the AWS CLI command response failed on a server, or monitoring is suspended on a server. |
||
|
Error |
The AWS virtual ip monitor resource has an error. |
||
|
Dummy Failure |
Dummy Failure is enabled. |
||
|
Unknown |
No information is acquired. |
||
76 |
AWS AZ monitor resource 2 |
|
Normal |
The AWS AZ monitor resource is running normally. |
|
Caution |
Acquiring the AWS CLI command response failed on a server, or monitoring is suspended on a server. |
||
|
Error |
The AWS AZ monitor resource has an error. |
||
|
Dummy Failure |
Dummy Failure is enabled. |
||
|
Unknown |
No information is acquired. |
||
77 |
AWS DNS monitor resource 2 |
|
Normal |
AWS DNS monitor resource is running normally. |
|
Caution |
Acquiring the AWS CLI command response failed on a server, or monitoring is suspended on some servers. |
||
|
Error |
AWS DNS monitor resource has an error. |
||
|
Dummy Failure |
Dummy Failure is enabled. |
||
|
Unknown |
No information is acquired. |
||
78 |
Azure probe port monitor resource 2 |
|
Normal |
The Azure probe port monitor resource is running normally. |
|
Caution |
Probe port wait timeout occurred in the Azure probe port monitor resource to be monitored on a server, or monitoring is suspended on a server. |
||
|
Error |
The Azure probe port monitor resource has an error. |
||
|
Dummy Failure |
Dummy Failure is enabled. |
||
|
Unknown |
No information is acquired. |
||
79 |
Azure load balance monitor resource 2 |
|
Normal |
The Azure load balance monitor resource is running normally. |
|
Caution |
Monitoring for the Azure load balance monitor resource is suspended on a server. |
||
|
Error |
The Azure load balance monitor resource has an error. |
||
|
Dummy Failure |
Dummy Failure is enabled. |
||
|
Unknown |
No information is acquired. |
||
80 |
Azure DNS monitor resource 2 |
|
Normal |
The Azure DNS monitor resource is running normally. |
|
Caution |
Monitoring is suspended on a server. |
||
|
Error |
The Azure DNS monitor resource has an error. |
||
|
Dummy Failure |
Dummy Failure is enabled. |
||
|
Unknown |
No information is acquired. |


- 1
If recovery action triggered by monitor resource error is disabled, "Recovery Action Disabled" is indicated next to the monitor. If a monitor resource for which a dummy failure occurred exists, "Failure Verification" is indicated.
- 2(1,2,3,4,5,6,7,8,9,10,11,12,13,14,15,16,17,18,19,20,21,22,23,24,25,26,27,28,29,30,31,32,33,34,35,36,37,38,39,40,41)
If a dummy failure has occurred, "Dummy Failure" is indicated.
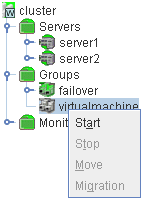
2.3.2. Operations from the WebManager
You can operate a cluster by right-clicking (1) a cluster, (3) an individual server, (10) an individual group, or (24) a VM resource and choosing an operation.
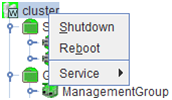
Objects of the cluster
When you right-click the cluster object, the following shortcut menu is displayed.

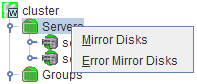
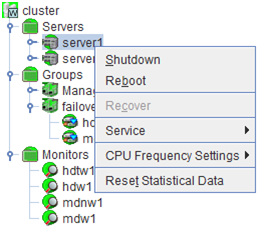
Server object
When you right-click the servers object, the following shortcut menu is displayed.
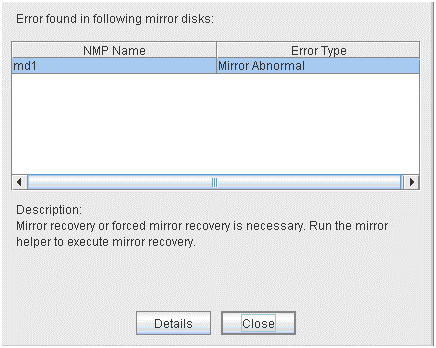
Error type
Description
Mirror Error
Mirror Error (Single Server Run)
Only one server is running, and the latest data of a mirror disk is not completed. To continue the operation, run the Mirror Helper and execute mirror recovery. Be careful since the server that is currently running will be the latest data when the mirror recovery is executed.
When you select Details, the Mirror Disk Helper is activated.
Individual server objects
When you right-click an individual server object, the following shortcut menu is displayed.


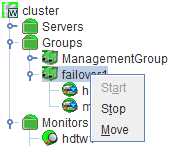
Individual group objects
When you right-click an individual group object, the following shortcut menu is displayed.
When group type is failover.
When group type is virtualmachine.


Individual group resource objects (except mirror disk resources and hybrid disk resources)
When you right-click an individual group resource object, the following shortcut menu is displayed.
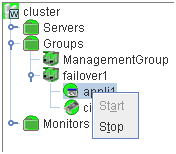
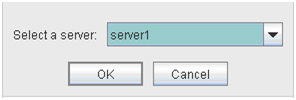
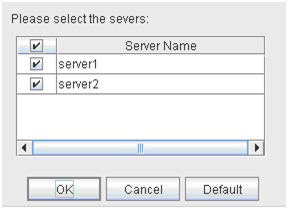
- Start (enabled only when the group is stopped)Starts up the selected group resource.The dialog box for selecting the server that starts up the selected group is displayed.

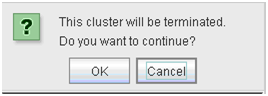
- Stop (enabled only when the group has been started up or when it has an error)Stops the selected group resource. When you selected this operation, the following dialog box is displayed for confirmation.

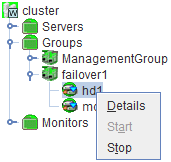
Objects of mirror disk resource and hybrid disk resource
When you right-click a mirror disk resource object, the following shortcut menu is displayed.
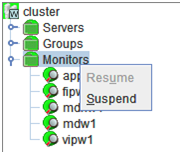
Monitor resource objects
When you right-click a monitor resource object, the following shortcut menu is displayed.
When operation mode is selected
When verification mode is selected


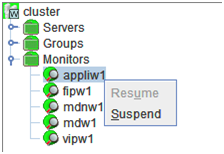
Individual monitor resource objects
When you right-click an individual monitor resource object, the following shortcut menu is displayed.
When operation mode is selected
When verification mode is selected
Mirror connect monitor resource
Mirror disk monitor resource
Hybrid disk monitor resource
Message receive monitor resource
VM monitor resource
The following dialog box for selecting the server on which A dummy failure is generated. for a selected monitor resource is displayed.Note
When an attempt is made to enable dummy failure, and if one or more servers cannot be connected, an error is displayed. Dummy failure cannot be enabled on a server that cannot be connected.


2.4. Checking the cluster status by the WebManager list view
The detailed information on the selected object in the tree view of the WebManager can be displayed in the list view.
2.4.1. To display information on the whole cluster
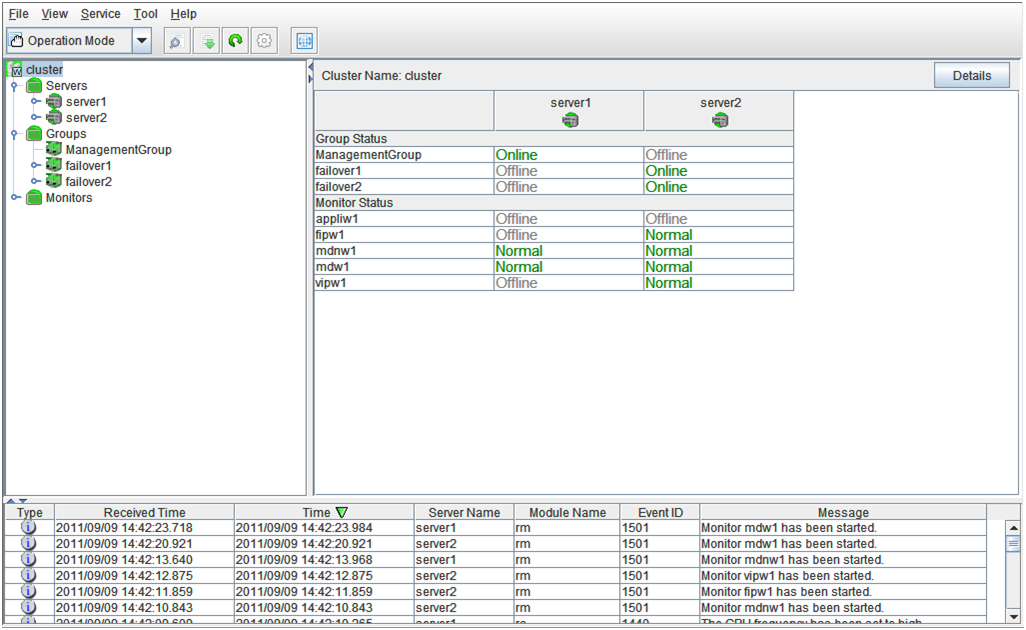
Start the WebManager.
- In this tree view, click the object icon
 for the cluster. In the list view in the right pane of the window, the group status and monitor resource status of each server are displayed.
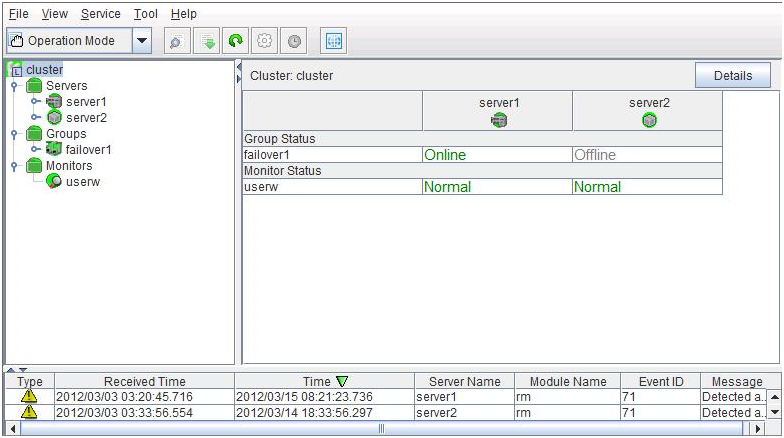
Click Details to display the following in the dialog box.
Info
- Name:
Cluster name
- Comment:
Comment for the cluster
- Status:
Status of the cluster

Heartbeat I/F
Server Down Notification: When you set this to On, one server is allowed to tell the other servers that it is being shut down by the commands from WebManager or command line, so that a failover occurs independently of the heartbeat timeout settings.
Note
Even if Server Down Notification is set to On, failover is performed after a heartbeat timeout when shutdown is performed with a method other than the WebManager or a command.
- Cast Method:
Configures the Heartbeat Cast Method (Unicast / Broadcast); Broadcast is unavailable when the IP address of the Heartbeat I/F is configured with IPv6.

NP Resolution
Action at NP Occurrence: Action to be taken when a network partition occurs

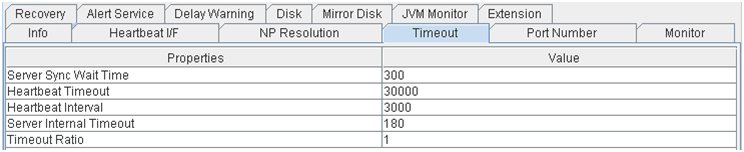
Timeout
- Server Sync Wait Time:
Time to wait for the other servers to start up (in seconds)
- Heartbeat Timeout:
Heartbeat timeout (in milliseconds)
- Heartbeat Interval:
The interval for sending heartbeats (milliseconds)
- Server Internal Timeout:
Internal communication timeout (in seconds)
- Timeout Ratio:
Current timeout ratio
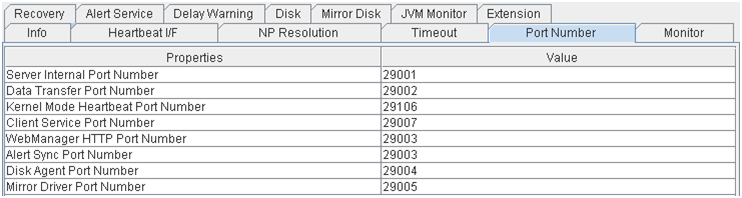
Port Number
- Server Internal Port Number:
Port number for internal communication
- Data Transfer Port Number:
Port number for data transfer
- Kernel Mode Heartbeat Port Number:
Port number for kernel-mode heartbeat
- Client Service Port Number:
Port number for client service
- WebManager HTTP Port Number:
Port number for WebManager
- Alert Sync Port Number:
Port number for alert synchronization
- Disk Agent Port Number:
Port number for disk agent
- Mirror Driver Port Number:
Port number for mirror driver (Only when Replicator/Replicator DR is used)
Monitor
- Collect System Resource Information:
Whether or not to collect System Resource Information

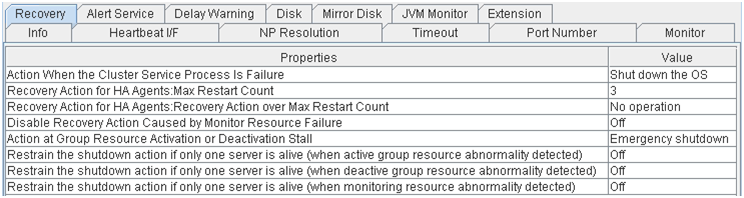
Recovery
- Action When the Cluster Service Process Is Failure:
Action to be taken when a cluster service process fails
- Recovery Action for HA Agents: Max Restart Count:
Maximum count to restart an HA process if the process fails
- Recovery Action for HA Agents: Recovery Action over Max Restart Count:
Action to be taken when the HA process fails and the process cannot be restarted even after retrying restart of the process for the maximum number of retries
- Disable Recovery Action Caused by Monitor Resource Failure:
Whether or not to disable the recovery action when the monitor resource fails
- Action at Group Resource Activation or Deactivation Stall:
Action to be taken when group resource activation/deactivation is stalled
- Restrain the shutdown action if only one server is alive (when active group resource abnormality detected):
Whether to disable shutdown at activation failure in the case of the last one server
- Restrain the shutdown action if only one server is alive (when deactive group resource abnormality detected):
Whether to disable shutdown at deactivation failure in the case of the last one server
- Restrain the shutdown action if only one server is alive (when monitoring resource abnormality detected):
Whether to disable shutdown at monitoring failure in the case of the last one server
Alert Service
- E-mail Address:
Destination mail address
- Use Network Warning Light:
Whether or not to use a network warning light
- Use Chassis Identify:
Whether or not to use chassis ID lamp association
- Enable Alert Setting:
Whether or not to enable setting

Delay Warning
- Heartbeat Delay Warning:
Heartbeat delay warning (%)
- Monitor Delay Warning:
Monitor delay warning (%)
- COM Delay Warning:
COM communication delay warning (%)

Disk
- Shared Disk Disconnection Retry Threshold:
Shared disk disconnection retry threshold
- Shared Disk Disconnection Timeout:
Shared disk disconnection timeout (in seconds)
- Shared Disk Disconnection Retry Interval:
Shared disk disconnection retry interval (in seconds)
- Shared Disk Disconnection Final Action:
Shared disk disconnection final action

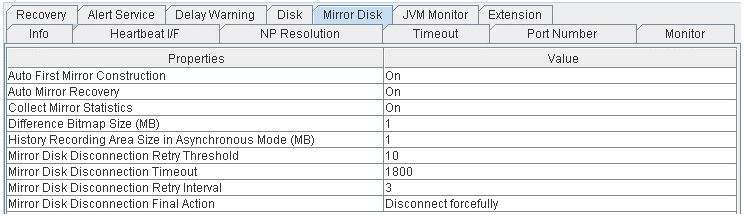
Mirror disk (Only when Replicator/Replicator DR is used)
- Auto First Mirror Construction:
Whether or not to perform auto mirror initial construction.
- Auto Mirror Recovery:
Whether or not to perform auto mirror recovery.
- Collect Mirror Statistics:
Whether or not to perform mirror statistics collection
- Difference Bitmap Size (MB):
Size of differential bitmap
- History Recording Area Size in Asynchronous Mode (MB):
Size of history record area of unsent data in asynchronous mode.
- Mirror Disk Disconnection Retry Threshold:
Mirror disk disconnection retry threshold
- Mirror Disk Disconnection Timeout:
Mirror disk disconnection timeout (in seconds)
- Mirror Disk Disconnection Retry Interval:
Mirror disk disconnection retry interval (in seconds)
- Mirror Disk Disconnection Final Action:
The final action at mirror disk disconnection
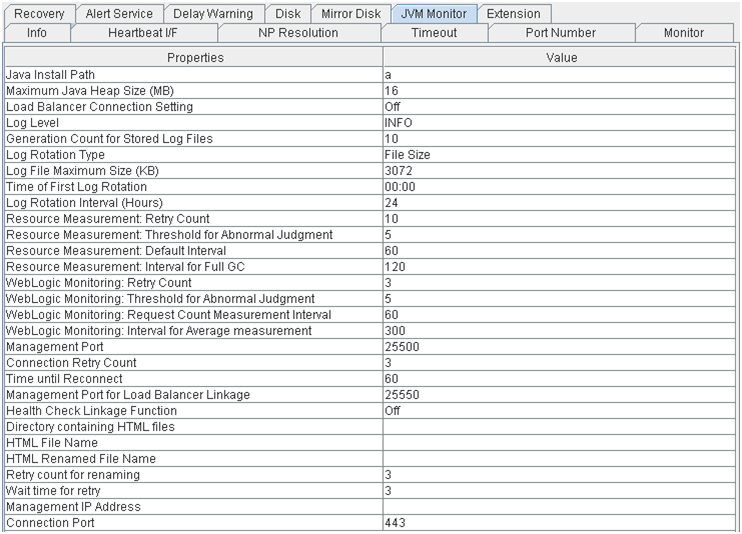
JVM monitor
- Java Installation Path:
Java installation path
- Maximum Java Heap Size (MB):
Maximum Java heap size (MB)
- Load Balancer Connection Setting:
Load balancer linkage settings
- Log Level:
Log level
- Generation Count for Stored Log files:
Number of generations of log files to be stored
- Log Rotation Type:
Log rotation type
- Log File Maximum Size (KB):
Maximum log file size (KB)
- Time of First Log Rotation:
Time of the first log rotation
- Log Rotation Interval (Hours):
Log rotation interval (hours)
- Resource Measurement: Retry Count:
Resource measurement: Measurement retry count
- Resource Measurement: Threshold for Abnormal Judgment:
Resource Measurement: Threshold for Abnormal Judgment:
- Resource Measurement: Default Interval:
Resource measurement: Interval for memory and thread measurement (sec)
- Resource Measurement: Interval for Full GC:
Resource measurement: Interval for Full GC measurement (sec)
- WebLogic Monitoring: Retry Count:
WebLogic monitoring: Measurement retry count
- WebLogic Monitoring: Threshold for Abnormal Judgment
WebLogic monitoring: Threshold for Abnormal Judgment:
- WebLogic Monitoring: Request Count Measurement Interval:
WebLogic monitoring: Interval for measuring the number of requests (sec)
- WebLogic monitoring: Interval for Average measurement:
WebLogic monitoring: Interval for measuring the average (sec)
- Management Port:
Management port number
- Connection Retry Count:
Connection retry count
- Time until Reconnect:
Time to wait for reconnection (sec)
- Management Port for Load Balancer Linkage:
Management port number for load balancer linkage
- Health Check Linkage Function:
Whether or not to use the health check linkage function
- Directory containing HTML files:
HTML storage directory
- HTML File Name:
HTML file name
- HTML Renamed File Name:
Renamed HTML file name
- Retry Count for renaming:
Retry count if renaming fails
- Wait time for retry:
Time to wait for a renaming retry (sec)
- Management IP Address:
BIG-IP LTM management IP address
- Connection Port:
Communication port number for BIG-IP LTM
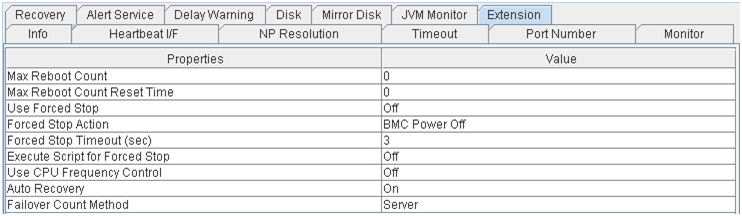
Extension
- Max Reboot Count:
Maximum reboots count
- Max Reboot Count Reset Time:
Time to reset maximum reboot count (in seconds)
- Use Forced Stop:
Whether or not to perform the forced stop function
- Forced Stop Action:
Action of forced stop function
- Forced Stop Timeout (sec):
Wait time until activation of failover group starts after forced stop has been performed (in seconds)
- Execute Script for Forced Stop:
Whether to execute a script for forced stop
- Use CPU Frequency Control:
Whether or not to use CPU frequency control
- Auto Recovery:
The setting whether server recovery is automatically performed after cluster server is rebooted from "Suspension (Isolated)."
- Failover Count Method:
Settings to specify the method of counting failovers (by Server or Cluster)
2.4.2. Checking the whole status of the server in the WebManager list view
Start the WebManager.
In the tree view, select the object icon for the entire server
 . In the upper part of the list view in the right pane, the heartbeat status and network partition resolution status list of each server are displayed.
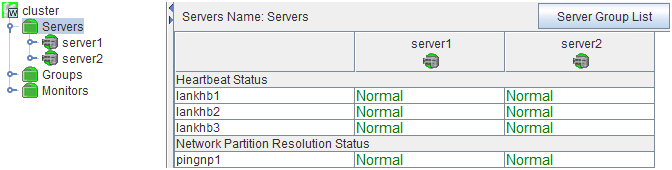
Additionally, click Server Group List to display the information of the server group on the pop up dialog.

2.4.3. Checking the status of individual server in the WebManager list view
Start the WebManager.
If the object
 of a server is selected in the tree view, Comment, Version, Product, Internal Version, Install Path and Status of the server are displayed.
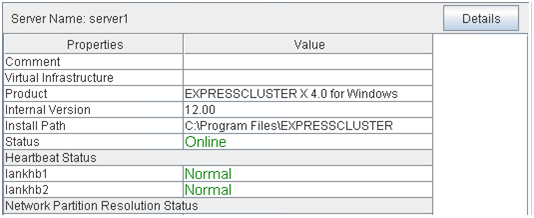
- Comment:
Comment for the server
- Virtual Infrastructure:
Virtual infrastructure name
- Product:
Name of the product
- Internal Version:
Internal version
- Install Path:
Install path of EXPRESSCLUSTER
- Status:
Status of the server
Click Details to display the following in the dialog box.
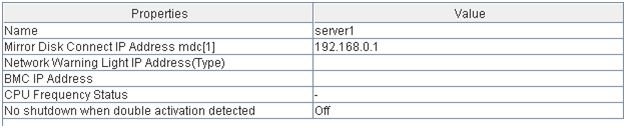
- Name:
Server name
- Mirror Disk Connect IP Address mdc[1] 3:
IP address of mirror disk connection
- Network Warning Light IP Address(Type):
IP address of network warning light
- BMC IP address:
BMC IP address
- CPU Frequency Status:
Current setting status of CPU frequency control
- No shutdown when double activation detected:
Whether to disable shutdown when activation of both disks is detected
- 3
The I/F number of the mirror disk connection is entered to the number in the parentheses.
2.4.4. Checking the status of the whole monitor in the WebManager list view
Start the WebManager.
In the tree view, select the object icon for the entire monitor
 . In the list view, Monitor Name and a list of server statuses are displayed.
2.5. Checking alerts using the WebManager
For the meanings of alert messages, see "Error messages" in the "Reference Guide". For information about searching alert messages, see "2.2.3. Searching for an alert by using the WebManager".
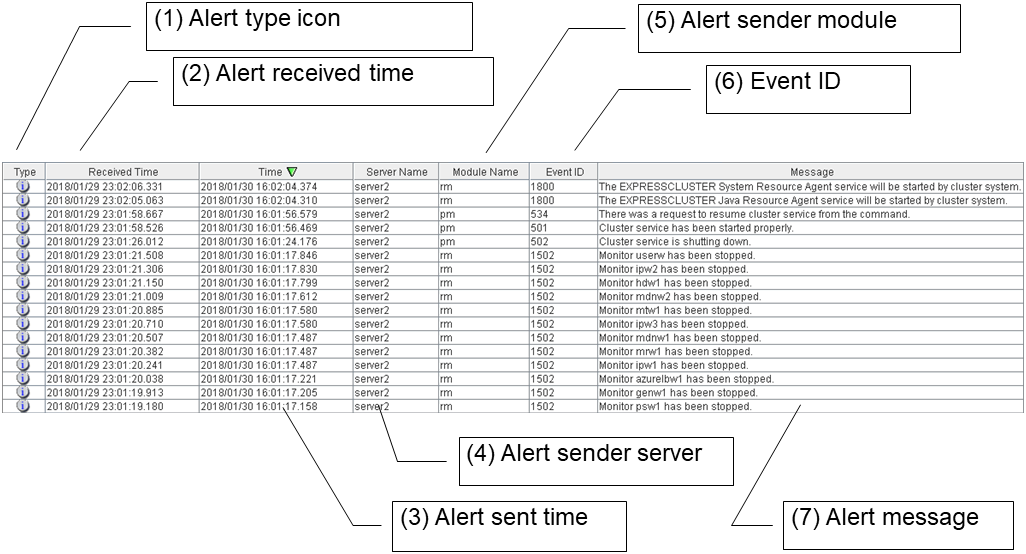
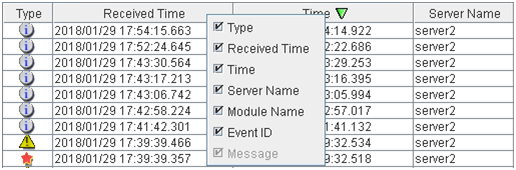
2.5.1. Alert view fields
The meaning of each of the fields in the alert view of the WebManager are the following.
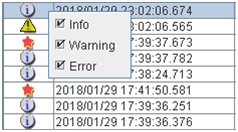
Alert type icon
Alert type
Description

Informational message

Warning message

Error message
- Alrert received timeThe time the alert was received. The time in the server to which the WebManager connects is applied.
- Alert sent timeThe time the alert was sent from a server. The time in the alert sender server is used.
- Alert sender serverThe name of a server that sent the alert.
- Alert sender moduleThe name of a module that sent the alert.For a list of module name types, see "2.2.3. Searching for an alert by using the WebManager".
- Event IDThe event ID number set to each alert.
- Alert messageThe alert messages.
2.5.2. Alert view operation

 or
or  mark is displayed in each field.
Mark |
Purpose |
|---|---|
|
Sorts alerts in the ascending order of the selected field. |
|
Sorts alerts in the descending order of the selected field. |


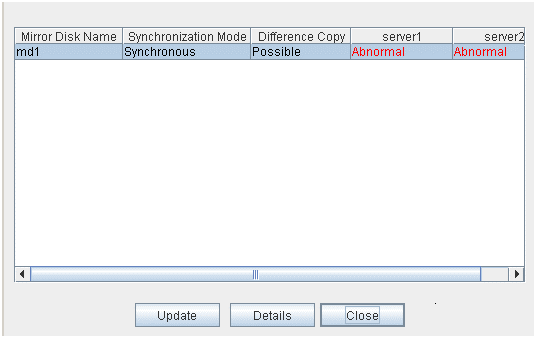
2.6. Mirror disk helper
2.6.1. Overview of the mirror disk helper
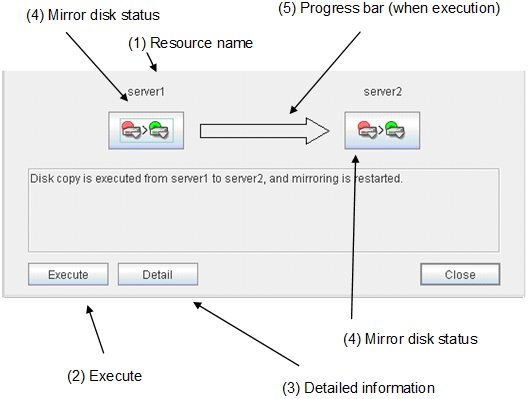
The Mirror Disk Helper is a tool to help the recovery of mirror disk/hybrid disk. It is used by starting up from the WebManager. The following shows the layout of the Mirror Disk Helper.
For mirror disk resource
For hybrid disk resource
The Mirror Disk Helper can be started by the mirror disk list or a mirror disk resource/hybrid disk resource of a group.The following is the description of the each field of the Mirror Disk Helper.

For mirror disk resource
- Server Name:
Server name
- Difference Copy:
Whether differential copying of the mirror disk resource is possible
- Activation Status:
Active status of the mirror disk device on the server
- Media Error:
Media error of the mirror disk resource
- Mirror Break Occurred at:
Mirror break time
- Last Updated:
The time that the data was updated the last time
- Necessary Copy Amount (%):
Amount of data to be copied again to resume mirroring
- Partition Usage Rate (%):
Partition usage rate
- Partition Size (M bytes):
Partition size
For hybrid disk resource
- Server Group Name:
Server group name
- Current Server Name:
Name of the server that uploads and manages the disks in the server group.
- Differential Copy:
Whether differential copying of the mirror disk resource is possible
- Activation Status:
Active status of the mirror disk device on the server
- Mirror Break Occurred at:
Mirror break time
- Last Update:
The time that the data was updated the last time
- Necessary Copy Amount (%):
Amount of data to be copied again to resume mirroring
- Partition Usage Rate (%):
Partition usage rate
Last Data Update Time is displayed when only one of the servers is updated.Mirror Break Time is displayed when mirror connect is disconnected.Partition Usage Rate is displayed for the server of which resources are active.

- Mirroring disk statusThe following table shows the mirroring disk status of servers:You can select what to perform for the mirror disk by clicking the icon.
Icon
Mirroring disk status
Mirror color 4

Mirroring status is normal. The server is inactive.
Green

Mirroring status is normal. The server is active.
Green

Mirror recovery or forced mirror recovery is underway. The server is inactive.
Yellow

Mirror recovery or forced mirror recovery is underway. The server is active.
Yellow

There might be a difference, but it has not been determined which has the latest information. Mirror recovery is required.
Orange

The server has an error. Mirror recovery is required.
Red

The server is stopped or its status is unknown. Information on the server status cannot be acquired.
Gray

Both systems are active.
Blue

Cluster partition has an error.
Black
- 4
To see the mirror color, run the clpmdstat command.
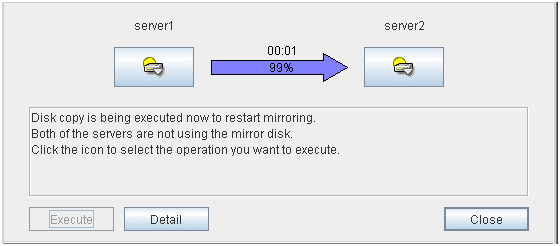
- Progress barWhen performing the mirror recovery, the progress bar shows an arrow from a source server with the latest data to a copy destination server.How far the mirror recovery has progressed and expected time required for copying are displayed in the progress bar.
- Current server (only hybrid disk resource)Current server displays the current server that updates and manages the disks. You can check the status of each member server of the server group by clicking the drop-down arrow. The current server is represented in the bold font. The server represented in gray font is in the down state.When performing mirror recovery or canceling access restrictions, you can select a server from the list shown by clicking the drop-down arrow to change a current server.
- Server group name (only hybrid disk resource)The server group name is displayed. For more information on server groups, refer to "Understanding server groups" in "What is a group?""Group resource details" in the "Reference Guide".
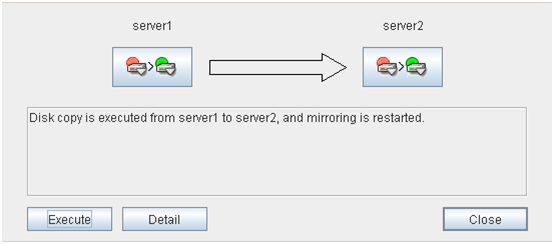
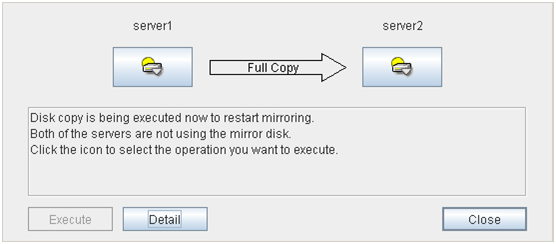
2.6.2. Recovering a mirror (forcefully)
Mirror recovery
If there is a difference between the mirror disks on both servers:
 If there is a difference between the mirror disks on both servers, and one of the servers has an error, the progress bar direction is fixed. When you click Execute, mirror recovery starts.When you click Execute, mirror recovery starts. If any group is active, the server with the active group becomes the source server. When it is possible to recover differences, only the difference is recovered. If it is impossible to recover differences, whole partition area is recovered.
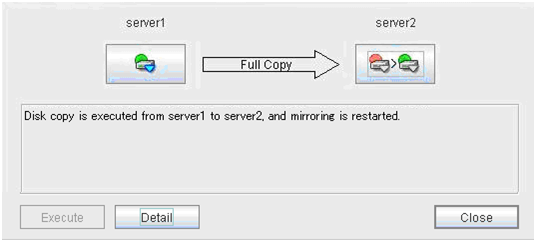
If there is no difference between the mirror disks on both servers:
If there is no difference, full copy of the mirror is performed.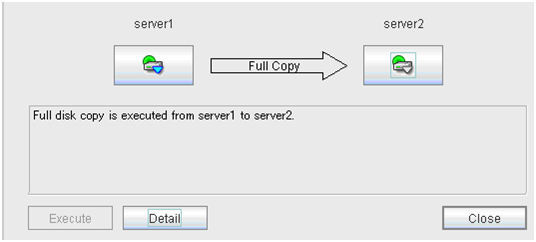 If there is no difference between the mirror disks of both servers, and both servers are running normally, the progress bar is displayed. When you click Execute, mirror recovery starts.
If the status of both servers is Error:
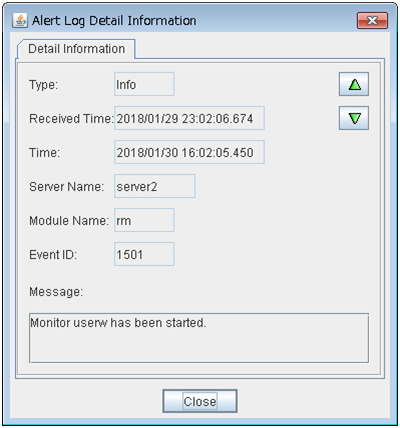
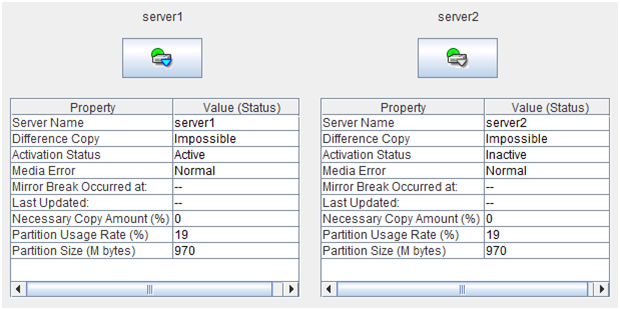
If both servers have errors, click Details to determine a source server. When you click Details, the following detailed information is displayed.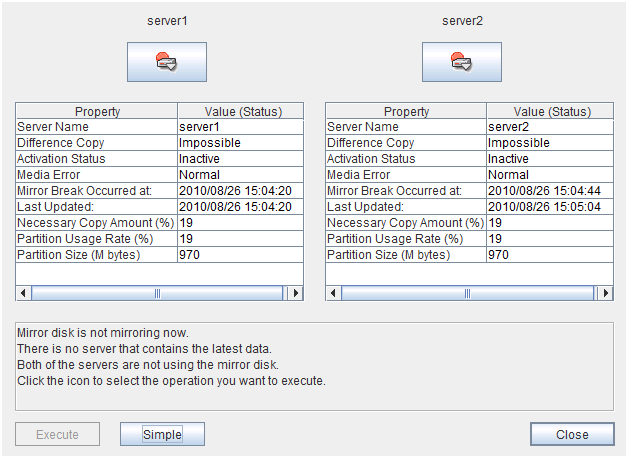 Check the Last Data Update Time, and choose a server with the latest data as the source server. Note that the time you see here is of the OS.If you select an icon whose status is mirrored disk as the source, the progress bar is displayed. Click Execute to start mirror recovery.
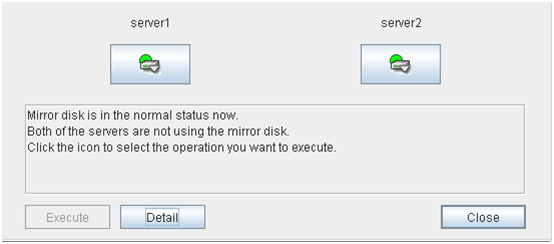
Forced mirror recovery only for a single server
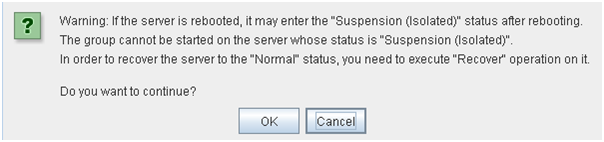
When one server has an error while the other is in the unknown status or stopped, the Mirror Disk Helper is displayed.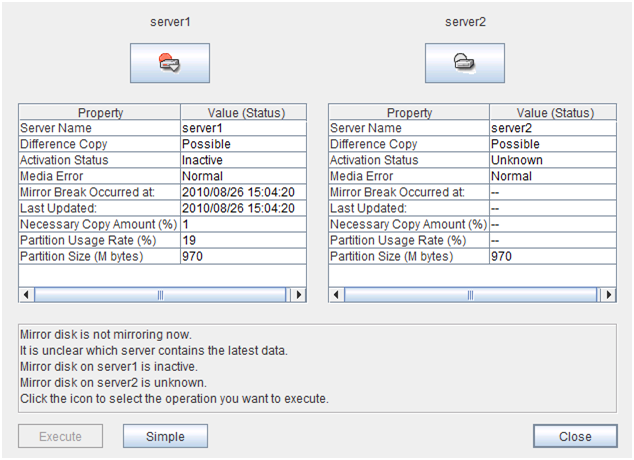 When you click the icon of the server with an error, the following is displayed:
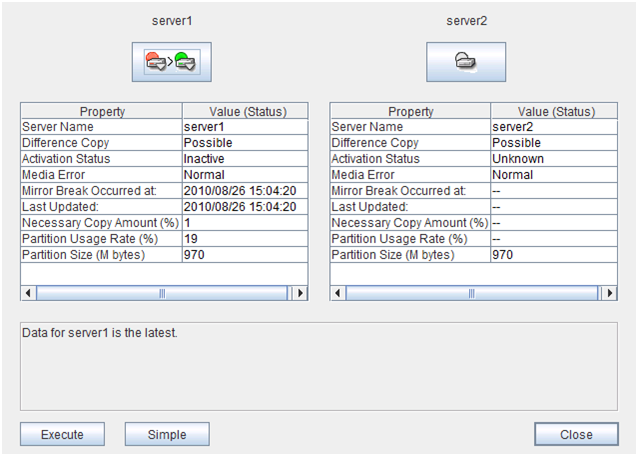 When you click Execute, forced mirror recovery of only one server starts.
2.6.3. Stopping mirror recovery
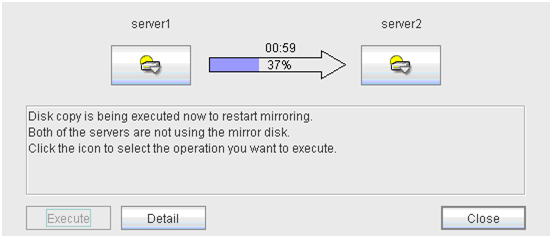
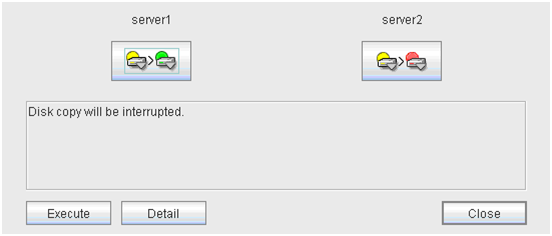

2.6.4. Canceling access restriction
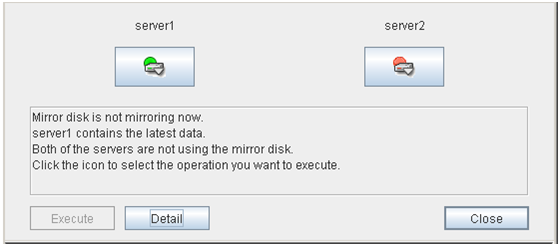
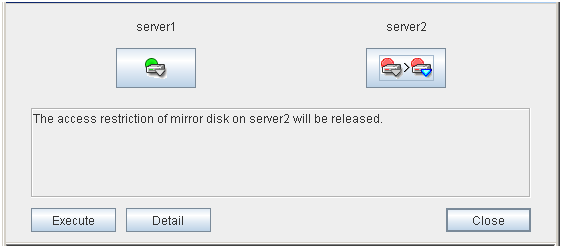
Note
When the Auto Mirror Recovery is enabled and one of the servers is operating normally, it is necessary to disable Auto Mirror Recovery in advance or suspend the mirror disk monitor resource or hybrid disk monitor resource so that Auto Mirror Recovery does not operate when the access restriction is canceled in the server that is abnormal.
2.7. Manually stopping and starting the WebManager
2.8. When you do not want to use the WebManager
2.9. Setting limitations on the connection and operation of the WebManager
The limitation in connection and operation of the WebManager can be configured in Cluster Properties in the Builder. For details, see "3.11.9. WebManager tab".
2.9.1. Type of limitation
There are two ways to set usage limitations:
Limiting the access by using client IP addresses
Limiting the operation by using a password
Limiting the access by using client IP addresses
This function limits the clients who can access the WebManager and operations on the WebManager by using client IP addresses.Add IP addresses to IP Addresses of the Accessible Clients on the WebManager tab in Cluster Properties of the Builder. For details, see "3.11.9. WebManager tab".When setting the limitation of the connection of the WebManager, if you attempt to access to the WebManager from the IP address that is not added to IP Addresses of the Accessible Clients, the following error messages are displayed.Example: when using the Internet Explorer
When connecting to the WebManager from the client of which the operation is limited, WebManager becomes Reference only and is not able to switch to Operation Mode nor Verification mode.

The limitation by using a password
This function limits viewing and operations on the WebManager by using a password.To configure this limitation: in Cluster Properties of the Builder, click the WebManager tab and then Control connection by using password. For details, see "3.11.9. WebManager tab".Once password limitation of the WebManager is set, the following authorization dialog box is displayed when trying to access the WebManager by setting a password.
You can log on to the WebManager by selecting Operation Mode or Reference Only in Authorization and entering a correct password.
The authorization dialog box is not displayed when the password limitation is not configured (you can log on to the WebManager without authorization).
You cannot log on to the WebManager if you enter a wrong password three consecutive times.
When you log in with Reference Only selected for Permission, the WebManager is placed in reference mode. When you attempt to switch to operation mode, config mode, or verification mode in this status, the above authorization dialog is displayed, and you are requested to enter a password for Operation Mode.
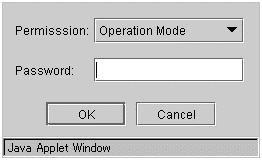
Combination of the IP address and password
The operational limitations when using both IP addresses and passwords are the following:
Operable mode
Reference only
Unavailable
Reference only 5
Reference only
Unavailable
Cannot access
Cannot access
Cannot access
- 5
Authorization cannot be selected.
2.10. Operating a cluster by using the WebManager
2.10.1. Cluster shutdown and cluster shutdown reboot
For information on how to perform cluster shutdown and cluster shutdown reboot from the WebManager, see "2.3.2. Operations from the WebManager".
2.10.2. Mirror disk resource and hybrid disk resource
For information on how to use the mirror disks, hybrid disk resources, and Mirror Disk Helper from the WebManager, see "Server object" in "2.3.2. Operations from the WebManager" and "Objects of mirror disk resource and hybrid disk resource" in "2.3.2. Operations from the WebManager".
2.10.3. Recovering servers
When Auto Return is set to Off on the Extension tab in Cluster Properties of the Builder, and a server is shut down or rebooted without using the cluster shutdown command, the server is started in the suspension (isolated) state. A server in this status does not run as a part of the cluster system. Thus, you need to return the server to the cluster system after you have finished the necessary maintenance work on the server. For more information on how to return a server to a cluster system by using the WebManager, see "Individual server objects" in "2.3.2. Operations from the WebManager".
2.10.4. Shutting down and rebooting an individual server
For information on how to shut down and reboot an individual server from the WebManager, see "Individual server objects" in "2.3.2. Operations from the WebManager".
2.10.5. Starting, stopping, and moving an individual group
For information on how to start, stop, and move an individual group from the WebManager, see "Individual group objects" in "2.3.2. Operations from the WebManager".
2.10.6. Starting and stopping a group resource
For information on how to start and stop a group resource from the WebManager, see "Individual group resource objects (except mirror disk resources and hybrid disk resources)" in "2.3.2. Operations from the WebManager".
2.10.7. Resuming, suspending, and stopping dummy failure of monitor resources
For information on how to resume, suspend, or stop dummy failure of a monitor resource from the WebManager, see "Monitor resource objects" in "2.3.2. Operations from the WebManager".
2.10.8. Resuming, suspending, starting dummy failure, and stopping dummy failure of an individual monitor resource
For information on how to resume, suspend, start or stop dummy failure of a monitor resource from the WebManager, see "Individual monitor resource objects" in "2.3.2. Operations from the WebManager".
2.11. Limitations of the WebManager
Information displayed by the WebManager does not always reflect the latest status. To acquire the latest information, click the Reload icon on the toolbar or Reload in the Tool menu.
If a server fails while the WebManager is acquiring information, the information acquisition fails, which may result in the failure to show some objects.
Wait for the next automatic update, or click the Reload icon on the toolbar or Reload in the Tool menu to reacquire the latest information.
The EXPRESSCLUSTER logs cannot be collected from two or more WebManager instances simultaneously.
If you work on the WebManager when no connectivity is established, it may take a while to regain control.
While the mouse pointer is the hourglass which indicates that the OS is processing something, moving the cursor outside the browser may return to the arrow icon even if the process is still underway.
If a proxy server is used, configure the proxy server so that the port number of the WebManager can be relayed.
When a reverse proxy server is used, the WebManager does not run normally.
When updating EXPRESSCLUSTER, close all running browsers. Clear the Java cache (not browser cache) and open browsers.
When updating Java, close all running browsers. Clear the Java cache (not browser cache) and open browsers
If the client PC to connect to WebManager uses Java(TM) Runtime Environment Version 8.0 Update 162 or later, and cannot be connected to the Internet, it may take time to start WebManager. This can be avoided by setting Execute Certificate Revocation Check to Not Check on Detailed Settings on the Java Control Panel. For details of how to set it, check the Java website.
Do not set the Reload Interval on the WebManager tab or less than 30 seconds. If you set it for less than 30 seconds, it may affect the performance of EXPRESSCLUSTER
2.12. Error messages on the WebManager
The following is a list of error messages displayed when using the WebManager.
Level |
Message |
Cause |
Solution |
|---|---|---|---|
Info |
Alert Service is already started. |
The status of the alert service became normal. |
- |
Error |
Alert service is inactive. |
Starting the alert service failed. |
Check the configuration of alert-related modules. |
Error |
Could not start the group because necessary responses have not been made. |
No status can be acquired because the EXPRESSCLUSTER is now being started up. |
Try reloading the status later. |
Error |
Could not connect to the server. |
Connecting the WebManager to the EXPRESSCLUSTER server failed. |
Check if the destination server is running. |
Error |
Connection Timeout. |
Internal timeout occurred. |
Internal timeout may occur when a time-consuming task is performed. Check the status after the timeout and if there is no problem, operations can be continued. |
Error |
Connection is terminated. |
The connection between the WebManager and the EXPRESSCLUSTER is disconnected. |
Check if the connection destination server has failed. |
Error |
Could not activate some resources. |
Failed to start some resources under the group. |
Solve the problem that caused the resource error.
See the alert log for the detailed information on the error.
|
Error |
Could not deactivate some resources. |
Failed to stop some resources under the group. |
Solve the problem that caused a resource error.
For details on the error, see the alert log.
|
Error |
Failed to collect cluster logs from the server. |
Failed to collect cluster logs.
Some servers may have been shut down during the cluster log collection. Some servers may not be able to be accessed due to error.
|
Retry log collection.
If logs from a certain server cannot be collected, run the clplogcc command on the server to collect logs.
|
Error |
Failed to connect to server({0} : {1}). |
Failed to connect to the WebManager. |
Check if the EXPRESSCLUSTER Web Alert service is running on the server. |
Error |
Failed to find group online server. |
Failed to detect the server whose group is online. |
The server status may have changed during the operation. Reload the status. |
Error |
Failed to get data for the cluster tree view from the server. |
Failed to acquire the cluster configuration. |
Check if EXPRESSCLUSTER is running on the server by using a command. |
Error |
Failed to get the latest alert log. |
1) The alertlog.alt file does not exist or is corrupted.
2) The maximum number of the alert viewer records in the cluster configuration data is over the limitation. (Up to 999)
|
1) Temporarily store all the files under the /installation_path/alert/log on the server, and then restart the alert synchronization service.
2) Check the maximum number of the alert viewer records set in the Builder.
|
Error |
Failed to get property from the server. |
Failed to acquire a cluster property value. |
Run a command on the server to check if EXPRESSCLUSTER is running. |
Error |
Failed to search the alert logs. |
Failed to open alert log files on a server. |
Temporarily store the files under the /installation_path/alert/log on the server, and then restart the alert synchronization service. |
Error |
The response content is invalid. |
Connection to the server is disconnected. |
Check the server operating status and network connectivity. |
Error |
Failed to move group "Group Name" to server "Server Name". |
Moving the group failed.
[Group Name] group_name [Server Name] server_name
|
Solve the problem that failed to move the group.
For the detailed information on the error, see the alert log.
|
Error |
The group is already started. |
The group which is the target of the operation has already been started.
Another manager or command on the server may have performed operations on the same group.
|
Try reloading the group status later to update it, and then perform operations on the group. |
Error |
The group is already stopped. |
The group which is the target of the operation has already been stopped.
Another manager or command on the server may have performed operations on the same group.
|
Try reloading the group status later to update it, and then perform operations on the group. |
Error |
Group is updating its status. |
The status of the group which is the target of the operation is changing.
Another manager or command on the server may have performed operations on the same group.
|
Try reloading the group status later to update it, and then perform operations on the group. |
Error |
Internal error. |
An internal WebManager error occurred. |
Perform reloading.
If the same error occurs even after reloading, restart the EXPRESSCLUSTER Web Alert service.
|
Error |
Invalid configuration data. |
Failed to acquire the cluster configuration data. |
Check the information on the cluster configuration. |
Error |
Invalid group name. |
An internal error of the WebManager occurred. |
Perform reloading.
If the error occurs even after reloading, restart the EXPRESSCLUSTER Web Alert service.
|
Error |
Invalid group name or server name. |
An internal error of the WebManager occurred. |
Perform reloading.
If the error occurs even after reloading, restart the EXPRESSCLUSTER Web Alert service.
|
Error |
Invalid parameter. |
An internal error of the WebManager occurred. |
Perform reloading.
If the error occurs even after reloading, restart the EXPRESSCLUSTER Web Alert service.
|
Error |
Invalid server name. |
An internal error of the WebManager occurred. |
Perform reloading.
If the error occurs even after reloading, restart the EXPRESSCLUSTER Web Alert service.
|
Error |
An error occurred in server or group operation. |
Some operations failed. |
Run a command to check the server status. If there is no problem, operations can be continued. |
Error |
Operatable group does not exist. |
The operation to the group failed. |
Solve the problem that caused the failure of the operation to the group.
For the detailed information on the error, see the alert log.
|
Error |
Enter the number of alert logs displayed on each page. |
The number of the alert log filter result to be displayed (for example, the number of logs in a window) is not set. |
Specify the number of the alert log filter result to be displayed. |
Error |
Enter the event ID. |
The ID for alert log search is not set. |
Specify the ID for alert log search. |
Error |
Enter the module name. |
The name of the module for the alert log search is not set. |
Specify the name of a module for the alert log search. |
Error |
Enter the number of searches. |
The number of alert logs to be searched is not set. |
Specify the number of alert logs to be searched for. |
Error |
Enter the page number. |
The page to show the results of the alert log research is not set. |
Specify the page to show the results of the alert log research. |
Error |
Enter the server name. |
The name of a server for alert log search is not set. |
Specify the name of the server to be searched for. |
Error |
The selected server is invalid. |
The server specified as the destination for moving the group is invalid. |
Wait for a while to perform reloading to update the group status, and then perform the operation to the group. |
Error |
Specified server is not active. |
The server that initiated the operation is not active. |
Wait for a while to perform reloading to update the group, and then perform the operation. |
Warning |
The cluster tree obtained from the server may not be complete. |
An error occurred while acquiring the server status. |
Try reloading later. |
Error |
The number of alert logs per page you have entered is not in the specified range (1 to {0}). |
The specified number of alert log filter results displayed per page is out of the range. |
Specify a value between 1 and 300. |
Error |
The value in "To" is incorrect. |
The time specified for end of alert log search is invalid. |
Set a correct time. |
Error |
Event ID entered is less than 1. |
The ID set for alert log search is smaller than one. |
Specify a value of 1 or greater. |
Error |
There are no groups that can be started. |
Failed to start up a group. |
Solve the problem that caused the failure of the operation to the group.
For the detailed information on the error, see the alert log.
|
Error |
There are no groups that can be stopped. |
Failed to stop the group. |
Solve the problem that caused the failure of the operation to the group.
For details on the error, see the alert log.
|
Error |
There are groups that failed to start. |
Some operations failed. |
Run a command to check the server status. If there is no problem, operations can be continued. |
Error |
There are groups that failed to stop. |
Some operations have failed. |
Run a command to check the server status. If there is no problem, operations can be continued. |
Warning |
The number of searches entered is less than 1. |
The ID set for alert log search is smaller than one. |
Specify a value of 1 or greater. |
Error |
Page number entered is less than 1. |
The number of pages specified for the alert log search is smaller than one. |
Specify a value of 1 or greater. |
Error |
The page number entered is greater than the total page number. |
The number of pages specified for alert log search is greater than the total page number. |
Specify the number that is smaller than the total page number. |
Warning |
The properties got from server may not be completed. |
Failed to acquire some information. |
Try reloading later. |
Error |
There are servers that failed to stop. |
There is a server that may have failed to shut down the cluster. |
Check if the server is down. If it is not down, check that EXPRESSCLUSTER is running. |
Error |
The value in "From" is incorrect. Enter the correct value. |
The time set for start of alert log search is invalid. |
Set a correct time. |
Error |
The value set in "From" is later than the value in "To". |
The time set for start of the alert log search is later than the time set for end. |
Set a correct time. |
Info |
The total number of pages has been changed. The server alert log will be updated. |
The number of total pages of alert log filter results is updated.
New alerts may have been issued while the search results were being displayed.
|
To apply added alerts to the search results, close the window displaying the search results and perform search again. |
Error |
Failed to get mirror disk list from server. |
An internal error of the Disk Agent occurred.
Communication from the WebManager server to the EXPRESSCLUSTER Web Alert service failed.
The process on the server timed out.
|
Make sure that the Disk Agent is working. If the Disk Agent is not started, reboot the server. |
Error |
Failed to get mirror status. |
The Disk Agent failed to acquire mirror disk status.
An internal error of the Disk Agent occurred.
Communication from the EXPRESSCLUSTER Web Alert service to the Disk Agent has failed.
The process in the server timed out.
|
Check if the Disk Agent is active. If the Disk Agent is not started, reboot the server. |
Error |
Failed to recover the mirror. |
An error occurred while performing mirror recovery. |
Make sure that the Disk Agent is operating. If the Disk Agent is not started, restart the server. |
Error |
Detected disk error while recovering the mirror. |
A disk error was detected during the mirror recovery. |
Run the clpmdstat --mirror command to check disk error status on each server. |
Error |
Failed to recover the mirror since mirror status has changed. |
Mirror recovery failed because the mirror status is changed after the Mirror Disk Helper dialog box was displayed. |
Close this error message dialog box, and the information will be updated. |
Confirmation |
Data on two disks are identical. Are you sure to execute a mirror recovery? |
The mirror disks on both servers have no difference. Do you want to continue mirror recovery? |
- |
Confirmation |
{0} is recovering now. Are you sure to stop? |
Do you want to stop mirror recovery? |
- |
Error |
Failed to stop recovery. |
Failed to stop the mirror recovery. |
The server may be heavily loaded. Start up the Mirror Disk Helper again. |
Error |
Failed to get recovery status. |
Acquiring information on the progress of mirror recovery failed. |
The server may be heavily loaded. Start up the Mirror Disk Helper again. |
Error |
The local applet version does not match the server's. Close the browser and clear the applet cache. |
A mismatch between the Java applet and the server occurred because the Java cache remains. |
Exit the browser. Clear the cache of Java and restart the browser. |
Error |
Failed to recover since NMP size of "{0}" is smaller than "{1}". |
Data partition size of the source server is larger than that of the destination server when recovering a mirror. The recovery is stopped. Initial mirror may not have been configured properly. |
Specify a server as a source whose data partition size is smaller. |
Error |
Failed to get server list. |
Failed to get a server list. |
Check log collection from another WebManager is running or not. Restart after another log collection completes. |
Error |
Server is collecting logs. Try again after log collection is completed. |
The server is collecting logs. |
Try again after other log collections are completed. |
Error |
Failed to collect cluster logs from the server. |
An error occurred while collecting cluster logs. |
Check the result in dialog box showing the progress of log collection (See "2.2.4. Collecting logs by using the WebManager"). |
Error |
Failed to Login (Internal error) |
An internal error occurred when logging on to the WebManager. |
Try logging on to the WebManager again. Start the EXPRESSCLUSTER Web Alert service if the error still occurs. |
Error |
Failed to login. |
Incorrect password was entered three consecutive times. |
Try logging on to the WebManager again with a correct password. |
Error |
Incorrect password. |
Incorrect password was entered. |
Enter a correct password. |
Error |
Authorization failed. |
Password was changed while accessing the WebManager. |
Try logging on to the WebManager again. |
Error |
Authorization failed. (Internal error.) |
An internal error occurred when accessing to the WebManager. |
Try logging on to the WebManager again. Reboot the EXPRESSCLUSTER Web Alert service if the error still occurs. |
Error |
Failed to connect to the server. |
Failed to communicate with the WebManager. |
Check if the EXPRESSCLUSTER Web Alert service is working on the server.
Check if connecting to the server can be performed successfully.
|
Error |
Failed to get the list of mirror disk error. |
Disk Agent failed to get the information on the mirror disk.
Internal error of the Disk Agent occurred.
The access to the Disk Agent from the EXPRESSCLUSTER Web Alert service failed.
The processing timed out on the server.
|
Check if the Disk Agent is operating. If the Disk Agent is not operating, restart the server. |
Error |
Failed to get the data for the cluster tree view from the server. |
Failed to get the cluster data of the destination server.
Failed to get all cluster data in the cluster tree view.
|
Check if EXPRESSCLUSTER is operating by running a command on the destination server
Check if all cluster management IPs in the tree view are running normally.
|
Error |
Another user is performing auto-search now. Try it again later. |
Auto-search has already been performed from the other manager. |
Retry auto-search later. |
Error |
Internal error. |
An internal error of the WebManager has occurred. |
Perform the auto-search again. If an error still occurs, restart the EXPRESSCLUSTER Web Alert service. |
Error |
Not connected to the server now. The settings will be displayed when the connection recovers. Wait for a moment. |
Because communication with WebManager failed, the changed setting is applied as soon as the connection is recovered. |
Confirm that the EXPRESSCLUSTER Web Alert service is operating on the server side.
Confirm that the server is connected normally.
|
Error |
Failed to recover the server "{0}".
Click the Reload button, or try again later.
|
The displayed server status might not be the latest status.
The status of the server that was changed by a different operation is not reflected on the display.
|
Click the Reload button, and retry the operation once the status has been updated. |
Error |
Failed to migrate group "{0}" to server "{1}". |
The displayed group status might not be the latest status.
Operation from a different WebManager or operation by means of the clpgrp command might not have been reflected in the group status on the display.
|
Click the Reload button, and retry the operation once the status has been updated. |
Error |
Failed to disable dummy failure of monitors.
Click the Reload button, or try again later.
|
The displayed cluster status might not be the latest status.
Operation from a different WebManager or operation by means of the clpmonctrl command might not have been reflected in the cluster status on the display.
|
Click the Reload button, and retry the operation once the status has been updated. |
Error |
Failed to disable a part of dummy failure of monitors.
Click the Reload button, or try again later.
|
The displayed cluster status might not be the latest status.
Operation from a different WebManager or operation by means of the clpmonctrl command might not have been reflected in the cluster status on the display.
|
Click the Reload button, and retry the operation once the status has been updated. |
Error |
Failed to enable dummy failure of monitor "{0}".
Click the Reload button, or try again later.
|
The displayed cluster status might not be the latest status.
Operation from a different WebManager or operation by means of the clpmonctrl command might not have been reflected in the cluster status on the display.
|
Click the Reload button, and retry the operation once the status has been updated. |
Error |
Failed to disable dummy failure of monitor "{0}".
Click the Reload button, or try again later.
|
The displayed cluster status might not be the latest status.
Operation from a different WebManager or operation by means of the clpmonctrl command might not have been reflected in the cluster status on the display.
|
Click the Reload button, and retry the operation once the status has been updated. |
Error |
Failed to get the license information. |
Failed to obtain the license information. |
Check to see the license.
Shut down and then reboot the cluster.
|
Error |
The license information obtained from the server may be incomplete. |
Part of the license information could not be obtained. |
Check to see the license.
Shut down and then reboot the cluster.
|
Error |
The request to resume the cluster failed on some servers. |
Some servers failed to resume the clusters. |
Check the status of the server which failed to resume the clusters. |
Error |
Failed to get the time info from the server. |
The time information could not be obtained. |
Click the Reload button, and retry the operation once the status has been updated. |
Error |
Failed to clear the time info. |
Failed to clear the time information. |
Click the Reload button, and retry the operation once the status has been updated. |
3. Function of the Builder
This chapter provides information on functions of the EXPRESSCLUSTER X Builder.
This chapter covers:
3.1. Overview of the Builder
The Builder is a tool for creating and changing the cluster configuration data (config and/or script) for the EXPRESSCLUSTER Ver3.0 or later.
Note
You cannot configure or display functions that have been added to or changed in versions later than EXPRESSCLUSTER X 4.0.
There are two versions of the Builder; online version and offline version.
- Online versionTo start the Builder, click Config Mode on the View menu or select the config mode icon [
 ] from the dropdown menu on the toolbar.You can also directly connect to the server to create a cluster or change its configuration and distribute the cluster configuration data.
 - Offline versionWith the offline version Builder, you can create or change the cluster configuration data on the machine which cannot connect to a server.To distribute the cluster configuration data, you need to use the clpcfctrl command.
See also
For the system requirements of the Builder, see the corresponding web page.
Note
3.1.1. Limitations of the Builder
- The following products' cluster configuration data is not compatible.A Builder other than that of EXPRESSCLUSTER X 4.0 for WindowsThe Builder of the EXPRESSCLUSTER for LinuxThe Builder of the EXPRESSCLUSTER for Windows Value Edition
- Cluster configuration data created using a later version of this product cannot be used with this product.
- Cluster configuration data of EXPRESSCLUSTER X1.0/2.0/2.1/3.0/3.1/X3.2/X3.3/4.0 for Linux can be used with this product.You can use such data by clicking Import from the File menu in the Builder.
- If you close the Web browser (by clicking Exit on the File menu or by clicking X on the window frame), the dialog box to confirm to save is displayed.
 When you continue to edit, click the Cancel button.
Note
This dialog box is not displayed if JavaScript is disabled.
- Reloading the Web browser (by clicking Reload on the Tool menu or the Reload icon on the toolbar) , the dialog box to confirm to save is displayed.
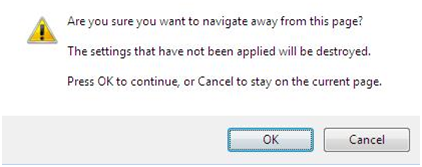 When you continue to edit, click the Cancel button.
Note
This dialog box is not displayed if JavaScript is disabled.
If you change the screen resolution while the Builder is running, the Java VM stack trace (example: NullPointerException) may be logged on the Java console. The Builder can keep running.
If you press Esc while a pull-down menu of your browser is displayed, the Java VM stack trace (example: NullPointerException) may be logged on the Java console. The Builder can keep running.
In some cases, you cannot use the keyboard because the keyboard focus of the Builder becomes disabled (the focus changes to the Web browser). Click the Builder window and get the focus back to the Builder.
When you are using the multi-display function, do not run the Builder on the secondary display. Otherwise, it may not work properly. For example, the screen is not displayed. Use the Builder on the primary display.
On the Alert Log tab (see "3.11.10. Alert Log tab"), for Max. Number to Save Alert Records, if you set a number smaller than the current one, all alert logs will be deleted. Take into account the available disk space, and specify the number before you start the operation.
In the environment where Internet Explorer is used, disable Protected Mode on the security setting of Internet Explorer.
The JIS 2004-unique characters are not supported. Thus, you cannot enter or view the characters added by JIS 2004.
The Builder does not run normally through the Reverse Proxy server.
When you use the Offline Builder and the EXPRESSCLUSTER rpm, a combination of their versions should be the one shown below. The Builder may not operate properly if they are used in a different combination.
Offline Builder version
EXPRESSCLUSTER internal version
4.0.0-1
1212.01
3.2. Details on the Builder screen
This topic explains the Builder screen layout.
3.2.1. Overview of the EXPRESSCLUSTER X Builder
The screen layout of the Builder is displayed below.
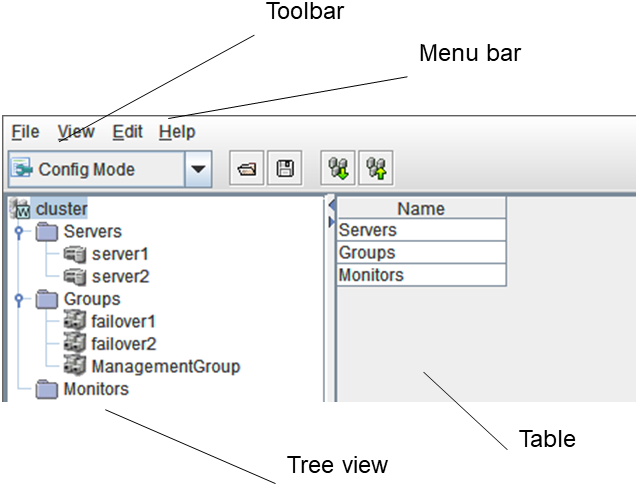
The tree view on the left pane shows the cluster objects in the hierarchical order. If you select an object from the tree view, its subordinate objects are displayed in the table view on the right pane.
3.2.2. Tree view
The following objects are displayed in the tree view:
Hierarchy |
Object |
Contents |
Table view when the object is selected |
|---|---|---|---|
1 |
|
Represents the cluster. |
Displays cluster names. |
2 |
 Groups
|
Represents a set of groups in the clusters |
Displays groups. |
3 |
|
Represents each group. |
Displays group names. |
2 |
 Monitors
|
Represents a set of monitor resources in the clusters |
Displays monitors. |
2 |
 Servers
|
Represents a set of servers in the clusters |
Displays servers. |
3 |
|
Represents an individual server. |
Displays server names. |


3.2.3. Table view
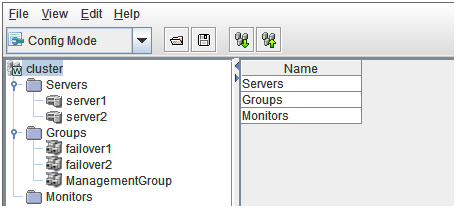
3.2.5. Table for group selection
Group list
Displays the failover priorities of the groups.
Column name
Overview
Name
Displays the group names in alphanumerical order.
Type
Displays the group type.
Comment
Displays comments specified for the groups.
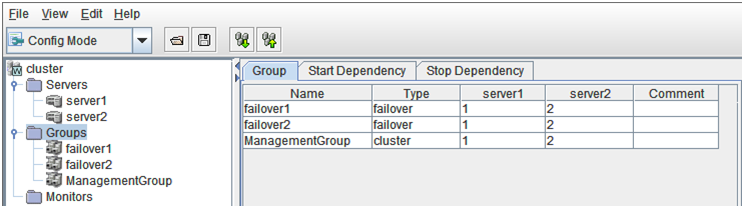
Start Dependence
The dependencies included in the group start dependence are listed.
Column name
Overview
Name
Displays group names.
The levels of depth are illustrated below. Arrows (->) in the figure represent group start dependence targets.
The dependencies represented by this figure are listed below.
Depth
Name
Start Dependence Group Name
0
group1
none
1
group2
group1
1
group4
group1
2
group3
group2
2
group5
group4
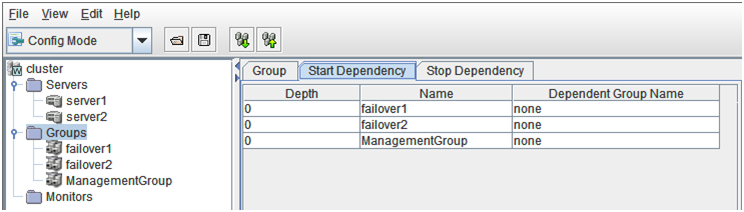
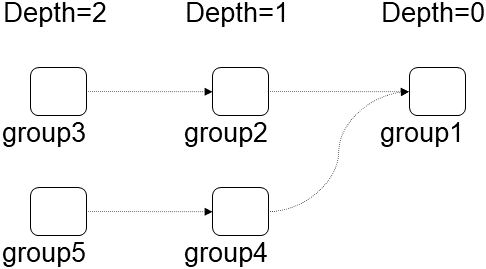
Stop Dependence
The dependencies included in the group stop dependence are listed.
Column name
Overview
Name
Displays group names.
The levels of depth are illustrated below. Arrows (->) in the figure represent group stop dependence targets.
The dependencies represented by this figure are listed below.
Depth
Name
Stop Dependence Group Name
0
group1
none
1
group2
group1
1
group4
group1
2
group3
group2
2
group5
group4

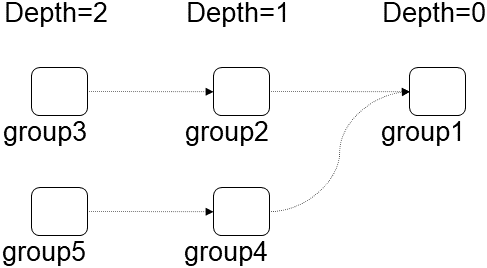
3.2.6. Table for group name selection
Resources
Group resources in the selected group are listed.
Column name
Overview
Name
Displays group resource names in alphanumerical order.
Type
Displays a group resource type.
Resource Information
Displays objects to be activated or deactivated for the group resource.
Comment
Displays comments specified for the group resource.
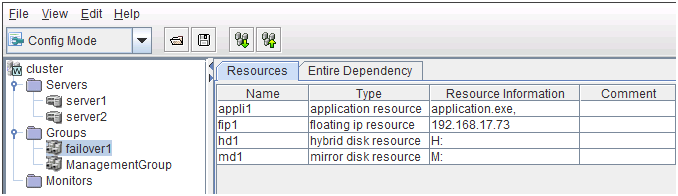
Dependency List
Dependency among group resources in a selected group is listed.
Column name
Overview
Name
Displays the group resource name.
The levels of depth are illustrated below. Arrows (->) in the figure represent the group resource activation order.
The dependencies in this figure are listed below. These are not the default dependencies, but specified with resource names.
Depth
Name
Dependent Resource Name
Type
0
disk1
none
-
0
disk2
none
-
1
fip1
disk1
disk resource
1
fip2
disk2
disk resource
2
script1
fip1
floating ip resource
-
-
fip2
floating ip resource
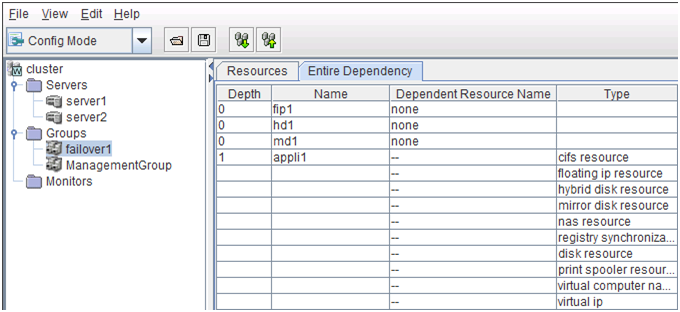
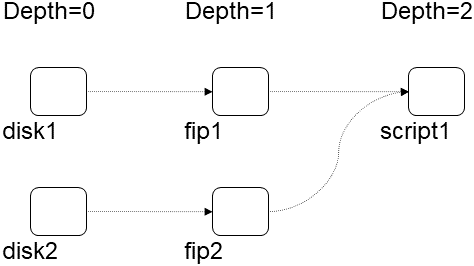
3.2.7. Table for monitor resource selection
Displays the list of monitor resources.
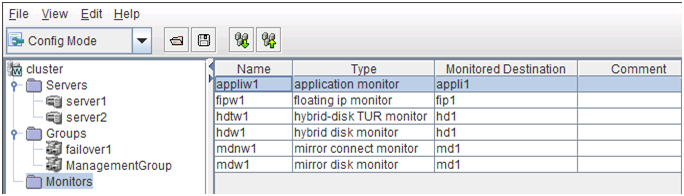
Column name |
Overview |
|---|---|
Name |
Displays monitor resource names in alphanumerical order. |
Type |
Displays the monitor resource type. |
Monitored Destination |
Displays the monitor resource to be monitored. |
Comment |
Displays comments specified for the monitor resource. |
3.2.8. Table for server selection
Displays the list of servers.
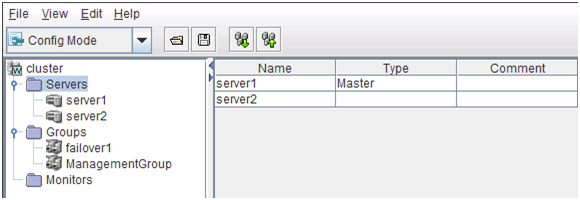
Column name |
Overview |
|---|---|
Name |
Displays server names in alphanumerical order. |
Type |
If the server is specified as the master server, "Master" is displayed. |
Comment |
Displays comments specified for the server. |
3.2.9. Table for server name selection
Displays the list of groups allowed to start on the selected server.
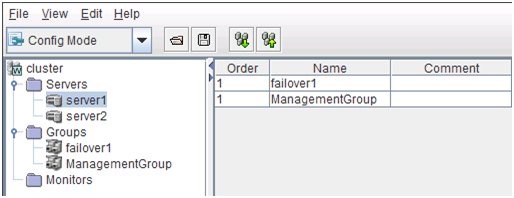
Column name |
Overview |
|---|---|
Order |
Displays the server priority. The groups in the name cells start on servers in this order.
"1" is displayed for the top priority.
This list is displayed in the descending order of priority.
This field is blank if the group does not have a specific startup order of servers (if it follows the servers' priorities). The WebManager group is not displayed.
|
Name |
Displays the group name. |
Comment |
Displays comments specified for the group. |
3.3. Pop-up menu
Pop-up menus are displayed by right-clicking a tree object or table row.
If select |
Displayed menu |
Refer to |
|---|---|---|
 no_cluster_name
|
Cluster Generation Wizard |
|
 cluster_name
|
Remove Cluster |
|
Rename Server |
||
Properties |
||
 Servers
|
Add Server |
|
Properties |
||
 server_name
|
Remove Server |
|
Rename Server |
||
Properties |
||
 Monitor
|
Add monitor resource |
|
 Groups
|
Add Group |
|
Add Group for WebManager |
||
Properties |
||
 group_name
|
Add Resource |
|
Remove Group |
||
Rename Group |
||
Properties |
||
group_resource_name |
Remove Resource |
|
Rename Resource |
||
Properties |
||
monitor_resource_name |
Remove Monitor Resource |
|
Rename Monitor Resource |
||
Properties |
3.4. Using a tool bar of the Builder
The Builder provides a toolbar:
- Online Version

- Offline Version
 There is a drop down menu for mode switch on the left side of the toolbar with online version. For details on this menu, see "2.2. Window of the WebManager" "2.2.1. Main window of the WebManager" "Toolbar" in "2. Functions of the WebManager".Click each icon on the tool bar to do the same operation of the some items on the menu bar.
Button |
Function |
Refer to |
|---|---|---|
|
Opens a file. This is the same as clicking File from the menu bar and then selecting Open. |
|
|
Saves a file. This is the same as clicking File from the menu bar and then selecting Save. |
|
|
Get the configuration. This is the same as clicking Get the Configuration File on the File menu. This is not available with the offline version. |
|
|
Apply the configuration. This is the same as clicking Apply the Configuration File on the File menu. This is not available with the offline version. |


3.6. File menu
Select File to display the following menu.
Menu |
Function |
|---|---|
New File |
Creates a new cluster. |
Cluster Generation Wizard |
Starts the cluster generation wizard. |
Import |
Read the cluster configuration information file. |
Export |
Save the configuration information as the cluster configuration information file. |
Get the Configuration File |
Connect to the cluster and get the current configuration information (online version only). |
Apply the Configuration File |
Apply the configuration information to the cluster (online version only). |
Update Server Data |
Update the server IP address and the device information (online version only). |
Option |
Starts the Option dialog box. |
Save Log Files |
Starts the Save Logs dialog box. |
Exit |
Exits the Builder. |
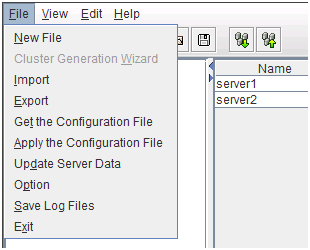
3.6.1. Creating a new cluster
Create a new cluster using the Builder.
Important
If you create a new cluster, the cluster configuration data that has been edited will be discarded. Be sure to save the required data before you create a new cluster.
On the menu bar, click File and then click New File.
If you made changes in the cluster configuration data, a dialog box asks if you want to save them before they are discarded. Click Yes to save the changes. A dialog where you can specify a folder to save the cluster configuration data is displayed. If you do not want to save the changes, click No. For how to save the data, see "3.6.3. Saving the configuration file".
On the left pane of the screen on the tree view displayed, right-click the cluster icon and click Cluster Generation Wizard. Use the Cluster Generation Wizard to create a cluster.
3.6.2. Opening the configuration file
How to use:
Click Import from the File menu.
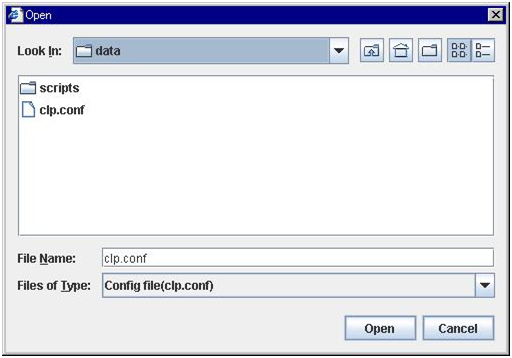
3.6.3. Saving the configuration file
The server exists.
Kernel-mode LAN heartbeat resource exists.
How to use:
Select Export from the File menu.
Note
When using Builder on the server on which EXPRESSCLUSTER is operated, do not editetc\clp.confin the EXPRESSCLUSTER installation path. Otherwise, messagesregarding how to apply the changes are not properly displayed, and/or EXPRESSCLUSTER may notwork properly. Save the file on a different directory temporarily.When uploading is performed by using the clpcfctrl command, specify the directory where thefile is saved by using the -x option.
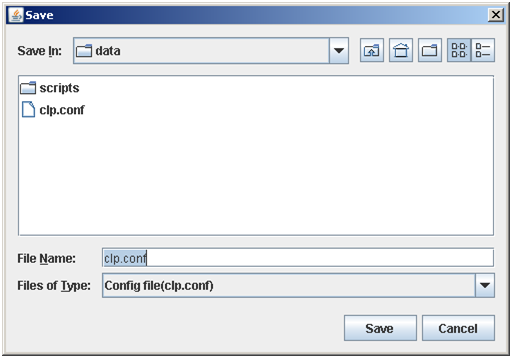
3.6.4. Get the configuration file (online version only)
Note
Do not create a folder or a file under the <EXPRESSCLUSTER installation path>\scripts on the server. Getting the configuration file may fail if you create a file or a folder.
3.6.5. Apply the configuration file (online version only)
A server exists.
A LAN heartbeat resource of kernel mode exists.
Note
If this condition is not satisfied, connection to the other server will fail, so applying of the cluster configuration data fails. In this case, you can forcibly apply the cluster configuration data only to a server to which connection is possible. For details, see "Creating a cluster (clpcfctrl --push)" in "Creating a cluster and backing up configuration data (clpcfctrl command)" in " EXPRESSCLUSTER command reference" in the "Reference Guide".
Note
When using a hybrid disk resource, do not apply configuration information if any part of the server is stopped. If configuration information is applied in this state, an error will be detected in the control module of the hybrid disk resource, possibly causing the server to shut down.
The following message is displayed while applying the cluster configuration data. If the applying the data fails, take an action according to the error message, and apply the data again.
Message |
Solution |
|---|---|
The apply is completed successfully. |
- |
Changes applied successfully.
Some services have been stopped in order to apply the changes.
Use the following steps to resume the stopped services.
<Necessary operation>
Execute now ?
|
If you select Yes, indicated operation is carried out. |
There is the disk information that is not configured. Are you sure you want automatic configuration? |
Some GUID information of the volume is not configured. If you select Yes, automatic configuration is performed by determining the current GUID information from the derive letter. |
There is the HBA information that is not configured. Are you sure you want automatic configuration? |
The HBA information is not configured for the server where the information of HBA for accessing the shared disk was configured at the time of the installation. If you select Yes, the information configured at the time of the installation is inherited. |
There is difference between the disk information in the configuration information and the disk information in the server.
Are you sure you want automatic modification?
|
The combination between the GUID information of the volume and the drive letter does not match with the one on the actual servers. If you select Yes, automatic configuration is performed by determining the current GUID information from the derive letter.
|
The upload was stopped. There is one or more servers that cannot be connected to. To apply cluster configuration information forcibly, run the clpcfctrl command on the server. |
Since there is a server that cannot be connected to exist in the cluster, applying the cluster configuration data has been canceled. Make sure that all the servers in the cluster have been started, and then apply the cluster configuration data.
If you want to apply the cluster configuration data forcibly even though there is a server that cannot be connected in the cluster, see "Creating a cluster (clpcfctrl --push)" in "Creating a cluster and backing up configuration data (clpcfctrl command)" in " EXPRESSCLUSTER command reference" in the Reference Guide.
|
An error occurred when applying data to the cluster. Cfctrl (%0) |
Since an error has occurred while performing processing, applying the cluster configuration data has been canceled. Apply the data again. |
Checking the cluster configuration file failed. Check the following settings.
Server Name, IP address for interconnect, IP address for Integrated WebManager
|
There are differences between the IP addresses included in the cluster configuration information and the IP addresses currently set to each server. Check correct IP addresses are set or not.
|
See also
If a server that cannot be connected exists in the cluster, the cluster configuration information cannot be applied from the Builder. In this case, by running the clpcfctrl command, you can forcibly apply the cluster configuration information only on the server that can be connected.
Follow the steps below to forcibly apply the cluster configuration data.
- Save the cluster configuration data to an appropriate directory of the local disk from the Builder.Example) Save the configuration data to
C:\config - Save the cluster configuration data that you have saved on a server in the cluster.Example) Save the data in
C:\configthat you have saved in step (1) in theC:\tmpdirectory on a server in the cluster. Run the following command on the server where the cluster configuration data has been saved.
clpcfctrl --push -x "Directory where the cluster configuration data has been saved" --force
Example) Run the following command on the server where step (2) has been performed.
clpcfctrl --push -x "C:\tmp" --force
3.6.6. Updating the server information (online version only)
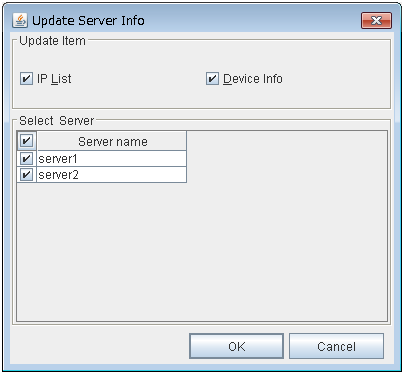
Update Item
Select Server
Specify the servers from which the information is obtained. By clicking the check box on the table title, the status of all the server check boxes can be changed at once.
3.6.7. Changing communication settings

Communication Timeout (0 to 999)
This is the time-out value when accessing a server.
3.6.8. Changing log level settings of Builder
Select Option and then the Log tab to change the log level of the Builder.
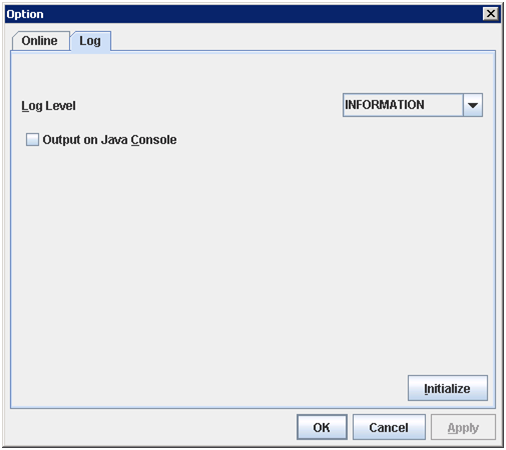
Log Level
Configure the level of internal logs that Builder produces during operating.
Output on Java Console
Click this to configure whether or not to report logs to the Java console.
3.6.9. Collecting Builder logs
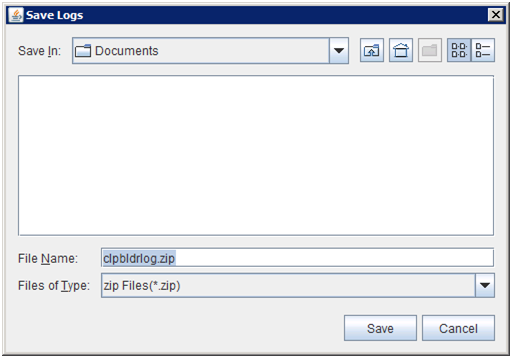
3.6.10. Exiting from the Builder
3.7. View menu
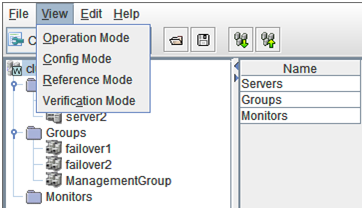
3.7.1. Operation Mode
3.7.2. Config Mode
3.7.3. Reference Mode
3.7.4. Verification Mode
3.8. Edit menu
To open the Edit menu: on the menu bar, click Edit.
Menu |
Function |
|---|---|
Add |
Adds the object. |
Remove |
Deletes the selected object. |
Rename |
Changes the name of the selected object. |
Properties |
Displays the properties of the selected object. |
Add Management Group |
Adds the management group. |
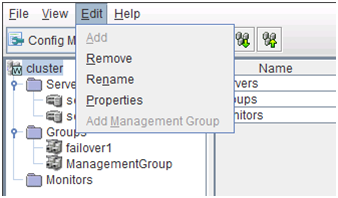
3.8.1. Adding an object
Displays the wizard for adding a server, group, group resource or monitor resource.
What you can add varies depending on what you select as shown below.
If select |
Object to be added |
|---|---|
 Groups
|
Group |
Group for WebManager |
|
 group_name
|
Group resource |
 Monitors
|
Monitor resource |
 Servers
|
Server |
Note
If Auto Failback is set to Failback Attribute in Group Properties, a mirror disk resource/hybrid disk resource cannot be added. Set Failback Attribute to Manual Failback and add a mirror disk resource and hybrid disk resource.
3.8.2. Removing an object
Displays a dialog box that asks if you want to remove the selected cluster, server, group, group resource, or monitor resource. Select Yes for removing and No for not removing it.
To remove a cluster, select New File from the File menu.
You cannot remove an object if any of the following conditions is met:
If select |
Conditions |
How to change |
|---|---|---|
 Cluster Name
|
None |
|
 Server Name
|
- There is no other server.
- The server is the only server where the group can start up.
|
Suspend and resume the cluster daemon |
 Group Name
|
- A recovery target of monitor resource 6 .
- Has group resources.
|
Stop the group
Suspend and resume the cluster daemon
Resume the group
|
Group Resource Name |
- A recovery target of monitor resource 6 .
- A target object in the monitoring timing of monitor resource 6 .
- To be monitored by the mirror disk monitor resource 6 .
- A mirror disk resource that uses the mirror connect to be monitored by the mirror disk connect monitor resource 6 .
- Other group resources in the same group depend on it.
|
Stop the group
Suspend and resume the cluster daemon
Resume the group
|
Monitor Resource Name |
- No condition for those other than mirror disk monitor resource.
- Auto Mirror Recovery is selected on the Mirror Disk tab of Cluster Properties for mirror disk monitor resource.
|
Suspend and resume the cluster daemon |
3.8.3. Renaming an object
Displays a dialog box for renaming the selected cluster, server, group, group resource, or monitor resource.

The following are restrictions for each of the objects.
If select |
Naming rules |
How to change |
|---|---|---|
Group Name |
- Only alphanumeric characters, hyphen (-), underscore (_) and space are allowed for names.
- Up to 63 characters (63 bytes)
- Names cannot start or end with a hyphen (-) or space.
|
Stop the group
Suspend and resume the cluster daemon
Resume the group
|
Group Resource Name |
- Only alphanumeric characters, hyphen (-), underscore (_) and space are allowed for names.
- Up to 63 characters (63 bytes)
- Names cannot start or end with a hyphen (-) or space.
|
Stop the group
Suspend and resume the cluster daemon
Resume the group
|
Cluster Name
Monitor Resource Name
|
- Only alphanumeric characters, hyphen (-), underscore (_) and space are allowed for names.
- Up to 63 characters (63 bytes)
- Names cannot start or end with a hyphen (-) or space.
|
Suspend and resume the cluster daemon |
Server Name |
- There are naming rules that are the same as the host name of TCP/IP that can be set by the OS. It should be completely the same as the name set to the server.
- Up to 63 characters (63 bytes)
- Neither hyphen (-) nor space can be the first or last letter in names.
- Underscore (_) is not allowed.
- A name consisting of only numbers is not allowed.
- Do not use "localhost" as the server name.
|
When changing a server name, you have to be careful.
For the server name renaming procedure, see "The system maintenance information" in the "Maintenance Guide".
|
Names should be unique (case-insensitive) by categories such as cluster, server, group, group resource and monitor resource.
3.8.4. Properties
3.10. Parameter details
3.11. Cluster properties
In Cluster Properties, you can view and change the cluster's settings.
3.11.1. Info tab
You can view the cluster name, and enter or change a comment for this cluster.
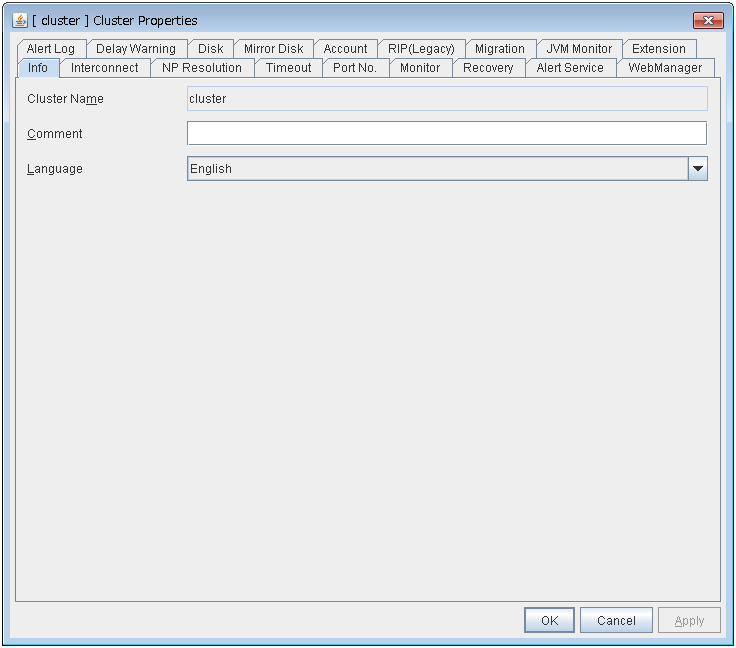
Cluster Name
The cluster name is displayed. You cannot change the name here.
Comment
You can enter a comment for the cluster. Only alphanumeric characters are allowed.
Language
Select a language for cluster from the following. Set the language (locale) of OS on which the WebManager runs.
English
Japanese
Chinese
3.11.2. Interconnect tab
This tab allows you to set up network communication paths between cluster servers.
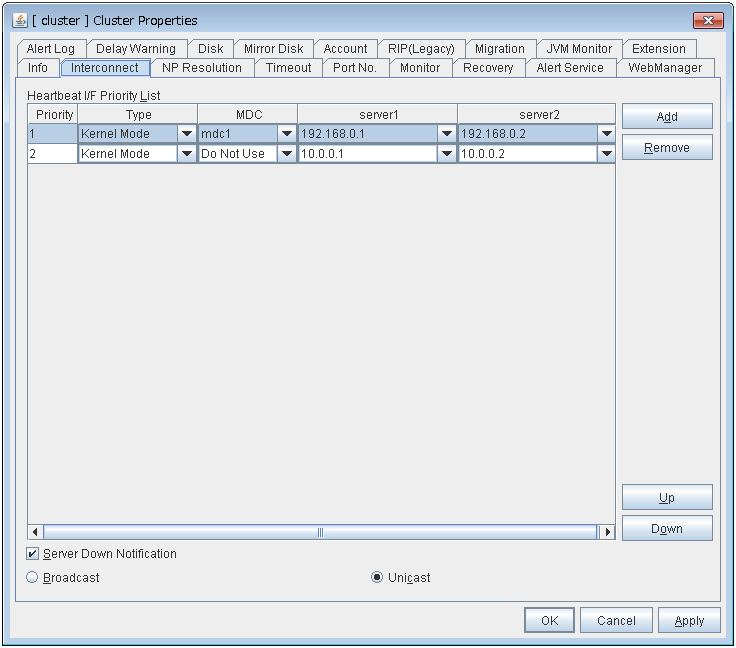
The Heartbeat I/F Priority List displays network communication paths between servers in the cluster.
Add
Adds a communication path. To specify the IP address of the communication path for each server, click a cell in each server's column, and then select or enter the address. For a communication route to which some servers are not connected, leave the cells for the unconnected servers blank.
Remove
Removes a communication path. Select the column of the communication path to remove, and then click Remove to remove the selected path.
Type
For a communication route used for kernel mode LAN heartbeat transmission (interconnect), click a cell in the Type column, and then select Kernel Mode.Specify as many communication routes for the interconnect as possible.To use a BMC heartbeat resource, select BMC.To prepare a dedicated data mirroring communication path (mirror disk connect), click the Type column cell and then select Mirror Communication Only.
MDC column
To use a communication path as a mirror disk connect, click the MDC column cell and then select a mirror disk connect.The entry differs depending on the type.
Up & Down
When multiple IP addresses for Integrated WebManager are configured, the communication path with the smallest number in the Priority column is used preferentially for the internal communication among cluster servers. To change the priority, change the order of selected rows with Up or Down. It is recommended to specify a higher priority for the interconnect communication path than any other paths.
Note
Priority is used to decide on the priority of communication routes used for internal communication between the servers in the cluster. Heartbeat between the servers in the cluster is implemented on all communication routes that are set up for heartbeat, regardless of Priority.
Server column
The entry differs depending on the type.
Note
More than one IP addresses which belong to the same network address cannot exist in a single server. And also, inclusive relation cannot exist like the following relation.
IP address:10.1.1.10, subnet mask:255.255.0.0
IP address:10.1.2.10, subnet mask:255.255.255.0
To list the IP addresses to be set for the interconnect in the list box on the online version Builder, execute Update Server Info from the File menu.
Server Down Notification
When a server stops successfully (including shutdown and reboot), it is notified to other servers in the cluster. You can perform failover faster by notifying it in advance.When failing to deactivate groups when a server stops (including shutdown and reboot), or when other abnormalities occur, other servers are not notified of it regardless of the settings of failed server notification.
Broadcast and Unicast
Select the communication method of a kernel mode LAN heartbeat from the following.
3.11.3. NP Resolution tab
Set up the network partition (NP) resolution method.
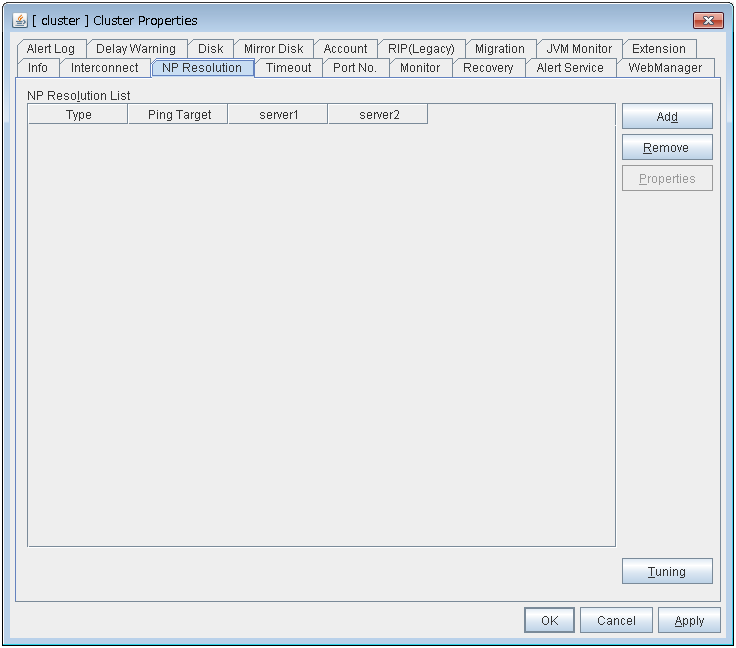
Add
Add network partition resolution (NP resolution) resource. Click the Type column cell and select the type of NP resolution type (COM, DISK, Ping, Majority). If the type is Ping, click the Ping target column cell and set the IP address of the Ping destination device. Click the cell of each server and set Use or Do Not Use.
Remove
Remove network partition resolution resource. Select the network partition resolution resource to be removed and click Remove, then the selected network partition resolution resource is removed.
Properties
Only available when the selected resource type is DISK or Ping. The DISK NP Properties or Ping NP Properties window is displayed.
Tuning
Network Partition Resolution Tuning Properties window is displayed.
Type
Set the type of network partition resolution resource. COM, DISK, Ping, Majority is selectable.
Ping Target
Set the IP address of the Ping destination device with Ping method NP resolution. Available only when the type is Ping.
Server
Entry differs depending on the type.
Note
To list the drive letters to be set for the disk heartbeat partition in the list box on the online version Builder, execute Update Server Info from the File menu.
DISK NP Properties
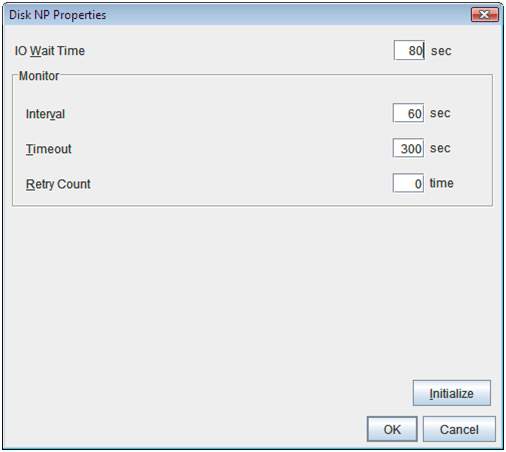
Ping NP Properties
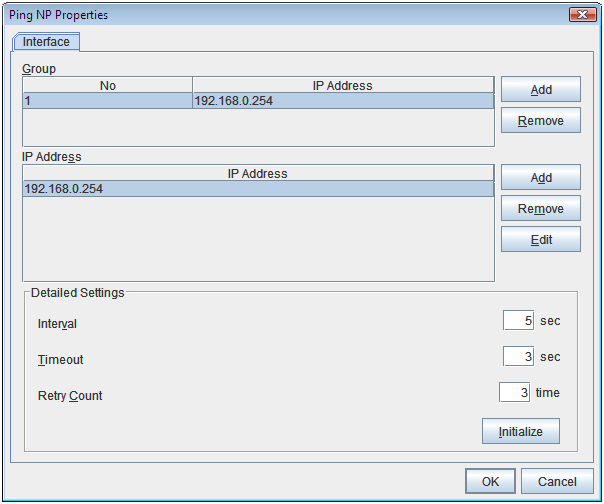
Network Partition Resolution Tuning Properties
Action at NP Occurrence
Note
When mirror disk resources or hybrid disk resources are used, it is not recommended that you set Stop the cluster service for Action at NP Occurrence.If Stop the cluster service is set, you might have to run the forcible mirror recovery at the time of recovery from NP occurrence.
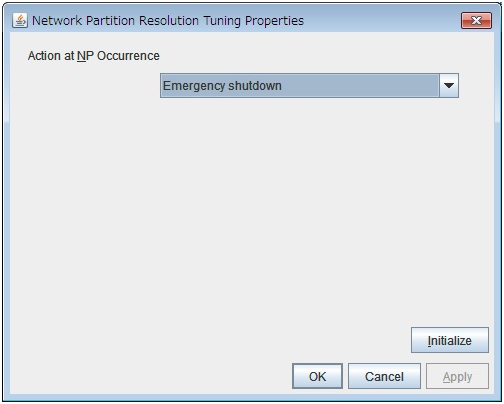
Initialize
Set the actions at NP occurrence to the default settings.
- 7
This function does not require ipmiutil, unlike the forced stop function.
3.11.4. Timeout tab
Specify values such as time-out on this tab.
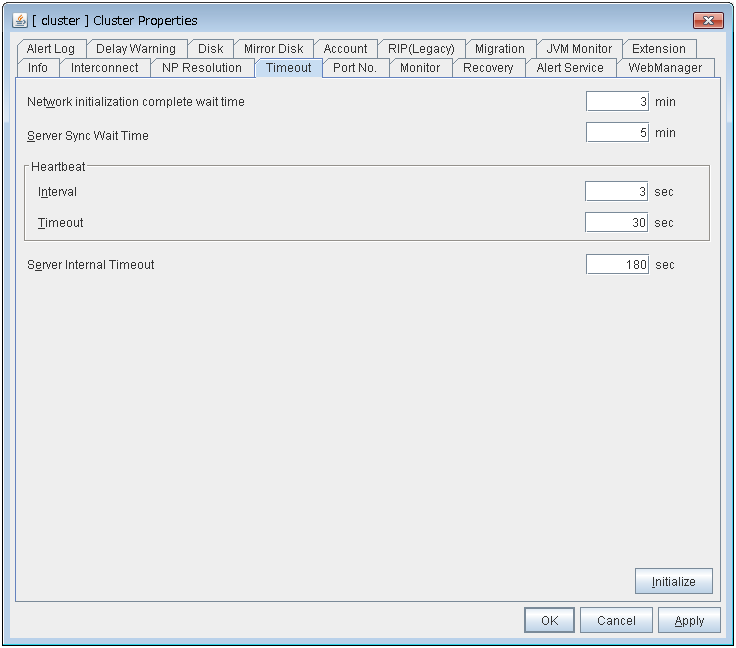
Network initialization complete wait time (0 to 99)
This is the time the server waits until its NIC becomes valid after startup.
Server Sync Wait Time (0 to 99)
For the time specified here, the server will wait at startup until other servers are started.
Heartbeat
Server Internal Timeout (1 to 9999)
The timeout to be used in the EXPRESSCLUSTER Server internal communications that are performed while an EXPRESSCLUSTER command is executed, or an operation is performed or a screen is displayed by WebManager.
Initialize
Used for initializing the value to the default value. Click Initialize to initialize all the items to their default values.
3.11.5. Port No. tab
Specify TCP port numbers and UDP port numbers.
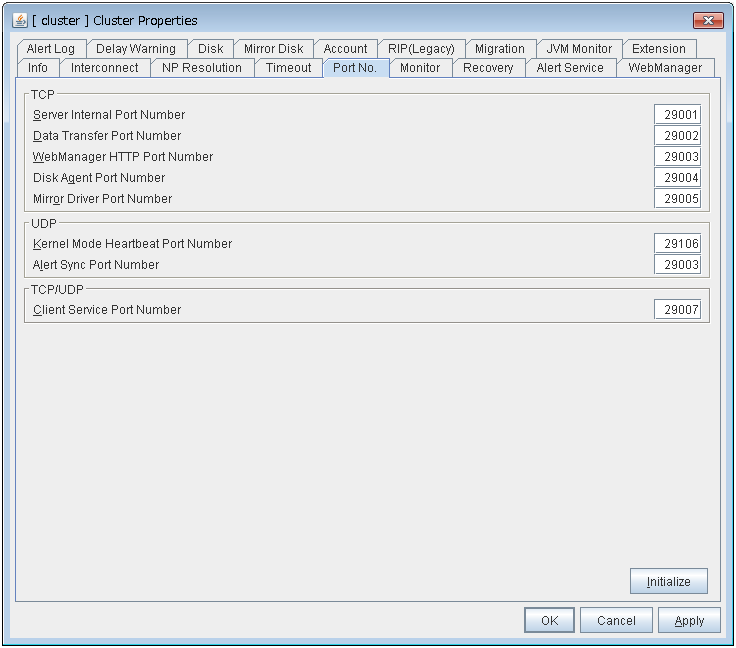
TCP
No TCP port numbers can be overlapped. When the Replicator/Replicator DR is used, they should not be overlapped with any mirror data port number of any mirror disk resources and hybrid disk resource.
UDP
TCP/UDP
Initialize
This is used for initializing the value to the default value. Click Initialize to initialize all the items to the default values.
3.11.6. Monitor tab
Specify the settings for monitoring.
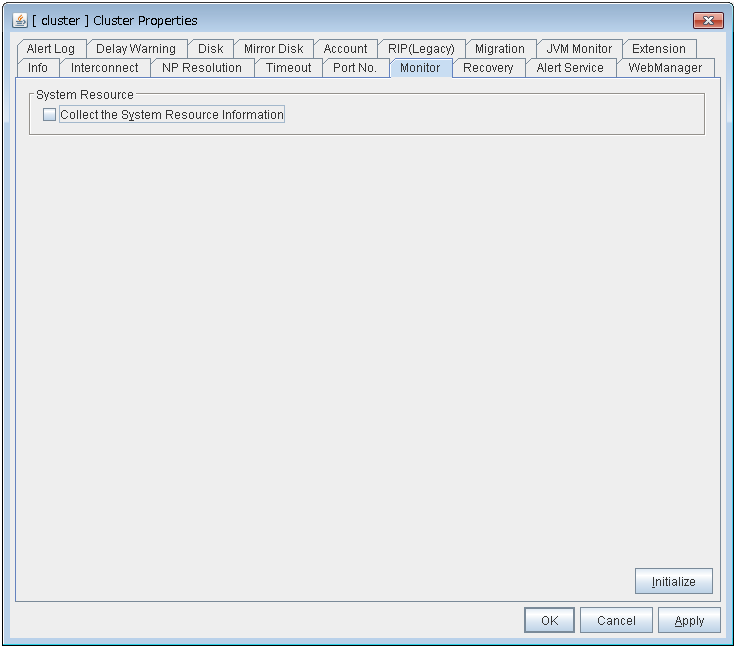
System Resource
Select whether to collect system resource information.System resource information is collected regularly so as to improve system operability. System resource information is useful for investigating the operation status of EXPRESSCLUSTER, and makes it easy to determine the cause of a failure attributable to a shortage of system resources.
3.11.7. Recovery tab
Make settings on cluster recovery.
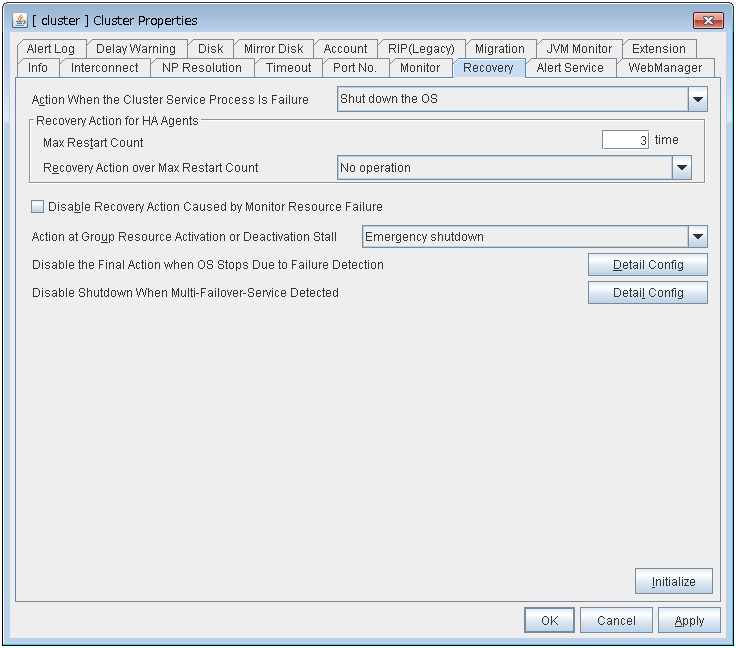
Action When the Cluster Service Process Is Failure
Specify an action at process abnormity of the cluster service.
The following two cluster service processes are monitored by this function:
clprc.exe
clpnm.exe
- 9
This function does not require ipmiutil, unlike the forced stop function.
Recovery Action for HA Agents
Note
The HA process is used with the system monitor resource, JVM monitor resource, and system resource information collection function.
Disable Recovery Action Caused by Monitor Resource Failure
Note
This recovery action suppression function is intended to suppress the recovery action due to the error detection of a monitor resource. This does not suppress the recovery action at the time of an activation error of a group resource.This function is not enabled for the action at the time of the stall error detection of the disk RW monitor resource or at the time of a timeout of the user space monitor resource.This option is not available for the message receive monitor resource.
Action at Group Resource Activation or Deactivation Stall
Specify the action to apply in the event of an activation/deactivation stall of a group resource.
Note
If a stall occurs with "Nothing (handle a stall as an activation/deactivation failure)" specified, the effect on the group resources is undefined, so we do not recommend changing the setting to "Nothing (handle a stall as an activation/deactivation If you do specify "Nothing (handle a stall as an activation/deactivation failure)", set the recovery operation upon the detection of an activation/deactivation failure of a group resource as described below.
Activation/deactivation retry threshold: 0 (times)
Failover threshold: 0 (times)
Final action: Intentionally causing a stop error
If Stop the cluster service and shut down OS or Stop the cluster service and reboot OS is specified as the final action, it takes a considerable amount of time for the cluster service to stop.
Disable the Final Action when OS Stops Due to Failure Detection
Click Detail Config to set suppression of the final action which accompanies the OS stop caused by error detection.
Note
If errors were detected on multiple servers almost at the same time, and the final action was taken for those servers, the final action which accompanies the OS stop may be taken for all the servers even if the final action caused by an error detection in a monitor resource is set to be suppressed.
The message receive monitor resource does not become the target for which the final action caused by error detection is suppressed.
Stop the cluster service and shutdown OS
Stop the cluster service and reboot OS
Generate an intentional stop error
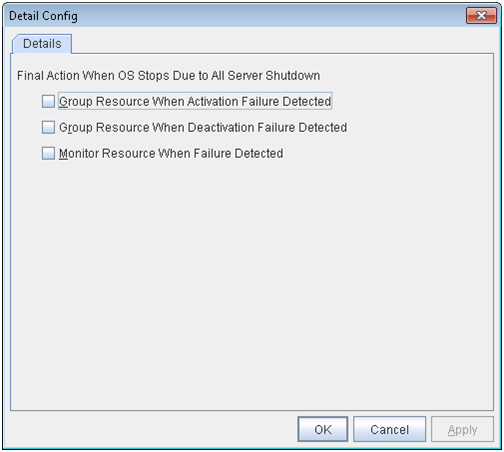
Disable Shutdown When Multi-Failover-Service Detected
Click Detail Config to suppress the shutdown of all servers upon detection of both-system activation.
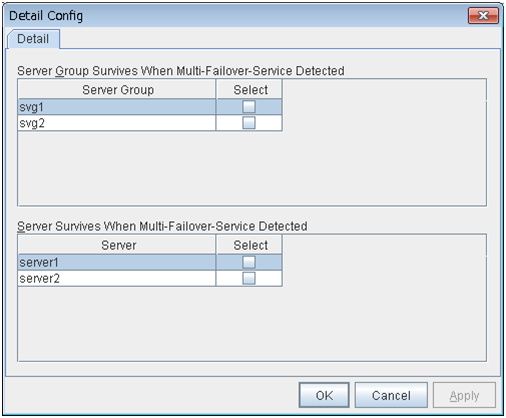
Server Group Survives When Multi-Failover-Service Detected
Select one server. The shutdown of the server, which belongs to the server group selected when the both-system activation of the failover group was detected, is suppressed. When the both-system activation is detected among servers in the selected server group, both of the servers will be shut down. If you want to suppress the shutdown in this case, make the settings to disable shutdown when the following double activation is detected.
Server Survives When Multi-Failover-Service Detected
Select one server. The shutdown of the server, selected when the both-system activation of the failover group was detected, is suppressed.If a server group to which shutdown is not executed when Multi-Failover is detected is set, it is possible to select only a server belonging to the set server group. If no server group is set, all the servers can be selected.Important
Suppose that shutdown is suppressed upon the detection of both-system activation in an environment in which the mirror disk resource is used for setting automatic mirror recovery. In this case, automatic mirror copying starts when the server which is shut down upon the detection of both-system activation is re-started through the OS. Care is needed since this discards one piece of data from among that updated separately on the mirror disk of each server at both-system activation.You need to select a server for which the data is to be protected when suppressing shutdown caused by the detection of both-system activation in an environment in which the mirror disk resource is used.Note
When the both-system activation is detected, the group statuses will be inconsistent among the servers, and failover and failback operations will be able to fail.
If a group status mismatch occurs, the following alert log is output:
To fix this problem, restart the group, execute a cluster reboot, restart all the servers on which the groups are not started, or restart the cluster services of all the servers on which the groups are not started.
3.11.8. Alert Service tab
Set up the alert service, chassis ID, and network warning light.
Note
To use the mail alert function and network warning light, EXPRESSCLUSTER X Alert Service 4.0 for Windows is required.
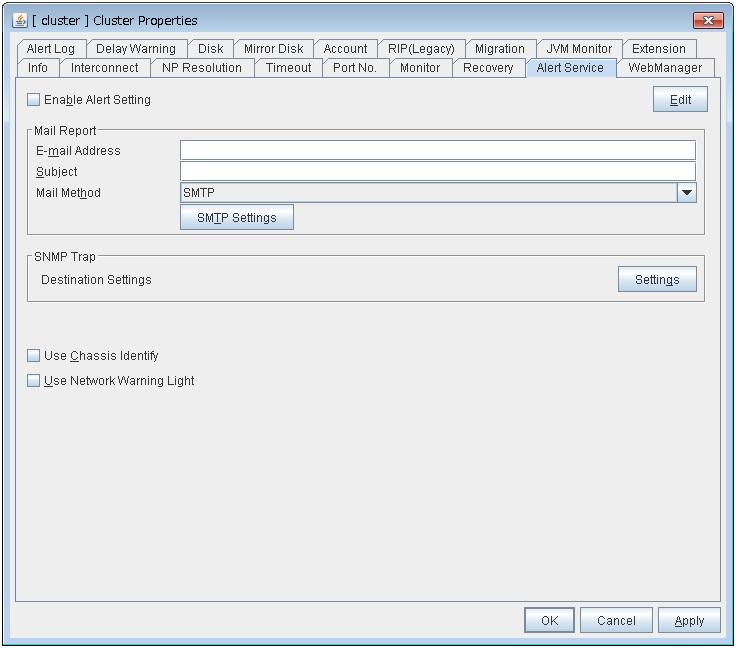
Enable Alert Setting
Configure whether to modify the alert destination from the default value. If you modify the alert destination, click Edit to set the destination address.If you clear the check box, the destination address you have modified returns to the default settings temporarily.For the default settings for the destination address, see "Messages reported by event log and alert" in "Error messages" in the "Reference Guide".
E-mail Address (Within 255 bytes)
Enter the e-mail address to which the report is sent. If more than two e-mail addresses are set, delimit the address by semicolon.
Subject (Within 127 bytes)
Enter the subject title for the e-mail message.
Mail Method
Configure the methods to send mail. In this version, SMTP is the only option in this.
Destination Settings
Configure the SNMP trap transmission function. Click Setting to configure the SNMP trap transmission destination.
Use Chassis Identify
Configure whether or not to use the chassis identify function.
Use Network Warning Light
Configure whether or not to use the warning light (dedicated product) controlled by network. The IP address of warning light is entered on the server property.
Change Alert Destination
Clicking Edit displays the Change Alert Destination dialog box.
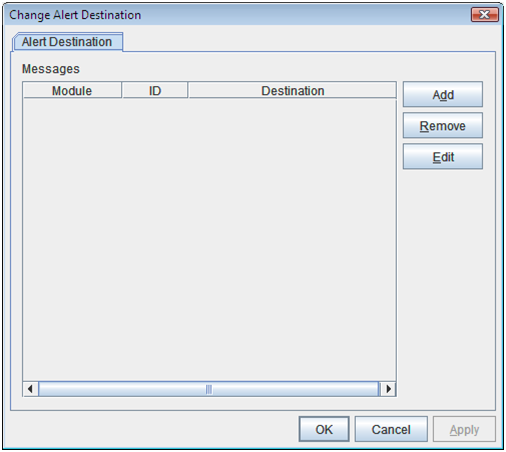
Add
Add the alert ID of the destination which you want to customize. Clicking Add displays the Enter the message dialog box.
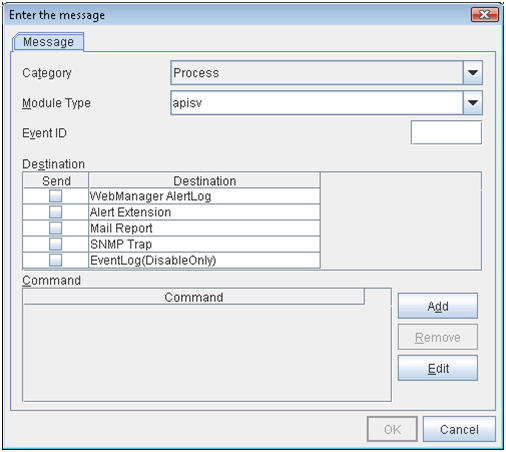
Category
Select a major category of the module type.
Module Type (Within 31 bytes)
Select the name of module type that you want to change the destination address.
Event ID
Enter the message ID of the module type for which you want to change the destination. For information on the message IDs, see "Messages reported by event log and alert " in "Error messages" in the "Reference Guide".
Destination
Select a message destination from the following options.
Add
Add a command of the alert extension function. Click Add to display the Enter Command dialog box.

Command (Within 511 bytes)
Enter any command you want to use.
Remove
Click this to remove a command of alert extension function. Select the command and then click Remove.
Edit
Click this to modify a command of alert extension function. Select the command and then click Edit.
SMTP Settings
Click SMTP Settings to display the SMTP Settings dialog box used for the mail alert.
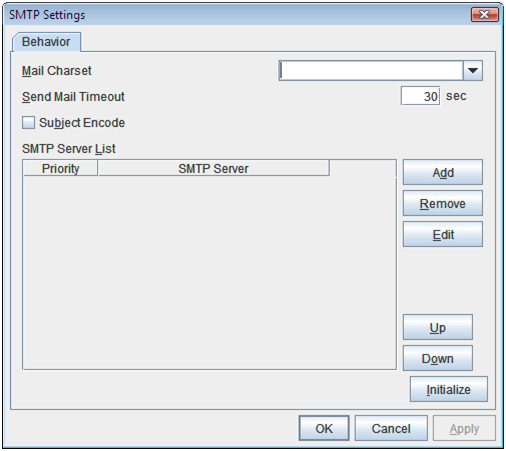
Mail Charset (Within 127 bytes)
Configure the character set of the e-mails sent for mail report.
Send Mail Timeout (1 to 999)
Configure the timeout value for communicating with the SMTP server.
Subject Encode
Select whether or not to encode the subject of e-mails.
SMTP Server List
Clicking this displays the configured SMTP servers. No more than four SMTP servers can be configured with this version.
Add
Use this button to add a SMTP server. Click Add to display the Enter the SMTP Server dialog box.
Remove
Use Remove to remove the SMTP server settings.
Edit
Use Edit to modify the SMTP server settings.

SMTP Server (Within 255 bytes)
Configure the IP address or host name of the SMTP server.
SMTP Port (1 to 65535)
Configure the port number of the SMTP server.
Sender Address (Within 255 bytes)
Configure the address from which an e-mail of mail report is sent.
Enable SMTP Authentication
Configure whether or not to enable SMTP authentication.
Method
Select a method of SMTP authentication.
User Name (Within 255 bytes)
Configure the user name used for SMTP authentication.
Password (Within 255 bytes)
Configure the password used for SMTP authentication.
SNMP Settings
Click this to display the Destination Settings dialog box which is used for the SNMP trap.
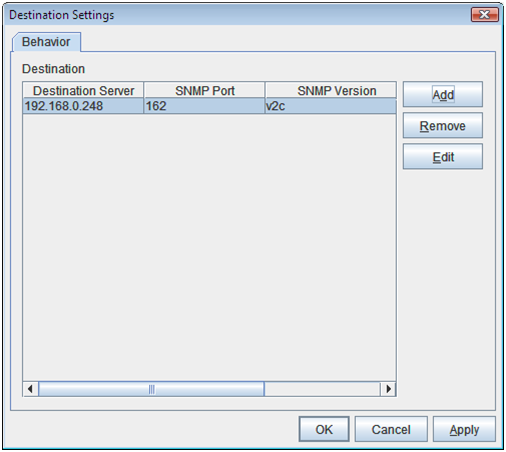
Destination
Displays the set SNMP trap transmission destinations. With this version, up to 32 SNMP trap transmission destinations can be set.
Add
Adds an SNMP trap transmission destination. Click Add to display the Change SNMP Destination dialog box.
Remove
Use Remove to remove the SNMP trap transmission destination settings.
Edit
Use Edit to modify the SNMP trap transmission destination settings.
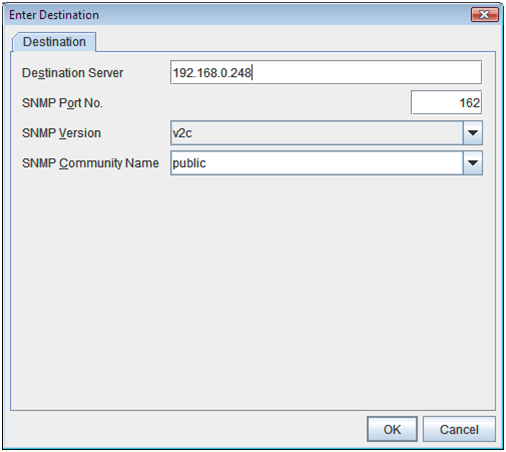
Destination Server (up to 255 bytes)
Configure the name of the SNMP trap transmission destination server.
SNMP Port No. (1 to 65535)
Configure the port number of the SNMP trap transmission destination.
SNMP Version
Configure the SNMP version of the SNMP trap transmission destination.
SNMP Community Name (up to 255 bytes)
Configure the SNMP community name of the SNMP trap transmission destination.
3.11.9. WebManager tab
Use this tab to configure the settings for the WebManager.
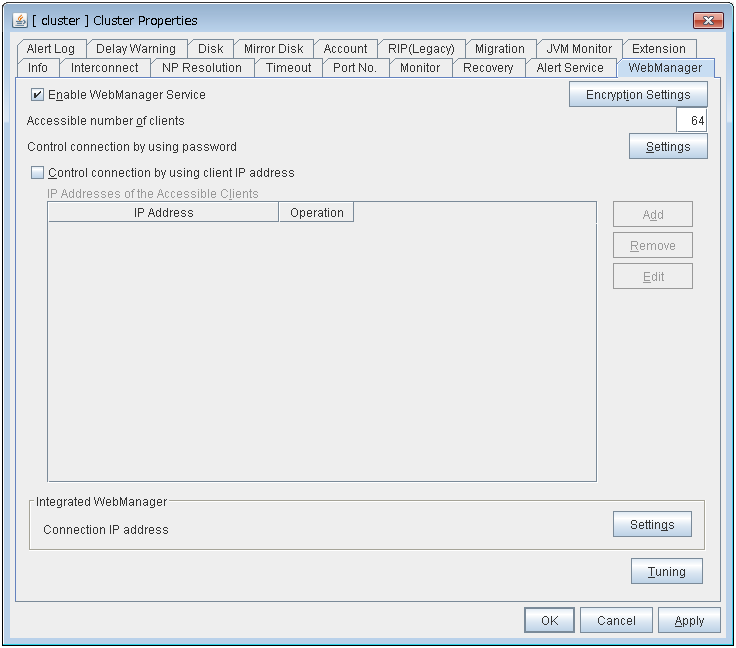
Enable WebManager Service
Enables the WebManager Service.
Encryption Settings
Make settings to encrypt the WebManager service.
Click Encryption Setting to display the Encryption Setting dialog box.
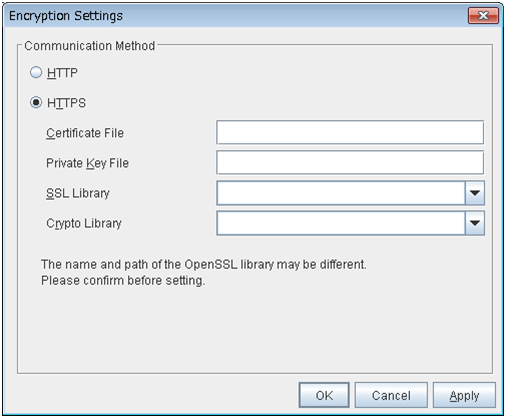
Communication Method
Certificate File
Sets the server credential file used for connecting to a client. Users need to prepare the server credential file.
Private Key File
Sets the private key file used for connecting to a client. Users need to prepare the private key file.
SSL Library
Sets the SSL library file used for encryption and selects the SSL library file included in OpenSSL. Users need to change it based on the environment, such as an installation folder.
Crypto Library
Sets the Crypto library file used for encryption and selects the Crypto library file included in OpenSSL. Users need to change it based on the environment, such as an installation folder.
Note
OpenSSL library is necessary to use HTTPS.
Accessible number of clients (1 to 999)
Set the number of requests that can be simultaneously received from clients. If more requests than the number set here are generated, the excess requests will be discarded.
Control connection by using password
Click Settings to display the WebManager Password dialog box.
WebManager
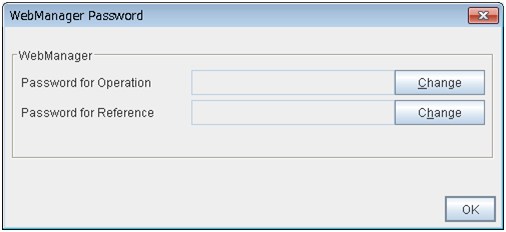
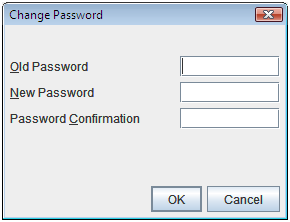
Control connection by using client IP address
If selected, accesses are controlled by client IP addresses.
Add
Use Add to add an IP address to IP Addresses of the Accessible Clients. Click Add to display the IP Address Settings dialog box is displayed. Newly added IP addresses have the rights for the operation.
IP address: 10.0.0.21
Network address: 10.0.1.0/24
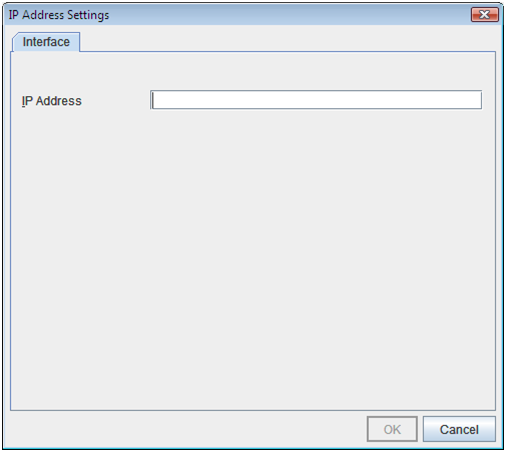
Remove
Use Remove to remove an IP address from IP Addresses of the Accessible Clients. Select the IP address you want to remove from IP Addresses of the Accessible Clients and then click Remove.
Edit
Use Edit to edit an IP address. Select an IP address you want to edit from IP Addresses of the Accessible Clients and then click Edit. The IP Address Settings dialog box where the specified IP address is present is displayed. The rights for operating the edited IP addresses remain the same.
Control column
Sets the operation rights for IP addresses that are registered in IP Addresses of the Accessible Clients.
IP address for Integrated WebManager
Click Settings to display the IP address for Integrated WebManager dialog box.
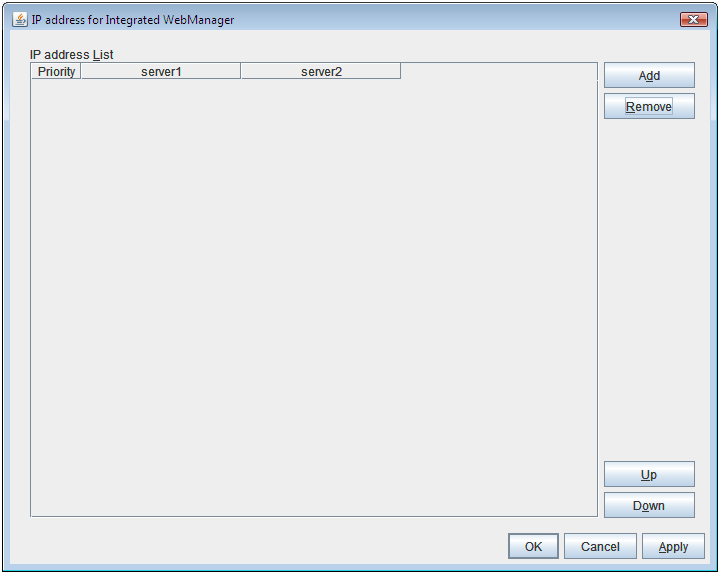
Add
Add IP addresses for the Integrated WebManager. Click the column cell of each server and select or enter IP address for the IP address of each server. For the communication path not connected to some server, set blank to the server cell of which the server is not connected.
Remove
Remove the communication path. Select the communication path to be removed and click Remove, then the selected path is removed.
Up, Down
When multiple IP addresses for Integrated WebManager are configured, the communication path with the smallest number in the Priority column is used preferentially for the internal communication among cluster servers. When changing the priority, click Up and Down to change the order of the selected row.
Tuning Properties
Use Tuning to tune the WebManager. Clicking Tuning displays the WebManager Tuning Properties dialog box.
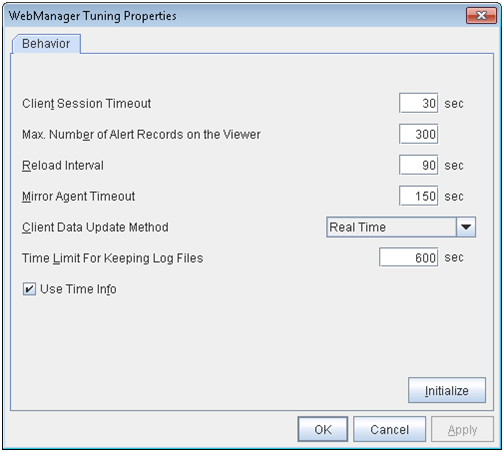
3.11.10. Alert Log tab
Configure the settings for the alert log.
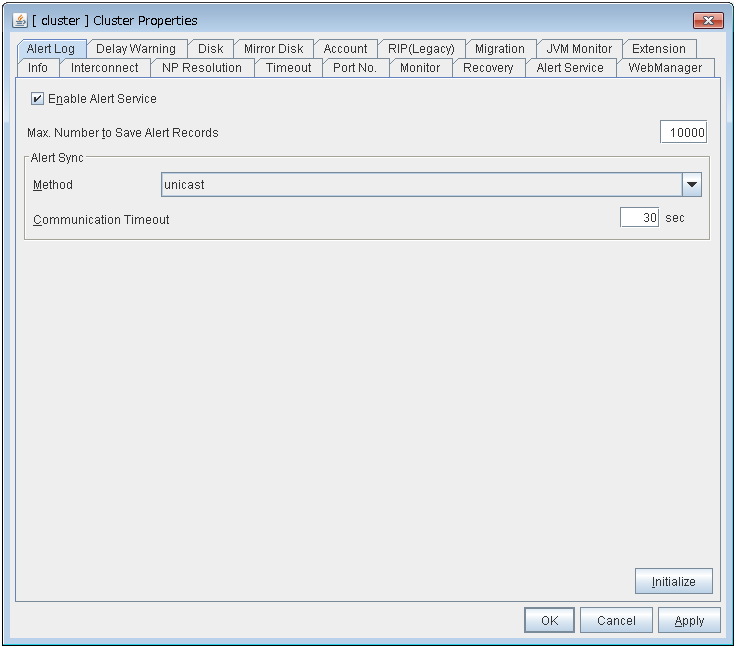
Enable Alert Service
Select this to start EXPRESSCLUSTER Web Alert service for the server.
Max. Number to Save Alert Records (1 to 99999)
Specify the maximum number of alert records that can be retained. EXPRESSCLUSTER Web Alert service for server can retain alert messages up to this number.
Alert Sync: Method
This communication mode is used for Alert Log synchronization. Only unicast is available in Method list box for this version.
Alert Sync: Communication Timeout (1 to 300)
Specify a communication time-out. A communication time-out is determined if the time specified here elapses after the last communication between EXPRESSCLUSTER Web Alert service and servers.
Initialize
Click Initialize to reset all settings on this tab to default. Click Initialize to set all items to their default values.
3.11.11. Delay Warning tab
Configure the settings for Delay Warning on this tab. For details on delay warnings, see "Monitor resources Delay warning of monitor resources" in "Monitor resource details" in the "Reference Guide".
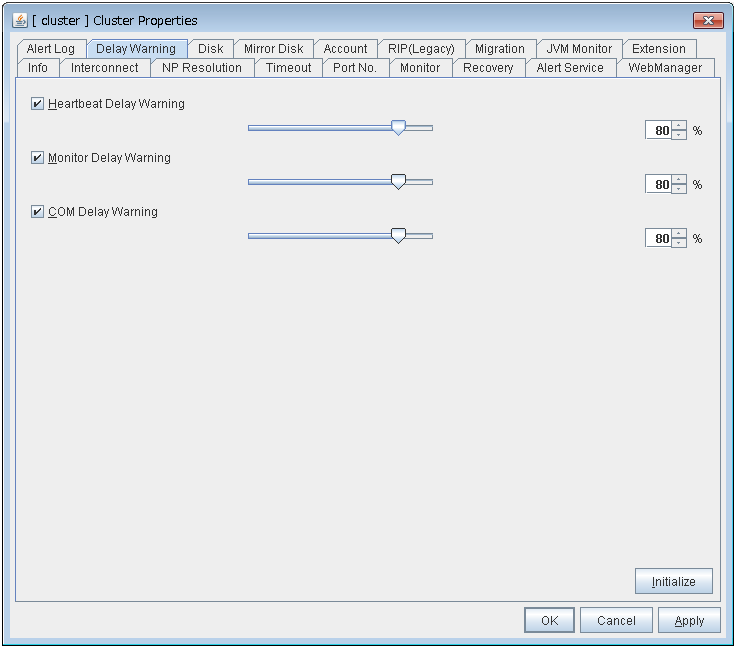
Heartbeat Delay Warning (1 to 99)
Set a percentage of heartbeat time-out at which the heartbeat delay warning is issued. If the time for the percentage passes without any heartbeat response, the warning will be produced in an alert log.
Monitor Delay Warning (1 to 99)
Set a percentage of monitor time-out at which the monitor delay warning is issued. If the time for the percentage passes without any monitor response, the warning will be produced in an alert log.
COM Delay Warning (1 to 99)
Set a percentage of COM I/F delay warning. If the time for the percentage passes without any COM response, the warning will be produced in an alert log.
3.11.12. Disk tab
Configure the setting for a shared disk.
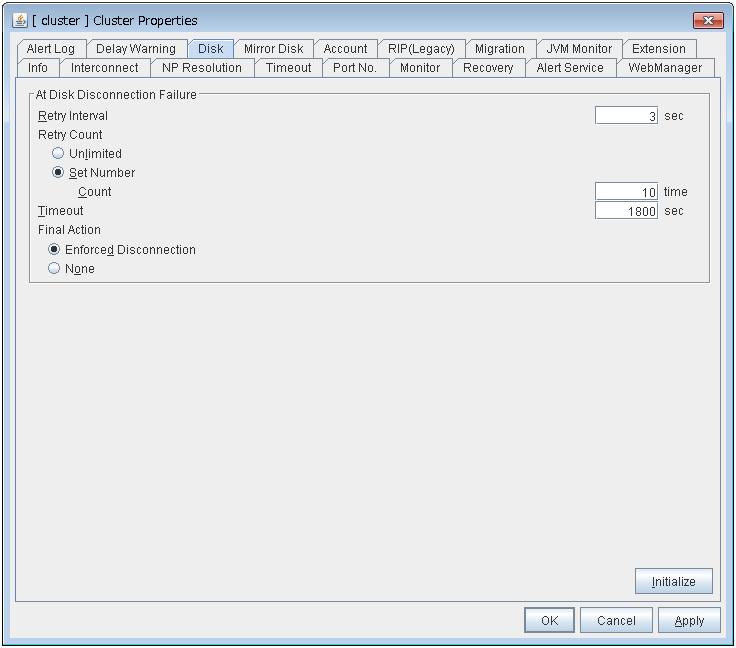
At Disk Disconnection Failure: Retry Interval (1 to 10)
Set the interval time required to retry disconnecting, when disconnecting a shared disk has failed.
At Disk Disconnection Failure: Retry Count (0 to 180)
Set the count to retry disconnecting when disconnecting a shared disk has failed.
At Disk Disconnection Failure: Timeout (1 to 9999)
Set the timeout at which to disconnect a shared disk.
At Disk Disconnection Failure: Final Action
If the count to disconnect a shared disk again is specified, set the action that will be taken in the case that disconnecting is failed for the specified count.
Initialize
This operation is used to return the value to the default value. Click Initialize to set all items to their default values.
Note
3.11.13. Mirror Disk tab
Configure the setting for a mirror disk.
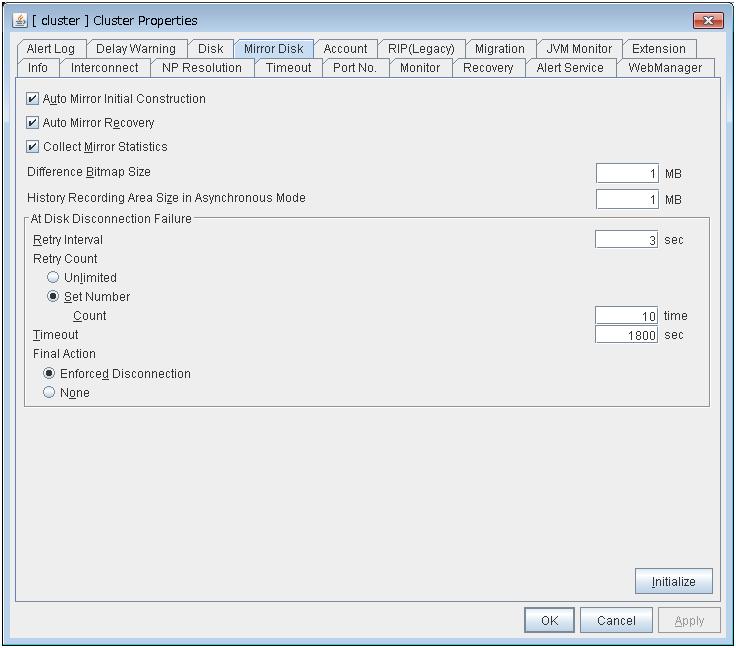
Auto Mirror Initial Construction
Specify whether to perform the mirror initial construction automatically when the newly created mirror disk resource is activated for the first time.
Auto Mirror Recovery
An automatic mirror recovery is performed when any difference occurs in the data of mirror disks between both servers. There is a case that mirror recovery cannot be performed automatically even if it is selected. For details, see "Troubleshooting" "Automatically recovering from mirroring" in "Troubleshooting" in the "Reference Guide"
Collect Mirror Statistics
This function can be used to collect and reference information about the mirroring performance. For details, see Mirror statistics information collection function" in "The system maintenance information" in the "Maintenance Guide".
Difference Bitmap Size (1 to 5)
Users can set the size of an area in which the data differential information between servers is recorded, when a mirror break occurs. If the data partition is data transfer for mirror recovery is optimized by enlarging the size.This item needs to be set before establishing a mirror disk resource and a hybrid disk resource. If the mirror disk resource and the hybrid disk resource already exist in the cluster, the setting cannot be changed.
History Recording Area Size in Asynchronous Mode (1 to 100)
Users can set the size of an area in which the history of unsent data is recorded. In the asynchronous mode, a mirror break occurs if a certain amount of unsent data is stored. Larger size makes it harder for the mirror break to occur.This item needs to be set before establishing a mirror disk resource and a hybrid disk resource. If the mirror disk resource and the hybrid disk resource already exist in the cluster, the setting cannot be changed.
At Disk Disconnection Failure: Retry Interval (1 to 10)
Set the interval time required to retry disconnecting, when disconnecting a mirror disk has failed.
At Disk Disconnection Failure: Retry Count (0 to 180)
Set the count to retry disconnecting when disconnecting a mirror disk has failed.
At Disk Disconnection Failure: Timeout (1 to 9999)
Set the timeout at which to disconnect a mirror disk.
At Disk Disconnection Failure: Final Action
If a retry count is set for mirror disk disconnection, set the action when that will be taken in the case that disconnection still fails after the specified retry count exceeds.
Initialize
This operation is used to return the value to the default value. Click Initialize to set all items to their default values.
Note
If the disk fails to be disconnected, retry or the final action is performed as many times as the value set above for each mirror disk resource deactivation.However, an emergency shutdown occurs if a single deactivation takes 9999 or more seconds.To change the retry count and retry interval, set the values in consideration of the above event.
3.11.14. Account tab
The Account tab is used to register and/or delete the user account that is used in the /U option of the ARMLOAD-compatible command. You can set up to sixteen user accounts for one cluster system. The accounts that have already set on the all cluster servers are the target to be registered. The user accounts that are currently registered on the Account are displayed.
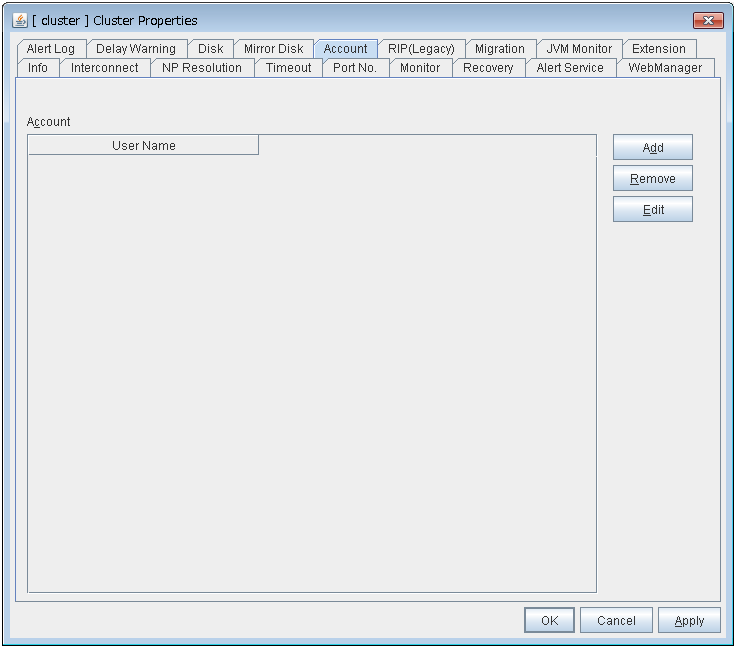
Add
Use Add to add a user account on the Account List. Click Add to display the Enter account dialog box.
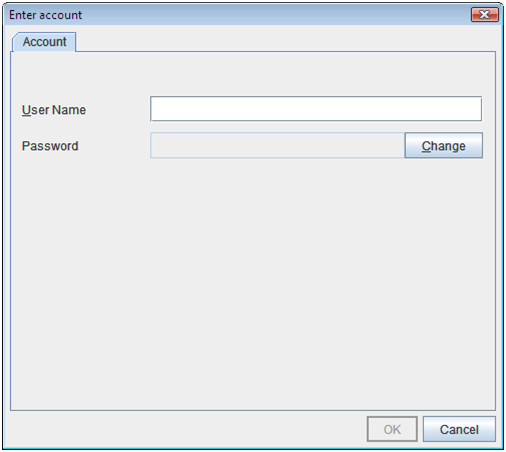
Remove
Use Remove to remove a user account from the Account List. Select the user account you want to remove from Account and then click Remove.
Edit
Use Edit to edit a user account. Select the user account you want to edit from Account and then click Edit. The Enter account dialog box where the selected account was entered is displayed.
3.11.15. RIP (Legacy) tab
When connecting to the EXPRESSCLUSTER Server from a remote LAN by using a virtual IP address, RIP must be sent to the public LAN which a router is connected to. The broadcast address of the RIP which is set on the cluster is displayed on the Network Address.
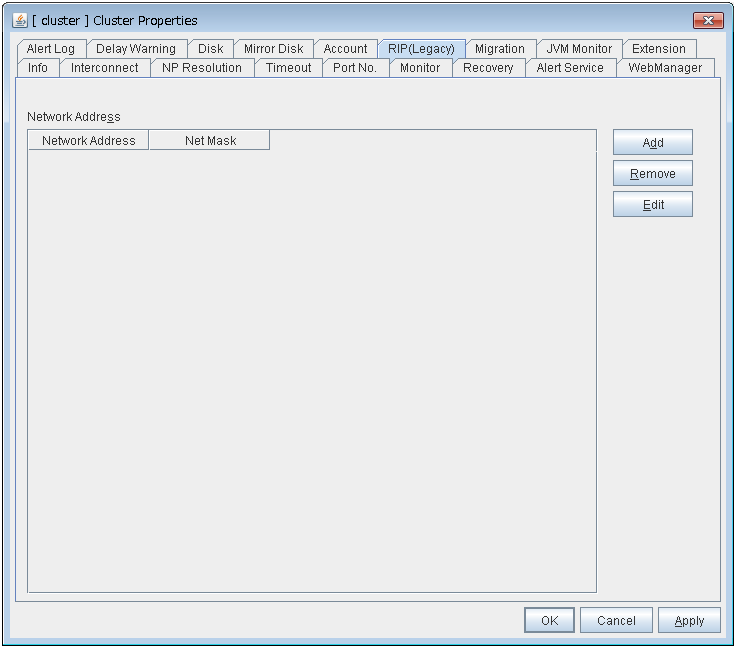
Add
Use Add to add a network address to the Network Address. Clicking Add displays the Enter network address dialog box.
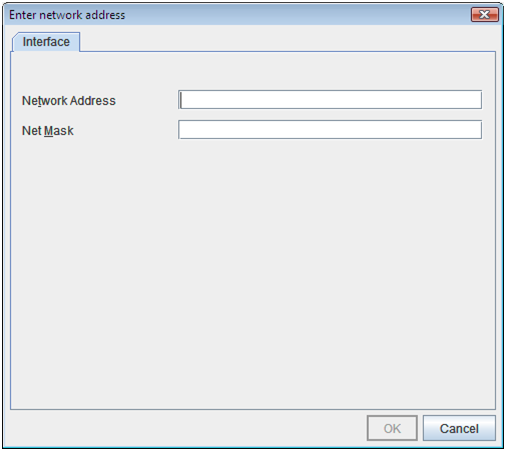
- Network AddressEnter a network address to be registered.
- Net MaskEnter a network mask to be registered.
Remove
Use Remove to remove a network address from the Network Address. Select the network address you want to remove from the Network Address and then click Remove.
Edit
Use Edit to edit a network address. Select the network address you want to edit from Network Address and then click Edit. The Enter network address dialog box where the selected network address was entered is displayed.
3.11.16. Migration tab
Set the migration of the virtual machine resource.
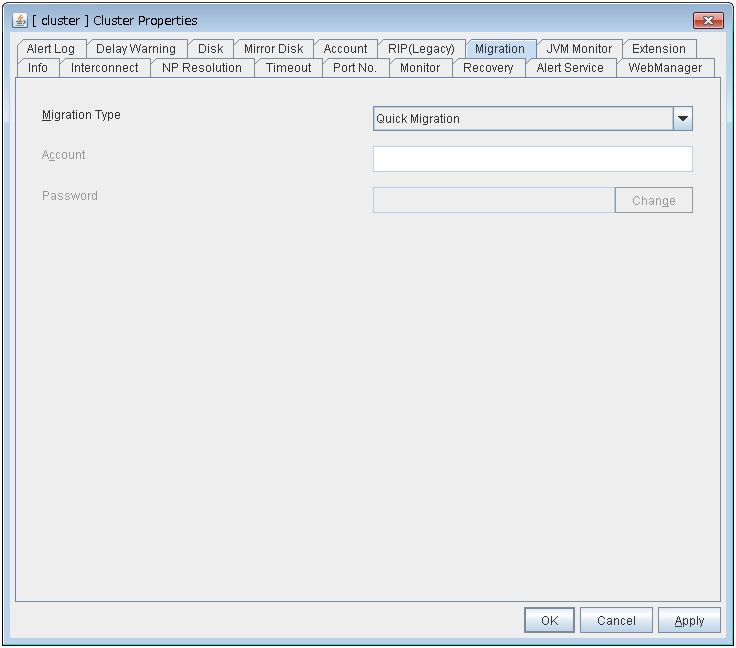
Migration Type
Account
Enter the name of the user account to be registered. Enter "domain_name\account_name."
Password
Enter the password for the user account to be registered.
3.11.17. JVM monitor tab
Configure detailed parameters for the JVM monitor.
Note
To display the JVM monitor tab on the online version Builder, you need to execute Update Server Info from the File menu after the license for Java Resource Agent is registered.
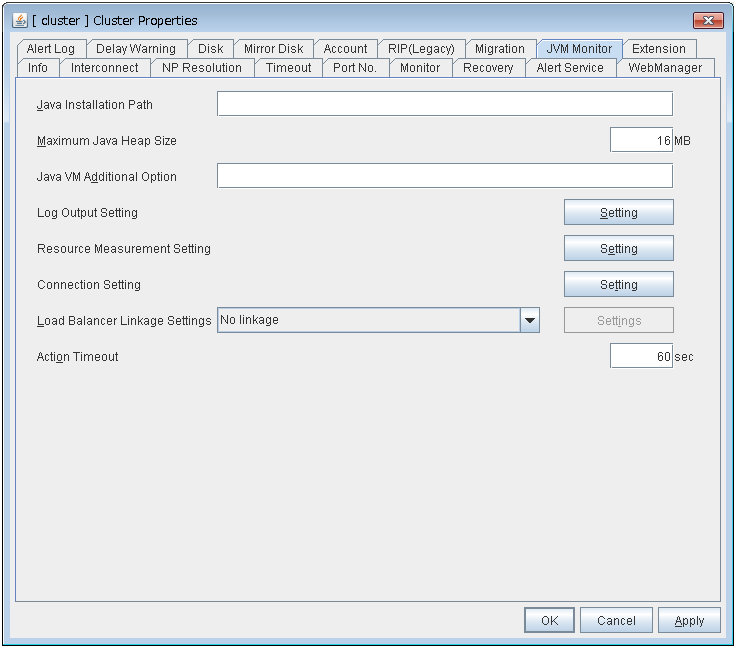
Java Installation Path(up to 255 bytes)
Set the Java VM install path used by the JVM monitor. Specify an absolute path using ASCII characters. Do not add " \ " to the end of the path. This setting becomes common for all servers in the cluster.Specification example:C:\Program Files\Java\jdk1.8.0_102
Maximum Java Heap Size(7 to 4096)
Set, in megabytes, the maximum Java VM heap size used by the JVM monitor (equivalent to -Xmx of the Java VM startup option). This setting becomes common for all servers in the cluster.
Java VM Additional Option (up to 1024 bytes)
Set the Java VM startup option used by the JVM monitor. However, specify -Xmx for Maximum Java Heap Size. This setting becomes common for all the servers in the cluster.Specification example:-XX:+UseSerialGC
Log Output Setting
Click the Setting button to open the Log Output Setting dialog box.
Resource Measurement Setting
Click the Setting button to open the Resource Measurement Setting dialog box.
Connection Setting
Click the Setting button to open the Connection Setting dialog box.
Load Balancer Linkage Settings
Select the load balancer type and then click the Settings button. The Load Balancer Linkage Settings dialog box appears.Select the load balancer type from the list. To perform load balancer linkage, select the load balancer you are using. To cancel the load balancer linkage, select No linkage.
Action Timeout (30 to 300)
Set a timeout value for the Command that has been specified on each window of the JVM monitor. This setting becomes common for all of the Command.
Log Output Setting
Clicking Setting displays the Log Output Setting dialog box.
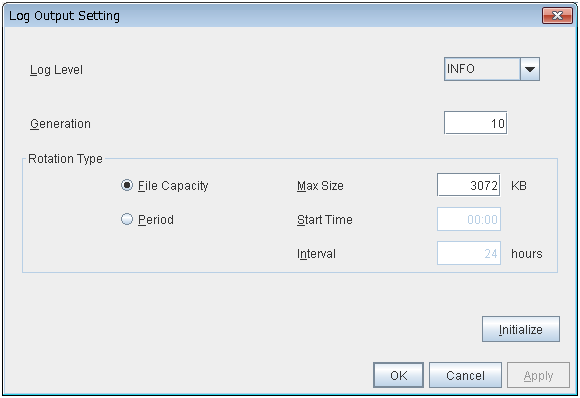
Log Level
Select the log level of the log output by the JVM monitor.
Generation (2 to 100)
Set the number of generations to be retained for the log output by the JVM monitor. When Period is selected for Rotation Type, the rotation count is reset when cluster is suspended. Therefore, note that log files under the
<EXPRESSCLUSTER_install_path>\log\ha\jraincrease per cluster suspend.
Rotation Type
Select a rotation type for the log output by the JVM monitor. If you select File Capacity as the rotation type, set the maximum size (200 to 2097151), in kilobytes, for each log file such as the JVM operation log. If you select Period as the rotation type, set the log rotation start time in "hh:mm" format (hh: 0 to 23, mm: 0 to 59) and the rotation interval (1 to 8784) in hours.
Initialize
Clicking Initialize returns the log level, generation, and rotation type items to their default values.
Resource Measurement Setting [Common]
Clicking Setting displays the Resource Measurement Setting dialog box. For details on the scheme for error judgment by the JVM monitor, see "Monitor resource details." in the "Reference Guide".
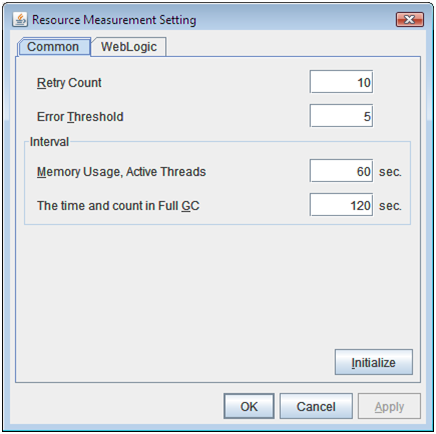
Retry Count (1 to 1440)
Set the resource measurement retry count to be applied if the JVM monitor fails in resource measurement.
Error Threshold (1 to 10)
Set the number of times abnormal judgment is performed when the usage of the Java VM or the application server resources collected by the JVM monitor via resource measurement continuously exceed the customer-defined threshold.
Memory Usage, Active Threads (15 to 600)
Set the interval at which the JVM monitor measures the memory usage and active thread count.
The time and count in Full GC (15 to 600)
Set the interval at which the JVM monitor measures the time and count in Full GC execution.
Initialize
Clicking Initialize returns the retry count, error threshold, and interval items to their default values.
Resource Measurement Setting [WebLogic]
Clicking Setting displays the Resource Measurement Setting dialog box. For details on the scheme for error judgment by the JVM monitor, see "Monitor resource details." in the "Reference Guide".
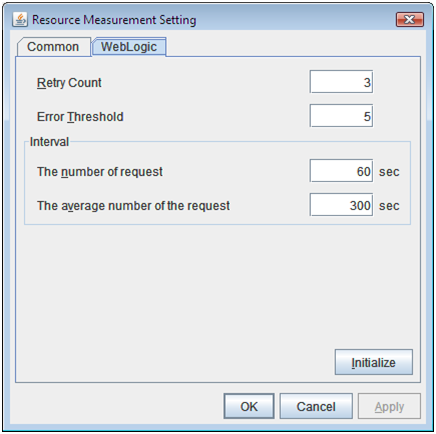
Retry Count (1 to 5)
Set the resource measurement retry count to be applied if the JVM monitor fails in resource measurement.
Error Threshold (1 to 10)
Set the number of times abnormal judgment is performed when the usage of the Java VM or the application server resources collected by the JVM monitor via resource measurement continuously exceed the customer-defined threshold.
The number of request (15 to 600)
Set the interval at which the JVM monitor measures the number of work manager or thread pool requests during WebLogic monitor.
The average number of the request (15 to 600)
Set the interval at which the JVM monitor measures the average number of work manager or thread pool requests during WebLogic monitor. Set a value that is an integer multiple of the value set in Interval: The number of request.
Initialize
Clicking Initialize returns the retry count, error threshold, and interval items to their default values.
Connection Setting
Clicking Setting displays the Connection Setting dialog box.
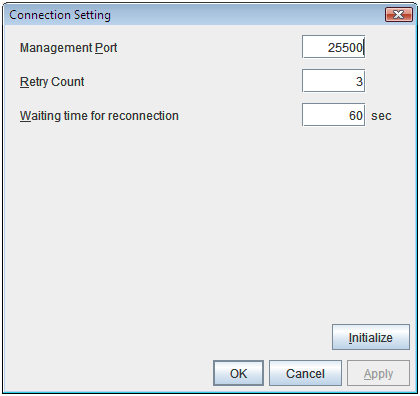
Management Port (10000 to 65535)
Sets the port number internally used by the JVM monitor resource. Make sure not to set the port number that has been used by other functions or programs. This setting becomes common for all the servers in the cluster. Do not set 42424 to 61000.
Retry Count (1 to 5)
Set the retry count to be applied if connection to the monitor target Java VM fails.
Waiting time for reconnection (15 to 60)
Set the interval at which the JVM monitor retries connection if it fails in Java VM connection.
Initialize
Clicking Initialize sets the management port, retry count, and waiting time for reconnection items to their default values.
Load Balancer Linkage Settings
If you select other than BIG-IP LTM as the load balancer type and then click the Settings button, the Load Balancer Linkage Settings dialog box appears.
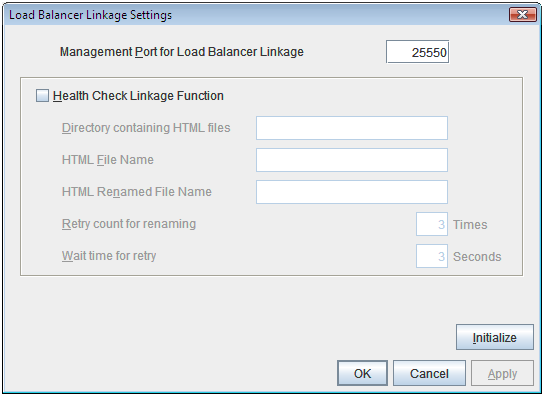
Management Port for Load Balancer Linkage (10000 to 65535)
Set the port number used by the load balancer linkage function. This setting becomes common to all the servers in the cluster. Do not set 42424 to 61000.
Health Check Linkage Function
Set whether to use the load balancer health check function if the monitor target Java VM detects a failure.
Directory containing HTML files(up to 255 bytes)
Set the directory in which the HTML file used by the load balancer health check function is stored.
HTML File Name(up to 255 bytes)
Set the HTML file name used by the load balancer health check function.
HTML Renamed File Name(up to 255 bytes)
Set the HTML renamed file name used by the load balancer health check function.
Retry Count for renaming (0 to 5)
Set the number of times HTML file renaming is retried if it fails.
Wait time for retry (1 to 60)
Set the interval at which HTML file renaming is retried if it fails.
Initialize
Clicking Initialize returns the management port for load balancer linkage, health check linkage function, directory containing HTML files, HTML file name, HTML renamed file name, retry count for renaming, and wait time for retry interval items to their default values.
Load Balancer Linkage Settings
Select BIG-IP LTM as the load balancer type and then click the Settings button. The Load Balancer Linkage Settings dialog box appears.
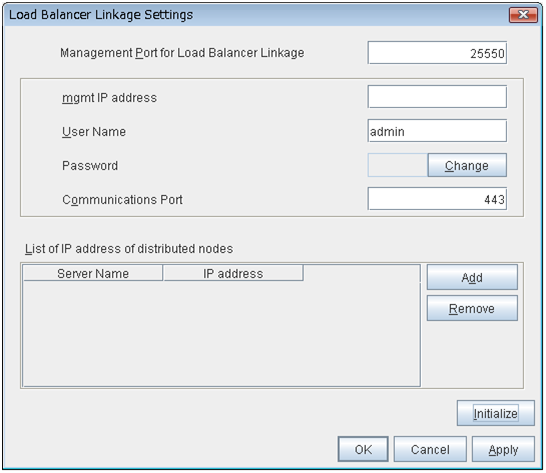
Management Port for Load Balancer Linkage (10000 to 65535)
Set the port number used by the load balancer linkage function. This setting becomes common to all the servers in the cluster. Do not set 42424 to 61000.
mgmt IP address
Set the BIG-IP LTM IP address.
User Name (up to 255 bytes)
Set the BIG-IP LTM management user name.
Password (up to 255 bytes)
Set the BIG-IP LTM management user password.
Communications Port (10000 to 65535)
Set the communication port number for BIG-IP LTM.
Add
Add the server name and IP address for the distributed node. For the server name, specify the computer name. For the IP address, specify the value set to Members in LocalTrafic - Pools:PoolList - Relevant pool - Members of BIG-IP Configuration Utility.To change the value, select the line and directly edit the description.
Remove
Remove the server name and IP address for the distributed node. Select the line to be removed and then click Remove. The selected server is removed.
Initialize
Clicking Initialize returns the management port for load balancer linkage, management user name, and communication port number to the default settings.
3.11.18. Extension Tab
Other cluster functions are set.
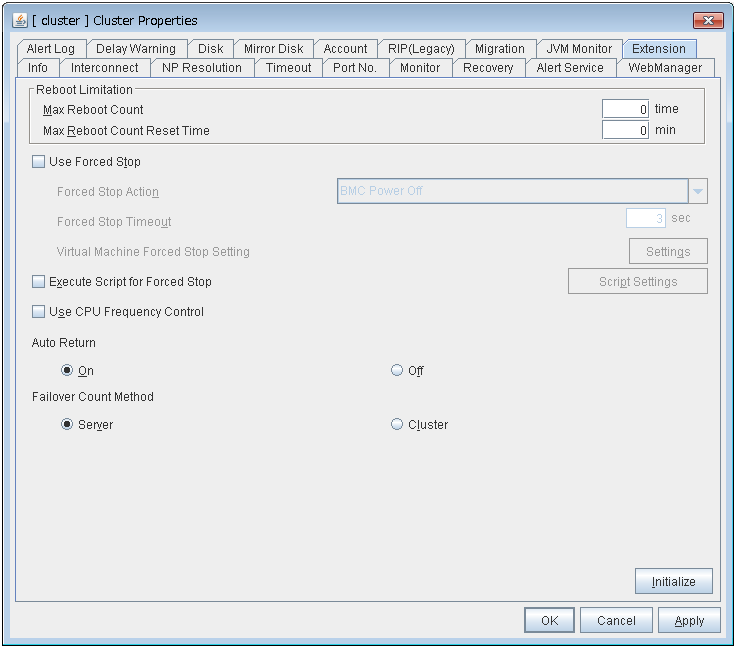
Reboot Limitation
You can specify the Reboot OS or Shut down OS as the final action at abnormality detection for group resources and monitor resources. If either of them is selected, reboot may be repeated infinitely. By setting the reboot limit, you can prevent repeated reboots.
Note
If Max Reboot Count is set to 1 or greater, usually set Max Reboot Count Reset Time to 1 or greater (default: 0). If Max Reboot Count Reset Time is set to zero (0), the reboot count is not reset. To reset the reboot count, use the clpregctrl command.
Use Forced Stop
Use this to select whether or not to enable the forced stop.
Forced Stop Action
Specify an action of the forced stop.
Forced Stop Timeout (0 to 999)
Configure the timeout value when performing Forced Stop. After the above commands are executed, activating failover groups starts when the time specified elapses.
Virtual Machine Forced Stop Setting
Configure forced stop for the virtual machine (guest OS). Click Setting to display the Virtual Machine Forced Stop Setting dialog box.
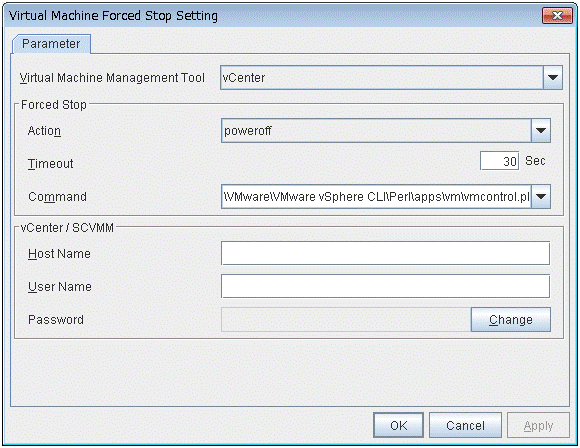
Virtual Machine Management Tool
Forced Stop
vCenter / SCVMM
Note
Do not use a double quotation mark (") in the password.
Execute Script for Forced Stop
Use this to select whether or not to execute a script for the forced stop.
Script Settings
Make settings on the script for the forced stop. Click Script Setting play the Edit Script dialog box.
C:\Program Files\script.batEach executable file is not included in the cluster configuration information of the Builder. They must be prepared on each server because they cannot be edited or uploaded by the Builder.
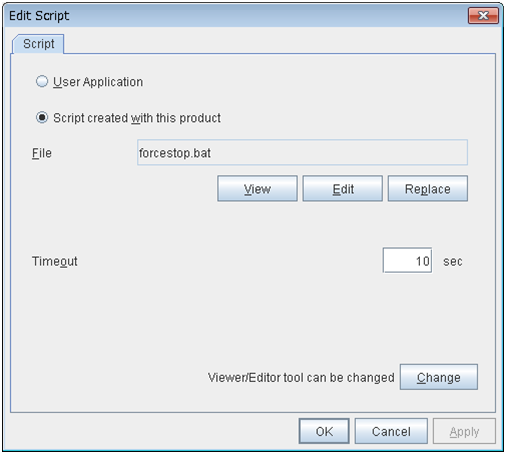
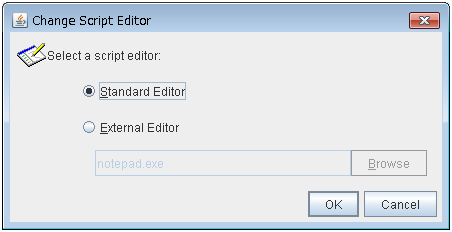
Use CPU Frequency Control
Configure whether or not to use the function to turn it to power-saving mode by controlling the CPU frequency of the standby server.Select the check box when you use CPU frequency control. If you uncheck the check box, CPU frequency control is disabled.See also
When CPU frequency control is used, the CPU frequency of the server where a failover group is activated is set to high, and that of the server where a failover group is stopped is set to low.When CPU frequency control is performed by a command or WebManager, the settings changed by the command or WebManager are given higher priority regardless of whether the failover group is started or stopped. Note that the settings changed by the command or WebManager is discarded after the cluster is stopped/started or suspended/resumed, so that CPU frequency is controlled by the cluster.Note
For using CPU frequency control, it is required that the frequency is changeable in BIOS settings and the CPU supports the frequency control by Windows OS power management function.
Note
If you disable CPU frequency control function with CPU frequency changed, the CPU frequency does not return to the state before changing.In this case, return the CPU frequency to the defined value by the following way.Select Balanced in Power Options -> Choose or customize a power plan in Control Panel.
Auto Return
Configure whether to perform "Auto Recovery" when a cluster server is restarted after server failure has occurred.
Failover Count Method
Select the method to count the number of failovers from Server or Cluster.
Initialize
This operation is used to return the value to the default value. Click Initialize to set all items to their default values.
3.12. Servers Properties
Configure setting information of all servers in Servers Properties.
3.12.1. Master Server tab
Configure the priority order of the servers and the server group. All the registered servers are displayed. Master server is the server to keep the master of cluster configuration information. And also, it is the server of the highest priority order.
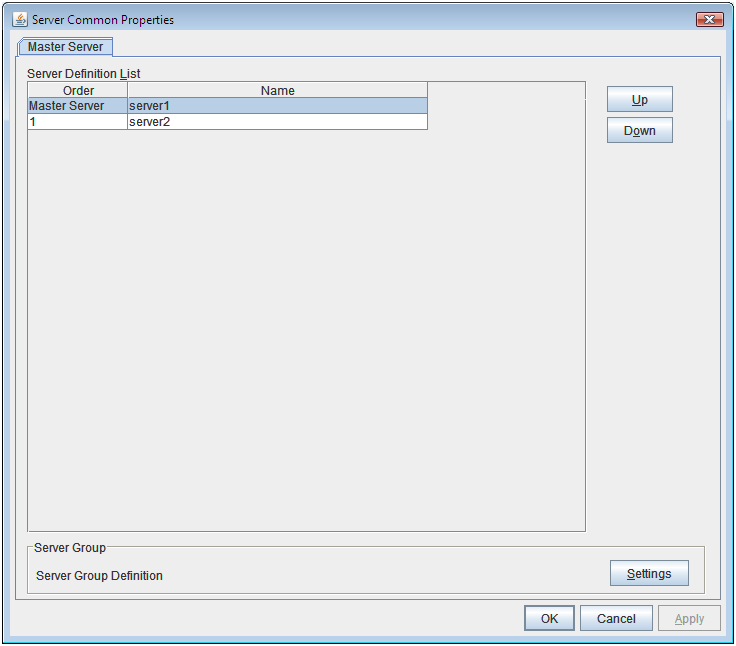
Up, Down
Used when changing the priority order of the servers. Select the server to be changed from the server definition list, and select Up or Down. The selected row moves.
Settings
Used when configuring the server group. Select Settings and the Server Group dialog box is displayed.
There are naming rules that are the same as the host name of TCP/IP that can be set by the OS.
Up to 31 characters (31 bytes).
Names cannot start or end with a hyphen (-) or a space.
A name consisting of only numbers is not allowed.
Names should be unique (case-insensitive) in the server group.

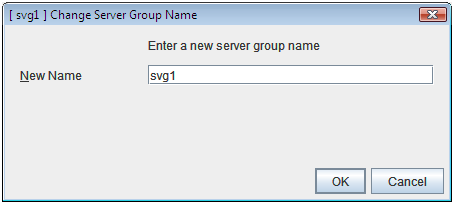
3.13. Server Properties
Configure individual settings on each server constructing the cluster in Server Properties.
3.13.1. Info tab
You can display the server name, and register and make a change to a comment on this tab.
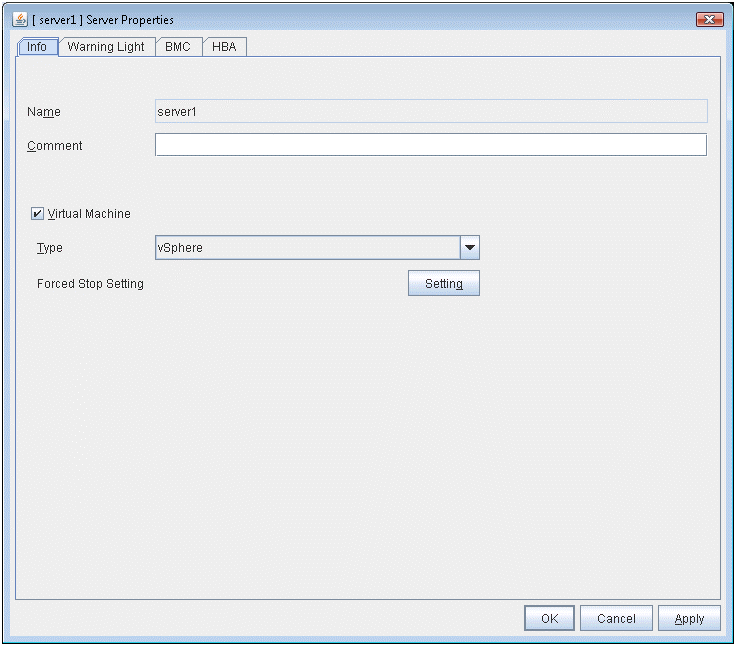
Name
The selected server name is displayed. You cannot change the name here.
Comment
You can specify a comment for the server. Only alphanumeric characters are allowed.
Virtual Machine
Specify whether this server is a virtual machine (guest OS).
Type
Specify the type of virtual infrastructure.
Forced Stop Setting
Set the information about the virtual machine (guest OS). Click Setting to display the Input for Virtual Machine name dialog box.
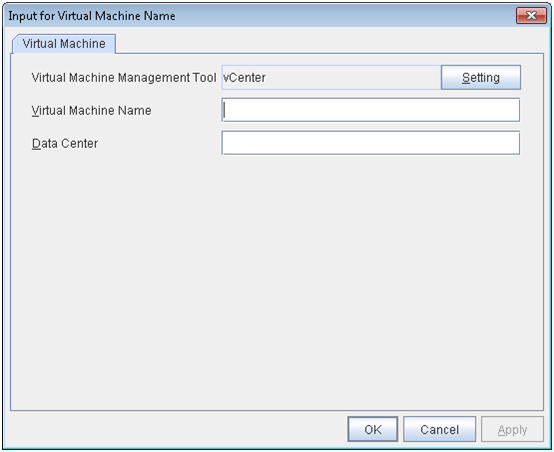
Virtual Machine Management Tool
Set the virtual machine management tool that manages the virtual machine (guest OS).Click Setting to display the Virtual Machine Forced Stop Setting dialog box.For details on Virtual Machine Forced Stop Setting, refer to the Extension Tab.
Virtual Machine name (Within 80 bytes)
Set the virtual machine (guest OS) name.
Note
Do not use a double quotation mark (") or percent sign (%) in the virtual machine name.
Data Center (Within 80 bytes)
Set the name of the data center that manages the virtual machine (guest OS).
Note
Do not use a double quotation mark (") or percent sign (%) in the virtual machine name.
3.13.2. Warning Light tab
Set an IP address of warning light (specified by NEC) controlled by network.
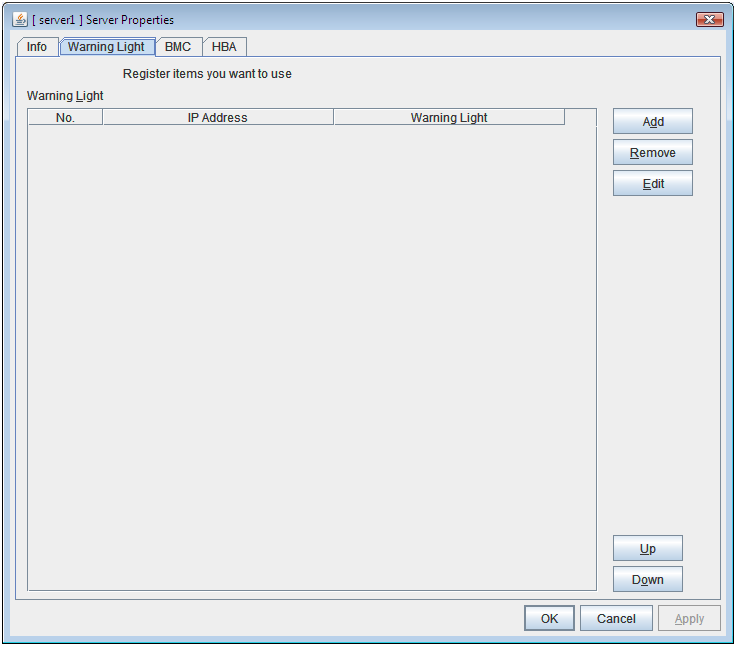
Add
Use this button to add an IP address of warning light. Click Add to open the Warning Light Settings dialog box.
Remove
Use this button to remove an IP address of warning light. Select the target setting, and then, click Remove.
Up
It can't be used because only 1 warning light can be registered at present.
Down
It can't be used because only 1 warning light can be registered at present.
Warning Light
Select the product number of the warning light you use. The products corresponding to each number are as follows.
Product Number
Product Name
DN-1000S/DN-1000R/DN-1300GL
DN-1000S/DN-1000R/DN-1300GL
DN-1500GL
DN-1500GL
NH-FB series/NH-FB1 series
NH-FB series/NH-FB1 series
NH-FV1 series
NH-FV1 series
Note
One warning light is required per one server. Do not set an IP address of the same warning light to multiple servers.
Note
Enter Administrator for user name, Administrator for password.
Specify rsh command execution file path
C:\WINDOWS\system32\rsh.exe
Note
To play the audio file, it must be registered in the network warning light.
For more information on audio file registration, refer to the instruction manual of the network warning light to be used.Set the audio file number corresponding to the audio file that is registered for the network warning light.
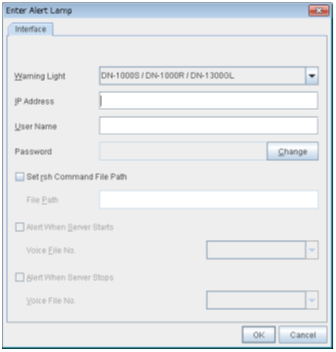
3.13.3. BMC tab
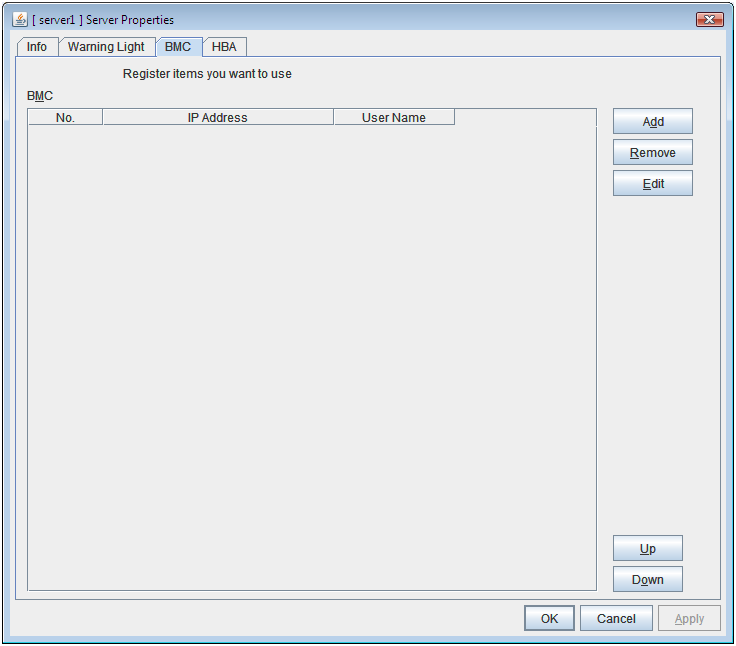
Add
Use this button to newly configure new settings. Click Add to open the BMC Settings dialog box.
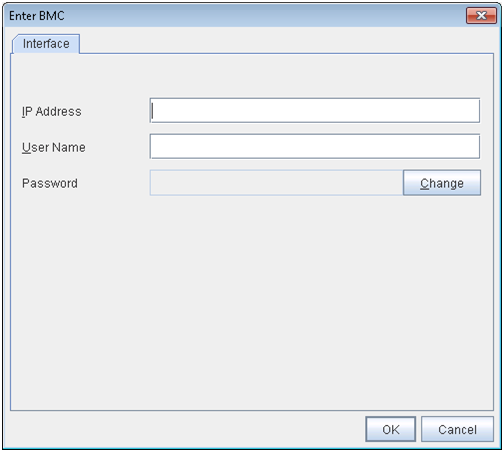
Remove
Use this button to remove the settings. Select the target setting, and then, click Remove.
Edit
Use this button to modify the settings. Select the target setting, and then, click Edit. The BMC Settings dialog box is displayed.
3.13.4. HBA tab
Set the HBA to which the shared disk is connected.
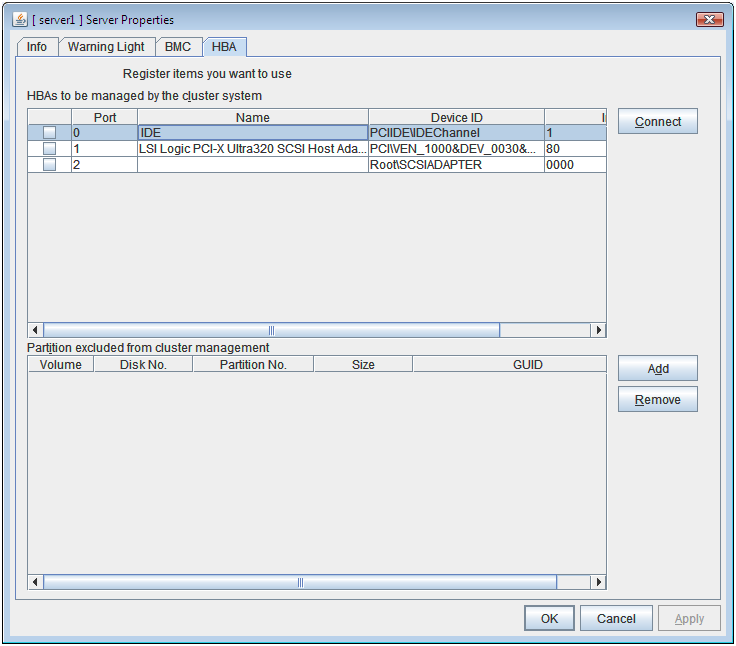
List of HBAs to be managed by the cluster system
Set the access to the shared disk. If the check box is selected, access to all disks connected to the HBA is controlled when starting the OS next time. To protect data, it is required to select the check box of the HBA to which the shared disk is connected.If the HBA list is not displayed, it can be displayed by clicking the Connect button.Important
Do not connect the shared disk to any HBA whose check box is not selected. Even though the check box is selected, do not connect to the shared disk when the OS is not started again after configuring the settings. Data on the shared disk may be corrupted.
Do not select the check boxes other than those of HBAs to which the shared disk is connected. If access to the system partition on which the OS has been installed is restricted, the OS may not be started.
Do not select the check boxes of HBA that connects the mirroring target internal disk if you use mirror disk resource. Starting mirror disk resource fails.
Partitions excluded from cluster management
When a disk other than the shared disk is connected to the HBA set in HBAs to be managed by the cluster system, register the partitions on the disk. The access to the partitions registered with this list is not restricted.
Important
In principle, do not register the partitions on the shared disk that can be accessed from multiple servers. Data on the shared disk may be corrupted.
Connect
Select this to get the HBA data by connecting to the server.
Add
Add a partition that should not be restricted in its access in Partition excluded from cluster management.
Remove
Remove the selected partition from Partition excluded from cluster management.
3.14. Installing the offline version of the Builder
It is not necessary to install the Builder (offline version) to the server where configure a cluster. Install it when a PC that cannot connect to the cluster through a Web browser is used for creating and modifying the cluster configuration data. Follow the procedures below to install the Builder (offline version).
Note
Install the Builder with the administrator privilege.
Insert the Installation CD-ROM to the CD-ROM drive.
Select EXPRESSCLUSTER® for Windows.
Note
If the menu screen does not open automatically, double-click menu.exe in the root folder of the CD-ROM.
Select EXPRESSCLUSTER® Accessories.
Select EXPRESSCLUSTER® Builder.
Select where to install in the Cluster Builder self-extracting dialog box and click Extract.
- Click OK in the ZIP self-extract dialog box. Installation is completed.Load the following file with a Web browser to start up the offline version of the Builder:
<installation path>/clptrek.htm
3.15. Uninstalling the offline version of the Builder
To uninstall the Builder, follow the procedures below:
Exit from all Web browsers (confirm that the JavaVM icon is no longer in the task tray).
Delete the Builder installation folder from Windows Explorer.
4. Compatible command reference
This chapter describes compatible commands.
This chapter covers:
4.4. Displaying the messages on EXPRESSCLUSTER clients (armbcast command)
4.5. Registering the messages on a log file or an alert log (armlog command)
4.6. Starting the applications or services (armload command)
4.7. Terminating the application or service (armkill command)
4.8. Waiting for the start or stop of groups (armgwait command)
4.9. Exclusive control between servers command (armcall command)
4.10. Retrieving the cluster wide variable or local variable (armgetcd command)
4.11. Setting the cluster wide variable or local variable (armsetcd command)
4.12. Monitoring errors on the connection to the shared resources (armwhshr command)
4.13. Controlling the applications or services started by the armload command (EXPRESSCLUSTER Task Manager)
4.18. Starting or stopping the application or service, suspending or resuming the monitoring (armloadc command)
4.19. Suspending the script execution until the user's direction (armpause command)
4.20. Suspending the script execution for the specified time (armsleep command)
4.21. Starting the network sharing of the directory (armnsadd command)
4.22. Stopping the network sharing of the directory (armnsdel command)
4.23. Setting the IP address returned by gethostbyname() (armwsset command)
4.24. Setting or displaying the start delay time (armdelay command)
4.25. Setting or displaying operations at the occurrence of the emergency shutdown (armem command)
4.27. Returning the server with the status of "Suspension (isolated)" (armmode command)
4.28. Permitting an access to the mirror disk (mdopen command)
4.29. Prohibiting an access to the mirror disk (mdclose command)
4.30. Permitting an access to the shared disk (sdopen command)
4.31. Prohibiting an access to the shared disk (sdclose command)
4.1. Compatible command overview
Compatible commands have compatibility with commands used in EXPRESSCLUSTER Ver8.0 or earlier in functions. This section explains how to use compatible commands.
4.2. Note on compatible commands
The following is the note on compatible commands.
To use a compatible command, the name of a cluster, server and group needs to be configured according to the naming rules of the conventional version.
Compatible commands cannot be used when the server is in the suspension (isolated) status.
Run the following compatible commands as a user with Administrator privileges.
4.3. Compatible commands
Commands that can be used only in scripts
command
Description
Page
armbcast.exe
Displays a default or optional message on the client on which the EXPRESSCLUSTER client is running.
4.4. Displaying the messages on EXPRESSCLUSTER clients (armbcast command)
armlog.exe
Registers log messages to the log file.
4.5. Registering the messages on a log file or an alert log (armlog command)
armload.exe
Starts an application. The application started by the armload.exe can be stopped by the armkill.exe in any position of a script.
4.6. Starting the applications or services (armload command)
armkill.exe
Stops the application started by the armload.exe.
4.7. Terminating the application or service (armkill command)
armgwait.exe
Waits for the start or stop of groups
4.8. Waiting for the start or stop of groups (armgwait command)
armcall.exe
Executes a command specified as a parameter or a program exclusively on nodes.
4.9. Exclusive control between servers command (armcall command)
armgetcd.exe
Retrieves the value specified to the desired variable by the armsetcd.exe command. This command can be used for branch conditions of scripts.
4.10. Retrieving the cluster wide variable or local variable (armgetcd command)
armsetcd.exe
Sets the value to the desired variable. This value can be referred by the armgetcd.exe command.
4.11. Setting the cluster wide variable or local variable (armsetcd command)
armwhshr.exe
Monitors errors on the connection to the shared name.
4.12. Monitoring errors on the connection to the shared resources (armwhshr command)
Commands that can be used both in and outside scripts.
command
Description
Page
armaswth.exe
Starts or stops the application or service, or suspends or resumes the monitoring or the application or service that is started by the armload.exe command.
4.13. Controlling the applications or services started by the armload command (EXPRESSCLUSTER Task Manager)
armdown.exe
Shuts down a server when you want to fail over a group intentionally, such as when starting or stopping the application or service fails.
armfover.exe
Moves or fails over groups.
armgstrt.exe
Starts groups.
armgstop.exe
Stops groups.
armloadc.exe
Start or stop the application or service, or suspends or resumes the monitoring.
4.18. Starting or stopping the application or service, suspending or resuming the monitoring (armloadc command)
armpause.exe
Suspends scripts. This command can be used as a debugger.Permit the interaction with desktop. You can configure the setting for the interaction with desktop on the Service of Administrative Tools on Programs.4.19. Suspending the script execution until the user's direction (armpause command)
armsleep.exe
Suspends the script execution for a specified time.
4.20. Suspending the script execution for the specified time (armsleep command)
armnsadd.exe
Starts sharing a network drive. This command functions in the same way as the net share shared_name=path_name.
4.21. Starting the network sharing of the directory (armnsadd command)
armnsdel.exe
Releases the network sharing forcibly specified by the net share shared_name=path_name.
4.22. Stopping the network sharing of the directory (armnsdel command)
armwsset.exe
Sets the IP address returned by executing gethostbyname() on the local server to the specific application.
4.23. Setting the IP address returned by gethostbyname() (armwsset command)
Commands that can be used only outside scripts
command
Description
Page
armdelay.exe
Sets or refers to the delay time of the EXPRESSCLUSTER service startup on the NEC Express5800/ft series or servers that have equivalent fault-tolerant functions.
4.24. Setting or displaying the start delay time (armdelay command)
armem.exe
Sets or refers to the mode at emergency shutdown.
4.25. Setting or displaying operations at the occurrence of the emergency shutdown (armem command)
armstdn.exe
Shuts down a cluster.
armmode.exe
Returns servers to a cluster.
4.27. Returning the server with the status of "Suspension (isolated)" (armmode command)
mdopen.exe
Permits an access to the mirror disk.
4.28. Permitting an access to the mirror disk (mdopen command)
mdclose.exe
Prohibits an access to the mirror disk.
4.29. Prohibiting an access to the mirror disk (mdclose command)
Important
The installation directory contains executable-format files and script files that are not listed in this guide. Do not execute these files other than EXPRESSCLUSTER. Any problems caused by not using EXPRESSCLUSTER will not be supported.
4.4. Displaying the messages on EXPRESSCLUSTER clients (armbcast command)
the armbcast.exe command displays the messages on EXPRESSCLUSTER clients.
-
Command line -
Format 1 armbcast.exe /ID n /S group_name
-
Format 2 armbcast.exe /MSG msg_strings [/A | /S group_name]
-
-
Description This command displays the default or optional messages on monitors of clients.
-
Parameter -
/ID<n>¶ - Displays a message that corresponds to the ID specified in n. You need to register this message in advance.This parameter cannot be specified with /MSG.
-
/MSG<msg_strings>¶ - Displays a character string msg_strings on clients. The maximum size of a string is 127 bytes.When the character string includes spaces, enclose it in double quotation marks. When you use double quotation marks in the string, describe them as \".This parameter cannot be specified with /ID.
-
/A¶ Displays a message on all clients.
-
/S<group_name>¶ - Displays a message on all clients that use the group specified in group_name.When using a Format 1, you cannot omit this parameter.When using a Format 2, you cannot specify this parameter with /A. You can omit /A and /S. When omitted, /A is assumed to be specified.
-
-
Return Value 0
Success
7
The EXPRESSCLUSTER Server service has not been started.
9
The parameter is invalid.
-
Notes This command cannot be used when recovering servers to a cluster (when the environment variable of start script "CLP_EVENT" is "RECOVER").
-
Remarks This command can be used only in scripts.
4.5. Registering the messages on a log file or an alert log (armlog command)
The armlog exe command registers the messages on a log file or an alert log.
-
Command line armlog.exe log_strings [/arm]
-
Description - This command registers specified messages to a log file or an alert log.The messages are registered on the log file (arm.log) of the server on which this command is run. They are also displayed on the Alert view of the WebManager.
-
Parameter -
<log_strings>¶ - Specifies a message string to be registered.The maximum size of a string is 128 bytes (when a string is displayed on the Alert view, the size is 111 bytes).When the character string includes spaces, enclose it in double quotation marks. When you use double quotation marks in the string, describe them as \".
-
/arm¶ - Displays a message on the Alert view of the WebManager.When this parameter is omitted, a message is registered only to a log file.
-
-
Return Value 0
Success
1
Logs were not registered due to an error.
8
The EXPRESSCLUSTER Server service has not been started.
9
The parameter is invalid.
-
Remarks This command can be specified only in scripts.
4.6. Starting the applications or services (armload command)
the armload.exe command starts applications or services.
-
Command line -
Format 1: application armload.exe watchID [[/U user-name] | [/WINDOW size]] [/WIDKEEP] [/C [CMD]] [<mode>] exec-name [parameter-1 parameter-2 .....]
For <mode>, one of the following can be specified.
/W
/M [/FOV [/CNT count]]
/R retry [/H hour] [/SCR] [/FOV [/CNT count]] [/INT time]
-
Format 2: service armload.exe watchID /S [/A] [/WIDKEEP] [/WAIT time] [/C [CMD]] [<mode>] service-name [parameter-1 parameter-2 .....]
For <mode>, one of the following can be specified.
/M [/FOV [/CNT count]]
/R retry [/H hour ] [/SCR] [/FOV [/CNT count]] [/INT time]
-
-
Description - This command starts applications or services.A failover or restart occurs when the started application or service fails (when specified as a monitoring target). Monitoring failures continues until the application or service is terminated by ARMKILL.A failure is a loss of a process for the application, and a service stop (SERVICE_STOPPED) and abnormal termination for the service.
-
Parameter -
<watchID>¶ - ID for monitoring.This ID is used for terminating the application or service by the ARMKILL command. Be aware of the following notes when using this parameter:
The same IDs cannot be specified within a cluster.
You cannot use IDs starting with "NEC" since those are already allocated (IDs of "NEC_product_name+ something extra" are used for the product programs of NEC).
Specify the ID with alphanumeric characters of up to 255 bytes (case-sensitive).
-
/U<user-name>¶ - Specifies the user account name that runs the application.This parameter is optional. When omitted, the application is started with the local system account.
This parameter cannot be specified in Format 2.
When specifying this parameter, refer to (3) on Note.
-
/WINDOW<size>¶ - Specifies the window size of an application. The following can be specified to size.maximum The application or service starts with windows of a maximum size.normal The application or service starts with windows of a size specified by the application.hide The application or service starts with hidden windows.This parameter is optional. When omitted, the application or service starts with windows of a minimum size.
This parameter cannot be specified in Format 2.
-
/C[CMD]¶ - Specifies the format to pass the parameter-n to the application or service. Specify this option when the parameter-n ends with an escape character (). Refer to the following examples to specify the parameter-n.Example 1) when the command passes
c:\to app.exe.ARMLOAD WatchID /C app.exe c:\Example 2) when the command passesc:\Program Files\to app.exe. Enclosec:\Program Files\in double quotation marks, and add escape characters for the number of escape characters in the end.armload WatchID /C app.exe "c:\Program Files\"Specify "CMD" as well when specifying this parameter and the type of application is command.
-
/WIDKEEP¶ Starts or stops the application or service with no monitoring parameter (/M, /R) specified by using the EXPRESSCLUSTER Task Manager or the ARMLOADC command.
This option is ignored when /W, /M or /R is specified.
-
/W¶ Waits until the execution of the application is terminated. When this parameter is specified, controls are not returned from this command until the application terminates. This parameter is optional.
This parameter cannot be specified with /M or /R.
This parameter cannot be specified in Format 2.
-
/M¶ Monitors the application or service. This parameter is optional. When omitted, monitoring is not performed.
This parameter cannot be specified with /W or /R.
When you use this parameter without specifying /FOV, servers are shut down at failure.
-
/R<retry>¶ Monitors the application or service and specifies the threshold of the restart count. This parameter is optional. When omitted, monitoring is not performed.
The value from 1 through 9 can be specified.
This parameter cannot be specified with /M or /W.
-
/H<hour>¶ Specifies the time to reset the restart count of the application or service to 0. The time can be specified by hours. When the application or service starts and operates normally during the time specified with the /H option, the restart count is reset to 0.
The value from 1 through 24 can be specified.
Restart count is not reset if this parameter is omitted with the parameter /R specified.
-
/SCR¶ When this parameter is specified, the application or service is restarted by scripts. This parameter is optional.
The application or service is restarted by itself if this parameter is omitted with the parameter /R specified.
-
/FOV¶ Fails over groups when the restart count threshold is exceeded on the application or service monitoring. This parameter is optional.
Servers are shut down if this parameter is omitted with the parameter /M or /R specified.
-
/CNT<count>¶ - A failover is not performed when the number of failovers already performed exceeds the count specified by this option. This is to avoid servers from repeating failing over endlessly. The number of failovers is counted for each server.The value from 1 through 255 can be specified.When omitted, 8 is specified.The failover count is reset to 0 on a specific server when:
the normal status continues more than 1 hour
the server is restarted
the failover group is activated
-
<exec-name>¶ Specifies an executable file name.
This parameter cannot be specified in Format 2.
-
<parameter-n>¶ Passed to an executable file. This parameter is optional.
-
/S¶ Specifies that the target to be started is a service.
This parameter cannot be specified in Format 1.
-
/A¶ - Specify this parameter when you want to specify the service as a monitoring target even though it is already started.This parameter is optional.
This parameter cannot be specified in Format 1.
-
/WAIT<time>¶ Specifies the time to wait for the completion of a service startup by the second. When this parameter is specified, this command does not return controls while waiting for the service to complete startup (SERVICE_RUNNING) or within the wait time. This parameter is optional. When omitted, the command does not wait for the completion of a startup.
This parameter cannot be specified in Format 1.
The value from 0 through 3600 can be specified. When 0 is specified, the command waits for the completion of a startup endlessly.
-
/INT<time>¶ Specifies restart interval of the application or service, or scripts by the second. This parameter is optional When omitted, 0 (second) is specified to the restart interval.
This parameter is valid when /R or /SCR option is specified.
The value from 0 through 3600 can be specified.
-
<service-name>¶ Specifies the service name.
This parameter cannot be specified in Format 1.
For service-name, specify one of the following:
Specify the service name that is displayed on the Services on the Administrative Tools.
Specify xxxx that matches with the service name displaying "DisplayName", the key of xxxx of the following registry in Services on Administrative Tools.
HKEY_LOCAL_MACHINE\SYSTEM\CurrentControlSet\Services\xxxx
Example) For FTP service of IISName displayed on the Service window
FTP Publishing Service
Name displayed on the registry
...\Services\MSFTPSVC
DisplayName:REG_SZ: FTP Publishing Service
Format:armload WatchID /S "FTP Publishing Service"
orarmload WatchID /S MSFTPSVC
-
-
Return Value 0
Success (the target application or service has started)
1
Cannot start the target application or service
2
Cannot perform process monitoring
3
The specified watchID is already used.
4
Time-out occurred while waiting for the service to complete startup (the service is starting up).
8
The EXPRESSCLUSTER Server service is not started.
9
The parameter is invalid.
-
Remarks This command can be used only in scripts.
Multiple parameters can be specified for a command that is passed to an executable file.
The figure below indicates operations performed when the application or service started by ARMLOAD fails.
The application or service is started by ARMLOAD
A failure occurs
Threshold check
When the threshold is not exceeded, the application or service is restarted by scripts.
4-1: Stop script execution 4-2: Start script execution
When the threshold is exceeded, a failover occurs or a server shuts down
5-1: Stop script execution 5-2: Fails over to another EXPRESSCLUSTER server
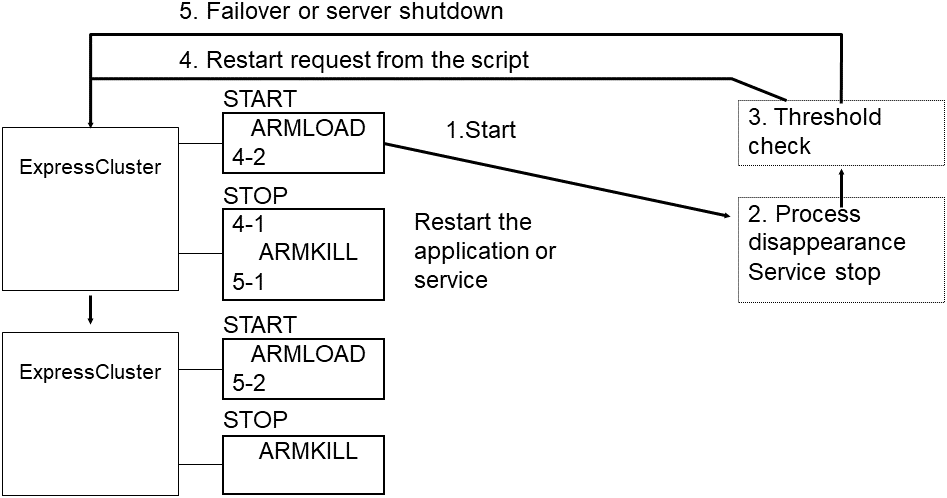
-
Notes This command can be specified only in scripts.
When you start the application with GUIs without specifying an account, select Allow service to interact with desktop on the EXPRESSCLUSTER Server service. When not selected, GUIs of the application are not displayed.
- When you specify a user account, it should have "local logon" permission. For information on the user permissions, see the help of the domain user administrator.When you specify the domain of an account explicitly, specify the following. Note that the domain name and the user name should be within 15 characters.
When the account is a local administrator
armload watchid /u administrator ap.exe
When the account is a domainadministrator
armload watchid /u domain\administrator ap.exe
- When you use the monitoring function (/M option) of the ARMLOAD command, make the setting so that the debugger is not automatically started, nor monitoring processing is prevented.
- Applications not suitable for ARMLOAD monitoring functionThe applications whose processes do not stay resident persistently are not suitable for the process monitoring (*). Since the process monitoring is assumed to monitor processes that stay persistently and do not terminate by themselves, it determines that an error occurs on an application when the started process is terminated.(*) The following applications are examples:An application whose process started by ARMLOAD does not stay resident persistentlyAn application whose process started by ARMLOAD starts its child process, and the process started first does not stay resident persistently (ARMLOAD only monitors the process it started)
The application that requires GUIs may be terminated when it is started by the ARMLOAD command and logged off. To prevent the application from being terminated, start it with an account (/U option).
If you use this command with the [/U] option and any account other than built-in Administrator, the command might fail.
- If you use this command with the [/S] option, it is recommended to set the recovery operation not to be performed by the service control manager so that applications other than EXPRESSCLUSTER will not control services.If a service is set to restart upon the recovery operation by the service control manager, an unexpected action might be performed due to duplication with the recovery operation by EXPRESSCLUSTER.
-
Limitations The ARMLOAD command with an account cannot be used in a batch program that is run with an account.
The application that is run with an account (including a child process) cannot use the LogonUser() function.
Do not execute a 16-bits application since it cannot be terminated by the ARMKILL command.
- When including spaces in a parameter, enclose it in quotation marks.Example)
ARMLOAD Wid1 "\Program Files\Application.exe" Only the process that is started by the ARMLOAD command can be terminated by the ARMKILL command.
Do not run the applications (XXXX.EXE) that EXPRESSCLUSTER provide.
The ARMLOAD command may terminate abnormally (return value 1: Cannot start the target application or service) if the application with an account is started while it cannot access the domain controller (due to a failed server or network disconnection, etc.).
4.7. Terminating the application or service (armkill command)
the armkill exe command terminates the application or service.
-
Command line armkill.exe watchID [/C | /T time]
-
Description - This command terminates the application or service that was started up by the ARMLOAD command.When one service is operated (monitoring target) with several ARMLOAD commands (when several ARMLOAD commands with /A option operate one service), the service is not terminated until ARMKILL is run for all watchID.
-
Parameter -
<watchID>¶ - Specifies the monitoring ID of the application or service you want to terminate.Use the ID specified when the application or service was started up by the ARMLOAD command.
-
/C¶ - Cancels the monitoring of the application or service but does not terminate the application or service.This parameter is optional. When omitted, the application or service is terminated. This parameter cannot be specified with the /T parameter.Do not use this option when stopping an application that was started by specifying the /U option of the ARMLOAD command.
-
/T<time>¶ - Sets the termination wait time of the application or service.The range that can be specified is from 0 to 3600 seconds. If 0 is specified, the command waits for the completion of termination of the application or service endlessly. This parameter is optional. When omitted, the wait time is set to 40 seconds. This parameter cannot be specified with the /C parameter.
-
-
Return Value 0
Success (the target application or service was terminated).
1
The application or service has already been terminated.
2
The application or service was not terminated.
(The application or service is being terminated.)
8
The EXPRESSCLUSTER Server service has not been started.
9
The parameter is invalid.
-
Remarks This command can be specified only in scripts.
To terminate the application, this command sends the WM_CLOSE message to it. If the application does not terminate within the specified time (/T time), this command executes the TerminateProcess() for the target application to forcibly terminate the application process.
To terminate the service, the requirement to stop the service is sent to the service control manager (SCM). When terminating the service has not been completed within the specified time (/T time), the return value of 2 is returned.
If /C is specified on this command, the application or service cannot be terminated by ARMKILL.
4.8. Waiting for the start or stop of groups (armgwait command)
the armgwait.exe command waits for the start or stop of groups.
-
Command line armgwait.exe group_name [time-out] [/stop]
-
Description - This command waits for the start or stop of groups.This command waits until the status of a group becomes active (when waiting for activation) or inactive (when waiting for termination), or until the specified time is exceeded.
-
Parameter -
<group_name>¶ Specifies a name of the group whose completion of start or stop the command waits for.
-
<time-out>¶ - Specifies the time-out by the second.When this parameter is omitted, the time-out value is set to default (120 seconds).
-
/stop¶ - Waits until the group is terminated.When this parameter is omitted, this command waits for the startup of the group.
-
-
Return Value 0
The status of the failover group is active or inactive.
1
The time-out has elapsed.
7
The EXPRESSCLUSTER Server service has not been started.
8
The specified group does not exist.
9
The parameter is invalid.
-
Notes Do not run this command directly from the start or stop script. When using this command from those scripts, prepare the batch file on which the command is described, and then run the batch file on the start or stop script by writing "START batch_file_name" on it.
-
Remarks This command can be run only in scripts. Follow the process on Note when using this command on the start or stop script.
4.9. Exclusive control between servers command (armcall command)
the armcall.exe command runs commands or programs exclusively on nodes.
-
Command line armcall.exe [/L lockname ] exec_name [parameter ...]
-
Description This command executes a program from a script without terminating it, and returns the control to the script that is invoked again. This program is executed exclusively between nodes.
-
Parameter -
/L<lockname>¶ - Specifies the lock name. When this option is omitted, "Default" is specified for the name.The commands are run exclusively for each lock name specified by this parameter.
-
<exec_name>¶ Specifies the command or program to be run.
-
<parameter...>¶ Specifies the command line information required to run the program specified in exec_name.
-
-
Return Value 0
Success
8
The program was not run due to an error.
9
The parameter is invalid.
-
Remarks This command can be run only in scripts.
-
Examples - When the process <A> must be run on all nodes, and the running of process <A> must be exclusive between nodes:
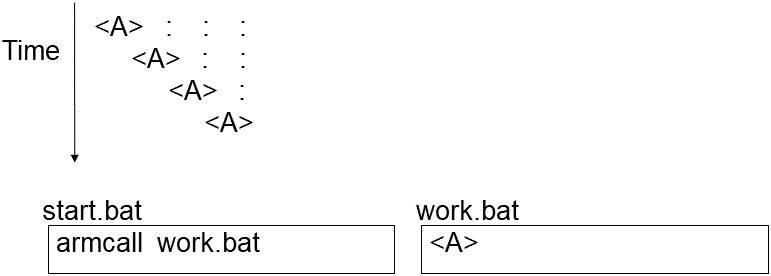 When the process <A> should be run only on one node and the process <B> should be run at all nodes, and the process <B> must be started after the completion of the process <A>.
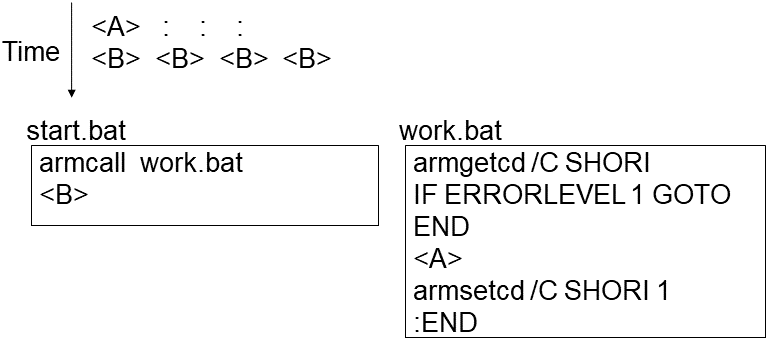
4.10. Retrieving the cluster wide variable or local variable (armgetcd command)
the armgetcd.exe command retrieves the cluster wide variable or local variable.
-
Command line armgetcd.exe [/C] variable
-
Description This command retrieves the setting value of the cluster wide variable or local variable specified by the armsetcd command.
-
Parameter -
/C¶ Retrieves the setting value of the cluster wide variable. When this parameter is omitted, the value of the local variable is retrieved.
-
<variable>¶ Specifies the variable name set by the armsetcd command.
-
-
Return Value 0
The value could not be retrieved due to an error.
1-255
The value set by the armsetcd command is returned.
-
Remarks - This command can be specified only in scripts.If you specify the variable name which is not set by the armsetcd command, 0 is returned.
4.11. Setting the cluster wide variable or local variable (armsetcd command)
The armsetcd.exe sets the cluster wide variable or local wide variable.
-
Command line armsetcd.exe [/C] variable value
-
Description - This command sets the cluster wide variable or the local variable.The setting value of the variable set by this command can be referred by using the armgetcd command on the same or other scripts.The cluster wide variable is shared between servers in a cluster. The variable set by the armsetcd command on one server can be referred or changed on another server.The local variable is valid only on the server on which the armsetcd command is run.
-
Parameter -
/C¶ - Sets the variable as a cluster wide variable.When this parameter is omitted, the variable is set as a local variable.
-
<variable>¶ - Specifies the name of the variable to be set. Specify the name with up to 127 alphanumeric characters.(The name is case-sensitive.)
-
<value>¶ Specifies the value to be set to the variable on variable in integers from 1 through 255.
-
-
Return Value 0
Success
8
The variable was not set due to an error.
9
The parameter is invalid.
-
Remarks - This command can be run only in scripts.Variable names are controlled separately for the cluster wide variable and the local variable. Thus, you can set both variables with one variable name. In this case, those are operated as two different variables.The local variable is valid until the EXPRESSCLUSTER Server service of the server on which this command was run is terminated.The cluster wide variable is valid until the EXPRESSCLUSTER Server services of all servers in a cluster are terminated.
4.12. Monitoring errors on the connection to the shared resources (armwhshr command)
the armwhshr.exe command monitors errors on the connection to the shared name.
-
Command line armwhshr.exe share-name ip-addr [/INT time] [/LOG log-strings] [/PROC exec-name parameter-1 parameter-2 ... parameter-n]
-
Description - This command monitors errors on the connection to the shared name.It checks if the ping is reached to the specified shared name server or monitors the connection error to the shared name. It registers the event log (ID:3514) when the ping is reached normally and an error occurred while connecting to the shared name.However, the event log is not registered when the connection error is already detected. It is registered when the status of connection changes from normal to error.With options, this command sends messages to the WebManager and starts specified executable files.
-
Parameter Specifies a shared name (UNC name).
-
<ip-addr>¶ Specifies the IP address of a server that possesses shared name.
-
/INT<time>¶ - Specifies monitoring interval (by the second).The range which can be specified is from 30 through 86400. This parameter is optional.When omitted, 180 (sec) is set for the interval.
-
/LOG<log-strings>¶ Specifies the character string to be reported to the WebManager when an error occurs on the connection to a shared name. It is reported to the WebManager every time an error on the connection to the shared name is detected. Maximum of 111 bytes can be specified for the string. If the string includes spaces, enclose it in double quotation marks. When you use the double quotation marks in the strings, describe them with \ ("). This parameter is optional.
-
/PROC<exec-name>¶ Specifies the name of an executable file that is started when an error occurs on the connection to the shared name. The executable file is started when the status of shared name connection changes from normal to abnormal. This parameter is optional.
-
<parameter-n>¶ This parameter is passed to the executable file. This parameter is optional.
-
Return Value 0
Success
1
The parameter is invalid.
2
Insufficient memory
8
The EXPRESSCLUSTER Server service has not been started.
-
How to use When using the ARMWHSHR command, configure the following settings.
- Registering the user accountRegister the user account with an administrator right.
- Describing the ARMWHSHR command in scriptsCreate a new failover group for monitoring errors on the connection to the shared name(*), and describe the ARMWHSHR command in scripts.
* Setting a failover group
Add only one server to the Servers that can run the Group by clicking the Startup Server tab on the Group Properties.For example, to monitor errors on the connection to the shared name (temp) of the server (server name: server public LAN IP address: 100.100.100.1), describe the following in the start script:(Lines in the script that is run when CLP_EVENT is START)ARMLOAD watchID /U Administrator ARMWHSHR \\server\temp 100.100.100.1
Describe the following in the stop script(Lines in the script that is run when CLP_EVENT is START)ARMKILL watchID
-
Usage example This command is used to confirm whether the local disk of the server can be accessed from the network. On the cluster system with 2 servers, accessibility to local disks on both servers from the network can be checked by monitoring another server from both servers. The following indicates the examples of configuration and script descriptions.
Example
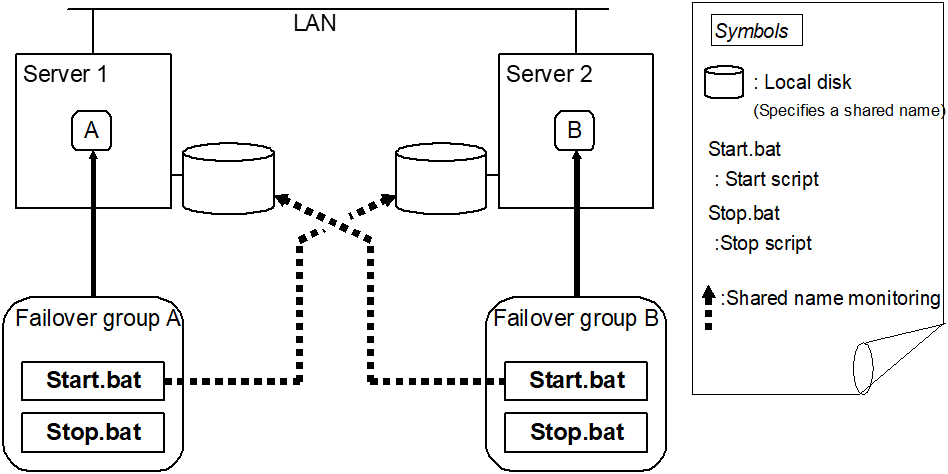
Server Information:
Server1
Server2
Server name
server1
server2
Public LAN IP address
100.100.100.1
100.100.100.2
Shared name
(1)share1
(1)share2
(2)share3
-
Script example Start.bat of Server 1
IF "%CLP_EVENT%" == "START" GOTO NORMAL
GOTO EXIT
:NORMAL
ARMLOAD W1 /U Administrator ARMWHSHR \\server2\share2 100.100.100.2
:EXIT
EXIT
Stop.bat of Server 1
ARMKILL W1
EXIT
Start.bat of Server 2
IF "%ARMS_EVENT%" == "START" GOTO NORMAL
GOTO EXIT
:NORMAL
ARMLOAD W2 /U Administrator ARMWHSHR \\server1\share1 100.100.100.1
ARMLOAD W3 /U Administrator ARMWHSHR \\server1\share3 100.100.100.1
:EXIT
EXIT
Stop.bat of Server 2
ARMKILL W2
ARMKILL W3
EXIT
-
-
Notes This command can be specified only in scripts.
4.13. Controlling the applications or services started by the armload command (EXPRESSCLUSTER Task Manager)
the armaswth.exe command lists applications or services started by the armload command in GUI.
-
Command line armaswth.exe
-
Description This command lists the applications or services started by the armload command in GUI. In addition, it can start or stop the applications or services, and suspend or resume the monitoring in the same way as the armload command.
-
Remarks This command can be specified both in and outside scripts.
-
Screen image 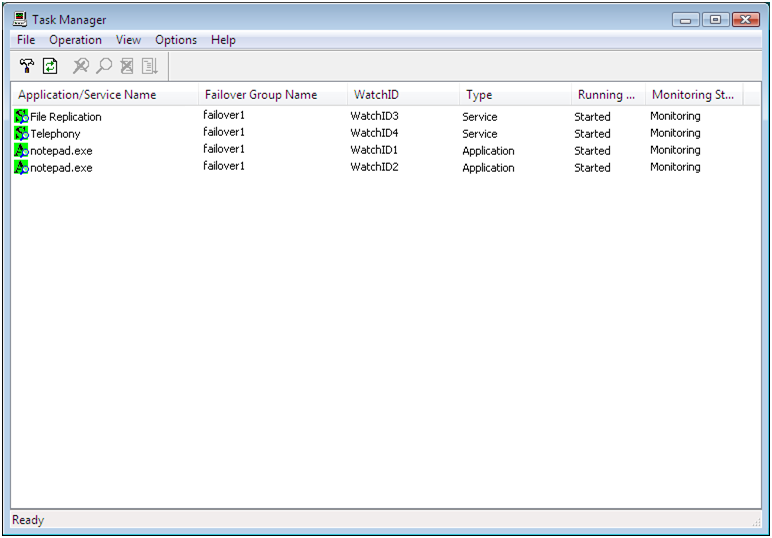
-
Description - Application/Service NameDisplays the names of applications or services started by the ARMLOAD command. Icons indicate the following status:
 : Application that is not monitored
 : Application that is being monitored
 : Application that is not a monitoring target
 : Service that is not monitored
 : Service that is being monitored
 : Service that is not a monitoring targetBackground colors of icons indicate the following status:
 : Started / Being started
 : Stopped / Being stopped
 - Failover Group NameDisplays the group names that the started applications or services belong to
- TypeDisplays the types (application or service)
- Running StatusStarted: Application or service has startedStopped: Application or service has not startedStarting: Application or service is being startedStopping: Application or service is being stopped
- Monitoring statusMonitoring: Application or service is being monitoredNot monitoring: Application or service is not being monitoredNot monitored: Application or service is not a monitoring target (is not set as a monitoring target but started by the ARMLOAD command)
-
Sort Click any of Application/Service Name, Failover Group Name, WatchID, Type, Running Status, or Monitoring Status to sort the list into ascending or descending order of the clicked item.
-
Operation - Same as the ARMLOADC command, four operations of monitoring stop, monitoring resume, stop, start can be performed. Operations that can be performed vary depending on the status of the application or service start and the monitoring. For details, see "ARMLOADC command."Select the application on the list (you cannot select multiple applications), and operate it by one of the following ways:
Operation menu
Toolbar
- Shortcut menu displayed by right-clicking the application name (shown below)
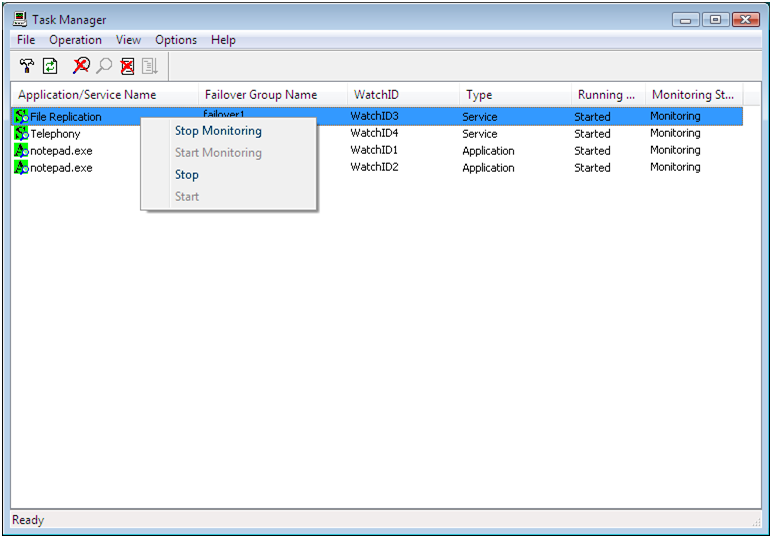
-
Settings To configure the settings, click Settings on the Option menu or on the toolbar.
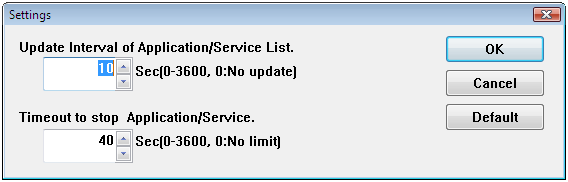
-
Update Interval of Application/Service List Specify the interval to automatically update the application or service list by the second. The value from 0 through 3600 can be specified. When 0 is set, the list is not updated automatically. The default is 10 (seconds).
-
Timeout to stop Application/Service Specify the wait time to stop when stopping the application or service by the second. The value from 0 through 3600 can be specified. When 0 is set, the termination of the application or service is waited endlessly. The default is 40 (seconds). If the application or service is not stopped after the stop time is exceeded, the application is forcibly stopped. This setting is used only when the application or service is stopped by the EXPRESSCLUSTER Task Manager.
-
4.14. Shutting down the server (armdown command)
the armdown.exe command shuts down the server.
-
Command line armdown.exe [reboot | off | stop]
-
Description This command stops the EXPRESSCLUSTER service of the server on which this command is run, and shuts down the server.
-
Parameter -
Noparameter¶ Shuts down the server and turns off the power.
-
reboot¶ Shuts down the server and reboots it. This parameter cannot be specified with "OFF" or "stop" parameter.
-
off¶ Shuts down the server and turns off the power. This parameter cannot be specified with "reboot" or "stop" parameter.
-
stop¶ - Stops the EXPRESSCLUSTER Server service without shutting down the server.This parameter cannot be specified with "reboot" or "OFF" parameter.
-
-
Return Value 0
Success (The server shutdown has started).
8
The EXPRESSCLUSTER Server service is not running.
9
The parameter is invalid.
-
Notes Do not run this command directly from the start or stop script. When using this command from those scripts, prepare the batch file on which the command is described, and then run the batch file on the start or stop script by writing "START batch_file_name" on it.
-
Remarks - This command can be specified both in and outside scripts. When running this command on the start or stop script, follow the steps on Notes.To shut down whole cluster normally, run the armstdn command.
4.15. Moving or failing over a group (armfover command)
the armfover.exe command moves or fails over a group
-
Command line armfover.exe [/F] group_name
-
Description - This command moves or fails over a group.A group is moved or failed over to the server next to the current server, in ascending order, on which the group can be started. If a subsequent server does not exist, the group is moved or failed over to the first server.
-
Parameter -
/F¶ - Fails over a group.When this parameter is omitted, a group is moved.When a group is failed over, "FAILOVER" is set to the environment value of the start script "CLP_EVENT" on the destination server.When a group is moved, "START" is set to the environment value of the start script "CLP_EVENT" on the destination server.
-
<group_name>¶ Specifies the name of the group to be moved or failed over.
-
-
Return Value 0
Success (the group was moved or failed over).
7
The specified group has not been started.
8
The EXPRESSCLUSTER Server service has not been started.
9
The parameter is invalid.
-
Notes Do not run this command directly from the start or stop script. When using this command from those scripts, prepare the batch file on which the command is described, and then run the batch file on the start or stop script by writing "START batch_file_name" on it.
-
Remarks This command can be specified both in and outside scripts. When running this command on the start or stop script, follow the steps on Notes.
4.16. Starting a group (armgstrt command)
the armgstrt.exe command starts a group
-
Command line armgstrt.exe group_name [host_name]
-
Description This command starts a group on a specified server
-
Parameter -
<group_name>¶ Specifies the name of a group to be started
-
<host_name>¶ Specifies the name of a server on which a group is started. When this parameter is omitted, the server is determined according to a group failover policy.
-
-
Return Value 0
Success
1
The status on which the specified operation is not available.
(checking if the shared disk is powered on or not)
7
The specified group has already been started.
8
The EXPRESSCLUSTER Server service has not been started.
9
The parameter is invalid.
-
Notes Do not run this command directly from the start or stop script. When using this command from those scripts, prepare the batch file on which the command is described, and then run the batch file on the start or stop script by writing "START batch_file_name" on it.
-
Remarks This command can be specified both in and outside scripts. When running this command on the start or stop script, follow the steps on Notes.
4.17. Stopping a group (armgstop command)
the armgstop.exe command stops a group
-
Command line armgstop.exe group_name
-
Description This command stops a group.
-
Parameter group_name Specifies the name of a group to be stopped.
-
Return Value 0
Success
7
The specified group has not been started.
8
The EXPRESSCLUSTER Server service has not been started.
9
The parameter is invalid.
-
Notes Do not run this command directly from the start or stop script. When using this command from those scripts, prepare the batch file on which the command is described, and then run the batch file on the start or stop script by writing "START batch_file_name" on it.
-
Remarks This command can be specified both in and outside scripts. When running this command on the start or stop script, follow the steps on Notes.
4.18. Starting or stopping the application or service, suspending or resuming the monitoring (armloadc command)
the armloadc.exe command starts or stops the application or service, or suspends or resumes the monitoring.
-
Command line armloadc.exe watchID /W mode [/T time]
-
Description - This command starts or stops the application or service, or suspends or resumes the monitoring.This command terminates when the operations of starting or stopping the application or service is completed.
-
Parameter -
<watchID>¶ This ID is for monitoring. Specify the ID used when the application or service is started by the ARMLOAD command.
-
/W<mode>¶ - Controls the monitoring.The following values can be specified for mode.
<mode>
- pauseSuspends the monitoring of the application or service.
- continueResumes the monitoring of the application or service. When the application or service has terminated, the monitoring is resumed after a startup.
- startStarts the application or service.
- stopTerminates the application or service. When the application or service is being monitored, it is terminated after suspending the monitoring.
-
/T<time>¶ This parameter is valid when "continue," "start" or "stop" is specified to mode of /W mode.
- When "continue" or "start" is specified to mode of /W mode:Specifies the wait time to start the service (this parameter is invalid for the application). The value from 0 through 3600 (seconds) can be specified. When 0 is specified, the command waits for the startup of the service endlessly. This parameter is optional. When omitted, the command only starts the service and returns the control without waiting for completion of start.
- When "stop" is specified to mode of /W mode:Specifies the wait time to stop the service. The value from 0 through 3600 (seconds) can be specified. When 0 is specified, this command waits for the termination of the application or service endlessly. This parameter is optional. When omitted, the command waits for maximum of 40 seconds.
-
-
Return Value 0
Success
1
The status is invalid.
2
The application or service was not stopped.
(The application or service is being started or stopped.)
7
An error occurred in WIN32API.
9
The parameter is invalid.
-
Remarks This command can be specified both in and outside scripts.
To terminate the application, send WM_CLOSE message to the application. When the application is not terminated within the specified time (/T time), run TerminateProcess() to forcibly terminate the application process.
To start or stop the service, send requests for start or stop of the service to the service control manager (SCM). When the start or stop has not been completed within the specified time (/T time), the return value of 2 is returned.
Refer to the table below for the values that can be specified in mode. If mode is invalid, the return value of 1 is returned.
-
Notes Before stopping the service (mode = stop), suspend the monitoring of watchID (mode=pause) which is monitoring the same service name, if any. A service error is detected (event ID=3506 - 3510) if the service is stopped without suspending the monitoring.
Application/Service specification matrix
Status
Monitoring
Suspending monitoring
Mode
Started
Starting
Terminating
Terminated
Started
Starting
Terminating
Terminated
pause
O
O
X
-
X
X
X
X
continue
X
X
X
-
O
O
O 11
O 11
start
X
X
X
-
X
X
X
O
stop
O 10
O
X
-
O
O
X
X
O: Executable X: Not executable (Invalid status) :This combination does not exist.
4.19. Suspending the script execution until the user's direction (armpause command)
the armpause.exe command displays a message box, and suspends the script execution until the user clicks OK.
-
Command line armpause.exe msg_strings
-
Description This command displays the message box and suspends the script execution. When the user clicks OK in the message box, script execution is resumed.
-
Parameter -
<msg_strings>¶ Specifies the character string to be displayed on the message box. Maximum of 128 bytes can be specified.
-
-
Return Value 0
Displaying the message was terminated.
1
The message cannot be displayed.
9
The parameter is invalid.
-
Notes To use this command in scripts, select Allow service to interact with desktop on the properties of the EXPRESSCLUSTER Server service.
-
Remarks This command can be specified both in and outside scripts.
4.20. Suspending the script execution for the specified time (armsleep command)
the armsleep.exe command suspends the script execution until the specified time is exceeded.
-
Command line armsleep.exe seconds
-
Description This command suspends the script execution until the specified time is exceeded.
-
Parameter -
<seconds>¶ Specifies the time to suspend the script execution by the second.
-
-
Return Value 0
Success
9
The parameter is invalid.
-
Remarks This command can be specified both in and outside scripts.
4.21. Starting the network sharing of the directory (armnsadd command)
the armnsadd.exe command starts the network sharing of the directory.
-
Command line armnsadd.exe share_name path
-
Description This command starts the network sharing of the directory. This is the same function as "net share shared_name=path_name."
-
Parameter Specifies the shared name of the network sharing to be started.
-
<path>¶ Specifies the directory to be shared by entering full path.
-
Return Value 0
Success
1
The parameter is invalid.
2
The path name cannot be found.
3
The shared name is invalid.
5
No access right.
7
Insufficient memory.
8
Already shared by the same shared name.
9
Other error
-
Remarks - This command can be specified both in and outside scripts.When using the net share command, it waits for the entry on the console when the shared name of more than 8 characters is specified. Thus, it is not suitable to be used in scripts. In such a case, use this command instead of the net share command.
4.22. Stopping the network sharing of the directory (armnsdel command)
the armnsdel.exe command starts the network sharing of the directory.
-
Command line armnsdel.exe share_name
-
Description This command stops the network sharing of the directory. This is the same function as "net share shared_name/delete."
-
Parameter Specifies the shared name of the network sharing to be stopped.
-
Return Value 0
Success
1
The parameter is invalid.
5
The access was denied.
8
Insufficient memory
2310
The shared name cannot be found.
-
Remarks - This command can be specified both in and outside scripts.The net share command waits for the entry on the console depending on the status of connection to the clients when the network sharing is stopped. In such a case, use this command instead of the net share command. This command stops the network sharing regardless of the status of connection to the clients.
4.23. Setting the IP address returned by gethostbyname() (armwsset command)
the armwsset.exe command sets the IP address returned by the gethostbyname() executed on the local server.
-
Command line -
Format1 armwsset.exe [/P] <path> [<ip_address> ...]
-
Format2 armwsset.exe /L
-
Format3 armwsset.exe /DEL
-
-
Description - This command sets the IP address returned by the gethostbyname() executed on the local server.Use this command when you want to return the virtual IP address as a local server's IP address that the application retrieves.
-
Parameter -
/P¶ - If this parameter is specified, settings are not deleted at system reboot. The settings are maintained after the system is restarted.When this parameter is omitted, settings are deleted at system reboot.
-
<path>¶ Specifies the full path to the executable file of the target application.
-
<ip_address...>¶ - Specifies the IP address returned by the gethostbyname().More than one IP address can be specified by separating them by spaces.When multiple addresses are specified, those are set in the array returned by gethostbyname() in the described order.When this parameter is omitted, the settings of the application specified by path are deleted.
-
/L¶ Lists the current settings.
-
/DEL¶ Deletes all current settings.
-
-
Return Value 0
Success
1
Failed to configure the settings.
-
Notes - The settings by this command function only when the application downloads wsock32.dll directly as a socket library. They do not function when the application uses ws2_32.dll.Run this command before starting the application.To use this command, execute the following steps for each application in advance.
Copy wsock32.dll that is included with OS and stored in
%SystemRoot%\system32to the stored directory for the application program, and change the name to "wsock__.dll."Copy wsock32.dll stored in the accessories folder under the EXPRESSCLUSTER installation directory to the stored directory of the application program.
Execute the steps above on all servers that run the application.
-
Remarks This command can be specified both in and outside scripts.
4.24. Setting or displaying the start delay time (armdelay command)
the armdelay.exe command sets or displays the delay time at the EXPRESSCLUSTER service startup.
-
Command line armdelay.exe /N [seconds]
-
Description This command sets or displays the delay time at startup of the EXPRESSCLUSTER Server service or the EXPRESSCLUSTER Disk Agent service.
-
Parameter -
/N[seconds]¶ - Sets or displays the delay time at startup of the EXPRESSCLUSTER Server service or the EXPRESSCLUSTER Disk Agent by the second. These services are started after the delay time is exceeded.For seconds, the value from 0 through 3600 can be specified.When seconds is omitted, the current setting values are displayed.
-
-
Return Value 0
Success
7
An error occurred in WIN32API.
9
The parameter is invalid.
-
Remarks - This command can be specified only outside scripts.The default value of the delay time immediately after the installation is 0 second.The delay time specified by this command is valid until the EXPRESSCLUSTER Server is uninstalled.The delay time must be set for each server. The setting values are valid only on the server on which this command was run.Normally, changing the delay time is not required. Setting the delay time is needed when using the EXPRESSCLUSTER on the fault-tolerant servers such as NEC Express5800/ft series.
4.25. Setting or displaying operations at the occurrence of the emergency shutdown (armem command)
the armem.exe command sets or displays the operation mode at the occurrence of emergency shutdown.
-
Command line armem.exe /M [shutdown | reboot | poweroff]
-
Description This command sets or displays the operation mode at the occurrence of the emergency shutdown.
-
Parameter -
/M<mode>¶ <mode>
- (None)Displays the current operation mode.
- shutdownThis parameter is for compatibility. It functions in the same way as the poweroff parameter.
- rebootReboots the server after shutdown.
- poweroffPowers off the server after shutdown.
-
-
Return Value 0
Success
7
An error occurred in WIN32API.
9
The parameter is invalid.
-
Remarks - This command can be specified only outside scripts.The default value of the operation mode immediately after the installation is "shutdown."The operation mode specified by this command is valid until the EXPRESSCLUSTER Server is uninstalled.The operation mode must be set for each server. The setting values are valid only on the server on which this command was run.
4.26. Shutting down the whole cluster (armstdn command)
the armstdn.exe command shuts down the whole cluster.
-
Command line armstdn.exe [reboot | off | stop]
-
Description This command stops the EXPRESSCLUSTER service in the whole cluster, and shuts down all servers.
-
Parameter -
Noparameter¶ Powers off the server after shutdown.
-
reboot¶ - Reboots the server after shutdown.This parameter cannot be specified with the off or stop parameter.
-
off¶ - Powers off the server after shutdown.This parameter cannot be specified with the reboot or stop parameter.
-
stop¶ - Stops only the EXPRESSCLUSTER Server service without shutting down the server.This parameter cannot be specified with the reboot or off parameter.
-
-
Return Value 0
Success
8
The EXPRESSCLUSTER Server service is not running.
9
The parameter is invalid.
-
Notes - Servers which cannot be communicated from the server on which this command was run are not shut down.Do not run this command while activating a group. Since a group cannot be inactivated while being activated, an emergency shutdown is executed.
-
Remarks This command can be specified only outside scripts.
4.27. Returning the server with the status of "Suspension (isolated)" (armmode command)
the armmode.exe command returns the server whose status is "Suspension (isolated)" to the normal status.
-
Command line armmode.exe [/F]
-
Description - This command returns the server whose status is "suspension (isolated)" to the normal status.Run this command on the server whose status is "suspension (isolated)."
-
Parameter No parameter Returns the server
-
/F¶ - This parameter is for compatibility.When specified, the command functions in the same way when no parameter is specified.
-
-
Return Value 0
Success
1
The status of the server is not "Suspension (isolated)."
8
The EXPRESSCLUSTER Server service is not running.
9
The parameter is invalid.
-
Remarks - This command can be specified only outside scripts.When the server did not shut down normally, the status of the server becomes "Suspension (isolated)" at the next server startup. On the server of that status, activating a group is prohibited. Activating a group becomes possible after returning the server to the normal status by this command.
4.28. Permitting an access to the mirror disk (mdopen command)
the mdopen.exe command permits an access to the mirror disk.
-
Command line mdopen.exe mirrordisk_alias
-
Description - Normally, the mirror disk is accessible only when the resource is activated. In other cases the access is prohibited.This command permits the access to the inactivated mirror disk.
-
Parameter -
<mirrordisk_alias>¶ Specifies the mirror disk resource name to which you want to permit the access.
-
-
Return Value 0
Success
1
The parameter is invalid.
2
The mirroring is in progress. The access cannot be permitted.
3 or larger
Other error (possible causes are described below)
The Replicator/Replicator DR is not used.
There is a task accessing the target mirror disk resource.
Internal error
-
Notes When accessing the mirror disk is permitted by using this command, be sure to prohibit the access using the mdclose command before recovering the mirror.
-
Remarks - This command can be specified only outside scripts.This command is available only when the Replicator/Replicator DR is used.This command is for executing the snapshot backup by a batch processing. For details on the snapshot backup, see "Performing a snapshot backup" in "The system maintenance information" in the "Maintenance Guide".
4.29. Prohibiting an access to the mirror disk (mdclose command)
the mdclose.exe command prohibits an access to the mirror disk.
-
Command line mdclose.exe mirrordisk_alias
-
Description - This command prohibits the access to the mirror disk that is permitted by the mdopen command.Do not run this command when there is no task accessing the specified mirror disk resource.
-
Parameter -
<mirrordisk_alias>¶ Specifies the name of a mirror disk resource to which you want to prohibit the access.
-
-
Return Value 0
Success
1
The parameter is invalid.
2 or larger
Other error (possible causes are described below)
The Replicator/Replicator DR is not used.
There is a task accessing the target mirror disk resource.
Internal error
-
Notes When accessing the mirror disk is permitted using the mdopen command, be sure to prohibit the access using this command before recovering the mirror.
-
Remarks - This command can be specified only outside scripts.This command is available only when the Replicator/Replicator DR is used.This command is for executing the snapshot backup by a batch processing. For details on the snapshot backup, see "Performing a snapshot backup" in "The system maintenance information" in the "Maintenance Guide".
4.32. Error messages of the compatible commands
Message |
Description |
Solution |
|---|---|---|
armbcast succeeded. |
armbcast succeeded. |
- |
armbcast has received an invalid parameter. |
armbcast received an invalid parameter. |
Specify the valid input parameter. |
armbcast failed in the internal processes (1%03d). The error code is 0x%x. |
armbcast T failed in the internal processing. |
Check if the memory is sufficient and/or OS is stable. |
Cannot execute armbcast. |
armbcast cannot be executed. |
armbcast cannot be used when the arms_event of the start script is in the recover status. This is because the server is recovering the cluster. |
armcall succeeded. command name=%.16s. |
armcall succeeded. |
- |
armcall has received an invalid parameter. |
armcall received an invalid parameter. |
Specify an valid input parameter. |
armcall failed to lock the file. |
armcall failed to acquire the privilege to write lock for exclusive access control. |
Check if the memory is sufficient
and/or OS is stable.
|
armcall received a console close signal. The server will be shut down. |
The server was shut down because the armcall console window was closed by a user's request. |
- |
armcall failed in the internal processes ("%03d"). The error code is 0x%x. |
armcall failed in the internal processing. |
Check if the memory is sufficient and/or OS is stable. |
armcall failed to execute the command line. The error code is 0x%x. |
Execution of exec-name specified in the command line of armcall failed. |
Check if the valid values are specified for the path name, file name and parameter-n in the command lines. |
armdown succeeded. option=%s. |
armdown succeeded. |
- |
armdown has received an invalid parameter. option=%s. |
armdown received an invalid parameter. |
Specify an valid input parameter. |
armdown shuts down the server. option=%s. |
armdown started a server shutdown. |
- |
armdown cannot execute specified action. option=%s |
armdown cannot be executed. |
The server may have failed. Check it. |
armdown failed in the internal processes (%03d). The error code is 0x%x.option=%s |
armdown failed in the internal processing. |
Check if the memory is sufficient and/or OS is stable. |
armem succeeded.
mode=%.
|
armem succeeded. |
- |
armem has received an invalid parameter. |
armem received an invalid parameter. |
Specify a valid input parameter. |
armdown failed in the internal processes (%04d). The error code is 0x%x.option=%s |
armem failed in the internal process. |
Check if the memory is sufficient and/or OS is stable. |
armforver succeeded.
option=%s group-name=%s
|
armforver succeeded. |
- |
armforver has received an invalid parameter.
option=%s group-name=%s
|
armforver received an invalid parameter. |
Specify a valid input parameter. |
Cannot execute armfover .
option=%s group-name=%s
|
armforver cannot be executed. |
Check if the failover group is being stopped or is already stopped. |
armfover failed in the internal processes (1%03d). The error code is 0x%x.option=%s.group-name=%s. |
armforver failed in the internal process. |
Check if the memory is sufficient and/or OS is stable. |
armgetcd succeeded. |
armgetcd succeeded. |
- |
armgetcd has received an invalid parameter. |
armgetcd received an invalid parameter. |
Specify a valid input parameter. |
armgetcd received a console close signal. The server will be shut down. |
The server was shut down. This is because the console window of armgetcd was closed by a user's request. |
- |
armgetcd failed in the internal processes ("%03d"). The error code is 0x%x. |
armgetcd failed in the internal process. |
Check if the memory is sufficient and/or OS is stable. |
armgstrt succeeded.
group-name=%s.server-name=%s.
|
armgstrt succeeded. |
- |
armgstrt has received an invalid parameter.group-name=%s.server-name=%s. |
armgstrt received an invalid parameter. |
Specify a valid input parameter. |
armgstrt failed in the internal processes (1%03d). The error code is 0x%x.group-name=%s.server-name=%s. |
armgstrt failed in the internal process. |
Check if the memory is sufficient and/or OS is stable. |
armgstrt cannot execute the specified operation.
group-name=%s server=%s
|
armgstart is not in the status to execute the specified operation. |
The failover group is being started or it has been started, or the server may not be operating successfully. Check them. |
armgstop succeeded.
group-name=%s
|
armgstop succeeded. |
- |
armgstop has received an invalid parameter.
group-name=%s
|
armgstop received an invalid parameter. |
Specify a valid input parameter. |
armgwait succeeded. |
armgwait succeeded. |
- |
armgwait has received an invalid parameter. |
armgwait received an invalid parameter. |
Specify a valid input parameter. |
armgwait timed out. |
armgwait timed out. |
Check the target failover group name. |
armgwait failed to run the internal processes (1%03d). The error code is 0x%x. |
armgwait failed in the internal process. |
Check if the memory is sufficient and/or OS is stable. |
armkill (WID="%0.16s") succeeded. |
armkill succeeded. |
- |
armkill has received invalid WID ("%0.10s") as a parameter. |
armload is not executed by the specified WID. |
Check the command line (watcID) of the armload. |
armkill has received an invalid parameter. |
armkill received an invalid parameter. |
Specify a valid input parameter. |
armkill (WID="%0.16s") forcefully terminated application. |
The application was forcefully terminated because it did not end within a designated time period. |
Examine the application to find why it did not terminate within the designated time period. |
armkill (WID="%0.16s") could not forcefully terminated application. |
The application was forcefully terminated, because it did not end within a designated time period. However the forced termination failed. |
Same as above |
armkill (WID="%0.16s") could not stop the service. |
The service did not end within the specified time period. |
Examine the service to find why it did not end within the specified time period. |
armkill (WID="%0.16s") has failed in the internal processes (3%03d). The error code is 0x%x. |
armkill failed in the internal process. |
When the "internal process" is 3060, the application is already closed. Examine the application to find why it ended.
If not above, check if the memory is sufficient and/or OS is stable.
|
armkill (WID="%0.32s") failed to stop the service. Detailed information:%0.160s |
armkill failed to stop the service. |
The request to stop the service that was asked to the service control manager failed. Investigation needs to be conducted in the service. |
armload (WID="%0.16s") succeeded. |
armload succeeded. |
- |
armload has received invalid WID ("%0.16s") as an invalid parameter. |
WID is overlapped. |
Specify a unique WID. |
armload has received an invalid parameter. |
armload received an invalid parameter. |
Specify an valid input parameter. |
armload (WID="%0.16s") has reached the maximum number of processes that can be run simultaneously. |
An attempt to start up applications/services more than executable number of applications/servers (256) was made |
Create scripts to make the number of running applications/ services within 256. |
armload has received WID ("%0.16s") that exceeds the maximum character count as a parameter. |
The character string of WID has more than 256 characters |
Make the character string of WID to have up to 255 characters. |
armload(WID="%0.16s") detected the service starting time-out. |
The service did not end within a designated time period. |
Examine the service to find why it did not end within the designated time period. |
armload (WID="%0.16s") failed in the internal processes(1%03d). The error code is 0x%x. |
armload failed in the internal processes. |
Check if the memory is sufficient
and/or OS is stable.
|
armpoll has received an invalid parameter. |
Command monitoring process received an invalid parameter. |
Check if the memory is sufficient and/or OS is stable. |
armpoll (WID="%0.16s") detected extinction of the application. The stop code is %d. |
Command monitor process did not detect any application. |
Detected an application termination. Examine the application to find why it ended. |
armload (WID="%0.16s") couldn't log on to user ("%0.32s"). The error code is 0x%x. |
Failed to log on to the user account. |
Check user account registration information (user ID, password), and if the domain name is indicated, also check the domain name in NEC EXPRESSCLUSTER manager. |
armload (WID="%0.16s") failed to execute the command line. The error code is 0x%x. |
Failed to start the application. |
Check if the valid path name and file name are specified in the exec-name of the armload command line. Check if a valid value is specified to the parameter-n. |
armload (WID="%0.16s") could not log on to user ("%0.32s"). The error code is 0x%x. |
Failed to acquire a password of a user account. |
Check if the user account registration is done in NEC EXPRESSCLUSTER manager . |
armload (WID="%0.16s") could not log on to user ("%0.32s"). The error code is 0x%x. |
Command monitoring process failed in internal processing. |
Check if the memory is sufficient and/or OS is stable. |
Command monitor process (WID="%0.16s") detected a failure in the services. The stop code is %d & %d. |
Command monitor process detected a failure of the service. |
Detected service termination. Examine the service to find it terminated. |
Command monitor process (WID="%0.16s") failed to get the environmental variable name. |
Command monitor process failed in acquiring an environmental variable name. |
It may have been started from outside of the scripts Start from outside of script is not supported.
If not above, check if memory is sufficient, and/or OS is stable.
|
Command monitor process (WID="%0.16s") restarted script. |
Command monitor process restarted scripts. |
Due to detection of application/service termination, the scripts restarted. |
Command monitor process (WID="%0.16s") restarted application. |
Command monitor process restarted the application. |
Due to detection of termination of the application, the application restarted. |
Command monitor process (WID="%0.16s") restarted Service |
Command monitor process restarted the service |
Due to detection of termination of the service, the restarted. |
Command monitor process (WID="%0.16s") completed the failover of the group ("%0.10s"). |
Command monitor process performed a failover to the group. |
Due to detection of application/service termination, the failover group failed over. |
Command monitor process (WID="%0.16s") shut down the server. |
Command monitor process shut down the server. |
Due to detection of application/service termination, the server shut down. |
armpoll (WID="%0.16s") has received an invalid service name ("%0.10s") as a parameter. |
armload received an invalid service name as a parameter. |
In the armload command line, check if the valid service name is specified for service-name. Check if the valid value is designated for parameter-n as well. |
armload (WID=""%0.16s"") failed to get user (""%0.32s"") information. The user name may be incorrect. The error code is 0x%x. |
Failed to acquire a domain name from the user name. |
Check if the user name is registered in the system. |
armpoll (WID="%0.16s") detected extinction of the application. |
Command monitor process did not detect any application (Failed to acquire the application termination code of the application). |
Detected termination of an application. Examine the application to find why it terminated. |
armload (WID="%0.16s") failed to start the service. The error code is 0x%x. |
Failed to start the service. |
Examine the service to find why it failed to start. |
Command monitor process (WID="%0.16s") failed to fail over the group(%s). The error code is 0x%x. |
Command monitor process failed to failover the group. |
Check if the failover destination server is operating successfully as a cluster. |
Command monitor process (WID="%0.32s") failed to stop the service. Detailed information:%0.160s |
Command monitor process failed to stop the service. |
The service stop request for the service control manager failed. Examine the service. |
Command monitor process (WID="%0.16s") forcefully terminated the application. |
Command monitor process forced to finish the application. |
The application was forcefully terminated by TerminateProcess() because it could not end within the specified time period. Check the application. |
Command monitor process (WID="%0.16s") failed to forcefully terminate the application. |
Command monitor process failed to finish the application. |
The application could not end within the specified time period due to the WM_CLOSE message. An attempt to forcefully terminate by the TerminateProcess() was made. However it did not end. Check the application. |
Command monitor process (WID="%0.16s") failed to stop Service. |
Command monitor process failed to stop Service. |
Service did not end within the specified time period. Check the Service. |
armloadc succeeded. WatchID=%0.16s.mode=%s.time=%s. |
armloadc succeeded. |
- |
armloadc received an invalid parameter. WatchID=%0.16s.mode=%s.time=%s. |
armloadc received an invalid parameter. |
Specify a valid input parameter. |
Cannot execute armloadc. WatchID=%0.16s.mode=%s.time=%s. |
armloadc cannot be executed. |
Check "startup state" and "monitoring state" by NEC EXPRESSCLUSTER task manager. Check whether or not armloadc can be executed by referring to application/service specification matrix of command reference (armloadc). |
armloadc detected time-out while waiting to start/stop the application/service. WatchID=%0.16s mode=%s time=%s |
Application/service did not end within the designated time period. |
Examine the application/service to find why it did not end within the designated time period. |
armloadc Win32API error.WatchID=%0.16s.mode=%s.time=%s. |
armloadc failed in the internal processing. |
Check if the memory is sufficient and/or OS is unstable. |
armmode succeeded.
option=%s.
|
armmode succeeded. |
- |
armloadc received an invalid parameter. WatchID=%0.16s.mode=%s.time=%s. |
armloadc received an invalid parameter. |
Specify a valid input parameter. |
armmode cannot execute the specified action (%03d). option=%s. |
armmode cannot execute the specified operation. |
Force-return (/F) :
Some servers are not isolated. Check the servers.
Server isolation (/I) :
The local server is not operating successfully in the cluster. Or there are no two or more servers that are working successfully in the cluster. Check the servers.
Server isolation (/I) :
The local server is not operating successfully in the cluster. Check the server.
|
armmode failed in the internal processes(%03d).The error code is 0x%x.option=%s. |
armmode failed in the internal processing. |
Check if the memory is sufficient and/or OS is stable. |
armnsadd succeeded (share=%.80s,path=%.80s). |
armnsadd succeeded. |
- |
armnsadd has received an invalid parameter. |
armnsadd received an invalid parameter. |
Specify a valid input parameter. |
armnsadd failed to run the internal processes (1%03d). The error code is 0x%x. |
armnsadd failed in the internal processing. |
If the internal process is 1020, the shared name has more than 80 characters. Specify it within 80 characters.
If the internal process is 1040, the path name is invalid. Check the path name.
If the internal process is 1050, the shared name is invalid. Check if you did not use characters that cannot be specified for shared names.
If the internal process is 1060, you do not have the privilege to access the path name. Check the access privilege.
If the internal process is 1090, the same name is already used. Specify a shared name that does not overlap with others.
If not above, check if the memory is sufficient, and/or OS is stable.
|
armnsdel succeeded (share=%.80s). |
armnsdel succeeded. |
- |
armnsdel has received an invalid parameter. |
armnsdel received an invalid parameter. |
Specify a valid input parameter. |
armnsdel failed to run the internal processes (1%03d). The error code is 0x%x. |
armnsdel failed in the internal processing. |
If the internal process is 1030, you do not have the privilege to access the shared name. Check the access privilege.
If the internal process is 1060, the shared name cannot be found. Check the name.
If not above, check if the memory is sufficient, or OS is stable.
|
armpause succeeded. |
armpause succeeded. |
- |
armpause has received an invalid parameter. |
armpause received an invalid parameter. |
Specify a valid input parameter. |
armpause cannot display the message. |
armpause cannot display dialog messages. |
Check if the memory is sufficient and/or OS is stable. |
armsetcd succeeded. |
armsetcd succeeded. |
- |
armsetcd has received an invalid parameter. |
armsetcd received an invalid parameter. |
Specify a valid input parameter. |
armsetcd received a console close signal. The server will be shut down. |
server shutdown was executed because armsetcd console window was closed by user's request. |
- |
armsetcd failed in the internal processes ("%03d"). The error code is 0x%x. |
armsetcd failed in the internal processing. |
Check if the memory is sufficient
And/or OS is stable.
|
armsleep succeeded. |
armsleep succeeded. |
- |
armsleep has received an invalid parameter. |
armsleep received an invalid parameter. |
Specify a valid input parameter. |
armstdn failed in the internal processes(%03d).The error code is 0x%x.option=%s. |
armstdn failed in the internal processing. |
Check if the memory is sufficient
and/or OS is stable.
|
armstdn succeeded.
cmd=%s
|
armstdn succeeded. |
- |
Failed to shut down the cluster. The server is not operating as a cluster. |
Failed to acquire a cluster name. |
The server is not operating as cluster. Check it. |
Failed to shut down the cluster. The error code is 0x%x. |
armwhshr failed in internal processing. |
Check if the memory is sufficient and/or OS is stable. |
Failed to shut down the cluster. EXPRESSCLUSTER Server Service is not started. |
"The EXPRESSCLUSTER Server" service is not started. |
"The EXPRESSCLUSTER Server" service is not started. Check it. |
armwhshr has received an invalid parameter. |
armwhshr received an invalid parameter. |
Specify a valid input parameter. |
armwhshr failed in the internal processes(1%03d). The error code is 0x%x. |
armwhshr failed in the internal processing. |
Check if the memory is sufficient and/or OS is stable. |
armwhshr detected connection error to share-name(%.48s). The error code is 0x%x. |
armwhshr detected error in connection to the shared name. |
The shared name cannot be used. Recover devices that are associated to the shared name.
1.OS is unstable. Check it.
2. Make sure that power is supplied to the devices.
3. Make sure that the devices and the servers are connected properly.
|
armwhshr detected connection recovery to shared name(%.48s). The error code is 0x%x. |
rmwhshr detected recovery of connection to the shared name. |
- |
mdopen failed. An internal error occurred. |
mdopen failed. An internal error occurred. |
Check if the memory is sufficient and/or OS is stable. |
mdopen failed. The resource is busy. |
mdopen failed. The resource is busy. |
The partition may be being used. Retry later. |
mdopen failed. A network error occurred. |
mdopen failed. A network error occurred. |
Check how the interconnect is connected. |
mdopen failed. Cannot establish the mirror disk connection. |
mdopen failed to establish the communication of the mirror disk. |
Check if the cluster configuration data is valid. |
mdopen failed. The resource name is invalid. |
mdopen failed. The resource name is invalid. |
Check if the cluster configuration data is valid. |
mdopen failed. The status is invalid. |
mdopen failed. The status is invalid. |
Mirror recovery is required. |
mdopen failed. The resource is not initialized. |
mdopen failed. The resource is not initialized. |
Check if the partition is allocated , the disk is recognized by OS and the cluster configuration data is correct.
|
mdopen failed. The resource is not performed first mirror construction. |
mdopen failed. Initial mirror construction is not done for resources. |
Initial mirror construction is required. |
mdopen failed. Cannot lock the mirror disk. |
mdopen failed to lock the mirror disk. |
Check if the memory is sufficient and/or OS is stable. |
mdopen failed. The license is not registered. |
mdopen failed. The license is not registered. |
Register the license. |
mdopen failed. The trial version has expired. |
mdopen failed. The trial version has expired. |
Register the license. |
mdopen failed. The license authentication failed. |
mdopen failed. The license authentication failed. |
Register the license. |
mdopen failed. Cannot find the history folder. |
mdopen failed. The history folder cannot be found. |
Check if the cluster configuration data is correct. |
mdopen failed. The mirror connect is not initialized. |
mdopen failed. The mirror connect is not initialized. |
Check the connection status of the mirror connect. Check if the cluster configuration data is correct. |
mdopen failed. Cannot find the partition specified for the cluster partition. |
mdopen failed. The partition specified for the cluster partition cannot be found. |
Check if the partition is allocated and the disk is recognized by OS. |
mdopen failed. Cannot find the partition specified for the data partition. |
mdopen failed. The partition specified for the data partition cannot be found. |
Check if the partition is allocated and the disk is recognized by OS. |
mdopen failed. Cannot change the drive letter for the cluster partition. |
mdopen failed. The drive letter for the cluster partition could not be changed. |
Check the specification of the drive letter of the cluster configuration data. Make sure that the drive letter is not used by any other partitions. |
mdopen failed. Cannot change the drive letter for the data partition. |
mdopen failed. The drive letter for the data partition could not be changed. |
Check the specification of the drive letter of the cluster configuration data. Make sure that the drive letter is not used by any other partitions. |
mdopen failed. The server name is invalid. |
mdopen failed. The server name is invalid. |
Check if the cluster configuration data is correct. |
mdopen has received an invalid parameter. |
mdopen received an invalid parameter. |
Specify a valid input parameter. |
mdopen failed in the internal processes(%2). The error code is %3. |
mdopen failed in the internal processing. |
Check if the memory is sufficient and/or OS is stable. |
mdopen succeeded. The mirror disk resource is %2. |
mdopen succeeded. |
- |
mdclose failed. An internal error occurred. |
mdclose failed. An internal error occurred. |
Check if the memory is sufficient and/or OS is stable. |
mdclose failed. The resource is busy. |
mdclose failed. The resource is busy. |
Retry it later. |
mdclose failed. A network error occurred. |
mdclose failed. A network error occurred. |
Check the connection status of the interconnect. |
mdclose failed. Cannot establish the mirror disk connection. |
mdclose failed to establish the mirror disk connection. |
Check if the cluster configuration data is correct. |
mdclose failed. The resource name is invalid. |
mdclose failed. The resource name is invalid. |
Check if the cluster configuration data is correct. |
mdclose failed. The status is invalid. |
mdclose failed. The status is invalid. |
Mirror recovery is required. |
mdclose failed. The resource is not initialized. |
mdclose failed. The resource is not initialized. |
Check if the partition is allocated, if the disk is identified by OS and if the cluster configuration data is correct. |
mdclose failed. The resource has not performed initial mirror construction. |
mdclose failed. The initial mirror construction has not been done for the resource. |
Initial mirror construction is required. |
mdclose failed. Cannot lock the mirror disk. |
mdclose failed to lock the mirror disk. |
Check if the memory is sufficient and/or OS is stable. |
mdclose failed. The license is not registered. |
mdclose failed. The license is not registered. |
Register the license. |
mdclose failed. The trial version has expired. |
mdclose failed. The trial version has expired. |
Register the license. |
mdclose failed. The license authentication failed. |
mdclose failed. The license authentication failed. |
Register the license. |
mdclose failed. Cannot find the history folder. |
mdclose failed to find the history folder. |
Check if the cluster configuration data is correct. |
mdclose failed. The mirror connect is not initialized. |
mdclose failed. The mirror connect is not initialized. |
Check the connection status of the mirror connect. Check if the cluster configuration data is correct. |
mdclose failed. Cannot find the partition specified for the cluster partition. |
mdclose failed to find the partition specified for the cluster partition. |
Check if the partition is allocated and if the disk is identified by OS. |
mdclose failed. Cannot find the partition specified for the data partition. |
mdclose failed to find the partition specified for the data partition. |
Check if the partition is allocated and if the disk is identified by OS. |
mdclose has received an invalid parameter. |
mdclose received an invalid parameter. |
Specify a valid input parameter. |
mdclose failed in the internal processes(%2). The error code is %3. |
mdclose failed in the internal processing. |
Check if the memory is sufficient and OS is stable. |
mdclose succeeded. The mirror disk resource is %2. |
mdclose succeeded. |
- |
sdopen succeeded. (%2) |
sdopen succeeded. |
- |
sdopen failed. Internal error occurred. (%1) |
sdopen failed. Internal error occurred. |
Check if the memory and/or the resource of OS are sufficient. |
sdopen failed. Failed to load cluster configuration data. (%1) |
sdopen failed to load cluster configuration data. |
Check if the cluster configuration data exists in the place it should be. |
sdopen failed. Failed to unload cluster configuration data. (%1) |
sdopen failed to unload cluster configuration data. |
Check if the cluster configuration data exists in the place it should be. |
sdopen failed. Failed to get cluster configuration data. (%1) |
sdopen failed to acquire the cluster configuration data. |
Check if the cluster configuration data is correct. |
sdopen failed. Failed to allocate memory. (%1) |
sdopen failed to allocate memory. |
Check if the memory and/or the resource of OS are sufficient. |
sdopen failed. Failed to activate resource. (%1) |
sdopen failed to activate resource. |
Check if the setting of HBA is correct. The partition may be being used. Check it. |
sdopen failed. Failed to create thread. (%1) |
sdopen failed to create thread. |
Check if the memory and/or the resource of OS are sufficient. |
sdopen failed. Timeout occurred on thread. (%1) |
sdopen failed. Timeout occurred on thread. |
Check if the memory and/or the resource of OS are sufficient. |
sdopen failed. Failed to dismount the partition specified by the resource. (%1) |
sdopen failed to dismount the partition specified by the resource. |
The partition may be being used. Check it. |
sdopen failed. Failed to lock the partition specified by the resource. (%1) |
sdopen failed to lock the partition specified by the resource |
The partition may be being used. Check it. |
sdopen failed. Server does not exist in cluster configuration data. (%1) |
sdopen failed. The server does not exist in cluster configuration data. |
Check if the server exists in the cluster configuration data. |
sdopen failed. Resource does not exist in cluster configuration data. (%1) |
sdopen failed. The resource does not exist in cluster configuration data. |
Check if the resource exists in the cluster configuration data. |
sdopen failed. Cannot find the specified partition. (%1) |
sdopen failed to find the specified partition. |
Check if the specified partition is recognized by OS. |
sdopen failed. Cannot change the drive letter. (%1) |
sdopen failed to change the drive letter. |
Check if the specified drive letter is not used in other partitions. |
sdclose succeeded. (%2) |
sdclose succeeded. |
- |
sdclose failed. Internal error occurred. (%1) |
sdclose failed. Internal error occurred. |
Check if the memory and/or the resource of OS are sufficient. |
sdclose failed. Failed to load cluster configuration data. (%1) |
sdclose failed to load cluster configuration data. |
Check if the cluster configuration data exists in the place it should be. |
sdclose failed. Failed to unload cluster configuration data. (%1) |
sdclose failed to unload cluster configuration data. |
Check if the cluster configuration data exists in the place it should be. |
sdclose failed. Failed to get cluster configuration data. (%1) |
sdclose failed to acquire the cluster configuration data. |
Check if the cluster configuration data is correct. |
sdclose failed. Failed to allocate memory. (%1) |
sdclose failed to allocate memory. |
Check if the memory and/or the resource of OS are sufficient. |
sdclose failed. Failed to deactivate resource. (%1) |
sdclose failed to deactivate resource. |
Check if the setting of HBA is correct. |
sdclose failed. Failed to create thread. (%1) |
sdclose failed to create thread. |
Check if the memory and/or the resource of OS are sufficient. |
sdclose failed. Timeout occurred on thread. (%1) |
sdclose failed. Timeout occurred on thread. |
Check if the memory and/or the resource of OS are sufficient. |
sdclose failed. Failed to dismount the partition specified by the resource. (%1) |
sdclose failed to dismount the partition specified by the resource. |
The partition may be being used. Check it. |
sdclose failed. Failed to lock the partition specified by the resource. (%1) |
sdclose failed to lock the partition specified by the resource. |
The partition may be being used. Check it. |
sdclose failed. Server does not exist in cluster configuration data. (%1)) |
sdclose failed. Server does not exist in cluster configuration data. |
Check if the server exists in the cluster configuration. |
sdclose failed. Resource does not exist in cluster configuration data. (%1) |
sdclose failed. The resource does not exist in cluster configuration data. |
Check if the resource exists in the cluster configuration. |
sdclose failed. Cannot find the specified partition. (%1) |
sdclose failed to find the specified partition. |
Check if the specified partition is recognized by OS. |