1. Preface
1.1. Who Should Use This Guide
The EXPRESSCLUSTER X Maintenance Guide describes maintenance-related information, intended for administrators. See this guide for information required for operating the cluster.
1.2. How This Guide is Organized
2. The system maintenance information: Provides maintenance information for EXPRESSCLUSTER.
1.3. EXPRESSCLUSTER X Documentation Set
The EXPRESSCLUSTER X manuals consist of the following six guides. The title and purpose of each guide is described below:
This guide is intended for all users. The guide covers topics such as product overview, system requirements, and known problems.
Installation and Configuration Guide
This guide is intended for system engineers and administrators who want to build, operate, and maintain a cluster system. Instructions for designing, installing, and configuring a cluster system with EXPRESSCLUSTER are covered in this guide.
This guide is intended for system administrators. The guide covers topics such as how to operate EXPRESSCLUSTER, function of each module and troubleshooting. The guide is supplement to the "Installation and Configuration Guide".
Maintenance Guide
This guide is intended for administrators and for system administrators who want to build, operate, and maintain EXPRESSCLUSTER-based cluster systems. The guide describes maintenance-related topics for EXPRESSCLUSTER.
This guide is intended for administrators and for system engineers who want to build EXPRESSCLUSTER-based cluster systems. The guide describes features to work with specific hardware, serving as a supplement to the "Installation and Configuration Guide".
This guide is intended for administrators and for system engineers who want to build EXPRESSCLUSTER-based cluster systems. The guide describes EXPRESSCLUSTER X 4.0 WebManager, Builder, and EXPRESSCLUSTER Ver 8.0 compatible commands.
1.4. Conventions
In this guide, Note, Important, See also are used as follows:
Note
Used when the information given is important, but not related to the data loss and damage to the system and machine.
Important
Used when the information given is necessary to avoid the data loss and damage to the system and machine.
See also
Used to describe the location of the information given at the reference destination.
The following conventions are used in this guide.
Convention |
Usage |
Example |
|---|---|---|
Bold |
Indicates graphical objects, such as fields, list boxes, menu selections, buttons, labels, icons, etc. |
In User Name, type your name.
On the File menu, click Open Database.
|
Angled bracket within the command line |
Indicates that the value specified inside of the angled bracket can be omitted. |
|
Monospace |
Indicates path names, commands, system output (message, prompt, etc), directory, file names, functions and parameters. |
|
bold |
Indicates the value that a user actually enters from a command line. |
Enter the following:
clpcl -s -a
|
italic |
Indicates that users should replace italicized part with values that they are actually working with. |
|
 In the figures of this guide, this icon represents EXPRESSCLUSTER.
1.5. Contacting NEC
For the latest product information, visit our website below:
2. The system maintenance information
This chapter provides information you need for maintenance of your EXPRESSCLUSTER system. Resources to be managed are described in detail.
This chapter covers:
2.4. System resource statistics information collection function
2.6. Function for outputting the operation log of Cluster WebUI
2.8.2. Procedure for suspending or releasing the limit on the band for mirror connect communication
2.10. Configuring the settings to temporarily prevent execution of failover
2.23. How to restore the mirror/hybrid disk from the disk image
2.31. Replacing the disk array controller (DAC)/updating the firmware
2.33. Updating data encryption key file of mirror/hybrid disk resources
2.1. Directory structure of EXPRESSCLUSTER
Note
You will find executable files and script files that are not described in "EXPRESSCLUSTER command reference" in the "Reference Guide" under the installation directory. Run these files only with EXPRESSCLUSTER. Any failures or troubles caused by executing them by using applications other than EXPRESSCLUSTER are not supported.
EXPRESSCLUSTER directories are structured as described below:
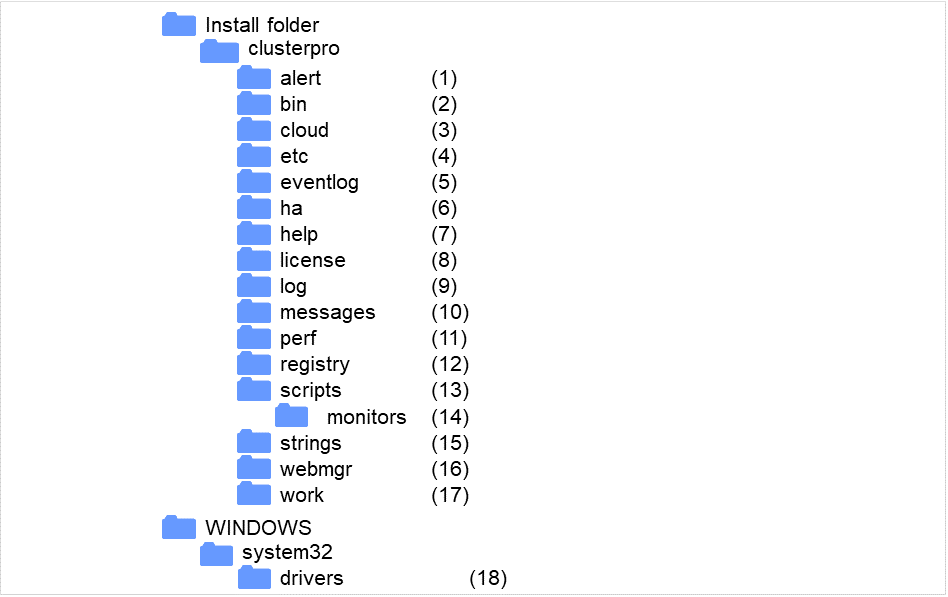
Fig. 2.1 Directory structure
- Directory for alert synchronizationThis directory stores EXPRESSCLUSTER Alert Synchronization's modules and management files.
- Directory for cluster modulesThis directory stores the EXPRESSCLUSTER Server's executable files and libraries.
- Directory for cloud environmentThis directory stores script files for cloud environment.
- Directory for cluster configuration dataThis directory stores the cluster configuration files and policy file of each module.
- Directory for event logsThis directory stores libraries that are related to the EXPRESSCLUSTER event logs.
- Directory for HA productsThe directory stores binary files and setting files of Java Resource Agent and System Resource Agent.
- Directory related to HelpNot used now.
- Directory for licensesThis directory stores licenses for licensed products.
- Directory for module logsThis directory stores logs produced by each module.
- Directory for report messages (alert, event log)This directory stores alert and event log messages reported by each module.
- Directory for performance logThis directory stores performance log of mirror or hybrid disk resources and system resource of OS.
- Directory for the registryNot used now.
- Directory for script resource scripts of group resourcesThis directory stores script resource scripts of group resources.
- Directory for the recovery script executedThis directory stores the script executed when an error is detected in the group resource or monitor resource.
- Directory for the string tableThis directory stores string tables used in EXPRESSCLUSTER.
- Directory for the WebManager server and Cluster WebUI.This directory stores the WebManager server modules and management files.
- Directory for module tasksThis is a work directory for modules.
- Directory for cluster driversThis directory stores drivers for kernel mode LAN heartbeat and disk filter.
2.2. How to delete EXPRESSCLUSTER logs or alerts
To delete EXPRESSCLUSTER logs or alerts, perform the following procedure.
Disable all cluster services on all servers in a cluster.
clpsvcctrl.bat --disable -a
Shut down the cluster with the Cluster WebUI or clpstdn command, and then reboot the cluster.
To delete logs, delete the files in the following folder. Perform this operation on the server for which you want to delete the logs.
<EXPRESSCLUSTER installation path>\log
To delete alerts, delete the files in the following folder. Perform this operation on the server for which you want to delete the alerts.
<EXPRESSCLUSTER installation path>\log
Enable all cluster services on all servers in a cluster.
clpsvcctrl.bat --enable -a
Restart all the servers in the cluster.
2.3. Mirror statistics information collection function
2.3.1. What is the mirror statistics information collection function?
The mirror statistics information collection function collects statistics information related to the mirror function that is obtained from each mirror source in mirror disk and hybrid disk configurations.
Using the Windows OS functions (performance monitor and typeperf command), the mirror statistics information collection function can collect mirror statistics information for EXPRESSCLUSTER X and display the collected information in real time. Moreover, it can continuously output mirror statistics information to a statistic log file from the instant that the mirror is constructed.
As shown below, the collected mirror statistics information can be used during mirror construction and mirror operation.
During mirror construction |
To tune the mirror setting items in the current environment, you can adjust the optimum setting by checking how each setting item influences the current environment. |
|---|---|
During mirror operation |
You can monitor the situation to determine whether a problem is likely to occur.
Moreover, analysis performance improves because mirror statistics information can be collected before and after failure occurrence.
|
2.3.2. Linkage between the mirror statistics information collection function and OS standard functions
Using the OS standard functions
Using the performance monitor and typeperf command, mirror statistics information can be collected and that information displayed in real time. Any counter can be selected from the subsequent "Counter names" list to continuously display and collect information over a fixed period of time. This allows you to visually check whether the mirror-related setting values are suitable for the constructed environment or whether an error has occurred during the collection of the statistics information.
For the procedure for using the performance monitor and typeperf command, see the subsequent items "Displaying mirror statistics information with the performance monitor," "Collecting mirror statistics information from the performance monitor", and "Collecting mirror statistics information from the typeperf command."
Specifying an object name
The object name used with the mirror statistics information collection function is "Cluster Disk Resource Performance" Specifying the "Cluster Disk Resource Performance" object enables the collection of mirror statistics information.
Specifying a counter name
The counter names used by the mirror statistics information collection function are listed below.
Counter name
Meaning
Unit
Description
% Compress Ratio
Compression ratio
%
Compression ratio of the mirror data to be sent to a remote server. The ratio of the compressed data size relative to the original data is used. Therefore, if 100 MB of data is compressed to 80 MB, the compression ratio is 80%.
Async Application Queue BytesAsync Application Queue Bytes, MaxApplication queue size (instantaneous value/maximum value)
Byte
Amount of data which is retained in the user space memory and which has yet to be sent during asynchronous mirror communication. The value that appears when the latest data is collected is an instantaneous value while the value that appears when the amount of data to be retained is the greatest is the maximum value.
Async Kernel Queue BytesAsync Kernel QueueBytes, MaxKernel queue size (instantaneous value/maximum value)
Byte
Amount of data which is retained in the kernel space memory and which has yet to be sent during asynchronous mirror communication. The value that appears when the latest data is collected is an instantaneous value while the value that appears when the amount of data to be retained is the greatest is the maximum value.
Async Mirror Queue Transfer TimeAsync Mirror Queue Transfer Time, MaxTime for transfer from the kernel queue to the application queue (average value/maximum value)
msec
Average value/maximum value of the time needed to transfer data from the kernel space memory to the user space memory during asynchronous mirror communication
Async Mirror Send Wait History Files Total BytesAsync Mirror Send Wait History Files Total Bytes, MaxHistory file usage (instantaneous value/maximum value)
Byte
Total size of the data files accumulated in the history file storage folder and which have yet to be sent during asynchronous mirror communication. The value that appears when the latest data is collected is an instantaneous value while the value that appears when the amount of accumulated data is the greatest is the maximum value.
Async Mirror Send Wait Total BytesAsync Mirror Send Wait Total Bytes, MaxAmount of data yet to be sent (instantaneous value/maximum value)
Byte
Total amount of mirror data which is to be sent to a remote server and which has yet to be sent during asynchronous mirror communication. The value that appears when the latest data is collected is an instantaneous value while the value that appears when the amount of data that has yet be sent is the greatest is the maximum value.
Mirror Bytes SentMirror Bytes Sent/secMirror transmission amount (total value/average value)
Byte(Byte/sec)Number of bytes of mirror data sent to a remote server. The total number of bytes that appears until the latest data is collected is the total value while the number of bytes to be sent per second is the average value.
Request Queue BytesRequest Queue Bytes, MaxRequest queue size (instantaneous value/maximum value)
Byte
Amount of queue used when an IO request is received during mirror communication. The value that appears when the latest data is collected is an instantaneous value while that the value that appears when the queue size is the greatest is the maximum value.
Transfer Time, AvgTransfer Time, MaxMirror communication time (average value/maximum value)
msec/time
Communication time per mirror communication used during mirror data transmission. The communication time averaged by the number of times of mirror communication used until the latest data is collected is the average value while the communication time per mirror communication which was the greatest is the maximum value.
- Specifying the instance nameThe instance name to be used by the mirror statistics information collection function is "MD,HD ResourceX." X indicates a mirror disk number/hybrid disk number from 1 to 22.For example, if the mirror disk number of mirror disk resource "MD" is set to "2", the mirror statistics information relating to resource "MD" can be collected by specifying instance "MD,HD Resource2."Moreover, if two or more resources are set, specifying instance "_Total" can collect information totalized by mirror statistics information relating to all resources that have been set.
Note
Specify the instance name corresponding to the mirror disk number/hybrid disk number for which a resource is set. An instance for which no resource is set can be specified; however, mirror statistics information cannot be displayed/collected.
Using mirror statistics information
Mirror statistics information that has actually been collected can be used to adjust the mirror-related setting values. If, for example, the communication speed and communication load can be confirmed from the collected mirror statistics information, it may be possible to improve the communication speed by turning the mirror-related setting values.
Displaying mirror statistics information with the performance monitor
Procedure for displaying the mirror statistics information to be collected in real time
From the Start menu, start Administrative Tools - Performance Monitor.
Select the performance monitor.
Click the + button or right-click to execute Add Counters from the menu.
Save the counter setting added with File - Save as.
Starting from the saved setting, you can repeatedly use the same counter setting.
The procedure is detailed below.Here, "Mirror Bytes Sent," or one item of mirror statistics information, is collected as an example. The target instance is assumed to be "MD/HD Resource1."From the Start menu, start Administrative Tools - Performance.
- From the left-hand menu tree in the window, select Performance Monitor.
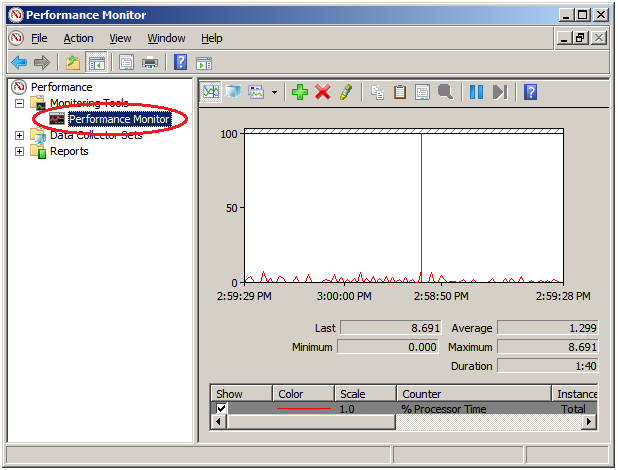 The performance monitor window appears on the right-hand side of the window.
 - Click the + button or right-click to execute Add Counters from the menu.
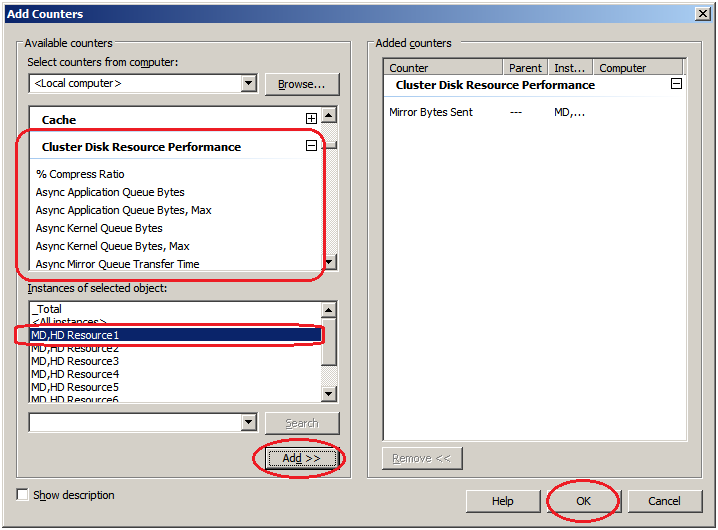 If the operation conditions are satisfied, the additional counter/instance is displayed.Select Cluster Disk Resource Performance, select counter Mirror Bytes Sent and instance MD,HD Resource1 and then click Add.
Note
If Cluster Disk Resource Performance is not displayed, the linkage function is disabled. In this case, execute the following command at the command prompt to enable the linkage function, and then retry the procedure from step 1.
>lodctr.exe <EXPRESSCLUSTER installation path>\perf\clpdiskperf.ini
Save the counter setting added with File - Save as.
Starting from the saved setting, you can repeatedly use the same counter setting.
Collecting mirror statistics information from the performance monitor
The following explains the procedure for collecting the log file of mirror statistics information from the performance monitor.
Procedure for collecting the log file
From the Start menu, start Administrative Tools - Performance Monitor.
Create a new data collector set with Data Collector Sets - User Defined.
From Create Data Log, select Performance Counter and then click Add.
Select Cluster Disk Resource Performance and then add the counter and instance to be collected.
Start log collection.
The procedure is detailed below.Here, "Mirror Bytes Sent," or one item of mirror statistics information, is collected as an example. The target instance is assumed to be "MD/HD Resource1."From the Start menu, start Administrative Tools - Performance Monitor.
From Data Collector Sets - User Defined, select Operation - New, or from New of the right-click option, specify Data Collector Set.
Enter any name as the data collector set name.
As the data collector set creation method, select Create manually (Details) (C).
From Create Data Log, select Performance Counter and then click Add.
- Add a counter. Here, after selecting Mirror Bytes Sent from Cluster Disk Resource Performance, select MD,HD Resource1 from Instances of Selected object, and then click Add.MD,HD Resource1 of Mirror Bytes Sent is added to Added Counter.After adding all the counters to be collected, click OK and then select Finish.
Note
If Cluster Disk Resource Performance is not displayed, the linkage function is disabled. In this case, execute the following command at the command prompt to enable the linkage function, and then retry the procedure from step 1.
>lodctr.exe <EXPRESSCLUSTER installation path>\perf\clpdiskperf.ini
Start log collection. Execute Start from the menu with Data Collector Sets - User Defined - (Data Collector Set Name).
Collecting mirror statistics information from the typeperf command
The following explains the procedure for collecting the mirror statistics information from the typeperf command.
From the Start menu, start Programs - Accessories - Command Prompt.
Execute typeperf.exe.
The following explains the use example in detail.
[Use example 1] Collecting the mirror communication time (specifying all instances EXPRESSCLUSTER Resource)
Case in which MD resources: md01 to md04 and HD resources: hd05 to hd08 are already registeredHowever, each resource is set as follows:The md01 mirror disk number is 1. The md02 mirror disk number is 2. : The hd07 hybrid disk number is 7. The hd08 hybrid disk number is 8.
In line 1 below, the typeperf command is executed to collect the mirror communication time.Lines 2 through 11 show the column headers of the results.Here, the column headers are separated into each of the lines for readability, which are actually printed in one line.From line 12, the actually collected statistics data is displayed.Columns separated by "," indicate the following values, starting from left to right:"Sampling time", each communication time of "md01", "md02", "md03", "md04", "hd05", "hd06", "hd07", and "hd08"
 1
 2
 3
 4
 5
 6
 7
 8
 9
10
11
12
13
14
15
16
17
18
19
C:\>typeperf "\Cluster Disk Resource Performance(*)\Transfer Time, Avg"
"(PDH-CSV 4.0)","\\v-ra1w2012\\Cluster Disk Resource Performance(*)\Transfer Time, Avg",
"\\v-ra1w2012\Cluster Disk Resource Performance(MD/HD Resource1)\Transfer Time, Avg",
"\\v-ra1w2012\Cluster Disk Resource Performance(MD/HD Resource2)\Transfer Time, Avg",
"\\v-ra1w2012\Cluster Disk Resource Performance(MD/HD Resource3)\Transfer Time, Avg",
"\\v-ra1w2012\Cluster Disk Resource Performance(MD/HD Resource4)\Transfer Time, Avg",
"\\v-ra1w2012\Cluster Disk Resource Performance(MD/HD Resource5)\Transfer Time, Avg",
"\\v-ra1w2012\Cluster Disk Resource Performance(MD/HD Resource6)\Transfer Time, Avg",
"\\v-ra1w2012\Cluster Disk Resource Performance(MD/HD Resource7)\Transfer Time, Avg",
"\\v-ra1w2012\Cluster Disk Resource Performance(MD/HD Resource8)\Transfer Time, Avg",
"\\v-ra1w2012\Cluster Disk Resource Performance(_Total)\Transfer Time, Avg"
"03/03/2010 15:21:24.546","0.24245658","0.3588965","0.488589","0.24245658","0.3588965","0.488577","0.3588965","0.488589"
"03/03/2010 15:21:24.546","0.21236597","0.6465466","0.488589","0.24245658","0.3588965","0.488589","0.2588965","0.288589"
"03/03/2010 15:21:24.546","0.24465858","0.7797976","0.488589","0.13123213","0.4654699","0.488544","0.6588965","0.288589"
"03/03/2010 15:21:24.546","0.85466658","0.5555565","0.488589","0.24245658","0.3588965","0.485689","0.7588965","0.388589"
"03/03/2010 15:21:24.546","0.46564468","0.3123213","0.488589","0.24245658","0.4388965","0.482289","0.8888965","0.338589"
"03/03/2010 15:21:24.546","0.85858998","0.3588965","0.488589","0.44245658","0.2288965","0.483289","0.3768965","0.228589"
"03/03/2010 15:21:24.546","0.47987964","0.3588965","0.488589","0.64245658","0.1288965","0.488214","0.3488965","0.428589"
"03/03/2010 15:21:24.546","0.88588596","0.3588965","0.488589","0.84245658","0.1588965","0.484449","0.3668965","0.422589"
[Use example 2] Collecting the amount of mirror data transmission (specifying the hd05 resource for the instance)
Case in which MD resources: md01 to md04 and HD resources: hd05 to hd08 are already registeredHowever, each resource is set as follows:The md01 mirror disk number is 1. The md02 mirror disk number is 2. : The hd07 hybrid disk number is 7. The hd08 hybrid disk number is 8.
In line 1 below, the typeperf command is executed to collect the amount of mirror data transmission.Line 2 shows the column headers of the results.From line 3, the actually collected statistics data is displayed.Columns separated by "," indicate the following values, starting from left to right:"Sampling time", the amount of data transmission of "hd05"
 1
 2
 3
 4
 5
 6
 7
 8
 9
10
C:\>typeperf "\Cluster Disk Resource Performance(MD/HD Resource5)\Mirror Bytes Sent/sec"
"(PDH-CSV 4.0)","\\v-ra1w2012\\Cluster Disk Resource Performance(MD/HD Resource5)\Mirror Bytes Sent/sec"
"03/03/2010 15:21:24.546","52362",
"03/03/2010 15:21:24.546","45564",
"03/03/2010 15:21:24.546","25560",
"03/03/2010 15:21:24.546","25450",
"03/03/2010 15:21:24.546","22560",
"03/03/2010 15:21:24.546","21597",
"03/03/2010 15:21:24.546","35999",
"03/03/2010 15:21:24.546","25668",
[Use example 3] Outputting the compression ratio to the log (specifying the hd01 resource for the instance)
Case in which MD resources: md01 to md04 and HD resources: hd05 to hd08 are already registeredHowever, each resource is set as follows:The md01 mirror disk number is 1. The md02 mirror disk number is 2. : The hd07 hybrid disk number is 7. The hd08 hybrid disk number is 8.
CSV is specified as the log file format andC:\PerfData\hd01.csvas the file output destination path.C:\>typeperf "\Cluster Disk Resource Performance(MD/HD Resource1)\% Compress Ratio" -f CSV -o C:\PerfData\hd01.csv
Use [Ctrl]+[C] to stop the log output after command execution.[Use example 4] Displaying the counter list (specifying no instance)
Case in which MD resources: md01 to md04 and HD resources: hd05 to hd08 are already registeredHowever, each resource is set as follows:The md01 mirror disk number is 1. The md02 mirror disk number is 2. : The hd07 hybrid disk number is 7. The hd08 hybrid disk number is 8.
In line 1 below, the typeperf command is executed to display the counter list.From line 2, the counters are displayed.1 2 3 4 5 6 7 8 9 10 11 12 13 14 15 16 17 18
C:\>typeperf -q "\ Cluster Disk Resource Performance"
\Cluster Disk Resource Performance(*)\% Compress Ratio
\Cluster Disk Resource Performance(*)\Async Application Queue Bytes
\Cluster Disk Resource Performance(*)\Async Application Queue Bytes, Max
\Cluster Disk Resource Performance(*)\Async Kernel Queue Bytes
\Cluster Disk Resource Performance(*)\Async Kernel Queue Bytes, Max
\Cluster Disk Resource Performance(*)\Async Mirror Queue Transfer Time
\Cluster Disk Resource Performance(*)\Async Mirror Queue Transfer Time, Max
\Cluster Disk Resource Performance(*)\Async Mirror Send Wait History Files Total Bytes
\Cluster Disk Resource Performance(*)\Async Mirror Send Wait History Files Total Bytes, Max
\Cluster Disk Resource Performance(*)\Async Mirror Send Wait Total Bytes
\Cluster Disk Resource Performance(*)\Async Mirror Send Wait Total Bytes, Max
\Cluster Disk Resource Performance(*)\Mirror Bytes Sent
\Cluster Disk Resource Performance(*)\Mirror Bytes Sent/sec
\Cluster Disk Resource Performance(*)\Request Queue Bytes
\Cluster Disk Resource Performance(*)\Request Queue Bytes, Max
\Cluster Disk Resource Performance(*)\Transfer Time, Avg
\Cluster Disk Resource Performance(*)\Transfer Time, Max
In addition, sampling interval change, command issuance to a remote server, and the like can all be specified as options.Use "Typeperf -?" to confirm the details of the options.
2.3.3. Operation of the mirror statistics information collection function
Mirror statistics information log output (automatic) during operation
The mirror statistics information collection function continuously collects statistics information in the environment in which the operation condition is satisfied and then outputs it to the statistic log file. Mirror statistics information collection and log output are performed automatically. Statistic log output is detailed below.
Item
Operation
Description
Output file name
nmp_<n>.curnmp_<n>.pre<x>nmp_total.curnmp_total.pre<x><n> indicates the mirror disk No. or hybrid disk No.cur is the newest, followed by pre, pre1, pre2, ..., in the newest to oldest order. The larger the number, the older.When the prescribed number of log files is exceeded, existing logs are deleted, starting with the oldest.total indicates the total data of all mirror disk resources/hybrid disk resources.Output file format
Text file
Data is output to the file in the comma-separated (CSV) text format.One-line data is output for each information collection.Output destination folder
EXPRESSCLUSTER installation folder\perf\diskData is output within the work folder immediately under the EXPRESSCLUSTER installation folder.
Resource to be output
For each resource+ totalLog is output to one file for each mirror disk resource or hybrid disk resource that was set.If no resource is set, no log file is created.If one or more log files are created, the Total log file indicating the total value of all the resources is also created.Output timing
Per minute
Information is output every minute.No log output occurs if the mirror statistics information output function is disabled.If the mirror statistics information log output operation is disabled, no log output occurs even though the mirror statistics information collection function is operating.Output file size
About 16 MB
The maximum size of one file is about 16 MB.If the upper size limit is exceeded, the log file is automatically rotated and the previous log file is saved.Even if the upper size limit is not exceeded, the log file may be rotated automatically when the output data is changed.Number of log rotations
12 generations
Up to 12 generations of log files are saved through log file rotations.If the upper rotation limit is exceeded, the oldest generation log file is automatically deleted.
2.3.4. Operation conditions of the mirror statistics information collection function
The mirror statistics information collection function runs when the following conditions are satisfied:
The EXPRESSCLUSTER Disk Agent service is active normally.
One or more mirror disk resources or hybrid disk resources are set.
The mirror statistic information collection function is enabled in cluster properties.
Confirm the EXPRESSCLUSTER Disk Agent service status.
From the Start menu, start Server Management - Service.Confirm that the EXPRESSCLUSTER Disk Agent service status is Start.Confirm that Startup Type is Auto.The server is required to be restarted if the service status is not Start.
Confirm the mirror setting.
Start Cluster WebUI.Confirm that the mirror disk resource or hybrid disk resource is set.
Confirm the setting of the mirror statistics information collection function.
Start Cluster WebUI.Change the mode to Settings. (Specification of the prescribed setting tab/cluster properties?)
For details of Cluster WebUI, see the online manual of Cluster WebUI.
2.3.5. Notes on the mirror statistics information collection function
To operate the mirror statistics information collection function, the free space (up to about 8.9 GB) is required on disk to record the statistic log file of the mirror statistics information.
Up to 32 processes can be started for a single server with both the performance monitor and typeperf commands combined. No mirror statistics information can be collected if more than 32 performance monitors or typeperf commands are executed for a single server.
- More than one of statistical information acquisition can't be done in 1 process.For example the computer which is a target from more than one performance monitor on the other computers, and the occasion from which more than one data collect is extracted by 1 performance monitor, etc.
- The extracted mirror statistics information is included in the logs collected by the clplogcc command or Cluster WebUI.Specify type5 to collect the log by the clplogcc command; specify Pattern 5 to collect the log by the Cluster WebUI. For details about log collection, see "Collecting logs (clplogcc command)" in "EXPRESSCLUSTER command reference" in the "Reference Guide" or the online manual.
2.4. System resource statistics information collection function
If the Collect the System Resource Information check box is checked on the Monitor tab of Cluster Properties in the Cluster WebUI config mode, or if system monitor resources or process resource monitor resources are added to the cluster, information on the system resource is collected and saved under install_path/perf/system according to the following file naming rules. The file format is CSV (text). In the following explanations, this file is referred to as the system resource statistics information file.
system.cur
system.pre
|
|
|---|---|
cur |
Indicates the latest information output destination. |
pre |
Indicates the previous, rotated, information output destination. |
The collected information is saved to the system resource statistics information file. The output interval (sampling interval) of statistics information is 60 seconds. If the size of current log file reached 16MB, log rotation occurs and the information is saved to a new log file (two generation log files can be used). Information saved to the system resource statistics information file can be used as a reference for analyzing the system performance. The collected statistics information contains the following items.
Statistic value name |
Unit |
Description |
|---|---|---|
CPUCount |
Quantity |
The number of CPUs |
CPUUtilization |
% |
Utilization of CPU |
MemoryTotalSize |
KByte |
Total memory size |
MemoryCurrentSize |
KByte |
Utilization of memory |
SwapTotalSize |
KByte |
Total swap size |
SwapCurrentSize |
KByte |
Utilization of swap |
ThreadCurrentSize |
Quantity |
The number of threads |
FileCurrentSize |
Quantity |
The number of opened files |
ProcessCurrentCount |
Quantity |
The number of processes |
AvgDiskReadQueueLength__Total |
Quantity |
The number of read requests queued in disk |
AvgDiskWriteQueueLength__Total |
Quantity |
The number of write requests queued in disk |
DiskReadBytesPersec__Total |
Byte |
The number of bytes transferred from disk by read operation |
DiskWriteBytesPersec__Total |
Byte |
The number of bytes transferred to disk by write operation |
PercentDiskReadTime__Total |
tick |
Busy time occurred while disk handles read requests |
PercentDiskWriteTime__Total |
tick |
Busy time occurred while disk handles write requests |
PercentIdleTime__Total |
tick |
Disk idle time |
CurrentDiskQueueLength__Total |
Quantity |
The number of requests remained in disk when performance data are collected |
The following output is an example of system resource statistics information file.
system.cur
"Date","CPUCount","CPUUtilization","MemoryTotalSize","MemoryCurrentSize","SwapTotalSize","SwapCurrentSize","ThreadCurrentSize","FileCurrentSize","ProcessCurrentCount","AvgDiskReadQueueLength__Total","AvgDiskWriteQueueLength__Total","DiskReadBytesPersec__Total","DiskWriteBytesPersec__Total","PercentDiskReadTime__Total","PercentDiskWriteTime__Total","PercentIdleTime__Total","CurrentDiskQueueLength__Total"
"2019/11/14 17:18:57.751","2","11","2096744","1241876","393216","0","1042","32672","79","623078737","241067820","95590912","5116928","623078737","241067820","305886514","0"
"2019/11/14 17:19:57.689","2","3","2096744","1234892","393216","0","926","31767","77","14688814","138463292","3898368","7112192","14688814","138463292","530778498","0"
"2019/11/14 17:20:57.782","2","2","2096744","1194400","393216","26012","890","30947","74","8535798","189735393","3802624","34398208","8535798","189735393","523400261","0"
                                       :
2.5. Cluster statistics information collection function
If the Cluster Statistical check box is already checked on the Extension tab of Cluster Properties in the Cluster WebUI config mode, it collects the information of the results and the time spent for each of the processings such as group failover, group resource activation and monitor resource monitoring. This file is in CSV format. In the following explanations, this file is represented as the cluster statistics information file.
For groups
group.curgroup.precur
Indicates the latest information output destination.
pre
Indicates the previous, rotated, information output destination.
File location
install_path/perf/cluster/group/
For group resources
The information for each type of group resource is output to the same file.
[Group resource type].cur[Group resource type].precur
Indicates the latest information output destination.
pre
Indicates the previous, rotated, information output destination.
File location
install_path/perf/cluster/group/
For monitor resources
The information for each type of monitor resources is output to the same file.
[Monitor resource type].cur[Monitor resource type].precur
Indicates the latest information output destination.
pre
Indicates the previous, rotated, information output destination.
File location
install_path/perf/cluster/monitor/
Note
Listed below are the timing to output the statistics information to the cluster statistics information file:
For groups 1
When the group startup processing is completed
When the group stop processing is completed
When the group move processing is completed 2
When the failover processing is completed 2
For group resources
When the group resource startup processing is completed
When the group resource stop processing is completed
For monitor resources
When the monitor processing is completed
When the monitor status change processing is completed
The statistics information to be collected includes the following items:
Statistic value name |
Description |
|---|---|
Date |
Time when the statistics information is output.
This is output in the form below (000 indicates millisecond):
YYYY/MM/DD HH:MM:SS.000 YYYY/MM/DD HH:MM:SS.000
|
Name |
Name of group, group resource or monitor resource. |
Action |
Name of the executed processing.
The following strings are output:
For groups: Start (at start), Stop (at stop), Move (at move/failover)
For group resources: Start (at activation), Stop (at deactivation)
For monitor resources: Monitor (at monitor execution)
|
Result |
Name of the results of the executed processing.
The following strings are output:
When the processing was successful: Success (no errors detected in monitoring or activation/deactivation)
When the processing failed: Failure (errors detected in monitoring or activation/deactivation)
When a warning occurred: Warning (only for monitoring, in case of warning)
When a timeout occurred: Timeout (monitoring timeout)
When the processing was canceled: Cancel (canceling processings such as cluster shutdown during group startup)
|
ReturnCode |
Return value of the executed processing. |
StartTime |
Start time of the executed processing.
This is output in the form below (000 indicates millisecond):
YYYY/MM/DD HH:MM:SS.000 YYYY/MM/DD HH:MM:SS.000
|
EndTime |
End time of the executed processing.
This is output in the form below (000 indicates millisecond):
YYYY/MM/DD HH:MM:SS.000 YYYY/MM/DD HH:MM:SS.000
|
ResponseTime(ms) |
Time taken for executing the processing (in millisecond).
This is output in millisecond.
|
Here is an example of the statistics information file to be output when a group with the following configuration is started up:
Group
Group name: failoverA
Group resource which belongs to the group (failoverA)
- script resourceResource name: script01, script02, script03
group.cur
"Date","Name","Action","Result","ReturnCode","StartTime","EndTime","ResponseTime(ms)"
"2018/12/19 09:44:16.925","failoverA","Start","Success",,"2018/12/19 09:44:09.785","2018/12/19 09:44:16.925","7140"
                                                    :
script.cur
"Date","Name","Action","Result","ReturnCode","StartTime","EndTime","ResponseTime(ms)"
"2018/12/19 09:44:14.845","script01","Start","Success",,"2018/12/19 09:44:09.807","2018/12/19 09:44:14.845","5040"
"2018/12/19 09:44:15.877","script02","Start","Success",,"2018/12/19 09:44:14.847","2018/12/19 09:44:15.877","1030"
"2018/12/19 09:44:16.920","script03","Start","Success",,"2018/12/19 09:44:15.880","2018/12/19 09:44:16.920","1040"
                                            :
2.5.1. Notes on the size of the cluster statistics information file
The size of the cluster statistics information file can be set between 1 and 99 MB. The number of cluster statistics information files to be generated differs depending on their configurations.Some configurations may cause a large number of files to be generated. Therefore, consider setting the size of the cluster statistics information file according to the configuration. The maximum size of the cluster statistics information file is calculated with the following formula:
The size of the cluster statistics information file =([Group file size]) x (number of generations (2)) +([Group resource file size] x [number of types of group resources which are set]) x (number of generations (2)) +([Monitor resource file size] x [number of types of monitor resources which are set]) x (number of generations (2))Example: For the following configuration, the total maximum size of the cluster statistics information files to be saved is 232 MB with this calculation. (((1MB) x 2) + ((3MB x 5) x 2) + ((10MB x 10) x 2) = 232MB)
Group (file size: 1 MB)
Number of group resource types: 5 (file size: 3 MB)
Number of monitor resource types: 10 (file size: 10 MB)
2.6. Function for outputting the operation log of Cluster WebUI
If the Output Cluster WebUI Operation Log check box is already checked on the WebManager tab of Cluster Properties in the config mode of Cluster WebUI, the information on the operation of Cluster WebUI is outputted to the log file. This file is in CSV format, which is hereinafter called "the operation log file of Cluster WebUI.
cur
Indicates the last outputted log file.
pre<x>
Where to save
Directory as Log output path in the config mode of Cluster WebUI
The operation information to be outputted includes the following items:
Item name |
Description |
|---|---|
Date |
Time when the operation information is outputted.
This is outputted in the form below (000 in milliseconds):
YYYY/MM/DD HH:MM:SS.000
|
Operation |
Name of the executed operation in Cluster WebUI. |
Request |
Request URL issued from Cluster WebUI to the WebManager server. |
IP |
IP address of a client that operated Cluster WebUI. |
UserName |
Name of a user who executed the operation.
When a user logged in to Cluster WebUI by using the OS authentication method, the user name is output.
|
HTTP-Status |
HTTP status code. |
ErrorCode |
Return value of the executed operation. |
ResponseTime(ms) |
Time taken for executing the operation (in milliseconds).
This is outputted in milliseconds.
|
ServerName |
Name of a server to be operated.
Its server name or IP address is outputted.
It is outputted when the name of a server to be operated is specified.
|
GroupName |
Name of a group to be operated.
It is outputted when the name of a group to be operated is specified.
|
ResourceName |
Name of a resource to be operated.
Outputted is the heartbeat resource name, network partition resolution resource name, group resource name, or monitor resource name.
It is outputted when the name of a resource to be operated is specified.
|
ResourceType |
Type of a resource to be operated.
It is output when the type of a resource to be operated is specified.
|
Parameters... |
Operation-specific parameters. |
The following output is an example of the operation log file of Cluster WebUI:
"Date","Operation","Request","IP","UserName","HTTP-Status","ErrorCode","ResponseTime(ms)","ServerName","GroupName","ResourceName","ResourceType","Parameters..."
"2020/08/14 17:08:39.902","Cluster properties","/GetClusterproInfo.js","10.0.0.15","user1",200,0,141,,,,
"2020/08/14 17:08:46.659","Monitor properties","/GetMonitorResourceProperty.js","10.0.0.15","user1",200,0,47,,,"fipw1","fipw"
"2020/08/14 17:15:31.093","Resource properties","/GetGroupResourceProperty.js","10.0.0.15","user1",200,0,47,,"failoverA","fip1","fip"
"2020/08/14 17:15:45.309","Start group","/GroupStart.js","10.0.0.15","user1",200,0,0,"server1","failoverA",,
"2020/08/14 17:16:23.862","Suspend all monitors","/AllMonitorSuspend.js","10.0.0.15","user1",200,0,453,"server1",,,,"server2"
                                                    :
2.7. Communication ports
EXPRESSCLUSTER uses the following port numbers by default. You can change these port numbers by using the Cluster WebUI. Make sure that the programs other than EXPRESSCLUSTER do not access these port numbers.
To set up a firewall for the server, make sure that the following port numbers can be accessed.
For an AWS environment, configure to able to access the following port numbers in the security group setting in addition to the firewall setting.
For port numbers EXPRESSCLUSTER uses, refer to "Getting Started Guide" > "Notes and Restrictions" > "Before installing EXPRESSCLUSTER" > "Communication port number".
2.8. Limit on the band for mirror connect communication
You can set a limit on the communication band used for mirror connect communication by using the standard Windows Local Group Policy Editor (Policy-based QoS). A limit is set for each mirror disk connect. This method is useful for setting a limit on the communication band for all mirror disk resources or hybrid disk resources using the specified mirror disk connect.
2.8.1. Procedure for setting a limit on the band for mirror connect communication
To set a limit on the band for mirror connect communication, follow the procedure described below.
Setting the properties of a network adapter
Click Start, Control Panel, then Network and Sharing Center. Then, open Properties for a mirror disk connect.
Check the Qos Packet Scheduler check box when it is in Properties.
Click Install, Services, and then Add buttons to select QoS Packet Scheduler when it is not in Properties.
- Starting the Local Group Policy EditorTo set a limit on the band, use the Local Group Policy Editor. From the Start menu, click Run, and then execute the following command:
gpedit.msc
Creating a policy
Create a policy for a limit on the band. In the left pane, click Local Computer Policy, Computer Configuration, then Windows Settings, and then right-click Policy-based QoS and select Create New Policy.
Policy-based QoS - Create a QoS policy window
Set items as follows.
Policy name
Enter a policy name for identification.
Specify DSCP value
Set the IP priority. This setting is optional. For details, see Learn more about QoS Policies.
Specify Outbound Throttle Rate
Check the Specify Outbound Throttle Rate check box. Specify an upper limit on the communication band used for the mirror disk connect in units of KBps (kilobytes per second) or MBps (megabytes per second).
After setting the required items, click the Next button.
Policy-based QoS - This QoS policy applies to: window
Set this item as follows.
This QoS policy applies to: (application specification)
Select All applications.
After setting the required items, click the Next button.
Policy-based QoS - Specify the source and destination IP addresses. window
Set these items as follows.
This QoS policy applies to: (source IP address specification)
Select Only for the following source IP address or prefix and then enter the source IP address used for the mirror disk connect.
This QoS policy applies to: (destination IP address specification)
Select Only for the following destination IP address or prefix and then enter the destination IP address used for the mirror disk connect.
After setting the required items, click the Next button.
Policy-based QoS - Specify the protocol and port numbers. window
Set these items as follows.
Select the protocol this QoS policy applies to (S)
Select TCP.
Specify the source port number:
Select From any source port.
Specify the destination port number:
Select To this destination port number or range and then specify the mirror driver port number (default: 29005).
- Reflecting the policyClick the Finish button to apply the settings. The set policy is not immediately reflected, but according to the automatic policy update interval (default: within 90 minutes). To reflect the set policy immediately, update the policy manually. From the Start menu, click Run, and then execute the following command:
gpupdate /force
This completes the setting of a policy.
2.8.2. Procedure for suspending or releasing the limit on the band for mirror connect communication
To suspend or release the limit on the band for mirror connect communication, follow the procedure described below.
- Starting the Local Group Policy EditorTo suspend or release the limit on a band, use the Local Group Policy Editor. From the Start menu, click Run, and then execute the following command:
gpedit.msc
Suspending a policy by changing its setting or deleting the policy
- To suspend a limit on the bandTo suspend a limit on the band, change the setting for the policy for the limit on the band. Right-click the target QoS policy and then choose Edit Existing Policy. Then, uncheck the Specify Outbound Throttle Rate check box.After making this setting, click the OK button.
- To release a limit on the bandTo release a limit on the band, delete the policy for the limit on the band. Right-click the target QoS policy and then choose Delete Policy. The pop-up message "Are you sure you want to delete the policy?" appears. Click Yes.
- Reflecting the policyThe modification or deletion of a policy is not immediately reflected, but according to the automatic policy update interval (default: within 90 minutes). To reflect the deletion or modification immediately, update the policy manually. From the Start menu, click Run, and then execute the following command:
gpupdate /force
This completes the setting of a policy.
2.9. What causes EXPRESSCLUSTER to shut down servers
When any one of the following errors occurs, EXPRESSCLUSTER shuts down or resets servers to protect resources.
2.9.1. Final action for an error in group resource activation or deactivation
When one of the following is specified as the final action to be taken for errors in resource activation/deactivation:
Final action |
Result |
|---|---|
The cluster service stops and the OS shuts down. |
Causes normal shutdown after the group resources stop. |
The cluster service stops and the OS reboots. |
Causes normal reboot after the group resources stop. |
An intentional stop error is generated |
Causes a stop error (Panic) intentionally upon group resource activation/deactivation error. |
2.9.2. Action for a stall of resource activation or deactivation
When one of the following is specified as the action to be taken for a stall of resource activation or deactivation, and resource activation or deactivation took longer time than expected:
Action for a stall |
Result |
|---|---|
Emergency shutdown |
Causes the OS to shut down upon the stall of group resource activation or deactivation. |
Intended generation of a stop error |
Causes a stop error (Panic) upon the stall of group resource activation or deactivation. |
The OS shuts down if the resource activation or deactivation takes an unexpectedly long time. The OS shuts down, regardless of the setting of recovery in the event of a resource activation or deactivation error.
If a resource activation stall occurs, the following message is output to the event log and as an alert message.
Module type: rc
Event ID: 1032
Message: Failed to start the resource %1. (99 : command is timeout)
Description: Resource start failure
If a resource deactivation stall occurs, the following message is output to the event log and as an alert message.
Module type: rc
Event ID: 1042
Message: Failed to stop the resource %1. (99 : command is timeout)
Description: Resource stop failure
2.9.3. Final action at detection of an error in monitor resource
When the final action for errors in monitor resource monitoring is specified as one of the following:
Final action |
Result |
|---|---|
Stop cluster service and shut down the OS |
Causes normal shutdown after the group resources stop. |
Stop cluster service and reboot the OS |
Causes normal reboot after the group resources stop. |
An intentional stop error is generated |
Causes a stop error (Panic) intentionally upon monitor resource error detection. |
2.9.4. Forced stop action
When the setting is configured as Use Forced Stop:
Physical machine
Forced stop action
Result
BMC reset
Causes reset in the failing server where the failover group existed.
BMC power off
Causes power off in the failing server where the failover group existed.
BMC power cycle
Causes power cycle in the failing server where the failover group existed.
BMC NMI
Causes NMI in the failing server where the failover group existed.
vSphere virtual machine (guest OS)
Forced stop action
Result
VMware vSphere CLI Power off
Causes power off in the failing server where the failover group existed.
2.9.5. Emergency server shutdown
When the following processes terminated abnormally, clustering can not work properly. Then EXPRESSCLUSTER shuts down the server on which those processes terminated. This action is called emergency server shutdown.
clpnm.exe
clprc.exe
Server shut down method can be configured in Action When the Cluster Service Process is Abnormal of Cluster Properties from the config mode of Cluster WebUI. Followin method can be set.
2.9.6. Resource deactivation error in stopping the EXPRESSCLUSTER Server service
When deactivating a resource by running clpcl -t, which stops the EXPRESSCLUSTER Server service fails, EXPRESSCLUSTER causes a shutdown.
2.9.7. Recovery from network partitioning
If all heartbeats are disrupted, network partitioning resolution takes place which results in one or all of the servers to shut down. Unless the automatic recovery mode is set in Cluster Properties, the server is in the Suspension (Isolated) status and is not clustered after reboot.
When you resolve the problem that caused the disruption of heartbeats, recover the cluster.
For details on network partitioning, see "Details on network partition resolution resources" in the "Reference Guide".
For information on the suspended status (restart following a shutdown) and cluster recovery, see the online manual "Functions of the WebManager" in this guide.
2.9.8. Emergency server restart
When an abnormal termination is detected in the following processes, EXPRESSCLUSTER reboots the OS. This action is called Emergency server restart.
EXPRESSCLUSTERDisk Agent (clpdiskagent.exe)
EXPRESSCLUSTERServer (clppmsvc.exe)
EXPRESSCLUSTERTransaction (clptrnsv.exe)
2.9.9. Failure in suspending or resuming the cluster
If suspending or resuming the cluster fails, the server is shutdown.
2.10. Configuring the settings to temporarily prevent execution of failover
Follow the steps below to temporarily prevent failover caused by a failed server from occurring.
(Example) To (temporarily) extend the heartbeat time-out to 3600 seconds (one hour) from the current time when the heartbeat time-out is set to 90 seconds:
clptoratio -r 40 -t 1h
Follow the steps below to temporarily prevent failover caused by a monitor error by temporarily stopping monitor resource monitoring.
(Example) To suspend all monitoring operations on the server in which the command is run:
clpmonctrl -s(Example) To suspend all monitoring operations on the server with -h option specified
clpmonctrl -s -h <server name>(Example) Resuming all monitoring operations on the server in which the command is run:
clpmonctrl -r(Example) To resume all monitoring operations on the server with -h option specified
clpmonctrl -r -h <server name>
Follow the steps below to temporarily prevent failover caused by a monitor error by disabling recovery action for a monitor resource error.
Follow the steps below to temporarily prevent failover caused by an activation error by disabling recovery action for a group resource activation error.
When an application or service has been started using the armload command with /M or /R specified, that process is monitored. To temporarily prevent failover caused by a monitoring error, follow the steps below.
For details on the armload and armloadc commands, see "Compatible command reference" in "Legacy Feature Guide".
2.11. How to execute chkdsk/defrag
2.11.2. How to execute chkdsk/defrag on a mirror/hybrid disk
When executing chkdsk or defrag on a partition configured as a mirror disk resource, the procedure differs depending on whether the server is an active server or a standby server.
How to execute chkdsk/defrag on an active server (mirror/hybrid disk)
Refer to "How to execute chkdsk/defrag on a shared disk"
How to execute chkdsk/defrag on a standby server (mirror disk)
If you perform a chkdsk or defragmentation in restoration mode on the standby server, mirror copy overwrites partitions established as mirror disks on the active disk image, and the file system fails to be restored or optimized. This section describes the procedure for chkdsk in order to check media errors.
Suspend the mdw monitor resources temporarily by using the Cluster WebUI or the clpmonctrl command.
(Example)
clpmonctrl -s -m <mdw monitor name>Isolate the target mirror disk resource.
(Example)
clpmdctrl --break <md resource name>Enable access to the mirror disk .
(Example)
mdopen <md resource name>Execute chkdsk or defrag on the target partition from the command prompt.
Important
If the message "chkdsk cannot run because the volume is being used by another process. Would you like to schedule this volume to be checked the next time the system restarts? (Y/N)" appears, select "N".
Disable access to the mirror disk.
(Example)
mdclose <md resource name>Resume the mdw monitor resources by using the Cluster WebUI or the clpmonctrl command.
(Example)
clpmonctrl -r -m <mdw monitor name>If automatic mirror recovery is disabled, perform mirror recovery manually from Mirror Disks.
How to execute chkdsk/defrag on a standby server (hybrid disk)
If you perform a chkdsk or defragmentation in restoration mode on the standby server, mirror copy overwrites partitions established as hybrid disks on the active disk image, and the file system fails to be restored or optimized. This section describes the procedure for chkdsk in order to check media errors.
Suspend the hdw monitor resources temporarily by using the Cluster WebUI or the clpmonctrl command.
(Example)
clpmonctrl -s -m <hdw monitor name>Isolate and enable access to the target hybrid disk resource.
(Example)
clphdsnapshot --open <hd resource name>Execute chkdsk or defrag on the target partition from the command prompt.
Important
If the message "chkdsk cannot run because the volume is being used by another process. Would you like to schedule this volume to be checked the next time the system restarts? (Y/N)" appears, select "N".
Disable access to the mirror disk ..
(Example)
clphdsnapshot --closeResume the mdw monitor resources by using the Cluster WebUI or the clpmonctrl command.
(Example)
clpmonctrl -r -m <hdw monitor name>If automatic mirror recovery is disabled, perform mirror recovery manually from Mirror Disks.
2.12. How to replace a server with a new one
When you replace a server in a cluster environment, follow the instructions below:
Set up a new server in the same way as the failed server.
When using a shared disk, do not connect the new server to the shared disk yet.
Set the same computer name and IP address as the failed server.
Register the EXPRESSCLUSTER license and apply updates as they have been registered and applied before.
If there were cluster partition and/or data partition of a mirror disk or hybrid disk on the local disk of the failing server, allocate these partitions and assign drive letters for them as they were configured in the failing server. When you use the disk of the failing server, configure drive letters for the partitions, though allocating partitions is not necessary.
When using a shared disk, set the SCSI controller or the HBA that is connected to the shared disk to be filtered in Filter Settings of Shared Disk upon installing the EXPRESSCLUSTER Server.
After the setup, shut it down and power it off.
Important
In Filter Settings of Shared Disk, set the SCSI controller or the HBA that is connected to the shared disk to be filtered. If the new server is connected to the shared disk when it has not been set to be filtered, data on the shared disk may be corrupted.
If the failed server is still running, shut it down and remove it from the shared disk and the LAN, and make sure other servers in the cluster are working properly. (Ignore errors caused by the failed server being stopped.)
Start the new server while it is connected to the LAN. When using a shared disk, start the server while it is also connected to the shared disk.
When using the shared disk, on the new server, use Disk Management (On the Start menu, point to Settings, and click Control Panel. Double-click Administrative Tools and then Computer Management, and click Disk Management.) to confirm that the shared disk is visible, and set the same drive letter as the failed server.
At this point, access to the shared disk is controlled, so the disk data cannot be referred.
Connect to a server in normal operation in the cluster by using the Web browser to start the config mode of Cluster WebUI. When using a shared disk, click Properties, HBA tab and Connect on the new server to check or modify the information on HBA and partitions.
Important
On the HBA tab of Properties of the new server, set the SCSI controller or the HBA that is connected to the shared disk to be filtered. If the shared disk is connected when it has not been set to be filtered, data on the shared disk may be corrupted.
When there is any mirror disk resource or hybrid disk resource in the resources used in the new server, stop the failover group containing these resources from the operation mode of Cluster WebUI.
Run "clpcl --suspend --force" from the command prompt on the server in normal operation in the cluster and suspend the cluster.
A server is recognized to have stopped, so the cluster cannot be suspended from the Cluster WebUI.
Select Apply the settings from the File menu in the Builder to apply the cluster configuration data .on the cluster.
When the message "There is difference between the disk information in the configuration information and the disk information in the server. Are you sure you want automatic modification?" appears, select Yes.
If you use a fixed term license, run the following command:
clplcnsc --reregister <a folder path for saved license files>
Resume the cluster from the operation mode of Cluster WebUI. If you stopped any group in step 6, start it.
Note
If you resume the cluster from the Cluster WebUI, the error message "Failed to resume the cluster. Click the Refresh data button, or try again later." is displayed, but ignore it. This is displayed because the new server has not been suspended.
Click Start Server Service for the new server in operation mode of Cluster WebUI.
Restart a manager from operation mode of Cluster WebUI.
When Off is selected for Auto Return in Extension tab of Cluster Properties, click Recover Server of the server where EXPRESSCLUSTER has been reinstalled in the operation mode of Cluster WebUI.
When a mirror disk resource or hybrid disk resource exists in the resources used in the new server and the Auto mirror recovery check box is not selected in Mirror Disk tab of Properties of the cluster, copy the mirror disk or hybrid disk fully from Mirror Disks.
Important
If the server that operates in another mirror disk type cluster is replaced with a new server, differential copy is executed automatically. After differential copy is completed, perform full copy manually. If you do not perform full copy, a mirror disk data incosistency will occcur.
Move group as necessary. When mirror disk or hybrid disk is being fully copied, complete copying before moving.
2.13. Wait time for synchronized cluster startup
Even all servers in a cluster are powered on simultaneously, it does not always mean that EXPRESSCLUSTER will start up simultaneously on all servers. EXPRESSCLUSTER may not start up simultaneously after rebooting the cluster following shutdown. Because of this, one server waits for other servers in the cluster to start.
By default, 5 minutes is set to the startup synchronization time. To change the default value, click Cluster Properties in the Cluster WebUI, click the Timeout tab, and select Synchronize Wait Time.
For more information, see "Timeout tab" in "Parameter details" in the "Reference Guide".
2.14. Changing the server configuration (add/delete)
2.14.1. Adding a server (mirror disk or hybrid disk is not used)
To add a server, follow the steps below:
Important
When adding a server in changing the cluster configuration, do not make any other changes such as adding a group resource.
- The additional server license must be registered.To register licenses, refer to "Installation and Configuration Guide" > "Registering the license".
Make sure that the cluster is working properly.
Start the server to add. For using the shared disk, make sure the server to add is not connected to the shared disk and then start the server to add.
Important
To use the shared disk, do not connect the server to the shared disk before setting it up and powering it off. Data on the shared disk may be corrupted.
Configure the settings that should be done before setting up the EXPRESSCLUSTER Server on the server to add. However, to use the shared disk, do not configure the settings for the disk in this step.
See also
As for the settings to be configured before the setup, see "Settings after configuring hardware" of "Determining a system configuration" in "Installation and Configuration Guide".
Set up the EXPRESSCLUSTER Server to the server to add. Enter the port numbers of the Cluster WebUI and the disk agent. Configure the same settings for the port number as the server that has been already set up. To use the shared disk, set the HBA that is connected to the shared disk to be filtered. Register the license as necessary. After the setup, shut down the server to add and power it off.
Important
If the shared disk is not set to be filtered in Filter Settings of Shared Disk when setting up the EXPRESSCLUSTER Server, do not connect to the shared disk even after the setup completes. Data on the shared disk may be corrupted. Reinstall EXPRESSCLUSTER and set the shared disk to be filtered.
Start the server to add. To use the shared disk, connect the disk to the server to add at first, and then start the server.
To use the shared disk, configure the settings for the disk on the server to add.
Use Disk Management (On the start menu, point to Settings, and click Control Panel. Double-click Administrative Tools and then Computer Management, and click Disk Management.) to confirm that the shared disk is visible.
Set the switchable partitions for disk resources and the partitions used as the cluster partition or data partition for hybrid disk resources so that they can be accessed from all the servers by using the same drive letters.
On all the servers, set the same drive letter to the disk heartbeat partitions to be used for the disk network partition resolution resources.
At this point, access to the shared disk is controlled, so the disk data cannot be referred.
Note
Changing or deleting the drive letter assigned to a partition of a shared disk may fail. To avoid this, specify the drive letter according to the procedure below:
Run the following command by using the command prompt to delete the drive letter.
> mountvol <drive_letter(_to_be_changed)>: /P
Confirm that the drive letter has been deleted from the target drive by using Disk Management (Control Panel > Administrative Tools > Computer Management > Disk Management).
Assign a new drive letter to the drive by using Disk Management.
Access to other server in the cluster via the Web browser and click the Add server in the config mode of Cluster WebUI.
By using the config mode of Cluster WebUI, configure the following settings of the server to add.
Information on the HBA and the partition on the HBA tab of Properties of the server to add (when using the shared disk).
Information on the disk heartbeat partition on the NP Resolution tab of Cluster Properties (when using the shared disk).
Information on the Source IP Address of the server to add on the Details tab of Properties of the virtual IP resource (when using the virtual IP resource).
IP Address of the server to add on the Monitor(special) tab of Properties of the NIC Link Up/Down monitor resource (when using the NIC Link Up/Down monitor resource).
Information on the ENI ID of the server to add on the Details tab of Properties of the AWS elastic IP resources (when using an AWS Elastic IP resource).
Information on the ENI ID of the server to add on the Details tab of Properties of the AWS virtual IP resources (when using an AWS virtual IP resource).
Information on the IP Address of the server to add on the Details tab of Properties of the Azure DNS resources (when using an Azure DNS resource).
Important
On the HBA tab of Properties of the server to add, set the SCSI controller and the HBA connected to the shared disk to be filtered. If the shared disk is connected when it has not been set to be filtered, data on the shared disk may be corrupted.
Click Properties of the failover group in the Cluster WebUI config mode. Add the server in the Startup Server tab as a startable server (Note : On each failover group, only required server for failover must be added.).
Click Apply the Configuration File in the Cluster WebUI config mode to update the cluster configuration.
Note: Apply the configuration when the confirmation message is displayed.
Perform Start server service of the added server in the Cluster WebUI operation mode.
Click Refresh data in the Cluster WebUI operation mode and confirm the displayed cluster information is in normal status.
If the server recovery is required, recover the server manually in the Cluster WebUI operation mode.
2.14.2. Adding a server (Mirror disk or hybrid disk is used)
To add a server, follow the steps below:
Important
When adding a server in changing the cluster configuration, do not make any other changes such as adding a group resource.
- The additional server license must be registered.To register licenses, refer to "Installation and Configuration Guide" > "Registering the license".
Make sure that the cluster is working properly.
Start the server to add. For using the shared disk, make sure the server to add is not connected to the shared disk and then start the server to add.
Important
To use the shared disk, do not connect the server to the shared disk before setting it up and powering it off. Data on the shared disk may be corrupted.
Configure the settings that should be done before setting up the EXPRESSCLUSTER Server on the server to add. However, to use the shared disk, do not configure the settings for the disk in this step.
See also
As for the settings to be configured before the setup, see "Settings after configuring hardware" of "Determining a system configuration" in "Installation and Configuration Guide".
Set up the EXPRESSCLUSTER Server to the server to add. Enter the port numbers of the Cluster WebUI and the disk agent. Configure the same settings for the port number as the server that has been already set up. To use the shared disk, set the HBA that is connected to the shared disk to be filtered. Register the license as necessary. After the setup, shut down the server to add and power it off.
Important
If the shared disk is not set to be filtered in Filter Settings of Shared Disk when setting up the EXPRESSCLUSTER Server, do not connect to the shared disk even after the setup completes. Data on the shared disk may be corrupted. Reinstall EXPRESSCLUSTER and set the shared disk to be filtered.
Start the server to add. To use the shared disk, connect the disk to the server to add at first, and then start the server.
To use the shared disk, configure the settings for the disk on the server to add.
Use Disk Management (On the start menu, point to Settings, and click Control Panel. Double-click Administrative Tools and then Computer Management, and click Disk Management.) to confirm that the shared disk is visible.
Set the switchable partitions for disk resources and the partitions used as the cluster partition or data partition for hybrid disk resources so that they can be accessed from all the servers by using the same drive letters.
On all the servers, set the same drive letter to the disk heartbeat partitions to be used for the disk network partition resolution resources.
At this point, access to the shared disk is controlled, so the disk data cannot be referred.
Note
Changing or deleting the drive letter assigned to a partition of a shared disk may fail. To avoid this, specify the drive letter according to the procedure below:
Run the following command by using the command prompt to delete the drive letter.
mountvol <drive_letter(_to_be_changed)>: /P
Confirm that the drive letter has been deleted from the target drive by using Disk Management (Control Panel > Administrative Tools > Computer Management > Disk Management).
Assign a new drive letter to the drive by using Disk Management.
Access to other server in the cluster via the Web browser and click the Add server in the config mode of Cluster WebUI.
By using the config mode of Cluster WebUI, configure the following settings of the server to add.
Information on the HBA and the partition on the HBA tab of Properties of the server to add (when using the shared disk).
Information on the disk heartbeat partition on the NP Resolution tab of Cluster Properties (when using the shared disk).
Information on the Source IP Address of the server to add on the Details tab of Properties of the virtual IP resource (when using the virtual IP resource).
IP Address of the server to add on the Monitor(special) tab of Properties of the NIC Link Up/Down monitor resource (when using the NIC Link Up/Down monitor resource).
Information on the ENI ID of the server to add on the Details tab of Properties of the AWS elastic IP resources (when using an AWS Elastic IP resource).
Information on the ENI ID of the server to add on the Details tab of Properties of the AWS virtual IP resources (when using an AWS virtual IP resource).
Information on the IP Address of the server to add on the Details tab of Properties of the Azure DNS resources (when using an Azure DNS resource).
Important
On the HBA tab of Properties of the server to add, set the SCSI controller and the HBA connected to the shared disk to be filtered. If the shared disk is connected when it has not been set to be filtered, data on the shared disk may be corrupted.
When using a hybrid disk resource in the added server, click Properties of Servers in the Conf mode of Cluster WebUI. From the Server Group tab, add the server to the servers that can run the Group. Do this for required servers only.
Click Properties of the failover group in the config mode of Cluster WebUI. Add the server to the servers that can be started on the Startup Server tab. Add the server that can be started only to the required failover group.
Click Apply the Configuration File in the Cluster WebUI config mode to update the cluster configuration. OS reboot might be required (proceed accordingly).
If the server recovery is required, recover the server manually in the Cluster WebUI operation mode.
2.14.3. Deleting a server (Mirror disk or hybrid disk is not used)
To delete a server, follow the steps below:
Important
When deleting a server in changing the cluster configuration, do not make any other changes such as adding a group resource.
Refer to the following information for licenses registered in the server you want to delete.
No action required for CPU licenses.
- VM node licenses and other node licenses are discarded when EXPRESSCLUSTER is uninstalled.Back up the serial numbers and keys of licenses if required.
No action required for fixed term licenses. Unused licenses are automatically collected and provided to other servers.
Make sure that the cluster is working normally. If any group is active on the server you are going to delete, move the group to another server.
When the server to be deleted is registered in a server group, click Properties of Server of the config mode of Cluster WebUI. Delete the server from Servers that can run the Group in the Server Group tab.
Click Remove Server of the server to delete in the config mode of Cluster WebUI.
Click Apply the Configuration File in the Cluster WebUI config mode to update the cluster configuration.
Proceed accordingly when the confirmation message is displayed.
Click Refresh data in the operation mode of Cluster WebUI to verify the cluster is properly working.
Deleted servers will not belong to clusters. To uninstall EXPRESSCLUSTER servers on the servers you want to delete, refer to "Installation and Configuration Guide" > "Uninstalling and reinstalling EXPRESSCLUSTER" > "Uninstallation".
2.14.4. Deleting a server (Mirror disk or hybrid disk is used)
To delete a server, follow the steps below:
Important
When deleting a server in changing the cluster configuration, do not make any other changes such as adding a group resource.
Refer to the following information for licenses registered in the server you want to delete.
No action required for CPU licenses.
No action required for fixed term licenses. Unused licenses are automatically collected and provided to other servers.
Stop groups using mirror disk resources or hybrid disk resources with Cluster Web UI operation mode.
Make sure that the cluster is working properly. (However, ignore errors in the server to be deleted.)
Access to other server in the cluster via the Web browser and start the Cluster WebUI.
When the server to be deleted is registered in a server group, click Properties of Server of the config mode of Cluster WebUI. Delete the server from Servers that can run the Group in the Server Group tab.
Click Remove Server of the server to delete in the config mode of Cluster WebUI.
Click Remove resource of mirror disk resource or hybrid disk resource in the Cluster WebUI config mode.
Click Apply the Configuration File in the Cluster WebUI config mode to update the cluster configuration. OS reboot might be required (proceed accordingly).
Click Refresh data in the operation mode of Cluster WebUI to verify the cluster is properly working.
Deleted servers will not belong to clusters. To uninstall EXPRESSCLUSTER servers on the servers you want to delete, refer to "Installation and Configuration Guide" > "Uninstalling and reinstalling EXPRESSCLUSTER" > "Uninstallation".
2.15. Changing the server IP address
To change the server IP address after you have started the cluster system operation, follow the instructions below.
2.15.1. When changing the mirror connect IP address is not required
Make sure that the cluster is working properly.
Suspend the cluster by using the operation mode of Cluster WebUI.
Change the OS network configuration in the Properties of My Network Places.
Change the IP address on the Interconnect tab of the Cluster Properties by using the config mode of Cluster WebUI.
If the changed IP address is used for the NIC Link Up/Down monitor resource, change the IP address on the Monitor(special) tab of the monitor resource properties.
Click Apply the Configuration File from the config mode of Cluster WebUI and apply the cluster configuration data to the cluster.
Resume the cluster by using the operation mode of Cluster WebUI.
2.15.2. When changing the mirror connect IP address is required
Make sure that the cluster is working properly.
Stop the cluster by using the operation mode of Cluster WebUI.
Change the OS network configuration in the Properties of My Network Places.
Change the IP address on the Interconnect tab and the MDC tab of the Cluster Properties by using the config mode of Cluster WebUI.
If the changed IP address is used for the NIC Link Up/Down monitor resource, change the IP address on the Monitor(special) tab of the monitor resource properties.
Click Apply the Configuration File from the config mode of Cluster WebUI and apply the cluster configuration data to the cluster.
Reboot the OS on all the servers.
2.16. Changing the host name
Follow the steps below if you want to change the host name of a server after you have started the cluster system operation.
2.16.1. Environment where the mirror disk / hybrid disk does not exist
Make sure that the cluster is working properly.
If the group is started on the server whose host name is to be changed, move the group.
Suspend the cluster by using the operation mode of Cluster WebUI.
Change the host name in the properties of My Computer.
Note
Do not restart the OS at this stage. The cluster configuration data will not be able to be applied until the OS is completely restarted.
Click Rename Server of the server in the config mode of Cluster WebUI.
Use the config mode of Cluster WebUI to save the cluster configuration information in which the server name has been changed in a disk area accessible from a cluster server.
When the Cluster WebUI is used on a cluster server, save the information in the local disk. When the Cluster WebUI is used in another PC, save the information in the shared disk that can be accessed from the cluster server or save it in an external media or the like and then copy it to the local disk of a cluster server.
Run the following command on one of the cluster servers to upload the saved cluster configuration information.
clpcfctrl --push -x <path_of_the_cluster_configuration_information> --nocheck
Note
Check cluster configuration information before the distribution if required.
Shutdown the OS on the server you have changed the host name.
Resume the cluster from the the operation mode of Cluster WebUI.
Note
If the cluster is resumed from the WebManager, the error message "Failed to resume the cluster. Click the Reload button, or try again later." is displayed, but ignore it. This message is displayed because the server whose host name was changed is not suspended.
Restart the manager from the operation mode of Cluster WebUI.
Execute the server of which the host name has been changed. When Off is selected for Auto Return in Extension tab of Cluster Properties, recover the cluster by using the operation mode of Cluster WebUI manually.
2.16.2. Environment where the mirror disk / hybrid disk exists
Make sure that the cluster is working properly.
Stop the cluster by using the operation mode of Cluster WebUI..
Change the host name in the properties of My Computer.
Note
Do not restart the OS at this stage. The cluster configuration data will not be able to be applied until the OS is completely restarted.
Click Rename Server of the server in the config mode of Cluster WebUI.
Use Cluster WebUI to save the cluster configuration information in which the server name has been changed in a disk area accessible from a cluster server.
When the Cluster WebUI is used on a cluster server, save the information in the local disk. When the Cluster WebUI is used in another PC, save the information in the shared disk that can be accessed from the cluster server or save it in an external media or the like and then copy it to the local disk of a cluster server.
Open Administrative Tools - Services for all servers to stop the EXPRESSCLUSTER X Disk Agent service.
Run the following command on one of the cluster servers to upload the saved cluster configuration information.
clpcfctrl --push -x <path_of_the_cluster_configuration_information> --nocheck
Note
Check cluster configuration information before the distribution if required.
Reboot the OS on all the servers.
2.17. Replacing the network card
To replace the network card, follow the steps below. To replace the network card used for the mirror connect, follow the same steps as well.
Make sure that the cluster is working properly. (However, ignore errors in the network card to be replaced.)
If a group is running on the server whose network card is to be replaced, move the group. If the network card has been used for the mirror connect, no groups can be moved until the mirror disk recovers after the replacement. Because of this, stop the group by Cluster WebUI.
Change a startup type to manual start on the server where you will replace a network card.
clpsvcctrl.bat --disable -a
Click Server Shut Down of the server whose network card is to be replaced from Cluster WebUI.
After the shutdown completes, replace the network card.
Start the server that the network card is replaced.
Configure the settings for the OS network in the Properties of My Network Places. Configure the same settings for the network as before replacing the network card.
Open Services on the server whose network card has been replaced (On the Start menu, point to Settings, and click Control Panel. Double-click Administrative Tools and then Services.), and restore Startup Type in Properties of each service which has been changed to Manual in step 3 to Automatic, and restart the server.
When Off is selected for Auto Return in Extension tab of Cluster Properties, recover the cluster by using the Cluster WebUI manually.
Move group as necessary.
2.19. Changing the disk configuration - For a mirror disk -
2.19.1. Replacing the disk
To replace the mirror disk, see "2.26. Replacing the mirror disk".
2.19.2. Adding a disk
To add a disk used for the mirror disk, follow the steps below:
Make sure that the cluster is working properly.
If the group is running on the server to which a disk is added, move the group.
Shut down only one server by using the operation mode of Cluster WebUI and power it off.
Expand the disk, and start the server.
Return the server to the cluster, and rebuild the mirror again.
Configure the settings for the disk by the server on which the disk is added.
Reserve a data partition and a cluster partition for mirror disk using Disk Management (On the Start menu, point to Settings, and click Control Panel. Double-click Administrative Tools and then Computer Management, and click Disk Management.). Set their drive letters so that they will be the same on both of the servers.
Perform the steps 2 to 6 on other server.
In the operation mode of Cluster WebUI, stop the group to which the mirror disk resource is to be added.
Suspend the cluster by using the operation mode of Cluster WebUI.
Add the mirror disk resource by clicking Add Resource of the group to which the mirror disk resource is added in the config mode of Cluster WebUI.
Click Apply the Configuration File of the config mode of Cluster WebUI and apply the cluster configuration data to the cluster.
Resume the cluster by using the operation mode of Cluster WebUI.
Start the added mirror disk resource or the group that added the mirror disk resource. If Auto Mirror Initial Construction is set to be performed in Cluster Properties, the initial mirror construction is started. If Auto Mirror Initial Construction is set not to be performed, perform the initial mirror construction manually.
Move group as necessary.
2.19.3. Deleting a disk
Follow the steps below to delete the disk used for the mirror disk.
Make sure that the cluster is working properly.
Stop the group with the mirror disk resource to be deleted by using the operation mode of the Cluster WebUI.
Suspend the cluster by using the operation mode of the Cluster WebUI.
Click the group from which the mirror disk resource is deleted in the config mode of Cluster WebUI. Click Remove Resources of the mirror disk resource.
Click Apply the Configuration File of the config mode of Cluster WebUI and apply the cluster configuration data to the cluster.
Resume the cluster by using the operation mode of Cluster WebUI.
Start the group with the operation mode of Cluster WebUI.
Shut down the server on which the group has not been started with the operation mode of Cluster WebUI and power it off.
Remove the disk, and start the server.
Move the group, and perform the steps 8 and 9 on other server.
Move group as necessary.
2.20. Backing up/restoring data
Data is backed up and restored, as shown in the following image. For details on how to back up data, see the manuals of the backup software.
Data of the Shared Disk and Local Disk is backed up to a device connected to the active server (Server 1).
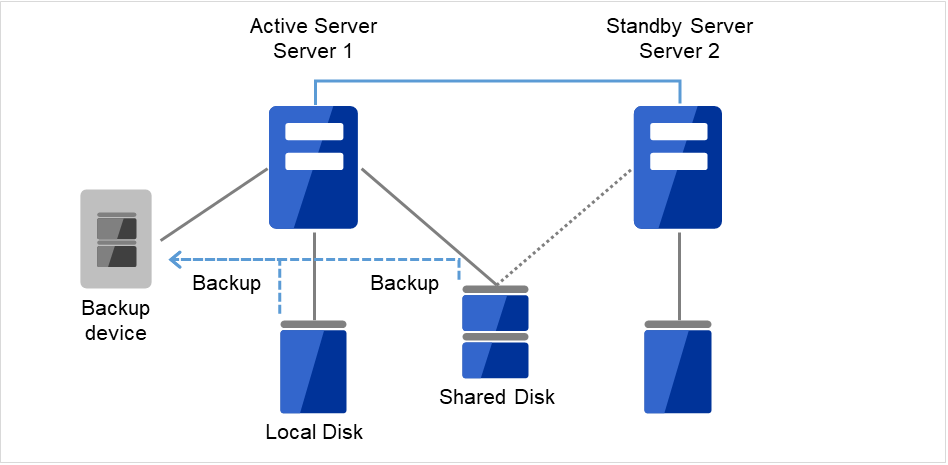
Fig. 2.2 Backup example of active-standby (1)
If an error has occurred on an active server (Server 1), data of the Shared Disk and Local Disk is backed up to a device connected to the standby server (Server 2).
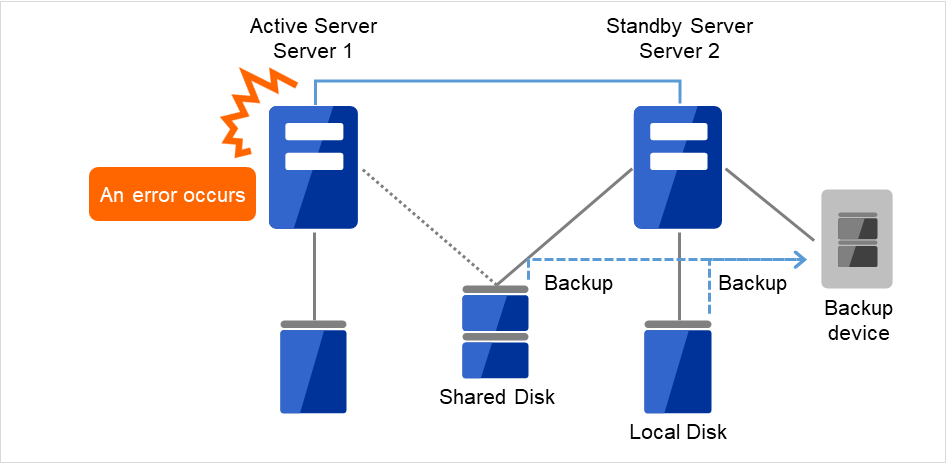
Fig. 2.3 Backup example of active-standby (2)
2.21. Performing a snapshot backup
When a mirror disk or a hybrid disk is used, it is possible to suspend mirroring to back up the stand-by data partition as a snapshot image. This is referred to as snapshot backup.
During executing snapshot backup, failover cannot be performed to the stand-by server or server group of the copying destination because mirroring is temporarily canceled. While in this state, cancel the access restriction to the data partition of the standby server to collect the backup.
To return from the snapshot status, control the disk access and build the mirror again.
For details for how to collect the backup, see the manuals of the backup software.
Note
When mirroring is interrupted, note that the data at the mirroring copy destination does not necessarily have integrity as NTFS or application data, depending on the timing of the mirroring.
2.21.1. Performing a snapshot backup
To execute the snapshot backup for a mirror disk, follow the steps below:
Stop the mirror disk monitor resource that monitors the mirror disk that will be backed up on the server to be backed up.
clpmonctrl -s -m <mdw(mirror_disk_monitor_resource_name)>
Disconnect the mirror disk.
clpmdctrl --break <md(mirror_disk_resource_name)>
Allow accesses to the mirror disk.
mdopen <md(mirror_disk_resource_name)>
Back up necessary files.
Forbid accesses to the mirror disk.
mdclose <md(mirror_disk_resource_name)>
Start the mirror disk monitor resource that monitors the mirror disk.
clpmonctrl -r -m <mdw(mirror_disk_resource_monitor_resource_name)>
If automatic mirror recovery is disabled, perform mirror recovery manually from Mirror Disks.
To execute the snapshot backup for a hybrid disk, collect the backup by following the steps below in a server in the standby server group of the copying destination.
Run the following command in the server where the backup is collected.
clphdsnapshot --open <hybrid_disk_resource_name>
When the access restriction in the data partition is canceled, back up the required files.
Run the following command in the server where the backup has been collected to restart mirroring.
clphdsnapshot --close <hybrid_disk_resource_name>
When the automatic mirror recovery is disabled, perform mirror recovery manually from Mirror Disks.
For the commands, see "EXPRESSCLUSTER command reference" in the "Reference Guide".
2.22. How to back up a mirror/hybrid disk to its disk image
Perform either of the following procedures when backing up the partition (cluster partition and data partition) for a mirror/hybrid disk, to its disk image:
Simultaneously backing up both active and standby mirror disks
Note
clpbackup --preorclpbackup --poston a server of a server group first, then performclpbackup --pre --only-shutdownorclpbackup --post --only-rebooton all the other servers of the server group.Each of the written procedures includes the current server of the server group, as a signpost for the first server of the group on which the command is executed. However, the current server does not have to be the first server.If the server group has only one server, it is unnecessary to executeclpbackup --pre --only-shutdownorclpbackup --post --only-rebooton all the other servers of the server group.* In each server group, a current server is responsible for the mirror data to be transmitted/received, and to be written to its disk.In the active server group, the current server contains the hybrid disk resource being activated.In the standby server group, the current server receives the mirror data, sent from the current server of the active server group, and writes such data to its mirror disk.Some invalid status. Check the status of cluster.", leading to a failure in the shutdown. Then wait a while before performing the clpbackup command again.Suspended (isolated)Suspension (Isolated).In this case, click Recover server in the Status tab of Cluster WebUI, or execute the clpcl command with the --return option as follows:clpcl --returnAfter the server recovery, the failover group may not be started. Then start it if necessary.See also
For information on the clpbackup command, see "Reference Guide" -> "EXPRESSCLUSTER command reference" -> "Preparing for backup to a disk image (clpbackup command)".
2.22.1. Simultaneously backing up both active and standby mirror disks
Check the mirror status by using Cluster WebUI or by running the clpmdstat / clphdstat command:
For mirror disk resources:
clpmdstat --mirror <md_resource_name>
For hybrid disk resources:
clphdstat --mirror <hd_resource_name>
clphdstat --active <hd_resource_name>
Note
For hybrid disk resources, confirm which is a current server in each the active server group and the standby server group.
Stop the activated failover group (the operation) by using Cluster WebUI or by running the clpgrp command.
- Run the following command on both of the active server and the standby server:* For hybrid disk resources, run the command on the current server of each server group.
clpbackup --pre
Note
After the execution, the status of mirroring is changed to that for the backup, automatic startup of the cluster service is set to disabled, and then the server is shut down.
For hybrid disk resources: After shutting down the current servers, execute the following command on all the other servers:
clpbackup --pre --only-shutdown
Note
When the command is executed, automatic startup of the cluster service is set to disabled and the server shuts down.
Execute backup on both servers.
- After completing the backup, start up both the active server and the standby server, then execute the following command on each of them.* For hybrid disk resources: Start all the servers, then execute the following command on the current server of the active server group and on that of the standby server group:
clpbackup --post
Note
After the execution, the mirror status returns to normal, automatic startup of the cluster service is set to enabled, and then the server reboots.
For hybrid disk resources: When each of the current servers starts rebooting, execute the following command on all the other servers:
clpbackup --post --only-reboot
Note
When the command is executed, automatic startup of the cluster service is set to enabled and the server reboots.
After both the servers are started, check the status of mirroring by using Cluster WebUI or by running the clpmdstat / clphdstat command.
2.22.2. Backing up active/standby mirror disks in each server
Back up the disks in each server alternately according to the following procedure as specified in "Backing up standby mirror disks".
Back up the disks on the standby server as specified in "Backing up standby mirror disks".
After the completion of backup, when mirror recovery is completed to synchronize the mirror disks between the active server and the standby server, move the failover group from the active server to the standby server.
Back up the disks on the previously active server as specified in "Backing up standby mirror disks".
After the completion of backup, when mirror recovery is completed to synchronize the mirror disks between the active server and the standby server, move the failover group as required.
2.22.3. Backing up standby mirror disks
Confirm that the mirror is synchronized normally by using Cluster WebUI or by running the clpmdstat / clphdstat command:
For mirror disk resources:
clpmdstat --mirror <md_resource_name>
For hybrid disk resources:
clphdstat --mirror <hd_resource_name>
clphdstat --active <hd_resource_name>
Note
For hybrid disk resources, confirm which is a current server in the standby server group.
In order to secure the quiescent point for data being written to the mirror area, stop the failover group including mirror disk resources and hybrid disk resources by using Cluster WebUI or by running the clpgrp command.
Note
Stopping the failover group prevents the backup of the data being written, or the failure to be written and backed up to a mirror area due to a cache.
- Suspend the mirror synchronization.First, in order to prevent the automatic mirror recovery from working, pause all the mirror disk monitor resources/hybrid disk monitor resources on both of the active server and the standby server, by using Cluster WebUI or executing the following clpmonctrl command:
clpmonctrl -s -h <server_name> -m <monitor_resource_name>
Next, suspend all the mirror synchronization in either of the following ways: In the Mirror disks tab of Cluster WebUI, click Mirror break icon to change the status to "Abnormal" (RED) for all the mirror disk resources/hybrid disk resources on the standby server. Alternatively, execute the following clpmdctrl/clphdctrl command with the --break option for all the mirror disk resources/hybrid disk resources on the standby server:For mirror disk resources:
clpmdctrl --break <md_resource_name>
For hybrid disk resources:
clphdctrl --break <hd_resource_name>
Note
Perform this command on the current server of the standby server group.
See also
For information on the clpmonctrl command, see "Reference Guide" -> "EXPRESSCLUSTER command reference" -> "Controlling monitor resources (clpmonctrl command)".
If you want to restart the operation immediately, start the failover group (operation) on the active server (i.e., the server not to be backed up) by using Cluster WebUI or by running the clpgrp command.
- Run the following command on the standby server:* For a hybrid disk, perform this command on one server of the standby server group:
clpbackup --pre
Note
After the execution, the status of mirroring is changed to that for the backup, automatic startup of the cluster service is set to disabled, and then the server is shut down.
For a hybrid disk, execute the following command on all the other servers of the standby server group:
clpbackup --pre --only-shutdown
Note
When the command is executed, automatic startup of the cluster service is set to disabled and the server shuts down.
Back up the disk to its disk images on the standby server.
- After the completion of the backup, run the following command on the standby server:* For hybrid disk resources: Start all the servers of the standby server group, then execute the following command on one of the servers:
clpbackup --post
Note
After the execution, the mirror status returns to normal, automatic startup of the cluster service is set to enabled, and then the server reboots.
For a hybrid disk, execute the following command on all the other servers of the standby server group:
clpbackup --post --only-reboot
Note
When the command is executed, automatic startup of the cluster service is set to enabled and the server reboots.
- The standby server is started.If the mirror disk monitor resources/hybrid disk monitor resources stay paused, resume them through Cluster WebUI or by executing the following clpmonctrl command:
clpmonctrl -r -h <server_name> -m <monitor_resource_name>
The failover group, if remains stopped (if not restarted immediately in the previous step), is executable on the active server.
- If automatic mirror recovery is enabled, mirroring is automatically recovered to return to normal.If automatic mirror recovery is not executed and the server is not working normally, execute mirror recovery by using Cluster WebUI or by running the clpmdctrl / clphdctrl command on the active server.
For mirror disk resources:
clpmdctrl --recovery <md_resource_name>
For hybrid disk resources:
clphdctrl --recovery <hd_resource_name>
Note
For hybrid disk resources, execute this command on the current server of the active server group.
2.23. How to restore the mirror/hybrid disk from the disk image
Perform either of the following procedures when restoring the partition (cluster partition and data partition) from its disk image backed up as specified in "How to back up a mirror/hybrid disk to its disk image":
Note
clprestore --postorclprestore --post --skip-copyon a server of a server group first, then performclprestore --post --only-rebooton all the other servers of the server group.Each of the written procedures includes the current server of the server group, as a signpost for the first server of the group on which the command is executed. However, the current server does not have to be the first server.If the server group has only one server, it is unnecessary to executeclprestore --post --only-rebooton all the other servers of the server group.* In each server group, a current server is responsible for the mirror data to be transmitted/received, and to be written to its disk.In the active server group, the current server contains the hybrid disk resource being activated.In the standby server group, the current server receives the mirror data, sent from the current server of the active server group, and writes such data to its mirror disk.Some invalid status. Check the status of cluster.", leading to a failure in the shutdown. Then wait a while before performing the clpbackup command again.Invalid configuration file." is displayed and the server is not restarted, check to see if the configuration data is registered, or there are any problems with the installation of EXPRESSCLUSTER or the setting of the firewall.Suspended (isolated)Suspension (Isolated).In this case, click Recover server in the Status tab of Cluster WebUI, or execute the clpcl command with the --return option as follows:clpcl --returnAfter the server recovery, the failover group may not be started. Then start it if necessary.
Run the following command by using the command prompt to delete the drive letter.
mountvol <drive_letter_to_be_changed>: /PConfirm that the drive letter has been deleted from the target drive by using Disk Management (Control Panel > Administrative Tools > Computer Management > Disk Management).
Assign a new drive letter to the drive by using Disk Management.
Save the configuration data file (in zip format) to the disk with Export of Cluster WebUI.
Extract the zip-formatted configuration data file to the disk accessible from either of the servers that belong to the cluster.
Forcibly distribute the extracted configuration information file to all the servers by using the clpcfctrl command:
clpcfctrl --push -x <path_to_the_directory_containing_the_extracted_configuration_data_file_clp.conf> --force --nocheckSee also
For information on the clprestore command, see "Reference Guide" -> "EXPRESSCLUSTER command reference" -> "Perform the processing after restoring from a disk image (clprestore command)".
For information on the clpcfctrl command, see "Reference Guide" -> "EXPRESSCLUSTER command reference" -> "Creating a cluster and backing up configuration data (clpcfctrl command)".
2.23.1. Simultaneously restoring the mirror disks on both of the active and standby servers from the same disk image
Important
In this procedure, Execute the initial mirror construction needs to be set to disabled in advance in the setting of mirror resources/hybrid resources.If Execute the initial mirror construction is enabled, an error occurs. In this case, disable the setting by using Cluster WebUI.
Stop the activated failover group by using Cluster WebUI or by running the clpgrp command.
- Run the following command on all the active/standby servers:* If the OS cannot be started and the OS or EXPRESSCLUSTER needs to be reinstalled or restored, run the following command on the server where the reinstallation or the restoration was performed:
clprestore --pre
Note
When the command is executed, automatic startup of the cluster service is set to disabled and the server shuts down.
- Restore the cluster partition and the data partition on both of the active server and standby server.* Restore the active server and the standby server from the same disk images.
After the completion of restoring both of the active server and the standby server, start all the servers.
- On each of the servers, go to Control Panel -> Administrative Tools -> Computer Management -> Disk Management, then respecify the drive letters--for example, of the restored data partition and cluster partition.* Explicitly respecify the drive letters even if they have not been changed.
Note
For a hybrid disk, you may fail to change/delete the drive latter of a shared-disk partition.In this case, execute the following mountvol command to delete the drive letter first, then respecify it in Disk Management:mountvol <drive_letter_to_be_changed>: /P
- Start Cluster WebUI and change the mode to Config mode.In each setting of the mirror disk resource and the hybrid disk resource, confirm or reselect the cluster partition and the data partition for each server.
- For information on mirror disk resources, select each server from Servers that can run the group on the Details tab in the Resource Properties and click the Edit button.Click the Connect button in Selection of partition to confirm that the data partition and the cluster partition are correctly selected. If not, select the correct partition and click the OK button.
- For hybrid disk resources, click Obtain information for Server Groups under Details tab of the Resource Properties.After the GUID for each partition has been updated, click the OK button.
See also
For the details of the setting, see "Reference Guide" -> "Group resource details" -> "Understanding Mirror disk resources" -> "Details tab" or "Understanding Hybrid disk resources" -> "Details tab".
If Execute the initial mirror construction is enabled in the setting of mirror disk resources/hybrid disk resources, change it to disabled.
See also
For the details of the setting, see Tuning and Execute the initial mirror construction in "Reference Guide" -> "Group resource details" -> "Understanding Mirror disk resources" -> "Details tab" or "Understanding Hybrid disk resources" -> "Details tab".
After confirming or modifying the setting with Cluster WebUI, execute Apply the Configuration File.
Note
If the message "There is a difference between the disk information in the configuration information and the disk information on the server. Do you want to automatically set it up?" appears upon executing Apply the Configuration File, select Yes.
- After completing the application, execute the following command on each of the active server and the standby server.* For a hybrid disk, perform this command on one server (e.g. the current server) of the active server group and on that of the standby server group:
clprestore --post --skip-copy
Note
When the command is executed, the cluster partition is updated, automatic startup of the cluster service is set to enabled, and the server reboots.This process may take time for a hybrid disk. For hybrid disk resources: When the server starts rebooting with the command in step 9 above, execute the following command on all the other servers of the server group:
clprestore --post --only-reboot
Note
When the command is executed, automatic startup of the cluster service is set to enabled and the server reboots.
- After both of the active/standby servers are started, check the status of mirroring by using Cluster WebUI or by running the clpmdstat / clphdstat command.The status of mirroring for both the active server and the standby server is "Normal" (GREEN).
For mirror disk resources:
clpmdstat --mirror <md_resource_name>
For hybrid disk resources:
clphdstat --mirror <hd_resource_name>
Note
If the mirroring status of either the active server or the standby server is "Normal" (GREEN) and that of the other is "Abnormal" (RED), then make a mirror recovery by clicking Difference copy icon in the Mirror disks tab of Cluster WebUI or by executing the clpmdctrl/clphdctrl command with the --recovery option on the "Normal" (GREEN) status server:For mirror disk resources:
clpmdctrl --recovery <md_resource_name>
- For hybrid disk resources:(* Perform this command on the current server.)
clphdctrl --recovery <hd_resource_name>
In addition, check the status of the failover group by using Cluster WebUI or executing the clpstat command. If you find the failover group has failed to start, stop the group by using Cluster WebUI or executing the clpgrp command. Then you can start the failover group (operation).Note
If the mirroring statuses of both the active server and the standby server are "Abnormal" (RED), change the status of the mirror side to be copied to "Normal" (GREEN) by clicking Forced mirror recovery icon in the Mirror disks tab of Cluster WebUI or by executing the clpmdctrl/clphdctrl command with the --force option.Confirm the status of the failover group by using Cluster WebUI or by running the clpstat command.Stop the failover group that failed the startup by using Cluster WebUI or by running the clpgrp command.After that, on the latest server, the failover group can be started (the operation can be started).And then, execute the mirror recovery.See also
For information on the clpmdctrl / clphdctrl command, see "Reference Guide" -> "EXPRESSCLUSTER command reference" -> "Operating mirror disk resource (clpmdctrl command)" or "Operating hybrid disk resource (clphdctrl command)".
If the setting of Execute the initial mirror construction is changed, restore the original setting by using Cluster WebUI as required.
2.23.2. Simultaneously restoring the mirror disks on both of the active and standby servers from their respective disk images
See also
For information on the procedure of restoring both of active/standby mirror disks from the same mirror disk image, see "Simultaneously restoring the mirror disks on both of the active and standby servers from the same disk image".
Stop the activated failover group by using Cluster WebUI or by running the clpgrp command.
- Run the following command on all the active/standby servers:* If the OS cannot be started and the OS or EXPRESSCLUSTER needs to be reinstalled or restored, run the following command on the server where the reinstallation or the restoration was performed:
clprestore --pre
Note
When the command is executed, automatic startup of the cluster service is set to disabled and the server shuts down.
Restore the cluster partition and the data partition on both of the active server and standby server.
After the completion of restoring both of the active server and the standby server, start all the servers.
- On each of the servers, go to Control Panel -> Administrative Tools -> Computer Management -> Disk Management, then respecify the drive letters--for example, of the restored data partition and cluster partition.* Explicitly respecify the drive letters even if they have not been changed.
- Start Cluster WebUI and change the mode to Config mode.In each setting of the mirror disk resource and the hybrid disk resource, confirm or reselect the cluster partition and the data partition for each server.
- For information on mirror disk resources, select each server from Servers that can run the group on the Details tab in the Resource Properties and click the Edit button.Click the Connect button in Selection of partition to confirm that the data partition and the cluster partition are correctly selected. If not, select the correct partition and click the OK button.
- For hybrid disk resources, click Obtain information for Server Groups under Details tab of the Resource Properties.After the GUID for each partition has been updated, click the OK button.
See also
For the details of the setting, see "Reference Guide" -> "Group resource details" -> "Understanding Mirror disk resources" -> "Details tab" or "Understanding Hybrid disk resources" -> "Details tab".
After confirming or modifying the setting with Cluster WebUI, execute Apply the Configuration File.
Note
If the message "There is a difference between the disk information in the configuration information and the disk information on the server. Do you want to automatically set it up?" appears upon executing Apply the Configuration File, select Yes.
- After completing the application, execute the following command on each of the active server and the standby server.* For a hybrid disk, perform this command on one server (e.g. the current server) of the active server group and on that of the standby server group:
clprestore --post
Note
When the command is executed, the cluster partition is updated, automatic startup of the cluster service is set to enabled, and the server reboots.This process may take time for a hybrid disk. For hybrid disk resources: When the server starts rebooting with the command in step 8 above, execute the following command on all the other servers of the server group:
clprestore --post --only-reboot
Note
When the command is executed, automatic startup of the cluster service is set to enabled and the server reboots.
- After both of the active/standby servers are started, check the status of mirroring by using Cluster WebUI or by running the clpmdstat / clphdstat command.The status of the mirror for both the active server and the standby server is "Abnormal" (RED).
For mirror disk resources:
clpmdstat --mirror <md_resource_name>
For hybrid disk resources:
clphdstat --mirror <hd_resource_name>
Confirm the status of the failover group by using Cluster WebUI or by running the clpstat command.
Stop the failover group that failed the startup by using Cluster WebUI or by running the clpgrp command.
Change the status of the mirror side to be updated to "Normal" (GREEN) by clicking Forced mirror recovery icon in the Mirror disks tab of Cluster WebUI or by executing the clpmdctrl/clphdctrl command with the --force option on the server whose status is to be "Normal" (GREEN).
For mirror disk resources:
clpmdctrl --force <server_name> <md_resource_name> -s
For hybrid disk resources:
clphdctrl --force <hd_resource_name>
On the latest server, by using Cluster WebUI or by running the clpgrp command, the failover group can be started (the operation can be started).
Make a mirror recovery (full copy) by clicking Full copy icon in the Mirror disks tab of Cluster WebUI or by executing the clpmdctrl/clphdctrl command on the copy-source server (on the copy-source current server for hybrid disk resources).
For mirror disk resources:
clpmdctrl --recovery <md_resource_name>
For hybrid disk resources:
clphdctrl --recovery <hd_resource_name>
For information on the clpmdctrl / clphdctrl command, see "Reference Guide" -> "EXPRESSCLUSTER command reference" -> "Operating mirror disk resource (clpmdctrl command)" or "Operating hybrid disk resource (clphdctrl command)".
2.24. Restoring the system disk
2.24.1. Restoring the system disk
If an error occurs in the system disk of the server, change the disk following the steps below, and restore the backup data. If EXPRESSCLUSTER has been updated or changes have been made on the configuration after the backup was created, make sure to uninstall EXPRESSCLUSTER after restoration and set this server as a new server by following the steps for server replacement.
If any group is running on the server where a system disk is restored (hereafter referred to as target server), move the group. When a mirror disk resource or hybrid disk resource is used, make sure that these resources are running properly after the group is moved.
Important
If the mirror disk resource or hybrid disk resource is not in the latest status, and if the system disk is restored on the server that is not to be restored, the data on the data partition may be corrupted.
If the mirror disk resource or hybrid disk resource is used, execute the following procedure.
Uncheck Auto Mirror Recovery in Mirror Disk tab of Cluster Properties in the config mode of Cluster WebUI.
Click Apply the Configuration File of the config mode of Cluster WebUI, and apply the cluster configuration data to the cluster.
If the target server is running, shut down the server by selecting Shut Down from Start menu.
When the shared disk is connected to the target server, remove the cable connecting the target server and the shared disk. Remove the cable carefully by following the instructions shown below:
When a SCSI disk array is used, remove the cable from the base of the two-way cable.
When a Fibre Channel disk array device, remove the cable between the failing server and the Fibre Channel-HUB or the Fibre Channel-Switch.
Change the system disk of the server to be restored. For details on how to change the system disk, see the user's guide provided with the device.
Follow the normal installation procedure and install the OS.
To install the OS, see the user's guide provided with the server.
Make sure to configure the network settings when installing the OS. Apply the same OS service pack as the removed disk.
Make sure that the OS is running normally, and install the backup software. (For details, see the manual of the backup software.)
Use the backup software to restore the system disk from the backup.
There is no note cluster dependent note. Restore the system disk with the settings that allow the registry to be recovered and files with the same file names to be overwritten. For details, see the manual of the backup software.
When the EXPRESSCLUSTER Server service of the target server is configured as Auto Startup, change the settings to Manual Startup.
Reset its drive letter if it has been changed. Make sure that the date and time are the same as those of other servers in the same cluster.
When the driver of SCSI controller or FC-HBA (Host Bus Adapter) cannot be restored, re-install the above driver. For details, refer to the instruction manual of backup software.
Restart the target server. When the shared disk is not connected to the target server, the following steps up to 16 are not required.
Connect to the server that has not been restored via the Web browser to start the Cluster WebUI. Open the Properties of the target server to configure the filter settings of the HBA connected to the shared disk.
Click Connect on the HBA tab to acquire the disk configuration information for the target server, and then select the check box for the HBA connected to the shared disk.
Do not change any settings other than above.
Use Cluster WebUI to save the cluster configuration information in which HBA filter settings have been configured in a disk area accessible from a cluster server.
When the Cluster WebUI is used on a cluster server, save the information in the local disk. When the Cluster WebUI is used in another PC, save the information in the shared disk that can be accessed from the cluster server or save it in an external media disk or the like and then copy it to the local disk of a cluster server.
Run the following command on one of the cluster servers to upload the saved cluster configuration information.
clpcfctrl --push -x <path_of_the_cluster_configuration_information> --nocheck
Shut down the target server and connect the disk cable, and then reboot the server.
If the server configuration (before restoration) meets any of the following conditions, create a partition again with Disk Management.
A cluster partition of a mirror disk resource/hybrid disk resource was present in the system disk
A data partition of a mirror disk resource/hybrid disk resource was present in the system disk.
Note
To re-create a data partition, resize the data partition according to data partition size of another server where you did not perform restoration.
Start the target server and check the drive letter of the shared disk and the mirror disk (data partition and cluster partition) in Disk Management of the target server. If the drive letter has been changed, re-configure it as it was, restart the server and check that the drive letter is configured correctly.
Connect to the server which has not been restored via the Web browser to start the Cluster WebUI. When the shared disk is connected to the target server and the shared disk has a volume that is not for filtering, update the information on the partition that is not for filtering in the HBA tab of Properties in the target server.
Perform the procedures in steps 14 and 15 above to save the cluster configuration information and then upload the information by using the clpcfctrl command from the server.
If the message "There is difference between the disk information in the configuration information and the disk information in the server. Are you sure you want automatic modification?" appears upon saving the configuration information, select Yes.
Restore the setting of the EXPRESSCLUSTER Server service to Auto Startup and reboot the target server.
When the Auto Recovery is configured as Off in Extension tab of Cluster Properties of the cluster, click Recover Server of the target server in the operation mode of Cluster WebUI. If mirror disk resource or hybrid disk resource is not used on the target server, the following procedure is not required.
When a mirror disk resource or hybrid disk resource is created on the system disk, the resource must be recreated before mirror recovery. Perform the following procedure.
23-1. From the the operation mode of Cluster WebUI, stop the group containing the target mirror disk resource or hybrid disk resource.
23-2. Suspend the cluster.
23-3. From the config mode of Cluster WebUI, execute Remove Resource of the target mirror disk resource or hybrid disk resource. Before deleting the resource, make a note of the parameter values required for recreating the resource.
23-4. Click Apply the Configuration File from the File menu and then apply the cluster configuration data to the cluster.
23-5. Execute Add Resource of the failover group. For each parameter, specify the same value as that specified for the resource that was deleted.
23-6. Click Apply the Configuration File from the File menu again and then apply the cluster configuration data to the cluster.
23-7. Resume the cluster.
Execute the mirror recovery (full copy) from the Mirror Disks of Cluster WebUI to all the mirror disk resources and hybrid disk resources.
Note
Data on the server on which restore is performed (the disk is replaced) may not be up to date. A server where restoring is not performed must be the source of the copy.In addition, Recover the mirror by fully copying, not partially copying because the data difference may be invalid in the process of restoring.When you have unchecked Auto Mirror Recovery in step 2, select Mirror disk tab and check Auto Mirror Recovery in the Cluster Properties of the config mode of Cluster WebUI.
Click Apply the Configuration File of the config mode of Cluster WebUI, to upload the cluster configuration data to the cluster.
Start the group.
2.26. Replacing the mirror disk
If an error occurs in a disk that forms a mirror set, follow the steps below to replace the disk. When using a disk array, the procedure below also needs to be performed if the array configuration is changed or a disk is recognized as a new one due to DAC replacement or some other reason.
You can replace a local disk mirrored by a hybrid disk resource by following the steps below. In that case, consider "mirror disk resource" in the description below as "hybrid disk resource". To replace a shared disk that is mirrored by a hybrid disk resource consisting of three or more servers, see the procedure described in "Replacing the hybrid disk".
Make sure that the cluster is working properly. (However, ignore errors in the disk to be replaced.)
If the group is running on the server, which contains the disk to be replaced, move the group.
When the Auto Mirror Recovery check box is selected in Properties of the cluster, in the config mode of Cluster WebUI, select Properties of the cluster and the Mirror disk tab, clear the Auto Mirror Recovery check box, click Apply the Configuration File in the File menu to apply the cluster configuration data to the cluster.
Shutdown the server whose disk is to be replaced from the operation mode of Cluster WebUI and power it off.
Replace the disk and start the server.
Configure the settings for the disk by the server with the replaced disk.
Reserve the data partition and the cluster partition for the mirror disk by using Disk Management (On the Start menu, point to Settings, and click Control Panel. Double-click Administrative Tools and then Computer Management, and click Disk Management.) Set the drive letters of the data partition and the cluster partition so that the drive letters of data partition and cluster partition and the size of data partitions are the same in both servers.
When the Auto Mirror Recovery is configured as Off in the Extension tab in Cluster properties, return the replaced server to the cluster from the operation mode of Cluster WebUI.
Suspend the cluster.
Start Cluster WebUI. If you have unchecked the Auto Mirror Recovery check box in procedure 3, check the Auto Mirror Recovery check box again.
Click Apply the Configuration File of the config mode of Cluster WebUI to upload the cluster configuration data to the cluster.
When the message "There is difference between the disk information in the configuration information and the disk information in the server. Are you sure you want automatic modification?" appears, select Yes.
Resume the cluster from the operation mode of Cluster WebUI.
If the Auto Mirror Recovery check box is selected in cluster properties, full reconstruction of mirror will be performed. If not, it is required to perform the reconstruction manually.
Move the group as necessary.
2.27. Replacing the hybrid disk
In a hybrid disk resource environment consisting of three or more servers, if an error occurs in a shared disk that forms a mirror set, replace that disk by applying the procedure described below. When a disk array is used, the procedure below also needs to be performed if the configuration of the array is changed or a disk is recognized as being a new one due to DAC replacement or some other reason.
To replace a local disk that is mirrored by a hybrid disk resource, see the procedure in "Replacing the mirror disk".
Check that the cluster is working properly. (Ignore errors with the disk that is to be replaced.)
If the group is running on the server, which contains the disk to be replaced, move the group.
When the Auto Mirror Recovery check box is selected in Properties of the cluster, in the config mode of Cluster WebUI, select Properties of the cluster and the Mirror disk tab, clear the Auto Mirror Recovery check box, click Apply the Configuration File in the File menu to apply the cluster configuration data to the cluster.
Select Stop Server Service from the operation mode of Cluster WebUI to execute cluster stop for all the servers connected to the shared disk to be replaced.
On all the servers connected to the shared disk to be replaced, set Startup Type to Manual for EXPRESSCLUSTER Server service.
Shut down all the servers connected to the shared disk to be replaced, and power them off.
Power off and replace the shared disk.
Power on the shared disk, and configure its settings.
If the RAID is to be built again or if the LUN configuration is to be changed, use the setup tool provided with the shared disk. For details, refer to the manual provided with the shared disk.
Start only one server, create a partition by using Disk Management (Control Panel > Administrative Tools > Computer Management > Disk Management) and set the drive letter as before replacing the disk. Even if the drive letter you want to assign is the same as the drive letter automatically assigned by the OS, manually assign the desired drive letter explicitly; for example, by deleting the OS assigned drive letter and then assigning the desired drive letter.
Note
Controlling the access to the created partition is started upon its creation, so it cannot be formatted. Set only the drive letter here.
Note
The size of the switchable partition used for a disk resource can be changed in this occasion. The sizes of the data partitions of a hybrid disk resource need to be the same in both server groups. For this reason, to change the size, it is necessary to delete the resource, change the partition size in both server groups and then create the resource again.
Note
Changing or deleting the drive letter assigned to a partition of a shared disk may fail. To avoid this, specify the drive letter according to the procedure below:
Run the following command by using the command prompt to delete the drive letter.
mountvol <drive_letter(_to_be_changed)>: /P
Confirm that the drive letter has been deleted from the target drive by using Disk Management (Control Panel > Administrative Tools > Computer Management > Disk Management).
Assign a new drive letter to the drive by using Disk Management.
To format the partition to be used as a disk resource, execute the following command to temporarily release the access restriction:
clpvolctrl --open <drive_letter_of_partition_to_be_used_as_disk_resource>
From Disk Management (Control Panel > Administrative Tools > Computer Management > Disk Management), format the partition to be used as a disk resource.
To restore the access restriction temporarily released in step 10 above, execute the following command:
clpvolctrl --close <drive_letter_of_partition_to_be_used_as_disk_resource>
Start the other servers connected to the replaced shared disk, and check that the partition created on the first server is visible from Disk Management (Control Panel > Administrative Tools > Computer Management > Disk Management).
Set the drive letter for each partition on the shared disk in the same way as for the first server as before replacing the disk.
On all the servers connected to the replaced shared disk, restore Startup Type to Automatic for EXPRESSCLUSTER Server service.
Start the Cluster WebUI and select Service, then click Start server service to execute cluster start for all the servers connected to the replaced shared disk.
Note
An hdw or hdtw warning message may be displayed at this time. Ignore the message and proceed to the next step.
Suspend the cluster.
When there are partitions with no access restrictions on the replaced shared disk, add these partitions to Partition excluded from cluster management by selecting the HBA tab of Properties and then clicking Connect for each server connected to the shared disk.
Note
When Partition excluded from cluster management is set for the shared disk before replacement, delete the setting, and then make the setting again. Perform the following procedure.
Open the HBA tab of Properties of the server that is connected to the replaced disk from the config mode of Cluster WebUI and then click Connect.
Select an HBA for which filtering is checked and then execute Remove for all the partitions that are displayed in Partition excluded from cluster management.
Click Add again to add all the partitions deleted in step 18-2.
Make sure that Volume, Disk No., Partition No., Size, and GUID are displayed for each partition that is excluded from cluster management.
Start the Cluster WebUI. If you have unchecked Auto Mirror Recovery in step 3, check it again.
Click Apply the Configuration File of the config mode of Cluster WebUI to apply the cluster configuration data to the cluster.
When the pop-up message "There is difference between the disk information in the configuration information and the disk information in the server. Are you sure you want automatic modification?" appears, select Yes.
Resume the cluster from the operation mode of Cluster WebUI.
If Auto Mirror Recovery is checked, full reconstruction (full copying) of the mirror set is performed automatically. Otherwise, manually reconstruct the mirror set.
Move the group as required.
2.29. Increasing the mirror disk size
Note
Make sure that the cluster is working properly.
Make sure mirror disk resource you will extend is in normal status.
Suspend all the mirror disk monitor resources in the operation mode of Cluster WebUI to prevent automatic mirror recovery.
Run the following clpmdctrl command on the server an inactive mirror disk resource belongs to. If the resource is not activated on either server, run the command on either of the servers. The following is an example for extending an md01 data partition to 500 gibibytes.
clpmdctrl --resize md01 500G
Run the clpmdctrl command on the other server. The following example is to extend to 500 gibibytes for a md01 data partition.
Important
If a mirror disk resource is activated on either of the servers, make sure to run the command on the server that a deactivated mirror disk belongs to. Execution on an activated server results in a mirror break.
clpmdctrl --resize md01 500G
Run the following command to confirm the volume sizes of the both servers are the same.
clpvolsz <Partition drive letter for mirror disk resource >:
Run the diskpart command on the server an active mirror resource belongs to.
diskpartRun the list volume command at DISKPART prompt to confirm the volume number (### column) of the target data partition. The example is as follows:
DISKPART> list volume

  Volume ###  Ltr  Label        Fs     Type        Size     Status     Info
  ----------  ---  -----------  -----  ----------  -------  ---------  --------
  Volume 0     E                       DVD-ROM         0 B  No Media
  Volume 1     C                NTFS   Partition     99 GB  Healthy    Boot
  Volume 2     D                NTFS   Partition    500 GB  Healthy
  Volume 3                      FAT32  Partition    100 MB  Healthy    System
Run the select volume command at DISKPART prompt to choose the target volume.
DISKPART> select volume 2
Run the extend filesystem command at DISKPART prompt to extend the target file system of the volume.
DISKPART> extend filesystem
Run the exit command at DISKPART prompt to end diskpart prompt.
DISKPART> exit
In the operation mode of Cluster WebUI, restart all the mirror disk monitor resources that were suspended in step 3.
Important
clpmdctrl --resize md01 500G -force
2.30. Increasing the hybrid disk size
Note
Make sure that the cluster is working properly.
Make sure that the hybrid disk resource to be expanded is in a normal status.
Suspend all the hybrid disk monitor resources in the operation mode of Cluster WebUI to prevent automatic mirror recovery.
Keeping in operation the current server of each server group, shut down all the other servers. You can check the status of the current server by executing the clphdstat with the -a option. The following shows an example of checking the status of the current server in the hd01 resource:
clphdstat -a hd01
- Execute the following clphdctrl command on the current server of the server group where the hybrid disk resource is deactivated.If the resource is not activated on either server group, run the command on either of the servers. The following is an example for extending an hd01 data partition to 500 gibibytes.
clphdctrl --resize hd01 500G
- Likewise, perform the following clphdctrl command on the current server of the other server group.The following is an example for extending an hd01 data partition to 500 gibibytes.
clphdctrl --resize hd01 500G
Important
If the hybrid disk resource is activated on either of the servers, make sure to run the command on the server where the hybrid disk resource is deactivated. Execution on an active server group results in a mirror break.
Run the following command to confirm that the size of the volume is the same between both the server groups:
clpvolsz <Partition drive letter for hybrid disk resource>:
Run the diskpart command on the active server.
diskpartRun the list volume command at DISKPART prompt to confirm the volume number (### column) of the target data partition. The example is as follows:
DISKPART> list volume

  Volume ###  Ltr Label        Fs     Type        Size     Status        Info
  ----------  --- -----------  -----  ----------  -------  ------------  --------
  Volume 0     E                       DVD-ROM        0 B   No media
  Volume 1     C                NTFS   Partition    99 GB   Normal          Boot
  Volume 2     D                NTFS   Partition   500 GB   Normal
  Volume 3                      FAT32  Partition   100 MB   Normal          System
Run the select volume command at DISKPART prompt to choose the target volume.
DISKPART> select volume 2
Run the extend filesystem command at DISKPART prompt to extend the target file system of the volume.
DISKPART> extend filesystem
Run the exit command at DISKPART prompt to end diskpart prompt.
DISKPART> exit
13.In the operation mode of Cluster WebUI, restart all the hybrid disk monitor resources that were suspended in step 3.
Start up all the servers that you shut down in step 4.
Important
clphdctrl --resize hd01 500G -force
2.31. Replacing the disk array controller (DAC)/updating the firmware
After the disk array controller (DAC) is replaced or the firmware is updated, the OS may recognize an existing disk as a new disk even if the disk has not been replaced actually. The required procedure varies depending on how the OS recognizes the disk. Therefore, be sure to perform the following procedure when replacing the DAC or updating the firmware.
Make sure that the cluster is working properly.
If a group is active on a server on which DAC is to be replaced or on which the firmware is to be updated (hereafter referred to as target server), move the group.
- Before replacing the DAC or updating the firmware, execute the following command to check the combinations of "drive letter" and "GUID" for the partitions of all the mirror disk resources and hybrid disk resources.
mountvolOutput example:
The following are output examples.The drive letter is applied to "C:\".The GUID is applied to "123da03b-e7e0-11e0-a2aa-806d6172696f".C:> mountvol Possible values for the current mount point and volume name: \\?\Volume{123da03a-e7e0-11e0-a2aa-806d6172696f}\ C:\ \\?\Volume{123da03b-e7e0-11e0-a2aa-806d6172696f}\ Z:\ \\?\Volume{123da03c-e7e0-11e0-a2aa-806d6172696f}\ P:\ When replacing the DAC, shut down the target server from the operation mode of Cluster WebUI to power off.
- Replace the DAC or update the firmware.When replacing the DAC, power on the target server to start the OS.
- After the completion of DAC replacement or firmware update, perform the following procedure to check that the OS recognizes the disk used by the mirror disk resources and hybrid disk resources as an existing disk.Execute the following command on the target server to check whether the combinations of "drive letter" and "GUID" for the mirror disk resources and hybrid disk resources have changed from those checked in step 3.
mountvol - When the combinations of "drive letter" and "GUID" for all mirror disk resources and hybrid disk resources have not changed from those checked in step 3, the disk is recognized as an existing disk by the OS. In this case, execute step 10 and subsequent steps. (Steps 8 and 9 are not required.)When the combination has changed from that checked in step 3, the disk is recognized as a new disk by the OS. In this case, execute step 8 and subsequent steps.
Check the disk setting on the target server.
Check the drive letters of the data and cluster partitions using Disk Management (Control Panel -> Administrative Tools -> Computer Management -> Disk Management). If the drive letter has been changed, re-configure it as it was, restart the server and check that the drive letter is configured correctly.
Restart the target server from the operation mode of Cluster WebUI.
If the drive letters are corrected in step 8 above, reconfigure the cluster information according to the procedures in steps 7 to 11 of "Replacing the mirror disk". In this case, read "server on which disks were replaced" as "target server".
Recover the target server to the cluster.
In automatic recovery mode, the server is automatically recovered to the cluster.
If Cluster Properties -> Mirror Disk tab -> Auto Mirror Recovery is set, the mirror is automatically reconstructed (partially copy or full copy). If the settings are configured not to perform Auto Mirror Recovery, reconstruct the mirror manually.
If mirror reconstruction ends abnormally, reconfigure the cluster information according to the procedures in steps 8 to 12 of "2.26. Replacing the mirror disk". In this case, read "server on which disks were replaced" as "target server".
Move the group as required.
2.32. Replacing FibreChannel HBA / SCSI / SAS controller
Follow the procedures below to replace HBA connecting the shared disk.
If the group is operating in the server where HBA is to be replaced (hereafter referred to as target server), move the group to another server.
Change the settings for the EXPRESSCLUSTER Server service of the target server to manual start.
Shut down the target server to replace HBA.
Start the target server with the disk cable disconnected.
From the config mode of Cluster WebUI, open the properties of the target server and configure filter settings on the replaced HBA.
Click Connect on the HBA tab to acquire the disk configuration data for the target server, and then select the replaced HBA.
Do not change the settings other than above.
Save the cluster configuration data in which HBA filter setting has been configured in Cluster WebUI temporarily in the disk area accessible from the cluster server.
If the Cluster WebUI is used on the cluster server, save the cluster configuration data in the local disk. Also, if the Cluster WebUI is used on another PC, save it in the shared folder accessible from the cluster server, or save it temporarily in an external media disk etc. and then copy it to the local disk of the cluster server.
Execute the following command on one of the cluster servers to upload the saved cluster configuration data.
clpcfctrl --push -x < path_of_the_cluster_configuration_information> --nocheck
Shut down the target server and connect the disk cable.
- Start the target server to check the drive letter in Disk Management.If the drive letter has been changed, set it as it was before. Restart the server to check that the drive letter is correctly configured.
From the config mode of Cluster WebUI, open the properties of the target server to check the settings for the HBA tab. If there is a partition which does not restrict access on the shared disk, check that the partition data is registered in Partition excluded from cluster management.
As with the steps 6 and 7 above, save the cluster configuration data temporarily and upload it from the cluster server with the following command:
clpcfctrl --push -x < path_of_the_cluster_configuration_information> --nocheck
If the message "There is difference between the disk information in the configuration information and the disk information in the server. Are you sure you want automatic modification?" appears upon saving the configuration information, select Yes.
Set the configuration for the EXPRESSCLUSTER Server service of the target server back to automatic start, and reboot the target server.
When Auto Recovery is configured as Off in Extension tab of Cluster Properties of the cluster, select Recover server the target server in the operation mode of Cluster WebUI.
Migrate the group if necessary.
2.33. Updating data encryption key file of mirror/hybrid disk resources
Perform the following procedure to update the encryption key used for the mirror communication encryption of mirror disk resources/hybrid disk resources.
Note
The following procedure is executable while mirror disk resources and hybrid disk resources are activated. At this time, however, mirroring in progress is suspended. In this case, execute mirror recovery after the completion of the procedure.
Run the clpkeygen command to create a new encryption key file. For more information on the clpkeygen command, see "Reference Guide" -> "EXPRESSCLUSTER command reference" -> "Creating a key file for encrypting communication data (clpkeygen command)".
clpkeygen 256 newkeyfile.bin
Overwrite the encryption key files for all the servers of which mirror disk resources/hybrid disk resources can be activated, by using the file created at step 1. Keep the original file then.
Execute the --updatekey option for the clpmdctrl or clphdctrl command.
for mirror disk resources
clpmdctrl --updatekey md01
for hybrid disk resources
clphdctrl --updatekey hd01
Once you execute the option on either server on which resources can be activated, the key information is updated for all servers necessary for update.At this time, mirroring in progress is suspended.Updating of the encryption key information is completed. From now on, the mirror communication encryption/decryption is executed by using the new encryption key.
If necessary, perform mirror recovery to resume the suspended mirroring.
2.34. Information required for inquiry
The following information is required for inquiring about the failure.
- FailureDescribe the failure.Example) Failover group (failover1) failed to fail over from server1 to server2.
- Time that the failure occurredExample) 2018/01/01 00:00
- Name of the server with the failureExample) server2
- Version of EXPRESSCLUSTERExample) EXPRESSCLUSTER X 4.3
- EXPRESSCLUSTER log and event log of when the failure occurredLogs can be collected by using the Cluster WebUI or by running the log collection command. To use Cluster WebUI, see the online manual. To use the log collection commands, see "Collecting logs (clplogcc command)" in "EXPRESSCLUSTER command reference" in the "Reference Guide".