1. Preface
1.1. Who Should Use This Guide
The EXPRESSCLUSTER X Maintenance Guide describes maintenance-related information, intended for administrators. See this guide for information required for operating the cluster.
1.2. How This Guide is Organized
2. The system maintenance information: Provides maintenance information for EXPRESSCLUSTER.
1.3. EXPRESSCLUSTER X Documentation Set
The EXPRESSCLUSTER manuals consist of the following five guides. The title and purpose of each guide is described below.
EXPRESSCLUSTER X Getting Started Guide
This guide is intended for all users. The guide covers topics such as product overview, system requirements, and known problems.
EXPRESSCLUSTER X Installation and Configuration Guide
This guide is intended for system engineers and administrators who want to build, operate, and maintain a cluster system. Instructions for designing, installing, and configuring a cluster system with EXPRESSCLUSTER are covered in this guide.
EXPRESSCLUSTER X Reference Guide
This guide is intended for system administrators. The guide covers topics such as how to operate EXPRESSCLUSTER, function of each module and troubleshooting. The guide is supplement to the Installation and Configuration Guide.
EXPRESSCLUSTER X Maintenance Guide
This guide is intended for administrators and for system administrators who want to build, operate, and maintain EXPRESSCLUSTER-based cluster systems. The guide describes maintenance-related topics for EXPRESSCLUSTER.
EXPRESSCLUSTER X Hardware Feature Guide
This guide is intended for administrators and for system engineers who want to build EXPRESSCLUSTER-based cluster systems. The guide describes features to work with specific hardware, serving as a supplement to the Installation and Configuration Guide.
1.4. Conventions
In this guide, Note, Important, See also are used as follows:
Note
Used when the information given is important, but not related to the data loss and damage to the system and machine.
Important
Used when the information given is necessary to avoid the data loss and damage to the system and machine.
See also
Used to describe the location of the information given at the reference destination.
The following conventions are used in this guide.
Convention |
Usage |
Example |
|---|---|---|
Bold
|
Indicates graphical objects, such as fields, list boxes, menu selections, buttons, labels, icons, etc.
|
In User Name, type your name.
On the File menu, click Open Database.
|
Angled bracket within the command line |
Indicates that the value specified inside of the angled bracket can be omitted. |
clpstat -s[-h host_name] |
# |
Prompt to indicate that a Linux user has logged on as root user. |
# clpcl -s -a |
Monospace |
Indicates path names, commands, system output (message, prompt, etc.), directory, file names, functions and parameters. |
|
bold
|
Indicates the value that a user actually enters from a command line.
|
Enter the following:
# clpcl -s -a
|
italic |
Indicates that users should replace italicized part with values that they are actually working with.
|
rpm -i expresscls-<version_number> -<release_number>.x86_64.rpm |
 In the figures of this guide, this icon represents EXPRESSCLUSTER.
1.5. Contacting NEC
For the latest product information, visit our website below:
2. The system maintenance information
This chapter provides information you need for maintenance of your EXPRESSCLUSTER system. Resources to be managed are described in detail.
This chapter covers:
2.4. System resource statistics information collection function
2.5. Process resource statistics information collection function
2.7. Function for outputting the operation log of Cluster WebUI
2.8. Function for outputting an API service operation log file
2.14. Configuring the settings to temporarily prevent execution of failover
2.16. How to replace a server with a new one ~For a shared disk~
2.17. How to replace a server with a new one ~For a mirror disk~
2.18. How to replace a server with a new one ~For a hybrid disk~
2.21. How to restore the mirror/hybrid disk from the disk image
2.22. How to back up a mirror disk with the business going on
2.23. How to restore a mirror disk from its backup created with the business going on
2.26. Changing offset or size of a partition on mirror disk resource
2.27. Changing offset or size of a partition on hybrid disk resource
2.32. Updating data encryption key file of mirror/hybrid disk resources
2.1. Directory structure of EXPRESSCLUSTER
Note
Executable files and script files that are not described in "EXPRESSCLUSTER command reference" in the "Reference Guide" can be found under the installation directory. Run these files only with EXPRESSCLUSTER. Any failure or trouble caused by executing them by applications other than EXPRESSCLUSTER is not supported.
EXPRESSCLUSTER directories are structured as described below:
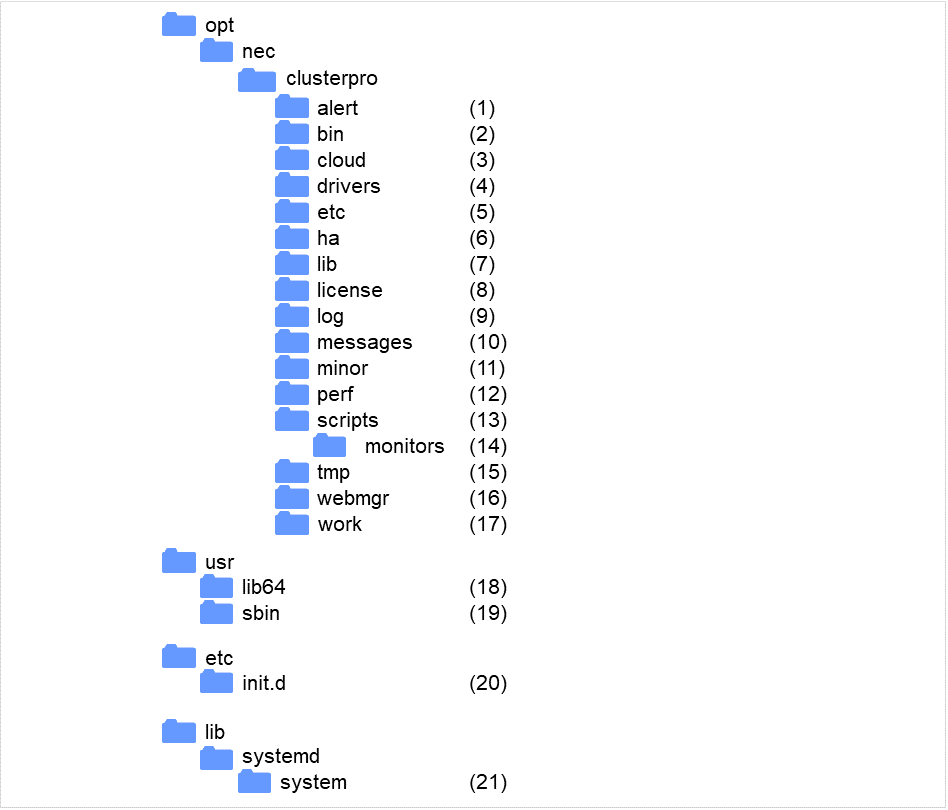
Fig. 2.1 Directory structure
- Directory for alert synchronizationThis directory stores EXPRESSCLUSTER Alert Synchronization's modules and management files.
- Directory for cluster modulesThis directory stores the EXPRESSCLUSTER Server's executable files.
- Directory for cloud environmentThis directory stores script files for cloud environment.
- Directory for cluster drivers
- Mirror driverThis directory stores the executable files of the data mirror driver.
- Kernel mode LAN heartbeat, keepalive driverThis directory stores the executable files of the kernel mode LAN heartbeat and keepalive driver.
- Directory for cluster configuration dataThis directory stores the cluster configuration files and policy file of each module.
- Directory for HA products linkageThis directory stores binaries and configuration files for the Java Resource Agent and System Resource Agent.
- Directory for cluster librariesThis directory stores the EXPRESSCLUSTER Server's library.
- Directory for licensesThis directory stores licenses for licensed products.
- Directory for module logsThis directory stores logs produced by each module.
- Directory for report messages (alert, syslog, mail)This directory stores alert, syslog and mail messages reported by each module.
- Directory for mirror disk and hybrid diskThis directory stores the executable files and policy files etc. of the modules for mirror disk and hybrid disk.
- Directory for the performance logsThis directory stores the information of performance about disk and system.
- Directory for EXEC resource script of group resourcesThis directory stores EXEC resource scripts of group resources.
- Directory for the recovery scriptThis directory stores the script executed by this function when an error is detected in the monitor resource if execution of a recovery script is in effect.
- Directory for temporary filesThis directory stores archive files created when logs are collected.
- Directory for the WebManager server and Cluster WebUI.This directory stores the WebManager's server modules and management files.
- Directory for module tasksThis is a work directory for modules.
- usr/lib64This directory stores the symbolic links to the EXPRESSCLUSTER Server's library.
- /usr/sbinThis directory stores the symbolic links to the EXPRESSCLUSTER Server's executable files.
- /etc/init.dFor init.d environment, this directory stores the EXPRESSCLUSTER Service's Start/Stop scripts.
- /lib/systemd/system (for SUSE Linux, the path will be /usr/lib/ systemd/system.)For systemd environment, the setting file of EXPRESSCLUSTER service is stored in this directory.
2.2. How to delete EXPRESSCLUSTER logs or alerts
To delete EXPRESSCLUSTER logs or alerts, perform the following procedure.
Disable all cluster services on all servers in a cluster .
clpsvcctrl.sh --disable -a
Shut down the cluster with the Cluster WebUI or clpstdn command, and then reboot the cluster.
To delete logs, delete the files and directories in the following directory. Perform this operation on the server for which you want to delete the logs.
/opt/nec/clusterpro/log/
To delete alerts, delete the files in the following directory. Perform this operation on the server for which you want to delete the alerts.
/opt/nec/clusterpro/alert/log/
Enable all cluster services on all servers in a cluster .
clpsvcctrl.sh --enable -a
Run the reboot command on all the servers in the cluster to reboot the cluster.
2.3. Mirror statistics information collection function
If the Mirror Statistics check box is already checked on the Statistics tab of Cluster Properties in the config mode of Cluster WebUI, information on the mirror performance is collected and saved to <installation path>/perf/disk according to the following file naming rules. In the following explanations, this file is represented as the mirror statistics information file.
nmpN.cur
nmpN.pre[X]
|
|
|---|---|
cur |
Indicates the latest information output destination. |
pre |
Indicates the previous, rotated, information output destination. |
N |
Indicates the target NMP number. |
[X] |
Indicates the generation number.
For a file that is one generation older, the generation number is omitted.
For a file that is m generations older, X is assumed to be m-1.
If the total number of generations is n, X of the oldest file is assumed to be n-2.
|
The collected information is saved to the mirror statistics information file. The time during which statistics information is output to this file (=sampling interval) is 60 seconds. .If the size of current log file reached 16MB, it is rotated to new log file. And two generation log files can be saved. Information recorded to the mirror statistics information file can be used as a reference for the tuning related to the mirror function. The collected statistics information contains the following items.
Note
Statistic value name
|
Unit
|
Description
|
Output
|
|---|---|---|---|
Write, Total
(Write amount)
|
Byte
(MB)
|
Total amount of data written to the mirror partition
The value to be output is the amount of data written by every sampling.
|
LOG,
CMD
(A)
|
Write, Avg
(Write amount, average value)
|
Byte/s
(MB/s)
|
Amount of data written to the mirror partition per unit time
|
LOG,
CMD
(A)
|
Read, Total
(Read amount)
|
Byte
(MB)
|
Total amount of data read from the mirror partition
The value to be output is the amount of data read by every sampling.
|
LOG,
CMD
(A)
|
Read, Avg
(Read amount, average value)
|
Byte/s
(MB/s)
|
Amount of data read from the mirror partition per unit time
|
LOG,
CMD
(A)
|
Local Disk Write, Total
(Local disk write amount)
|
Byte
|
Total amount of data written to the local disk (data partition)
The value to be output is the amount of data written by every sampling.
|
LOG
(B)
|
Local Disk Write, Avg
(Local disk average write amount)
|
Byte/s
|
Amount of data written to the local disk (data partition) per unit time
|
LOG
(B)
|
Local Disk Read, Total
(Local disk read amount)
|
Byte
|
Total amount of data read from the local disk (data partition)
The value to be output is the amount of data read by every sampling.
|
LOG
(B)
|
Local Disk Read, Avg
(Local disk average read amount)
|
Byte/s
|
Amount of data read from the local disk (data partition) per unit time
|
LOG
(B)
|
Send, Total
(Mirror communication amount, total value)
|
Byte
(KB)
|
Total amount of mirror communication sent up until mirror disk connect
The value to be output is the communication amount by every sampling.
TCP control information and the like are excluded.
|
LOG,
CMD
(B)
|
Send, Avg
(Mirror communication amount, average value)
|
Byte/s
(KB/s)
|
Mirror communication amount sent by up until mirror disk connect per unit time
|
LOG,
CMD
(B)
|
Compress Ratio
(Compression ratio)
|
%
|
Mirror data compression ratio
(Post-compression size) / (pre-compression size)
x 100
100 for noncompression
The value to be output is calculated based on the communication data for every sampling.
|
LOG
(A)
|
Sync Time, Max
(Mirror communication time, maximum value)
|
Second/time
|
Time needed until the first piece of mirror synchronization data is synchronized.[#f3]_ The value to be output is the longest mirror synchronization data time.
Mirror synchronization data that failed to be synchronized due to non-communication or the like (resulting in a mirror break) is excluded.
Moreover, the value to be output is obtained for communication for every sampling.
|
LOG,
CMD
(A)
|
Sync Time, Avg
(Mirror communication time, average value)
|
Second/time
|
Time needed until the first piece of mirror synchronization data is synchronized. [3] The value to be output is the average for all the communications.
Mirror synchronization data that failed to be synchronized due to non-communication or the like (resulting in a mirror break) is excluded.
Moreover, the value to be output is obtained for communication for every sampling.
|
LOG,
CMD
(A)
|
Sync Ack Time, Max
(Mirror synchronization ACK response time, maximum value)
|
Millisecond
|
Time that elapses between mirror synchronization data being sent to the other server and ACK being received from the other server. [3] The maximum value of all such times is output.
This value is used as a reference to determine Ack Timeout of the Mirror Driver tab that is set with the mirror disk resource or hybrid disk resource.
However, mirror synchronization data that results in an ACK timeout is excluded from the measurement.
The value to be output is the time after the mirror daemon (mirror agent) starts.
|
LOG
(A)
|
Sync Ack Time, Cur
(Mirror synchronization ACK response time, latest value)
|
Millisecond
|
Of the lengths of time needed for mirror synchronization data ACK reception, this value is the time that needed for the most recent ACK reception. [3]
However, mirror synchronization data that results in an ACK timeout is excluded from the measurement.
|
LOG
(A)
|
Recovery Ack Time, Max
(Mirror recovery ACK response time, maximum value)
|
Millisecond
|
Time that elapses between mirror recovery data being sent to the other server and ACK being received from the other server
The maximum value of all such times is output.
This value is used as a reference to determine Ack Timeout of the Mirror Driver tab that is set with the mirror disk resource or hybrid disk resource.
However, mirror synchronization data that results in an ACK timeout is excluded from the measurement.
The value to be output is the time after the mirror daemon (mirror agent) starts.
|
LOG
(A)
|
Recovery Ack Time, Max2
(Mirror recovery ACK response time, maximum value during a certain period)
|
Millisecond
|
Maximum value of the time that elapses between mirror recovery data being sent to the other server and ACK being received from the other server.
The maximum value during one sampling period is output.
However, mirror synchronization data that results in an ACK timeout is excluded from the measurement.
|
LOG
(A)
|
Recovery Ack Time, Cur
(Mirror recovery ACK response time, latest value)
|
Millisecond
|
Time that elapses between the mirror recovery data being sent to the other server and ACK being received from the other server
The value to be output is the time needed for the most recent ACK reception.
However, mirror synchronization data that results in an ACK timeout is excluded from the measurement.
|
LOG
(A)
|
Sync Diff, Max
(Difference amount, maximum value)
|
Byte
(MB)
|
Amount of mirror synchronization data that has not yet been synchronized with the other server. The value to be output is the maximum from among all the samplings.
Mirror synchronization data that failed to be synchronized due to non-communication or the like (resulting in a mirror break) is excluded.
|
LOG,
CMD
(A)
|
Sync Diff, Cur
(Difference amount, latest value)
|
Byte
(MB)
|
Amount of mirror synchronization data that has not yet been synchronized with the other server. The value to be output is that which was used most recently for collection.
Mirror synchronization data that failed to be synchronized due to non-communication or the like (resulting in a mirror break) is excluded.
|
LOG,
CMD
(A)
|
Send Queue, Max
(Number of send queues, maximum value)
|
Quantity
|
Number of queues used when mirror synchronization data is sent. The value to be output is the maximum used after the mirror daemon (mirror agent) starts.
This value is used as a reference to determine Number of Queues in Asynchronous mode that is set with the mirror disk resource or hybrid disk resource.
|
LOG
(A)
|
Send Queue, Max2
(Number of send queues, maximum value during a certain period)
|
Quantity
|
Number of queues used when mirror synchronization data is sent. The maximum value during one sampling period is output.
|
LOG
(A)
|
Send Queue, Cur
(Number of send queues, latest value)
|
Quantity
|
Number of queues used when mirror synchronization data is sent. The value to be output is that which was used most recently for collection.
|
LOG
(A)
|
Request Queue, Max
(Number of request queues, maximum value)
|
Quantity
|
Number of I/O requests being processed that were sent to the mirror partition. The value to be output is the maximum used after the mirror daemon (mirror agent) starts.
This value is used as a reference to determine Request Queue Maximum Number of the Mirror Driver tab of cluster properties.
|
LOG
(A)
|
Request Queue, Max2
(Number of request queues, maximum value during a certain period)
|
Quantity
|
Number of I/O requests being processed that were sent to the mirror partition. The maximum value during one sampling period is output.
|
LOG
(A)
|
Request Queue, Cur
(Number of request queues, latest value)
|
Quantity
|
Number of I/O requests being processed that were sent to the mirror partition. The value to be output is that which was used most recently for collection.
|
LOG
(A)
|
MDC HB Time Max
(Mirror disconnect heartbeat time, maximum value)
|
Second
|
Time that elapses between ICMP ECHO being sent to the other server through mirror disconnect and ICMP ECHO REPLY being received from the other server.
The value to be output is the maximum used after the mirror daemon (mirror agent) starts.
|
LOG
(B)
|
MDC HB Time, Max2
(Mirror disconnect heartbeat time, maximum value during a certain period)
|
Second
|
Time that elapses between ICMP ECHO being sent to the other server through mirror disconnect and ICMP ECHO REPLY being received from the other server.
The maximum value during one sampling period is output.
|
LOG
(B)
|
MDC HB Time Cur
(Mirror disconnect heartbeat time, latest value)
|
Second
|
Time that elapses between ICMP ECHO being sent to the other server through mirror disconnect and ICMP ECHO REPLY being received from the other server.
The value to be output is that which was used most recently for collection.
|
LOG
(B)
|
Local-Write Waiting Recovery-Read Time, Total
(Mirror synchronization I/O exclusion time, total value)
|
Second
|
If writing to the same area of the disk occurs during mirror recovery, writing is held until the mirror recovery for that area is complete.
The value to be output is the cumulative value of the hold time, from when the mirror daemon (mirror agent) starts.
That hold time may be long if Recovery Data Size of the Mirror Agent tab of the cluster properties is made large. This value is used as a reference to determine this size.
|
LOG
(A)
|
Local-Write Waiting Recovery-Read Time, Total2
(Mirror synchronization I/O exclusion time, total value during a certain period)
|
Second
|
If writing to the same area of the disk occurs during mirror recovery, writing is held until the mirror recovery for that area is complete.
The value to be output is the cumulative value of the hold time during one sampling period.
|
LOG
(A)
|
Recovery-Read Waiting Local-Write Time, Total
(Mirror recovery I/O exclusion time, total value)
|
Second
|
If reading of mirror recovery data from the same area of the disk occurs during writing to the mirror partition, reading of the mirror recovery data is held until writing to that area is complete.
The value to be output is the cumulative value of the hold time, from when the mirror daemon (mirror agent) starts.
That hold time may be long if Recovery Data Size of the Mirror Agent tab of the cluster properties is made large. This value is used as a reference to determine this size.
|
LOG
(A)
|
Recovery-Read Waiting Local-Write Time, Total2 |
Second |
If reading of mirror recovery data from the same area of the disk occurs during writing to the mirror partition, reading of the mirror recovery data is held until writing to that area is complete. |
LOG |
Unmount Time, Max
(Unmount time, maximum value)
|
Second
|
Time needed for unmount to be executed when the mirror disk resource or hybrid disk resource is deactivated
This value is used as a reference to determine Timeout of the Unmount tab that is set with the mirror disk resource or hybrid disk resource.
|
LOG
(A)
|
Unmount Time, Last
(Unmount time, latest value)
|
Second
|
Time needed for unmount to be executed when the mirror disk resource or hybrid disk resource is deactivated
The value to be output is the time needed when unmount was most recently executed.
|
LOG
(A)
|
Fsck Time, Max
(fsck time, maximum value)
|
Second
|
Time needed for fsck to be executed when the mirror disk resource or hybrid disk resource is activated
This value is used as a reference to determine fsck Timeout of the fsck tab that is set with the mirror disk resource or hybrid disk resource.
|
LOG
(A)
|
Fsck Time, Last
(fsck time, latest value)
|
Second
|
Time needed for fsck to be executed when the mirror disk resource or hybrid disk resource is activated
The value to be output is the time needed when fsck was most recently executed.
|
LOG
(A)
|
If Collect Statistics is already checked, part of information (information with CMD in the Output column in the above table) can be collected and displayed with the clpmdstat/clphdstat command. For information on how to use this command, see "Displaying the mirror status (clpmdstat command)" in "EXPRESSCLUSTER command reference" in the "Reference Guide".
Display with commands can be used only when Mirror Statistics is already enabled in the Statistics tab of Cluster Properties in Cluster WebUI.
2.4. System resource statistics information collection function
If the System Resource Statistics check box is already checked on the Statistics tab of Cluster Properties in the Cluster WebUI config mode or if system monitor resources or process resource monitor resources are already added to the cluster, information on the system resource is collected and saved under <installation path>/perf/system according to the following file naming rules.
This file is in CSV-format. In the following explanations, this file is represented as the system resource statistics information file.
system.cur
system.pre
|
|
|---|---|
cur |
Indicates the latest information output destination. |
pre |
Indicates the previous, rotated, information output destination. |
The collected information is saved to the system resource statistics information file. The time during which statistics information is output to this file (=sampling interval) is 60 seconds. .If the size of current log file reached 16MB, it is rotated to new log file. And two generation log files can be saved. Information recorded to the system resource statistics information file can be used as a reference for analyzing the system performance.The collected statistics information contains the following items.
Statistic value name |
Unit |
Description |
|---|---|---|
CPUCount |
Quantity |
Number of CPUs |
CPUUtilization |
% |
CPU utilization |
CPUTotal |
10 Millisecond |
Total CPU time |
CPUUser |
10 Millisecond |
CPU usage time in the user mode |
CPUNice |
10 Millisecond |
CPU usage time in the user mode with low priority |
CPUSystem |
10 Millisecond |
CPU usage time in the system mode |
CPUIdle |
10 Millisecond |
CPU idle time |
CPUIOWait |
10 Millisecond |
I/O wait time |
CPUIntr |
10 Millisecond |
Interrupt processing time |
CPUSoftIntr |
10 Millisecond |
Software interrupt processing time |
CPUSteal |
10 Millisecond |
Time when CPU was consumed by the OS on another virtual machine for virtual environment |
MemoryTotalSize |
Byte (KB) |
Total memory capacity |
MemoryCurrentSize |
Byte (KB) |
Memory usage |
MemoryBufSize |
Byte (KB) |
Buffer size |
MemoryCached |
Byte (KB) |
Cache memory size |
MemoryMemFree |
Byte (KB) |
Available memory capacity |
MemoryDirty |
Byte (KB) |
Memory data waiting to be written on hard disk |
MemoryActive(file) |
Byte (KB) |
Buffer or page cache memory |
MemoryInactive(file) |
Byte (KB) |
Available buffer or available page cache memory |
MemoryShmem |
Byte (KB) |
Shared memory size |
SwapTotalSize |
Byte (KB) |
Available swap size |
SwapCurrentSize |
Byte (KB) |
Currently used swap size |
SwapIn |
Times |
Number of times of swap-in |
SwapOut |
Times |
Number of times of swap-out |
ThreadLimitSize |
Quantity |
Maximum number of threads |
ThreadCurrentSize |
Quantity |
Current number of threads |
FileLimitSize |
Quantity |
Maximum number of opened files |
FileCurrentSize |
Quantity |
Current number of opened files |
FileLimitinode |
Quantity |
Number of inodes in the whole system |
FileCurrentinode |
Quantity |
Current number of inodes |
ProcessCurrentCount |
Quantity |
Current total number of processings |
The following output is an example of system resource statistics information file.
system.cur
"Date","CPUCount","CPUUtilization","CPUTotal","CPUUser","CPUNice","CPUSystem","CPUIdle","CPUIOWait","CPUIntr","CPUSoftIntr","CPUSteal","MemoryTotalSize","MemoryCurrentSize","MemoryBufSize","MemoryCached","MemoryMemFree","MemoryDirty","MemoryActive(file)","MemoryInactive(file)","MemoryShmem","SwapTotalSize","SwapCurrentSize","SwapIn","SwapOut","ThreadLimitSize","ThreadCurrentSize","FileLimitSize","FileCurrentSize","FileLimitinode","FileCurrentinode","ProcessCurrentCount"
"2019/10/31 15:44:50","2","0","34607369","106953","59","23568","34383133","89785","0","3871","0","754236","231664","948","334736","186888","12","111320","167468","50688","839676","0","0","0","5725","183","71371","1696","22626","22219","121"
"2019/10/31 15:45:50","2","0","34619340","106987","59","23577","34395028","89816","0","3873","0","754236","231884","948","334744","186660","12","111320","167476","50688","839676","0","0","0","5725","183","71371","1696","22867","22460","121"
"2019/10/31 15:46:50","2","0","34631314","107022","59","23586","34406925","89846","0","3876","0","754236","231360","948","334764","187164","4","111348","167468","50688","839676","0","0","0","5725","183","71371","1696","22867","22460","121"
                                     :
2.5. Process resource statistics information collection function
If the System Resource Statistics check box is already checked on the Statistics tab of Cluster Properties in the Cluster WebUI config mode or if system monitor resources or process resource monitor resources are already added to the cluster, information on the process resource is collected and saved under <installation path>/perf/system according to the following file naming rules.
This file is in CSV-format. In the following explanations, this file is represented as the process resource statistics information file.
process.cur
process.pre
|
|
|---|---|
cur |
Indicates the latest information output destination. |
pre |
Indicates the previous, rotated, information output destination. |
The collected information is saved to the process resource statistics information file. The time during which statistics information is output to this file (=sampling interval) is 60 seconds. .If the size of current log file reached 32MB, it is rotated to new log file. And two generation log files can be saved. Information recorded to the process resource statistics information file can be used as a reference for analyzing the process performance.The collected statistics information contains the following items.
Statistic value name |
Unit |
Description |
|---|---|---|
PID |
- |
Process ID |
CPUUtilization |
% |
CPU utilization |
MemoryPhysicalSize |
Byte (KB) |
Physical memory usage |
MemoryVirtualSize |
Byte (KB) |
Virtual memory usage |
ThreadCurrentCount |
Quantity |
Number of running threads |
FileCurrentCount |
Quantity |
Number of opening files |
ProcessName |
- |
Process name
* Outputted not in double quotes.
|
The following output is an example of process resource statistics information file.
process.cur
"Date","PID","CPUUtilization","MemoryPhysicalSize","MemoryVirtualSize","ThreadCurrentCount","FileCurrentCount","ProcessName"
"2022/09/05 17:08:41","620","0","26384","1132","1","21",/usr/lib/systemd/systemd-logind
"2022/09/05 17:08:41","623","0","126384","1096","1","6",/usr/sbin/crond -n
"2022/09/05 17:08:41","1023","0","239924","2880","3","12",/usr/sbin/rsyslogd -n
                                     :
2.6. Cluster statistics information collection function
In the config mode of Cluster WebUI, with the Cluster Statistics check box (open Cluster Properties -> the Statistics tab) checked, CSV text files are created containing information on the processing results and time of, for example, reception interval for heartbeat resources, group failovers, starting group resources, and monitoring processes by monitor resources. These files are hereinafter called cluster statistics information files.
For heartbeat resources
Information is outputted to the file for each heartbeat resource type. This function is supported by kernel mode LAN heartbeat resources and user mode LAN heartbeat resources.
[Heartbeat resource type].cur[Heartbeat resource type].precur
Indicates the latest information output destination.
pre
Indicates the previous, rotated, information output destination.
File location
<installation path>/perf/cluster/heartbeat/
For groups
group.curgroup.precur
Indicates the latest information output destination.
pre
Indicates the previous, rotated, information output destination.
File location
<installation path>/perf/cluster/group/
For group resources
The information for each type of group resource is output to the same file.
[Group resource type].cur[Group resource type].precur
Indicates the latest information output destination.
pre
Indicates the previous, rotated, information output destination.
File location
<installation path>/perf/cluster/group/
For monitor resources
The information for each type of monitor resources is output to the same file.
[Monitor resource type].cur[Monitor resource type].precur
Indicates the latest information output destination.
pre
Indicates the previous, rotated, information output destination.
File location
<installation path>/perf/cluster/monitor/
Note
The cluster statistics information file is included in the logs collected by the clplogcc command or Cluster WebUI.
Specify type 6 to collect the log by the clplogcc command; specify Pattern 6 to collect the log by the Cluster WebUI. For details about log collection, see. "Collecting logs (clplogcc command)" in "EXPRESSCLUSTER command reference" of "Reference Guide" or the online manual.
Listed below are the timing to output the statistics information to the cluster statistics information file:
For heartbeat resources
Periodical output
For groups [4]
When the group startup processing is completed
When the group stop processing is completed
When the group move processing is completed [5]
When the failover processing is completed [5]
For group resources
When the group resource startup processing is completed
When the group resource stop processing is completed
For monitor resources
When the monitor processing is completed
When the monitor status change processing is completed
The statistics information to be collected includes the following items:
For heartbeat resources
Statistic value name
Description
Date
Time when the statistics information is output.This is output in the form below (000 indicates millisecond):YYYY/MM/DD HH:MM:SS.000Name
Name of a heartbeat resource.
Type
Type of the heartbeat resource.
Local
Host name of the local server.
Remote
Host name of the other server.
RecvCount
Heartbeat reception count during the log output interval.
RecvError
Error reception count during the log output interval.
RecvTime(Min)
Minimum interval (in milliseconds) of heartbeat reception during the log output interval.
RecvTime(Max)
Maximum interval (in milliseconds) of heartbeat reception during the log output interval.
RecvTime(Avg)
Average interval (in milliseconds) of heartbeat reception during the log output interval.
SendCount
Heartbeat transmission count during the log output interval.
SendError
Error transmission count during the log output interval.
SendTime(Min)
Minimum time (in milliseconds) for heartbeat transmission during the log output interval.
SendTime(Max)
Maximum time (in milliseconds) for heartbeat transmission during the log output interval.
SendTime(Avg)
Average time (in milliseconds) for heartbeat transmission during the log output interval.
For others (except heartbeat resources)
Statistic value name
Description
Date
Time when the statistics information is output.This is output in the form below (000 indicates millisecond):YYYY/MM/DD HH:MM:SS.000Name
Name of group, group resource or monitor resource.
Action
Name of the executed processing.The following strings are output:For groups: Start (at start), Stop (at stop), Move (at move), Failover (at failover)For group resources: Start (at activation), Stop (at deactivation)For monitor resources: Monitor (at monitor execution)Result
Name of the results of the executed processing.The following strings are output:When the processing was successful: Success (no errors detected in monitoring or activation/deactivation)When the processing failed: Failure (errors detected in monitoring or activation/deactivation)When a warning occurred: Warning (only for monitoring, in case of warning)When a timeout occurred: Timeout (monitoring timeout)When the processing was canceled: Cancel (canceling processings such as cluster shutdown during group startup)ReturnCode
Return value of the executed processing.
StartTime
Start time of the executed processing.This is output in the form below (000 indicates millisecond):YYYY/MM/DD HH:MM:SS.000EndTime
End time of the executed processing.This is output in the form below (000 indicates millisecond):YYYY/MM/DD HH:MM:SS.000ResponseTime(ms)
Time taken for executing the processing (in millisecond).This is output in millisecond.
Here is an example of the statistics information file to be output when a group with the following configuration is started up:
Server - Host name: server1, server2
Heartbeat resource
- Kernel mode LAN heartbeat resourceResource name: lankhb1, lankhb2
Group
Group name: failoverA
Group resource which belongs to the group (failoverA)
- EXEC resourceResource name: exec01, exec02, exec03
lankhb.cur
"Date","Name","Type","Local","Remote","RecvCount","RecvError","RecvTime(Min)","RecvTime(Max)","RecvTime(Avg)","SendCount","SendError","SendTime(Min)","SendTime(Max)","SendTime(Avg)"
"2018/12/18 09:35:36.237","lankhb1","lankhb","server1","server1","20","0","3000","3000","3000","20","0","0","0","0"
"2018/12/18 09:35:36.237","lankhb1","lankhb","server1","server2","20","0","3000","3000","3000","20","0","0","0","0"
"2018/12/18 09:35:36.237","lankhb2","lankhb","server1","server1","20","0","3000","3000","3000","20","0","0","0","0"
"2018/12/18 09:35:36.237","lankhb2","lankhb","server1","server2","20","0","3000","3000","3000","20","0","0","0","0"
                                :
group.cur
"Date","Name","Action","Result","ReturnCode","StartTime","EndTime","ResponseTime(ms)"
"2018/12/19 09:44:16.925","failoverA","Start","Success",,"2018/12/19 09:44:09.785","2018/12/19 09:44:16.925","7140"
                               :
exec.cur
"Date","Name","Action","Result","ReturnCode","StartTime","EndTime","ResponseTime(ms)"
"2018/12/19 09:44:14.845","exec01","Start","Success",,"2018/12/19 09:44:09.807","2018/12/19 09:44:14.845","5040"
"2018/12/19 09:44:15.877","exec02","Start","Success",,"2018/12/19 09:44:14.847","2018/12/19 09:44:15.877","1030"
"2018/12/19 09:44:16.920","exec03","Start","Success",,"2018/12/19 09:44:15.880","2018/12/19 09:44:16.920","1040"
                                     :
2.6.1. Notes on the size of the cluster statistics information file
The number of cluster statistics information files to be generated differs depending on their configurations. Some configurations may cause a large number of files to be generated. Therefore, consider setting the size of the cluster statistics information file according to the configuration. The maximum size of the cluster statistics information file is calculated with the following formula:
The size of the cluster statistics information file =([Heartbeat resource file size] x [number of types of heartbeat resources which are set]) x (number of generations (2)) +([Group file size]) x (number of generations (2)) +([Group resource file size] x [number of types of group resources which are set]) x (number of generations (2)) +([Monitor resource file size] x [number of types of monitor resources which are set]) x (number of generations (2))Example: For the following configuration, the total maximum size of the cluster statistics information files to be saved is 332 MB with this calculation. ((((50MB) x 1) x 2) + (((1MB) x 2) + ((3MB x 5) x 2) + ((10MB x 10) x 2) = 332MB)
Number of heartbeat resource types: 1 (file size: 50 MB)
Group (file size: 1 MB)
Number of group resource types: 5 (file size: 3 MB)
Number of monitor resource types: 10 (file size: 10 MB)
2.7. Function for outputting the operation log of Cluster WebUI
If the Output Cluster WebUI Operation Log check box is already checked on the WebManager tab of Cluster Properties in the config mode of Cluster WebUI, the information on the operation of Cluster WebUI is outputted to the log file. This file is in CSV format, which is hereinafter called "the operation log file of Cluster WebUI.
cur
Indicates the last outputted log file.
pre<x>
Where to save
Directory as Log output path in the config mode of Cluster WebUI
The operation information to be outputted includes the following items:
Item name |
Description |
|---|---|
Date |
Time when the operation information is outputted.
This is outputted in the form below (000 in milliseconds):
YYYY/MM/DD HH:MM:SS.000
|
Operation |
Name of the executed operation in Cluster WebUI. |
Request |
Request URL issued from Cluster WebUI to the WebManager server. |
IP |
IP address of a client that operated Cluster WebUI. |
UserName |
Name of a user who executed the operation.
When a user logged in to Cluster WebUI by using the OS authentication method, the user name is output.
|
HTTP-Status |
HTTP status code.
200: Success
Other than 200: Failure
|
ErrorCode |
Return value of the executed operation. |
ResponseTime(ms) |
Time taken for executing the operation (in milliseconds).
This is outputted in milliseconds.
|
ServerName |
Name of a server to be operated.
Its server name or IP address is outputted.
It is outputted when the name of a server to be operated is specified.
|
GroupName |
Name of a group to be operated.
It is outputted when the name of a group to be operated is specified.
|
ResourceName |
Name of a resource to be operated.
Outputted is the heartbeat resource name, network partition resolution resource name, group resource name, or monitor resource name.
It is outputted when the name of a resource to be operated is specified.
|
ResourceType |
Type of a resource to be operated.
It is output when the type of a resource to be operated is specified.
|
Parameters... |
Operation-specific parameters. |
The following output is an example of the operation log file of Cluster WebUI:
"Date","Operation","Request","IP","UserName","HTTP-Status","ErrorCode","ResponseTime(ms)","ServerName","GroupName","ResourceName","ResourceType","Parameters..."
"2020/08/14 17:08:39.902","Cluster properties","/GetClusterproInfo.js","10.0.0.15","user1",200,0,141,,,,
"2020/08/14 17:08:46.659","Monitor properties","/GetMonitorResourceProperty.js","10.0.0.15","user1",200,0,47,,,"fipw1","fipw"
"2020/08/14 17:15:31.093","Resource properties","/GetGroupResourceProperty.js","10.0.0.15","user1",200,0,47,,"failoverA","fip1","fip"
"2020/08/14 17:15:45.309","Start group","/GroupStart.js","10.0.0.15","user1",200,0,0,"server1","failoverA",,
"2020/08/14 17:16:23.862","Suspend all monitors","/AllMonitorSuspend.js","10.0.0.15","user1",200,0,453,"server1",,,,"server2"
                                                    :
The following is an example of the operation log file of Cluster WebUI outputted when the authentication fails:
When the cluster password method is used
"Date","Operation","Request","IP","UserName","HTTP-Status","ErrorCode","ResponseTime(ms)","ServerName","GroupName","ResourceName","ResourceType","Parameters..."
"2020/11/20 09:29:59.710","Login","/Login.js","10.0.0.15","",403,,0,,,,
When the OS authentication method is used
"Date","Operation","Request","IP","UserName","HTTP-Status","ErrorCode","ResponseTime(ms)","ServerName","GroupName","ResourceName","ResourceType","Parameters..."
"2020/11/20 09:29:59.710","Login User","/LoginUser.js","10.0.0.15","user1",401,,0,,,,
2.8. Function for outputting an API service operation log file
With the Output API Service Operation Log checkbox checked in the API tab of Cluster Properties in the config mode of Cluster WebUI, a log file is outputted containing information handled by the RESTful API. This CSV-format file is hereinafter called an API service operation log file.
cur
Indicates the last outputted log file.
pre<x>
Where to save
Directory as Log output path in the config mode of Cluster WebUI
The operation information to be outputted includes the following items:
Item name |
Description |
|---|---|
Date |
Time when the operation information is outputted.
This is outputted in the form below (000 in milliseconds):
YYYY/MM/DD HH:MM:SS.000
|
Method |
Either of the following HTTP request methods: GET or POST. |
Request |
Issued request-URI. |
IP |
IP address of the client which issued the request. |
UserName |
Name of a user who executed the operation. |
HTTP-Status |
HTTP status code.
200: Success
Other than 200: Failure
|
ErrorCode |
Return value of the executed operation. |
ResponseTime(ms) |
Time taken for executing the operation (in milliseconds).
This is outputted in milliseconds.
|
Here is an example of the contents of an outputted API service operation log file:
"Date","Method","Request","IP","UserName","HTTP-Status","ErrorCode","ResponseTime(ms)"
"2023/05/28 16:34:08.007","GET","https://10.0.0.1:29009/api/v1/cluster","10.0.0.15","user1",200,0,84
"2023/05/28 16:34:08.007","GET","https://10.0.0.1:29009/api/v1/servers/servers?select=name","10.0.0.15","user1",200,0,84
"2023/05/28 16:35:03.283","POST","https://10.0.0.1:29009/api/v1/cluster/start","10.0.0.15","user1",200,0,142
"2023/05/28 16:35:03.283","POST","https://10.0.0.1:29009/api/v1/groups/failoverA/start -d '{ "target" : "server1" }'","10.0.0.15","user1",200,0,142
"2023/05/28 16:35:03.283","POST","https://10.0.0.1:29009/api/v1/resources/fip1/start -d '{ "target" : "server1" }'","10.0.0.15","user1",200,0,142
"2023/05/28 16:35:03.283","POST","https://10.0.0.1:29009/api/v1/monitors/fipw1/suspend -d '{ "target" : "server1" }'","10.0.0.15","root",200,0,142
                                                    :
2.9. Function for exporting server-specific alert logs
By selecting the Enable Alert Service checkbox (go to the config mode of Cluster WebUI -> Cluster Properties -> Alert Log tab), you can export a text file (in CSV format) of server-specific alert logs. This file will be hereinafter called a "file of server-specific alert logs".
alttrace.csv
Timing of export
Storage destination
A file of server-specific alert logs contains the latest alert logs at the time of export as above. For more information on the clpalttrace command, see "Reference Guide" -> "EXPRESSCLUSTER command reference" -> "Exporting a file of server-specific alert logs (clpalttrace command)".
Note
Exported data is as follows:
Item |
Description |
|---|---|
Type |
Any of the following log types:
Error (abnormal)
Warning
Information
|
Time |
The date and time when the log was created.
With time correction [6], the date and time is a corrected value.
Without time correction, the date and time is the same value as RawTime.
The output format of the value is as follows (000 in milliseconds):
YYYY/MM/DD HH:MM:SS.000
|
RawTime |
The date and time when the log was created.
The date and time is original (without correction).
The output format of the value is as follows (000 in milliseconds):
YYYY/MM/DD HH:MM:SS.000
|
ModuleName |
The name of the module by which the log was created. |
EventID |
The event ID of the log. |
Message:<server name> |
A message of the log.
This item is outputted for each server.
|
Note
The following shows an example of a file of server-specific alert logs, for a two-node cluster to which server1 and server2 belong:
"Type","Time","RawTime","ModuleName","EventID","Message:server1","Message:server2"
"Information","2024/12/23 21:08:25.472","2024/12/23 21:08:25.472","nm","6",,"All servers have started."
"Information","2024/12/23 21:08:25.477","2024/12/23 21:08:25.477","nm","6","All servers have started.",
"Information","2024/12/23 21:08:29.773","2024/12/23 21:08:29.773","rm","1","Monitoring userw has started.",
"Information","2024/12/23 21:08:29.784","2024/12/23 21:08:29.784","rm","1",,"Monitoring userw has started."
"Information","2024/12/23 21:08:29.785","2024/12/23 21:08:29.785","rm","1","Monitoring genw2 has started.",
"Information","2024/12/23 21:08:29.795","2024/12/23 21:08:29.795","rm","1","Monitoring genw4 has started.",
"Information","2024/12/23 21:08:29.799","2024/12/23 21:08:29.799","rm","1",,"Monitoring genw2 has started."
"Information","2024/12/23 21:08:29.809","2024/12/23 21:08:29.809","rm","1",,"Monitoring genw4 has started."
"Information","2024/12/23 21:08:30.542","2024/12/23 21:08:30.542","rc","10","Activating group failover1 has started.",
"Information","2024/12/23 21:08:31.640","2024/12/23 21:08:31.640","rm","1","Monitoring genw1 has started.",
"Information","2024/12/23 21:08:31.654","2024/12/23 21:08:31.654","rm","1","Monitoring genw3 has started.",
"Information","2024/12/23 21:08:31.672","2024/12/23 21:08:31.672","rm","1","Monitoring genw5 has started.",
"Information","2024/12/23 21:08:31.780","2024/12/23 21:08:31.780","rc","11","Activating group failover1 has completed.",
                                                    :
In this file of server-specific alert logs, the data is sorted in ascending order of Time (default).
2.10. Function for obtaining a log file for investigation
If an activation/deactivation failure occurred in a group/monitor resource or a forced-stop resource failed in a forced stop, such information is collected and saved as a compressed file to the following directory: <installation path>/log/ecap. The format of the file name is <date and time when the event occurred>_<module name>_<event ID>.tar.gz.
You can obtain this log file through Cluster WebUI. To do so, in the config mode of Cluster WebUI, go to Cluster Properties -> the Alert Log tab, then check the Enable a log file for investigation to be downloaded.
The compressed file contains the output of an executed command shared by resource types and that of one specific to a resource type.
Output of an executed command shared by resource types
The output is stored as a text file in the common folder.
The information obtained with this command is the same as that described in "Reference Guide" -> "EXPRESSCLUSTER command reference" -> "Collecting logs (clplogcc command)" -> "Collecting information when a failure occurs" -> "OS information (/proc/*)" and "Information created by running a command".
Output of an executed command specific to a resource type
The output is stored as a text file in Markdown format: <resource type>.ecap.md.
This is outputted by executing the following command specific to a resource type (even if this command does not exist, the command shared by resource types is run):
Resource type
Command name
Necessary package
Floating IP resource
ip n
iproute
ping -w 3 <the IP address>
iputils
Dynamic DNS resource
nslookup -timeout=3 <the virtual host name>
bind-utils
dig any +time=3 <the virtual host name>
bind-utils
NIC Link Up/Down monitor resource
ethtool <the name of the NIC interface>
ethtool
Floating IP monitor resource
ip n
iproute
ping -w 3 <the IP address>
iputils
Dynamic DNS monitor resource
nslookup -timeout=3 <the virtual host name>
bind-utils
dig any +time=3 <the virtual host name>
bind-utils
Note
The log file for investigation may not be appropriately obtained, if the same event and the same module occurred more than once at the same period of time.
2.11. Communication ports
Refer to "Getting Started Guide" > "Notes and Restrictions" > "Communication port number" for port numbers used for EXPRESSCLUSTER.
2.12. Cluster driver device information
The mirror driver mainly uses 218 as the major number. Make sure that no other driver uses this major number. However, this major number can be changed to avoid using 218 due to system restrictions.
The kernel mode LAN heartbeat driver uses 10 as the major number, and mainly uses 253 as the minor number. Make sure that no other driver uses these major and minor numbers.
The keepalive driver uses 10 as the major number, and mainly uses 254 as the minor number. Make sure that no other driver uses these major and minor numbers.
2.13. What causes servers to shut down
When any one of the following errors occurs, EXPRESSCLUSTER shuts down, resets servers, or performs panic of servers to protect resources.
2.13.1. Final action for an error in resource activation or deactivation
When the final action for errors in resource activation/deactivation is specified as one of the following:
Final action |
Result |
|---|---|
The cluster service stops and the OS shuts down. |
Causes normal shutdown after the group resources stop. |
The cluster service stops and the OS reboots. |
Causes normal reboot after the group resources stop. |
Sysrq Panic |
Performs a panic upon group resource activation/deactivation error. |
Keepalive Reset |
Performs a reset upon group resource activation/deactivation error. |
Keepalive Panic |
Performs a panic upon group resource activation/deactivation error. |
BMC Reset |
Performs a reset upon group resource activation/deactivation error. |
BMC Power Off |
Performs a power off upon group resource activation/deactivation error. |
BMC power Cycle |
Performs a power cycle upon group resource activation/deactivation error. |
BMC NMI |
Causes NMI upon group resource activation/deactivation error. |
2.13.2. Action for resource activation or deactivation stall generation
When one of the following is specified as the final action to be applied upon the occurrence of an error in resource activation/deactivation, and if resource activation/deactivation takes more time than expected:
Action performed when a stall occurs |
Result |
|---|---|
The cluster service stops and the OS shuts down. |
When a group resource activation/deactivation stall occurs, performs normal shutdown after the group resources stop. |
The cluster service stops and the OS reboots. |
When a group resource activation/deactivation stall occurs, performs normal reboot after the group resources stop. |
Sysrq Panic |
When a group resource activation/deactivation stall occurs, performs a panic. |
Keepalive Reset |
When a group resource activation/deactivation stall occurs, performs a reset. |
Keepalive Panic |
When a group resource activation/deactivation stall occurs, performs a panic. |
BMC Reset |
When a group resource activation/deactivation stall occurs, performs a reset. |
BMC Power Off |
When a group resource activation/deactivation stall occurs, performs a power off. |
BMC power Cycle |
When a group resource activation/deactivation stall occurs, performs a power cycle. |
BMC NMI |
When a group resource activation/deactivation stall occurs, performs an NMI. |
The OS shuts down if the resource activation or deactivation takes an unexpectedly long time. The OS shuts down, regardless of the setting of recovery in the event of a resource activation or deactivation error.
If a resource activation stall occurs, alert occurs and the following message is output to syslog.
Module type: rc
Event ID: 32
Message: Activating %1 resource has failed.(99 : command is timeout)
Description: Failed to activate 1 resource.
If a resource deactivation stall occurs, alert occurs and the following message is output to syslog.
Module type: rc
Event ID: 42
Message: Stopping %1 resource has failed.(99 : command is timeout)
Description: Failed to stop the %1 resource.
2.13.3. Final action at detection of an error in monitor resource
When the final action for errors in monitor resource monitoring is specified as one of the following:
Final action |
Result |
|---|---|
Stop cluster service and shut down the OS |
Causes shutdown after the group resources stop. |
Stop cluster service and reboot the OS |
Causes reboot after the group resources stop. |
Sysrq Panic |
Causes panic when an error is detected in monitor resource. |
Keepalive Reset |
Causes reset when an error is detected in monitor resource. |
Keepalive Panic |
Causes panic when an error is detected in monitor resource. |
BMC Reset |
Causes reset when an error is detected in monitor resource. |
BMC Power Off |
Causes power off when an error is detected in monitor resource. |
BMC Power Cycle |
Causes power cycle when an error is detected in monitor resource. |
BMC NMI |
Causes NMI when an error is detected in monitor resource. |
2.13.4. Forced stop action
When the type of forced stop is configured as BMC:
Forced stop action
Result
BMC reset
Causes reset in the failing server in which a failover group existed.
BMC power off
Causes power off in the failing server in which a failover group existed.
BMC power cycle
Causes power cycle in the failing server in which a failover group existed.
BMC NMI
Causes NMI in the failing server in which a failover group existed.
When the type of forced stop is configured as vCenter:
Forced stop action
Result
Power off
Causes power off in the failing server in which a failover group existed.
Reset
Causes reset in the failing server where the failover group existed.
When the type of forced stop is configured as AWS or OCI:
Forced stop action
Result
stop
Stops the instance of the failing server where the failover group existed.
reboot
Reboots the instance of the failing server where the failover group existed.
When the type of forced stop is configured as Azure:
2.13.5. Emergency server shutdown, emergency server reboot
When an abnormal termination is detected in any of the following processes, a shutdown or reboot is generated. Shutdown or reboot generation depends on the setting of Action When the Cluster Service Process Is Abnormal.
clprc
clprm
2.13.6. Group resource deactivation error in stopping the EXPRESSCLUSTER daemon
If there is a failure to deactivate group resources during the EXPRESSCLUSTER daemon stop process, the action set in [Action When the Cluster Service Process Is Failure] is executed.
2.13.7. Stall detection in user space
When a server stalls longer than the heartbeat time-out, an OS hardware reset, panic, or I/O fencing is generated. Hardware reset or panic generation depends on the setting of Operation at Timeout Detection of the user-mode monitor resource.
2.13.8. Stall detection during shutdown process
When a server stalls during the OS shutdown process, an OS hardware reset, panic, or I/O fencing is generated. Hardware reset or panic generation depends on the setting of Operation at Timeout Detection of the shutdown monitor.
2.13.9. Recovery from network partitioning
When any network partition resolution resources are not set, if all heartbeats are disrupted (network partitioning), both servers failover to each other. As a result, groups are activated on both servers. Even when network partition resolution resources are set, groups may be activated on both servers.
If interconnections are recovered from this condition, EXPRESSCLUSTER causes shutdown on both or one of the servers.
For details of network partitioning, see "When network partitioning occurs" in "Troubleshooting" in the "Reference Guide".
2.13.10. Network partition resolution
In a cluster system where network partition resolution resources are configured, the network partition resolution is performed when all heartbeats are interrupted (network partition). If this is determined to be caused by the network partitions, some or all of the servers are shut down or stop their services. Shutdown or service stop generation depends on the setting of Action at NP Occurrence.
For details on the network partition resolution, see "Network partition resolution resources details" in the "Reference Guide".
2.13.11. Mirror disk error ~For Replicator~
When an error occurs in a mirror disk, the mirror agent causes reset.
2.13.12. Hybrid disk error ~For Replicator DR~
When an error occurs in a hybrid disk, the mirror agent causes reset.
2.13.13. Failure in suspending or resuming the cluster
If suspending or resuming the cluster fails, the server is shut down.
2.14. Configuring the settings to temporarily prevent execution of failover
Follow the steps below to temporarily prevent failover caused by a failed server from occurring.
- Temporarily adjust time-outBy temporarily adjusting time-out, you can prevent a failover caused by a failed server from occurring.The clptoratio command is used to temporarily adjust time-out. Run the clptoratio command on one of the servers in the cluster.
(Example) To extend the heartbeat time-out to an hour, or 3600 seconds, when the heartbeat time-out is set to 90 seconds:
clptoratio -r 40 -t 1h
For more information on the clptoratio command, see "Adjusting time-out temporarily (clptoratio command)" in "EXPRESSCLUSTER command reference" in the "Reference Guide". - Releasing temporary time-out adjustmentReleases the temporary adjustment of time-out. Execute the clptoratio command for any server in the cluster.
clptoratio -i
For more information on the clptoratio command, see "Adjusting time-out temporarily (clptoratio command)" in "EXPRESSCLUSTER command reference" in the "Reference Guide".
Follow the steps below to temporarily prevent failover caused by a monitor error by temporarily stopping monitor resource monitoring.
- Suspending monitoring operation of monitor resourcesBy suspending monitoring operations, a failover caused by monitoring can be prevented.The clpmonctrl command is used to suspend monitoring. Run the clpmonctrl command on all servers in the cluster.Another way is to use the -h option on a server in the cluster and run the clpmonctrl command for all the servers.
(Example) To suspend all monitoring operations:on the server in which the command is run:
clpmonctrl -s
(Example) To suspend all monitoring operations on the server with -h option specified
clpmonctrl -s -h <server name>
For more information on the clpmonctrl command, see "Controlling monitor resources (clpmonctrl command)" in "EXPRESSCLUSTER command reference" in the "Reference Guide". - Restarting monitoring operation of monitor resourcesResumes monitoring. Execute the clpmonctrl command for all servers in the cluster.Another way is to use the -h option on a server in the cluster and run the clpmonctrl command for all the servers.
(Example) Resuming all monitoring operations:on the server in which the command is run:
clpmonctrl -r
(Example) To resume all monitoring operations on the server with -h option specified
clpmonctrl -r -h <server name>
For more information on the clpmonctrl command, see "Controlling monitor resources (clpmonctrl command)" in "EXPRESSCLUSTER command reference" in the "Reference Guide".
Follow the steps below to temporarily prevent failover caused by a monitor error by disabling recovery action for a monitor resource error.
- Disabling recovery action for a monitor resource errorWhen you disable recovery action for a monitor resource error, recovery action is not performed even if a monitor resource detects an error. To set this feature, check the Recovery action when a monitor resource error is detected checkbox in Disable cluster operation under the Extension tab of Cluster properties in config mode of Cluster WebUI and update the setting.
- Not disabling recovery action for a monitor resource errorEnable recovery action for a monitor resource error. Uncheck the Recovery action when a monitor resource error is detected checkbox in Disable cluster operation under the Extension tab of Cluster properties in config mode of Cluster WebUI and update the setting.
Follow the steps below to temporarily prevent failover caused by an activation error by disabling recovery action for a group resource activation error.
- Disabling recovery action for a group resource activation errorWhen you disable recovery action for a group resource activation error, recovery action is not performed even if a group resource detects an activation error. To set this feature, check the Recovery operation when a group resource activation error is detected checkbox in Disable cluster operation under the Extension tab of Cluster properties in config mode of Cluster WebUI and update the setting.
- Not disabling recovery action for a group resource activation errorEnable recovery action for a group resource activation error. Uncheck the Recovery operation when a group resource activation error is detected checkbox in Disable cluster operation under the Extension tab of Cluster properties in config mode of Cluster WebUI and update the setting.
2.15. How to replace a mirror disk with a new one
When the replacement of mirror disks is necessary due to mirror disk breakdown or some reasons after starting operation, run the following steps:
See also
For details on how to stop and start daemons, see "Suspending EXPRESSCLUSTER" in "Preparing to operate a cluster system" in the "Installation and Configuration Guide".
2.15.1. In case of replacing a mirror disk constructed with a single disk(non-RAID)
Stop the server of which the mirror disk is going to be replaced.
Note
Before shutting down the server, it is recommended that the steps in "Disabling the EXPRESSCLUSTER daemon" in the "Installation and Configuration Guide" be executed.On the target server, execute the following command to disable the daemon.clpsvcctrl.sh --disable core mgr
If a hybrid disk failure occurs, terminate all servers connected to the disk to be replaced.
Install a new disk in the server.
Start up the server in which the new disk was installed. At this time, change the setting so that the EXPRESSCLUSTER services will not be executed. In case of not having disabled the EXPRESSCLUSTER daemon in the step 1, the daemons start up on run level 1 at OS startup.
Construct the same partition as the original disk to the new disk by fdisk command.
Note
To replace shared storage with the hybrid disk, create a partition and file system with any server connected to that shared storage.
Initialize the cluster partition when using the disk used as an EXPRESSCLUSTER mirror disk or hybrid disk with data discarded.
For more information on initializing the cluster partition (CLUSTER partition), see the related items ("Shared disk settings for Hybrid disk resource (Required for Replicator DR)", "Partition settings for Hybrid disk resource (Required for the Replicator DR)", and "Partition settings for Mirror disk resource (when using Replicator)") in "Settings after configuring hardware" in "Determining a system configuration" in the "Installation and Configuration Guide".
Prevent initial mirror construction from being performed automatically.
(A) In the state in which the operation is being performed on the server on which a mirror disk is not replaced (state in which the group containing mirror disk resources is active), you want to concurrently perform disk copy (initial mirror construction), there is no particular need to make sure that initial mirror construction is not automatically performed.
(B) If the operation could be stopped until disk copy is completed (the group may be deactivated), deactivate the group containing the mirror disk resource.
Note
- With procedure (A), copy is performed by the amount equal to that of disk space used, depending on the type of file system, so the copy time may depend on the amount of disk space used.Also, because the operation and copy are performed concurrently, the load may become high and copy may take time depending on the case.
With procedure (B) whereby disk copy is performed while the operation is stopped (the group is deactivated), copy is performed by the amount equal to that of disk space used, depending on the file system, so the copy time may depend on the amount of disk space used. The operation (group activation) can be started after the completion of copy.
On the server on which a new disk has been installed, enable the EXPRESSCLUSTER daemon, and restart the server.
Note
- In case that the steps in "Disabling the EXPRESSCLUSTER daemon" in the Installation and Configuration Guide were executed before shutting down the server, enable the EXPRESSCLUSTER daemons at this time.On the target server, execute the following command to enable the daemon.
clpsvcctrl.sh --enable core mgr
Start the initial mirror construction (disk copy) by executing the command described below.
- (A) When performing an operation on a server on which the mirror disk has not been replacedThe initial mirror construction (disk copy) is automatically started.If you set Execute the initial mirror construction to Off, construction is not started automatically; use Mirror Disks or either of the following commands to start it manually
[For a mirror disk]
clpmdctrl --force copy_source_server_name> <mirror_disk_resource_name>
[For a hybrid disk]
clphdctrl --force copy_source_server_name> <hybrid_disk_resource_name>
- (B) If the operation is stopped, and the operation is to be started after the completion of disk copy(When performing copy when the group containing the mirror disk resource is deactivated)
[For a mirror disk]
clpmdctrl --force <copy_source_server_name> <mirror_disk_resource_name>
[For a hybrid disk]
clphdctrl --force <copy_source_server_name> <hybrid_disk_resource_name>
- If initial mirror construction is started while the operation is stopped (deactivated) (B), you can start the operation (activate the group) after the completion of the initial mirror construction (after the completion of disk copy).If mirror recovery is interrupted, start initial mirror construction without activating the group.
2.15.2. In case of replacing a mirror disk constructed with a number of disks(RAID)
Stop the server of which the mirror disks are going to be replaced.
Note
- Before shutting down the server, it is recommended that the steps in "Disabling the EXPRESSCLUSTER daemon" in the Installation and Configuration Guide be executed.On the target server, execute the following command to disable the daemon.
clpsvcctrl.sh --disable core mgr
If a hybrid disk failure occurs, terminate all servers connected to the disk to be replaced.
Install the new disks in the server.
Start up the server.
Reconstruct the RAID before OS startup.
- Change the setting so that the EXPRESSCLUSTER services will not be executed at OS startup. In case of not having disabled the EXPRESSCLUSTER daemon in the step 1, startup the daemons on run level 1 at OS startup, then startup the daemons on run level 3 after disabling the daemons.Back up data from the data partition as required.
If LUN is initialized, use the fdisk command to create cluster and data partitions on a new disk.
Note
If a hybrid disk failure occurs, terminate all servers connected to the disk to be replaced.
Login as the root and initialize the cluster partition using one of the following methods.
Method (1) Without using the dd command
For the mirror disk
clpmdinit --create force <mirror disk resource name>
For the hybrid disk
clphdinit --create force <hybrid disk resource name>
Note
- For the mirror disk, if Execute initial mkfs is set to "on" when the mirror disk resource is set up, mkfs is executed upon execution of this command to initialize the file system.However, mkfs may take a long time to complete in the case of a large-capacity disk. (once mkfs is executed, any data saved in the data partition will be erased. Back up the data in the data partition as required, therefore, before executing this command.)Mirror data is copied from the destination server by means of the entire recovery described later.
If a hybrid disk failure occurs, terminate all servers connected to the disk to be replaced.
Method (2) Using the dd command
For the mirror disk
dd if=/dev/zero of=<cluster partition device name (Example: /dev/sdb1)>
clpmdinit --create quick <mirror disk resource name>
For the hybrid disk
dd if=/dev/zero of=<cluster partition device name (Example: /dev/sdb1)>
clphdinit --create quick <hybrid disk resource name>
Note
When the dd command is executed, data in the partition specified by of= is initialized. Confirm whether the partition device name is correct, and then execute the dd command.
- When the dd command is executed, the following message may appear. This does not, however, indicate an error.
dd: writing to <CLUSTER partition device name>: No space left on device
Mirror data is copied from the destination server by means of the entire recovery described later. Back up the data in the data partition as required, therefore, before executing this command.
If a hybrid disk failure occurs, terminate all servers connected to the disk to be replaced.
Prevent initial mirror construction from being performed automatically.
(A) In the state in which the operation is being performed on the server on which a mirror disk is not replaced (state in which the group containing mirror disk resources is active), you want to concurrently perform disk copy (initial mirror construction), there is no particular need to make sure that initial mirror construction is not automatically performed.
(B) If the operation could be stopped until disk copy is completed (the group may be deactivated), deactivate the group containing the mirror disk resource.
Note
- With procedure (A), copy is performed by the amount equal to that of disk space used, depending on the type of file system, so the copy time may depend on the amount of disk space used.Also, because the operation and copy are performed concurrently, the load may become high and copy may take time depending on the case.
With procedure (B) whereby disk copy is performed while the operation is stopped (the group is deactivated), copy is performed by the amount equal to that of disk space used, depending on the file system, so the copy time may depend on the amount of disk space used. The start of the operation (group activation) can be performed after the completion of copy.
On a server on which a disk has been replaced, enable the EXPRESSCLUSTER daemon, and then restart the server.
Note
- In the case that the steps in "Disabling the EXPRESSCLUSTER daemon" in the "Installation and Configuration Guide" were executed before shutting down the server, enable the EXPRESSCLUSTER daemons at this time.On the target server, execute the following command to enable the daemon.
clpsvcctrl.sh --enable core mgr
Use the following command to start the initial mirror construction (disk copy).
(A) When performing an operation on a server on which the mirror disk has not been replaced
The initial mirror construction (disk copy) is automatically started.If you set Execute the initial mirror construction to Off, construction is not started automatically; use Mirror Disks or either of the following commands to start it manually[For a mirror disk]
clpmdctrl --force <copy_source_server_name> <mirror_disk_resource_name>
[For a hybrid disk]
clphdctrl --force <copy_source_server_name> <hybrid_disk_resource_name>
- (B) If the operation is stopped, and is to be started after disk copy has been completed(When performing copy in the state in which the group containing the mirror disk resource is deactivated)
[For a mirror disk]
clpmdctrl --force <copy_source_server_name> <mirror_disk_resource_name>
[For a hybrid disk]
clphdctrl --force <copy_source_server_name> <hybrid_disk_resource_name>
- If initial mirror construction is started while the operation is stopped (deactivated) (B), you can start the operation (activate the group) after the completion of the initial mirror construction (after the completion of disk copy).If mirror recovery is interrupted, start the initial mirror construction without activating the group.
2.15.3. In case of replacing mirror disks of both servers
Note
The data of mirror disks are lost after replacing the mirror disks of both servers. Restore the data from backup data or other media as necessary after replacing the disks.
Stop the both servers.
Note
- Before shutting down both servers, it is recommended that the steps in "Disabling the EXPRESSCLUSTER daemon" in the Installation and Configuration Guide are executed.On the target server, execute the following command to disable the daemon.
clpsvcctrl.sh --disable core mgr
Install the new disks in both servers.
Startup both servers. At this time, change the setting so that the EXPRESSCLUSTER services will not be executed. In case of not having disabled the EXPRESSCLUSTER daemon in the step 1, the daemons start up on run level 1 at OS startup.
Construct the same partition as the original disk to the new disks of both servers by fdisk command.
Note
To replace shared storage with the hybrid disk, create a partition and a file system with any server connected to that shared storage.
Initialize the cluster partition when using the disk used as an EXPRESSCLUSTER mirror disk or hybrid disk with data discarded. If required, initialize the file system of the data partition.
For more information on initializing the cluster partition (CLUSTER partition) and on creating a file system and whether to create one or not, see the related items ("Shared disk settings for Hybrid disk resource (Required for Replicator DR)", "Partition settings for Hybrid disk resource (Required for the Replicator DR)", and "Partition settings for Mirror disk resource (when using Replicator)") in "Settings after configuring hardware" in "Determining a system configuration" in the Installation and Configuration Guide.
Restart both servers.
Note
- In the case that the steps in "Disabling the EXPRESSCLUSTER daemon" in the "Installation and Configuration Guide" were executed before shutting down the server, enable the EXPRESSCLUSTER daemons at this time.On the target server, execute the following command to enable the daemon.
clpsvcctrl.sh --enable core mgr
- The initial mirror construction (entire mirror recovery) starts automatically by restarting.If you set Execute the initial mirror construction to Off, the normal state is assumed directly without automatically starting. Thus, in this case, use the Mirror Disks of Cluster WebUI, clpmdctrl, or the clphdctrl command to manually start full mirror recovery.
After the completion of full mirror recovery, recover the data from a backup or the like after the completion of full mirror recovery.
2.17. How to replace a server with a new one ~For a mirror disk~
2.17.1. Replacing a server and its mirror disk
Connect to the Cluster WebUI with a management IP address. If you do not have any management IP address, connect to it by using the IP address of a server that is not to be replaced.
Replace the failed server machine and the disk. Set the same IP address and host name in the new server as the old server.

Fig. 2.2 Not able to start Server 2 or use its disk

Fig. 2.3 Replacing Server 2 and its disk with a new server and a new disk
- Create partitions in the new disk by executing the fdisk command.Install the EXPRESSCLUSTER Server on the new server. For details, see "Installing EXPRESSCLUSTER" in the Installation and Configuration Guide. The server on which you installed the EXPRESSCLUSTER Server should be restarted after the installation.
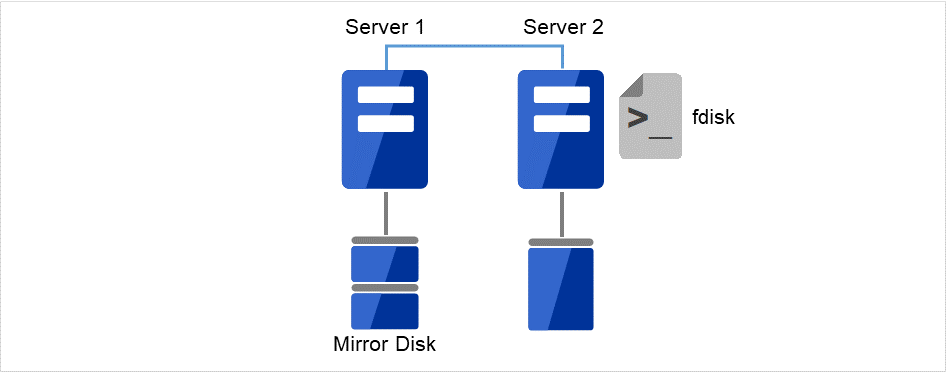
Fig. 2.4 Creating partitions in the new disk
When using the disk that was used as a mirror disk before, initialize the cluster partition.
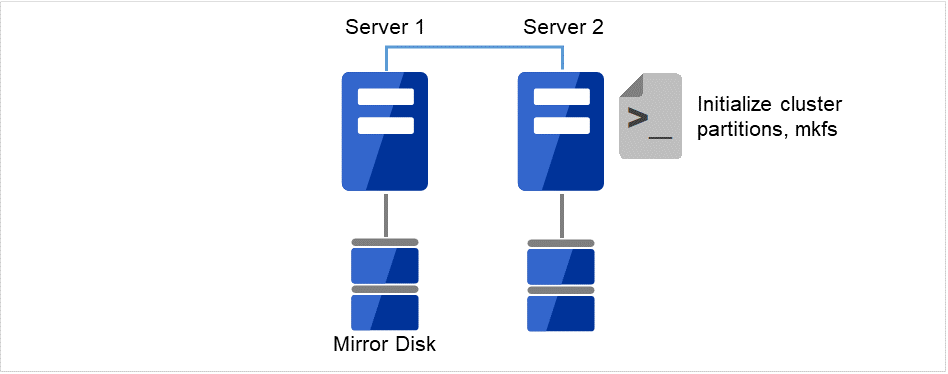
Fig. 2.5 Partitioning the new disk
Upload the cluster configuration data in the config mode of Cluster WebUI you connected to. When uploading the data completes, restart the replaced server.
If you use a fixed term license, run the following command:
clplcnsc --reregister <a folder path for saved license files>
- After the server is restarted, the cluster partitions in the new disk will be initialized and a file system will be created in the data partition.The mirror recovery is executed if the initial mirror construction is set. If not, you have to manually recover mirroring.For information on recovery of disk mirroring, refer to "Recovering mirror with a command" and "Recovering mirror using the Cluster WebUI" of "Troubleshooting" in "Reference Guide"In mirror recovery, the data is fully copied.Confirm that mirroring is successfully recovered by using the WebManager or by running the following command. For details, see "Mirror-related commands" in "EXPRESSCLUSTER command reference" in the "Reference Guide".
clpmdstat --mirror <mirror_disk_resource_name (Example: md1)>

Fig. 2.6 Starting mirror recovery on Server 1 (full copy)
2.17.2. Using the mirror disk of the failed server
Connect to the Cluster WebUI with a management IP address. If you do not have any management IP address, connect to it by using the IP address of a server that is not to be replaced.
Replace the failed server machine but continue using the mirror disk of the failed server. Set the same IP address and host name in the new server as before.

Fig. 2.7 Not able to start Server 2

Fig. 2.8 Replacing Server 2 with a new one
Install the EXPRESSCLUSTER Server on the new server. For details, see "Installing EXPRESSCLUSTER" in the "Installation and Configuration Guide". Restart the server on which the EXPRESSCLUSTER Server was installed.
Upload the cluster configuration data in the config mode of Cluster WebUI you connected to. When uploading the data completes, restart the replaced server.
If you use a fixed term license, run the following command:
clplcnsc --reregister <a folder path for saved license files>
- If there is no difference in mirror disks, you can immediately start the operation after restarting the server. On the other hand, if there is any difference in mirror disks, you have to recover the mirroring data after restarting the server.The disk mirroring is automatically recovered when auto-mirror recovery is enabled. If not, you have to manually recover disk mirroring. For information on recovery of disk mirroring, refer to "Recovering mirror with a command" and "Recovering mirror using the Cluster WebUI" of "Troubleshooting" in "Reference Guide".Confirm that mirroring is successfully recovered by using the Cluster WebUI or by running the following command. For details, see "Mirror-related commands" in "EXPRESSCLUSTER command reference" in the "Reference Guide".
clpmdstat --mirror <mirror_disk_resource_name (Example: md1)>

Fig. 2.9 Starting mirror recovery on Server 1 (differential copy)
2.18. How to replace a server with a new one ~For a hybrid disk~
2.18.1. Replacing a server and its non-shared hybrid disk
Connect to the Cluster WebUI with a management IP address. If you do not have any management IP address, connect to it by using the IP address of a server that is not to be replaced.
Replace the failed server machine and the disk. Set the same IP address and host name in the new server as the old server.
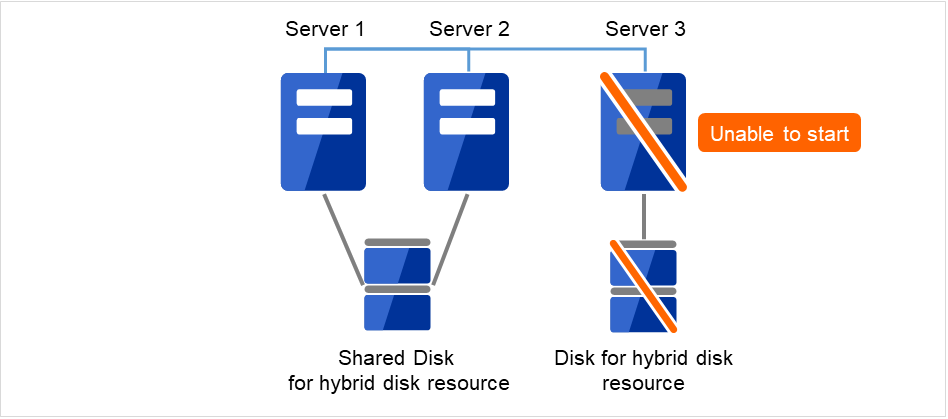
Fig. 2.10 Not able to start Server 3 or use its disk
Fig. 2.11 Replacing Server 3 and its disk with a new server and a new disk
Create partitions in the new disk by executing the fdisk command.
Fig. 2.12 Creating partitions in a new disk of Server 3
Install the EXPRESSCLUSTER Server on the new server. For details, see "Installing EXPRESSCLUSTER" in the Installation and Configuration Guide. The server on which you installed the EXPRESSCLUSTER Server should be restarted after the installation.
Upload the cluster configuration data in the config mode of Cluster WebUI you connected to.
If you use a fixed term license, run the following command:
clplcnsc --reregister <a folder path for saved license files>
Execute the clphdinit command in the replaced server.
# clphdinit --create force <Hybrid disk resource name (Example: hd1)>
Restart the replaced server.
- After the server is restarted, the mirror recovery is executed if the initial mirror construction is set. If not, you have to manually recover mirroring.For information on recovery of disk mirroring, refer to "Recovering mirror with a command" and "Recovering mirror using the Cluster WebUI" of "Troubleshooting" in "Reference Guide".In mirror recovery, the data is fully copied.Confirm that mirroring is successfully recovered by using the Cluster WebUI or by running the following command. For details, see "Hybrid-disk-related commands" in "EXPRESSCLUSTER command reference" in the "Reference Guide".
clphdstat --mirror <hybrid_disk_resource_name (Example: hd1)>
Fig. 2.13 Starting mirror recovery on Server 1 (full copy)
2.18.2. Replacing a server and a hybrid disk of the shared disk
Connect to the Cluster WebUI with a management IP address. If you do not have any management IP address, connect to it by using the IP address of a server that is not to be replaced.
Set the EXPRESSCLUSTER service not to start on the failed server and the other server connecting to the same shared disk.
clpsvcctrl.sh --disable core
- Shut down the server that was connected to the failing server via the shared disk by running the OS shutdown command etc.If you want to keep the operation during replacement, move the group to server 3.
Fig. 2.14 Not able to start Server 1 or use the shared disk
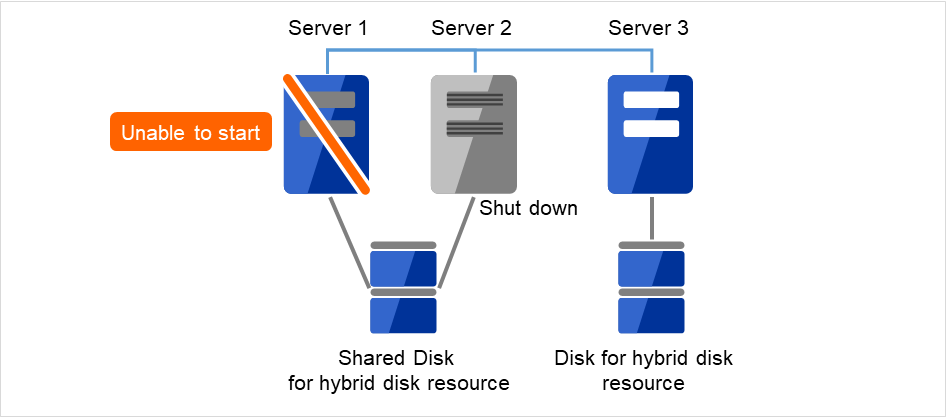
Fig. 2.15 Shutting down Server 2
Replace the failed server machine and the shared disk. Set the same IP address and host name in the new server as the old server.
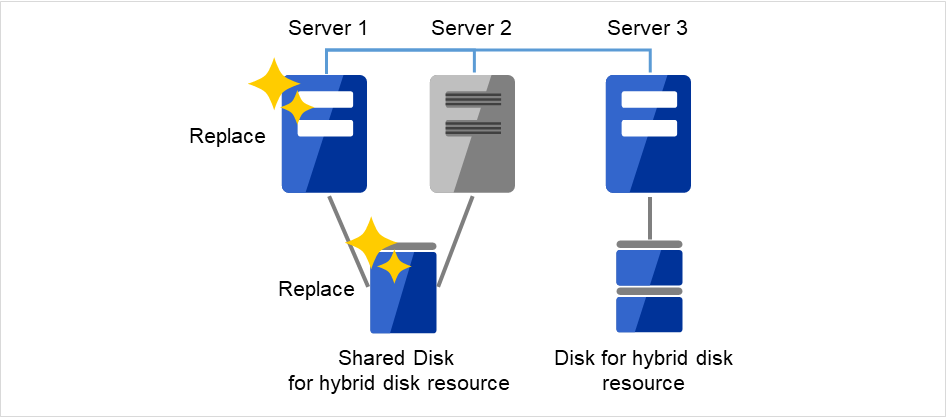
Fig. 2.16 Replacing Server 1 and the shared disk with a new server and a new disk
Create disk partitions from the replaced server by executing the fdisk command.
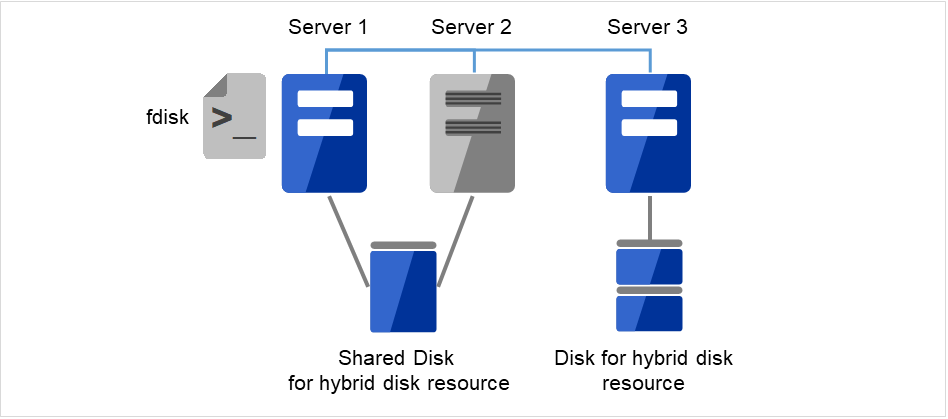
Fig. 2.17 Creating partitions in a new shared disk connected to Server 1
Install the EXPRESSCLUSTER Server on the new server. For details, see "Installing EXPRESSCLUSTER" in the "Installation and Configuration Guide". The server on which you installed the EXPRESSCLUSTER Server should be restarted after the installation. Start the server that was connected to the failing server via the shared disk.
EXPRESSCLUSTER is not started on the non-replaced server of the servers connected to the shared disk.
Fig. 2.18 Installing EXPRESSCLUSTER on Server 1 and starting Server 2
Upload the cluster configuration data in the config mode of Cluster WebUI you connected to.
If you use a fixed term license, run the following command:
clplcnsc --reregister <a folder path for saved license files>
- On the replaced server, run the clphdinit command.
# clphdinit --create force <hybrid disk resource name(example: hd1)>
Set the EXPRESSCLUSTER service to start on the failed server and the other server connecting to the same shared disk.
clpsvcctrl.sh --enable core
Restart the replaced server as well as the server that was connected to the failing server via the shared disk.

Fig. 2.19 Restarting the replaced server as well as the server that was connected to the failing server via the shared disk
- After the server is restarted, the mirror recovery is executed if the initial mirror construction is set. If not, you have to manually recover mirroringFor information on recovery of disk mirroring, refer to "Recovering mirror with a command" and "Recovering mirror using the Cluster WebUI" of "Troubleshooting" in "Reference Guide".The destination server of disk mirroring is the current server of the server group to which the shared disk is connected (The figure below shows an example where the server 1 is the current server).In mirror recovery, the data is fully copied.Check that mirror recovery has completed by running the following command, or by using WebManager. For details, see "Hybrid-disk-related commands" in "EXPRESSCLUSTER command reference" in the "Reference Guide".
clphdstat --mirror <hybrid disk resource name (example: hd1)>
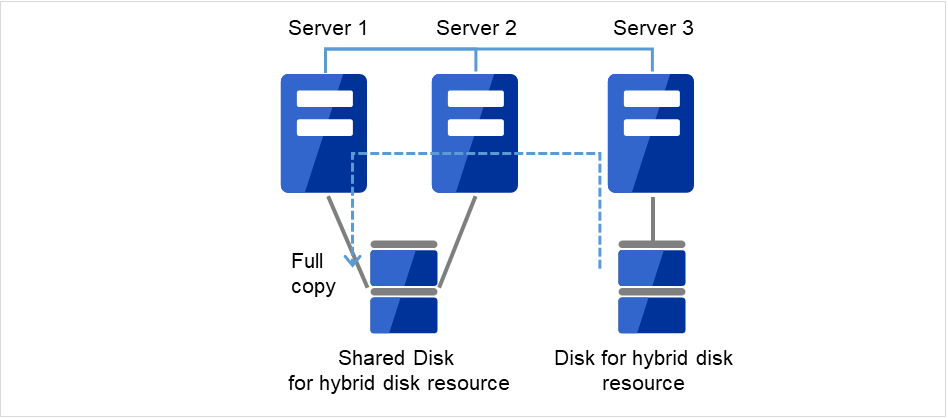
Fig. 2.20 Starting mirror recovery (full copy)
2.18.3. Using the disk of the failed server
Connect to the Cluster WebUI with a management IP address. If you do not have any management IP address, connect to it by using the IP address of a server that is not to be replaced.
Replace the failed server machine but continue using the disk of the failed server. Set the same IP address and host name in the new server as before.
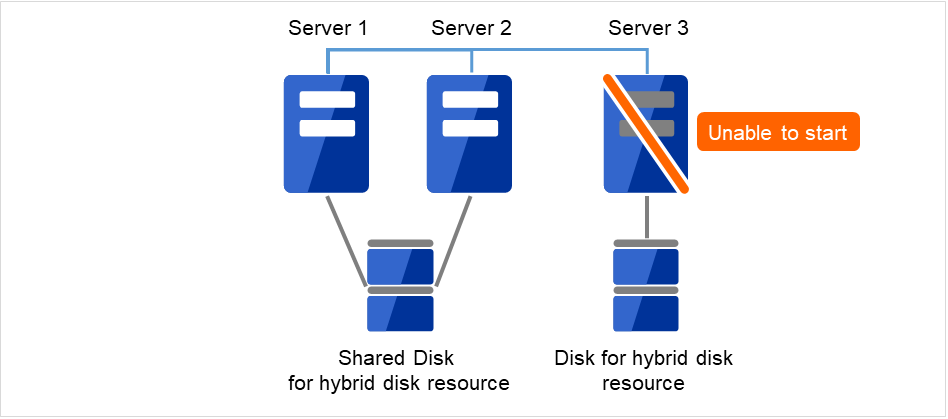
Fig. 2.21 Not able to start Server 1 or use the shared disk
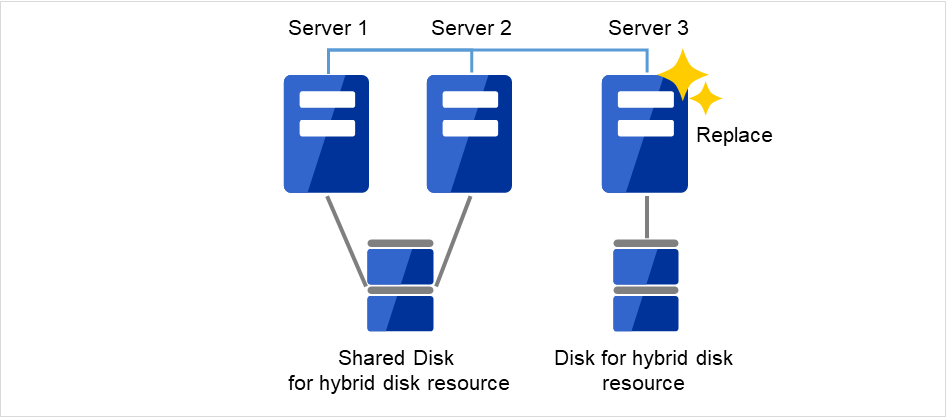
Fig. 2.22 Replacing Server 3 with a new one
Install the EXPRESSCLUSTER Server on the new server. For details, see "Installing EXPRESSCLUSTER" in the Installation and Configuration Guide. Restart the server on which the EXPRESSCLUSTER Server was installed.
Upload the cluster configuration data in the config mode of Cluster WebUI you connected to. When uploading the data completes, restart the replaced server.
If you use a fixed term license, run the following command:
clplcnsc --reregister <a folder path for saved license files>
- If there is no difference in mirror disks, you can immediately start the operation after restarting the server. On the other hand, if there is any difference in mirror disks, you have to recover the mirroring data after restarting the server.The disk mirroring is automatically recovered when auto-mirror recovery is enabled. If not, you have to manually recover disk mirroring. For information on recovery of disk mirroring, refer to "Recovering mirror with a command" and "Recovering mirror using the Cluster WebUI" of "Troubleshooting" in "Reference Guide".Confirm that mirroring is successfully recovered by using the Cluster WebUI or by running the following command. For details, see "Hybrid-disk-related commands" in "EXPRESSCLUSTER command reference" in the "Reference Guide".
clpmdstat --mirror <hybrid_disk_resource_name (Example: hd1)>
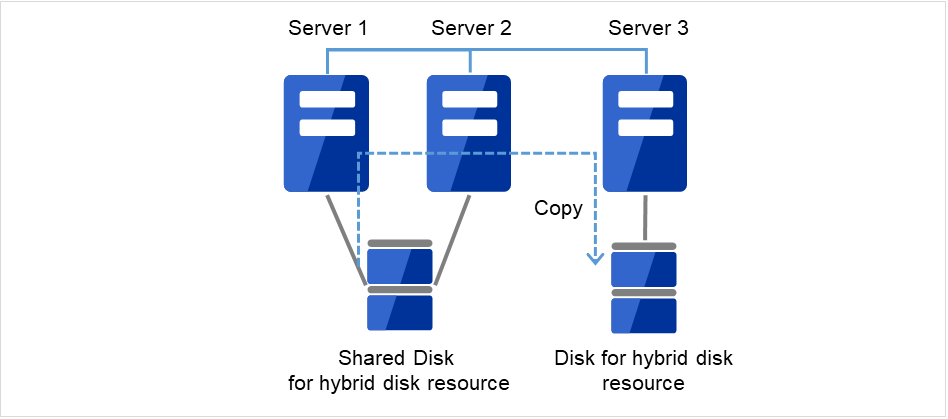
Fig. 2.23 Starting mirror recovery on Server 1 (differential copy)
2.18.4. Replacing a server to which the shared disk is connected
Connect to the Cluster WebUI with a management IP address. If you do not have any management IP address, connect to it by using the IP address of a server that is not to be replaced.
Replace the failed server machine and the shared disk. Set the same IP address and host name in the new server as the old server.
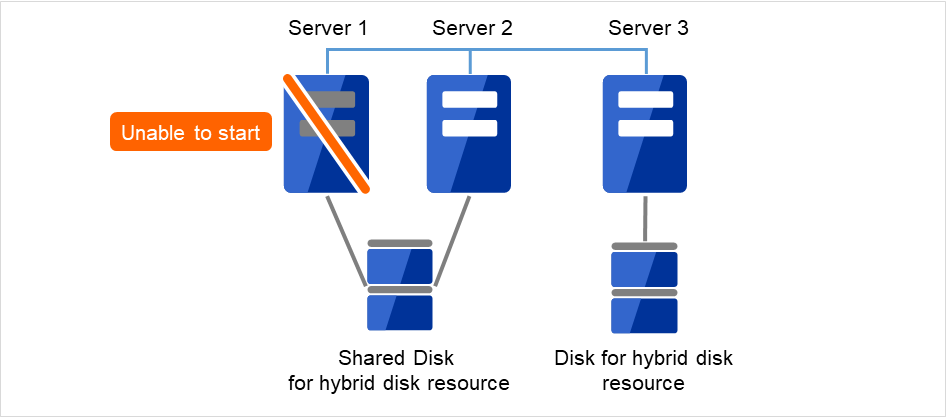
Fig. 2.24 Not able to start Server 1
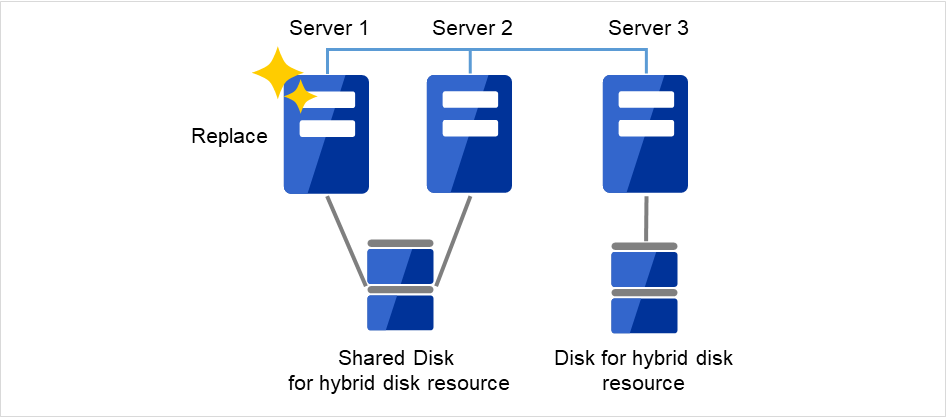
Fig. 2.25 Replacing Server 1 with a new one
Install the EXPRESSCLUSTER Server on the new server. For details, see "Installing EXPRESSCLUSTER" in the "Installation and Configuration Guide". Restart the server on which the EXPRESSCLUSTER Server was installed
Upload the cluster configuration data in the config mode of Cluster WebUI you connected to.
If you use a fixed term license, run the following command:
clplcnsc --reregister <a folder path for saved license files>
When uploading the data completes, restart the replaced server.
2.19. How to restore a virtual machine ~For a mirror disk~
If a failure occurs in the system disk of a server in a virtual environment, follow the steps below to replace the disk and to restore the contents from a backup.
Note
clpbackup.sh --pre --no-shutdownas a step for mirror disk resources. Instead, however, executeclpbackup.sh --preto shut down the server, and then create the backup. This is because, when you back up the system disk, it is recommended to make the system disk static.
Move a group which has started up on the server with the system disk to be restored (hereafter referred to as the target server), if any. After moving the group, check that each group resource is normally started up.
In order to prevent the automatic mirror recovery, pause all the mirror disk monitor resources on servers other than the target server, by using Cluster WebUI or executing the following clpmonctrl command:
clpmonctrl -s -h <server name> -m <monitor resource name>
Shut down the target server by executing the following the clprestore.sh command:
clprestore.sh --pre
Use the backup image of the target server to create a new virtual hard disk.
If the target server currently has separate virtual hard disks (one for the system disk and the other[s] for the mirror disk resource[s]), use their backup images to create their respective new virtual hard disks.
- Replace the existing virtual hard disk of the target server, with the new one.For more information on the replacement procedure, refer to the manuals or guides of virtual platforms and cloud environments.
Start up the target server.
Note
Starting up the target server does not automatically start up the cluster service. Since you executedclpbackup.sh --prein creating the backup, automatic startup of the cluster service is disabled.On the target server, check that the device file name of the disk after the restoration is the same as that before the restoration. If the name is different, set it as before.
Execute the following clprestore.sh command to reboot the target server.
clprestore.sh --post
Open Cluster WebUI -> Mirror disks, then make a mirror recovery (full copy) of all the mirror disk resources.
Note
The copy source must be a server on which data to be updated exists.Make a full copy instead of a differential copy, because the data difference may have become invalid during the restoration process.Resume the mirror disk monitor resources on the servers other than the target server, by using Cluster WebUI or executing the following clpmonctrl command:
clpmonctrl -r -h <server_name> -m <monitor_resource_name>
Confirm that the mirror is synchronized normally, by using Cluster WebUI or by running the clpmdstat command:
clpmdstat --mirror <md_resource_name>
Note
If the mirror status is GREEN for both servers, the mirror is synchronized normally.
2.20. How to back up a mirror/hybrid disk to its disk image
Perform either of the following procedures when backing up the partition (cluster partition and data partition) for a mirror/hybrid disk, to its disk image:
Note
Note
Note
clpbackup.sh --preorclpbackup.sh --poston a server of a server group first, then performclpbackup.sh --pre --only-shutdownorclpbackup.sh --post --only-rebooton all the other servers of the server group.Each of the written procedures includes the current server of the server group, as a signpost for the first server of the group on which the command is executed. However, the current server does not have to be the first server.If the server group has only one server, it is unnecessary to executeclpbackup.sh --pre --only-shutdownorclpbackup.sh --post --only-rebooton all the other servers of the server group.* In each server group, a current server is responsible for the mirror data to be transmitted/received, and to be written to its disk.In the active server group, the current server contains the hybrid disk resource being activated.In the standby server group, the current server receives the mirror data, sent from the current server of the active server group, and writes such data to its mirror disk.Note
Some invalid status. Check the status of cluster.", leading to a failure in the shutdown. Then wait a while before performing the clpbackup.sh command again.clpbackup.sh --post, a timeout may occur for the mirror agent being started, causing an error.In this case, wait a while before performing the clpbackup.sh command again.See also
For information on the clpbackup.sh command, see "Reference Guide" -> "EXPRESSCLUSTER command reference" -> "Preparing for backup to a disk image (clpbackup.sh command)".
2.20.1. Simultaneously backing up both active and standby mirror disks (with the business interrupted)
Confirm that the mirror is synchronized normally, by using Cluster WebUI or by running the clpmdstat / clphdstat command:
For mirror disk resources:
clpmdstat --mirror <md_resource_name>
For hybrid disk resources:
clphdstat --mirror <hd_resource_name>
Note
If the mirror status is GREEN for both servers or both server groups, the mirror is synchronized normally.For hybrid disk resources, confirm which is a current server in each of the active server group and the standby server group.Stop the activated failover group (the operation) by using Cluster WebUI or by running the clpgrp command.
Switch the mirror disks to backup mode by running the clpbackup.sh command.
For mirror disk resources:
Execute the following command on both of the active and standby servers:
clpbackup.sh --pre --no-shutdown
For hybrid disk resources:
Execute the following command on one server in both server groups:
clpbackup.sh --pre
Note
After the execution, the status of mirroring is changed to that for the backup, automatic startup of the cluster service is set to disabled.For mirror disk resources: After the above actions are completed, the cluster service stops.For hybrid disk resources: After the above actions are completed, the server shuts down.Note
For mirror disk resources: If you also want to immediately shot down the server, executeclpbackup.sh --preinstead ofclpbackup.sh --pre --no-shutdown.For hybrid disk resources: after shutting down the server with the clpbackup.sh command, execute the following command on all the other servers:
clpbackup.sh --pre --only-shutdown
Note
When the command is executed, automatic startup of the cluster service is set to disabled and the server shuts down.
Execute backup on both servers.
After completing the backup, return the mirror disks from backup mode to normal mode.
For mirror disk resources:
Execute the following command on both of the active and standby servers:
clpbackup.sh --post --no-reboot
For hybrid disk resources:
Start all the servers.Then, execute the following command on one server in both server groups:clpbackup.sh --post
Note
After the execution, the mirror status returns to normal, automatic startup of the cluster service is set to enabled.For mirror disk resources: After the above actions are completed, the cluster service starts up.For hybrid disk resources: After the above actions are completed, the server reboots. The process may take time.For hybrid disk resources: When the server starts rebooting with the clpbackup.sh command, execute the following command on all the other servers:
clpbackup.sh --post --only-reboot
Note
When the command is executed, automatic startup of the cluster service is set to enabled and the server reboots.
After the cluster services start up on all the active and standby servers, confirm that the mirror is synchronized normally by using Cluster WebUI or by running the clpmdstat / clphdstat command.
2.20.2. Backing up active/standby mirror disks in each server (with the business interrupted)
Back up the disks in each server alternately according to the following procedure as specified in "Backing up standby mirror disks (with the business interrupted)".
Back up the disks on the standby server as specified in "Backing up standby mirror disks (with the business interrupted)".
After the completion of backup, when mirror recovery is completed to synchronize the mirror disks between the active server and the standby server, move the failover group from the active server to the standby server.
Back up the disks on the previously active server as specified in "Backing up standby mirror disks (with the business interrupted)".
After the completion of backup, when mirror recovery is completed to synchronize the mirror disks between the active server and the standby server, move the failover group as required.
2.20.3. Backing up standby mirror disks (with the business interrupted)
Confirm that the mirror is synchronized normally by using Cluster WebUI or by running the clpmdstat / clphdstat command:
For mirror disk resources:
clpmdstat --mirror <md_resource_name>
For hybrid disk resources:
clphdstat --mirror <hd_resource_name>
Note
If the mirror status is GREEN for both servers or both server groups, the mirror is synchronized normally.For hybrid disk resources, confirm which is a current server in the standby server group.In order to secure the quiescent point for data being written to the mirror area, stop the failover group (operation) including mirror disk resources and hybrid disk resources by using Cluster WebUI or by running the clpgrp command.
Note
Stopping the failover group prevents the backup of the data being written, or the failure to be written and backed up to a mirror area due to a cache.
In order to prevent the automatic mirror recovery from working, pause all the disk monitor resources/mirror disk monitor resources/hybrid disk monitor resources on both of the active server and the standby server, by using Cluster WebUI or executing the following clpmonctrl command:
clpmonctrl -s -h <server_name> -m <monitor_resource_name>
Switch the mirror disks to backup mode by running the clpbackup.sh command.
For mirror disk resources:
Execute the following command on the standby server (i.e., the server to be backed up):
clpbackup.sh --pre --no-shutdown
For hybrid disk resources:
Execute the following command on one server in the standby server group:
clpbackup.sh --pre
Note
After the execution, the status of mirroring is changed to that for the backup, automatic startup of the cluster service is set to disabled.For mirror disk resources: After the above actions are completed, the cluster service stops.For hybrid disk resources: After the above actions are completed, the server shuts down.Note
For mirror disk resources: If you also want to immediately shot down the standby server (backup side), executeclpbackup.sh --preinstead ofclpbackup.sh --pre --no-shutdown.For a hybrid disk, after shutting down the server with the clpbackup.sh command, execute the following command on all the other servers of the standby server group:
clpbackup.sh --pre --only-shutdown
Note
When the command is executed, automatic startup of the cluster service is set to disabled and the server shuts down.
If you want to restart the operation immediately, start the failover group (operation) on the active server (i.e., the server not to be backed up) by using Cluster WebUI or by running the clpgrp command.
Back up the disk to its disk images on the standby server.
- After the completion of the backup, return the mirror disks from backup mode to normal mode.
For mirror disk resources:
Execute the following command on the standby server:
clpbackup.sh --post --no-reboot
For hybrid disk resources:
Start all the servers in the standby server group.Then, execute the following command on one server in the standby server group:clpbackup.sh --post
Note
After the execution, the mirror status returns to normal, automatic startup of the cluster service is set to enabled.For mirror disk resources: After the above actions are completed, the cluster service starts up.For hybrid disk resources: After the above actions are completed, the server reboots. The process may take time. For a hybrid disk, execute the following command on all the other servers of the standby server group:
clpbackup.sh --post --only-reboot
Note
When the command is executed, automatic startup of the cluster service is set to enabled and the server reboots.
- The cluster service starts up on the standby server.If the disk monitor resources/mirror disk monitor resources/hybrid disk monitor resources stay paused, resume them through Cluster WebUI or by executing the following clpmonctrl command:
clpmonctrl -r -h <server_name> -m <monitor_resource_name>
The failover group (operation), if remains stopped (if not restarted immediately in the previous step), is executable on the active server.
- Automatic mirror recovery, if enabled, synchronizes differences in mirror disks between the active server and the standby server, generated during the backup, and then the server functions normally.If automatic mirror recovery is not executed and the server is not working normally, manually make a mirror recovery by clicking Difference copy icon in the Mirror disks tab of Cluster WebUI or by executing the following clpmdctrl/clphdctrl command:
For mirror disk resources:
clpmdctrl --recovery <md_resource_name>
For hybrid disk resources:
clphdctrl --recovery <hd_resource_name>
Note
For hybrid disk resources, execute this command on the current server.
2.20.4. Backing up mirror disks on the single server (with the business interrupted)
For the procedure of backing up mirror disks on a single active server or its server group, while the other server or its server group is stopped and the synchronization of mirroring has not been executed, execute the backup as specified in "Simultaneously backing up both active and standby mirror disks (with the business interrupted)", in which "both" or "both servers" is considered as "single" or "single server" respectively.
See also
If you want to start the failover group (operation) immediately without waiting for the startup of the other server, run the following command to cancel the cluster activation synchronization wait processing:clpbwctrl -cThe executed command causes an error if the cluster activation synchronization wait processing is timed out or not yet started.For information on the clpbwctrl command, see "Reference Guide" -> "EXPRESSCLUSTER command reference" -> "Controlling cluster activation synchronization wait processing (clpbwctrl command)".
2.21. How to restore the mirror/hybrid disk from the disk image
Perform either of the following procedures when restoring the partition (cluster partition and data partition) from its disk image backed up as specified in "How to back up a mirror/hybrid disk to its disk image":
Restoring the mirror disk on the single server from the disk image
Note
Note
clprestore.sh --postorclprestore.sh --post --skip-copyon a server of a server group first, then performclprestore.sh --post --only-rebooton all the other servers of the server group.Each of the written procedures includes the current server of the server group, as a signpost for the first server of the group on which the command is executed. However, the current server does not have to be the first server.If the server group has only one server, it is unnecessary to executeclprestore.sh --post --only-rebooton all the other servers of the server group.* In each server group, a current server is responsible for the mirror data to be transmitted/received, and to be written to its disk.In the active server group, the current server contains the hybrid disk resource being activated.In the standby server group, the current server receives the mirror data, sent from the current server of the active server group, and writes such data to its mirror disk.Note
Some invalid status. Check the status of cluster.", leading to a failure in the shutdown. Then wait a while before performing the clprestore.sh command again.Invalid configuration file." is displayed and the server is not restarted, check to see if the configuration data is registered, or there are any problems with the installation of EXPRESSCLUSTER or the setting of the firewall.See also
For information on the clprestore.sh command, see "Reference Guide" -> "EXPRESSCLUSTER command reference" -> "Perform the processing after restoring from a disk image (clprestore.sh command)".
2.21.1. Simultaneously restoring the mirror disks on both of the active and standby servers from the same disk image
Important
In this procedure, Execute the initial mirror construction needs to be set to disabled in advance in the setting of mirror resources/hybrid resources.If Execute the initial mirror construction or Execute initial mkfs is enabled, an error occurs. In this case, disable the setting by using Cluster WebUI.
Stop the activated failover group by using Cluster WebUI or by running the clpgrp command.
- Run the following command on all the active/standby servers:* If the OS cannot be started and the OS or EXPRESSCLUSTER needs to be reinstalled or restored, run the following command on the server where the reinstallation or the restoration was performed:
clprestore.sh --pre
Note
When the command is executed, automatic startup of the cluster service is set to disabled and the server shuts down.
- Restore the cluster partition and the data partition on both of the active server and standby server.If you restore the cluster and data partitions from a snapshot: Use it to create a disk volume which includes the partitions, then replace an old disk volume with the new one.* Restore the active server and the standby server from the same disk images.
After the completion of restoring both of the active server and the standby server, start all the servers.
- After starting the servers, check the paths to the restored cluster partition and data partition.If any of the paths differs from before, start Cluster WebUI, switch to Config mode, change the path setting in Details tab of the mirror disk resource/hybrid disk resource properties, and then perform Apply the Configuration File.
Important
Carefully specify the path. Its incorrect setting could cause the start of mirroring to fail or the corresponding partition to be destroyed.Should you set a wrong path leading to a failure in the start of mirroring, begin the procedure over again from step 1. - Execute the following command on each of the active server and the standby server:* For a hybrid disk, perform this command on one server (e.g. the current server) of the active server group and on that of the standby server group:
clprestore.sh --post --skip-copy
Note
When the command is executed, all the cluster partitions are initialized, automatic startup of the cluster service is set to enabled, and the server reboots.
Note
If Execute the initial mirror construction is enabled in the setting of mirror disk resources/hybrid disk resources, the command fails.In this case, set Execute the initial mirror construction to disabled by using Cluster WebUI, click Apply the Configuration File, and then execute the command again.Note
If a stopped server exists, thereby causing Apply the Configuration File to be interrupted with Cluster WebUI, check the Forcibly apply settings checkbox to forcibly continue applying the settings.Remember to perform the distribution to the stopped server later to avoid inconsistency in the configuration data.Note
If the mirror agent is started, the cluster partition is initialized, causing the command to fail.In this case, after running theclprestore.sh --precommand, start the server, and run theclprestore.sh --post --skip-copycommand again. For hybrid disk resources: When the server starts rebooting with the command in step 6 above, execute the following command on all the other servers of the server group:
clprestore.sh --post --only-reboot
Note
When the command is executed, automatic startup of the cluster service is set to enabled and the server reboots.
- After both of the active/standby servers are started, check the status of mirroring by using Cluster WebUI or by running the clpmdstat / clphdstat command.The status of mirroring for both the active server and the standby server is "Normal" (GREEN).
For mirror disk resources:
clpmdstat --mirror <md_resource_name>
For hybrid disk resources:
clphdstat --mirror <hd_resource_name>
Note
If you restored a server from a backup or snapshot created through "How to back up a mirror disk with the business going on", execute the following command on the server:clprestore.sh --post --online --skip-copy
After that, if the failover group does not start automatically, start it manually. - If the setting of Execute the initial mirror construction is changed, restore the original setting by using Cluster WebUI as required.The cluster needs to be stopped when applying the configuration.
2.21.2. Simultaneously restoring the mirror disks on both of the active and standby servers from their respective disk images
See also
For information on the procedure of restoring both of active/standby mirror disks from the same mirror disk image, see "Simultaneously restoring the mirror disks on both of the active and standby servers from the same disk image".
Stop the activated failover group by using Cluster WebUI or by running the clpgrp command.
- Run the following command on all the active/standby servers:* If the OS cannot be started and the OS or EXPRESSCLUSTER needs to be reinstalled or restored, run the following command on the server where the reinstallation or the restoration was performed:
clprestore.sh --pre
Note
When the command is executed, automatic startup of the cluster service is set to disabled and the server shuts down.
- Restore the cluster partition and the data partition on both of the active server and standby server.If you restore the cluster and data partitions from a snapshot: Use it to create a disk volume which includes the partitions, then replace an old disk volume with the new one.
After restoring both of the active server and standby server, start all the servers.
- After the startup, confirm that the paths of the restored cluster partition and the data partition are correct.If any of the paths differs from before, start Cluster WebUI, switch to Config mode, change the path setting in Details tab of the mirror disk resource/hybrid disk resource properties, and then perform Apply the Configuration File.
Important
Carefully specify the path. Its incorrect setting could cause the start of mirroring to fail or the corresponding partition to be destroyed.Should you set a wrong path leading to a failure in the start of mirroring, begin the procedure over again from step 1.Note
If a stopped server exists, thereby causing Apply the Configuration File to be interrupted with Cluster WebUI, check the Forcibly apply settings checkbox to forcibly continue applying the settings.Remember to perform the distribution to the stopped server later to avoid inconsistency in the configuration data. - Execute the following command on each of the active server and the standby server:* For a hybrid disk, perform this command on one server (e.g. the current server) of the active server group and on that of the standby server group:
clprestore.sh --post
Note
When the command is executed, automatic startup of the cluster service is set to enabled and the server reboots.
For hybrid disk resources: When the server starts rebooting with the command in step 6 above, execute the following command on all the other servers of the server group:
clprestore.sh --post --only-reboot
Note
When the command is executed, automatic startup of the cluster service is set to enabled and the server reboots.
- After both of the active/standby servers are started, check the status of mirroring by using Cluster WebUI or by running the clpmdstat / clphdstat command.The status of the mirror for both the active server and the standby server is "Abnormal" (RED).
For mirror disk resources:
clpmdstat --mirror <md_resource_name>
For hybrid disk resources:
clphdstat --mirror <hd_resource_name>
Confirm the status of the failover group by using Cluster WebUI or by running the clpstat command.
Note
If you restored a server from a backup or snapshot created through "How to back up a mirror disk with the business going on", execute the following command on the server:clprestore.sh --post --online
Stop the failover group that failed the startup by using Cluster WebUI or by running the clpgrp command.
Change the status of the mirror side to be updated to "Normal" (GREEN) by clicking Forced mirror recovery icon in the Mirror disks tab of Cluster WebUI or by executing the clpmdctrl/clphdctrl command with the --force option on the server whose status is to be "Normal" (GREEN).
For mirror disk resources:
clpmdctrl --force <md_resource_name>
For hybrid disk resources:
clphdctrl --force <hd_resource_name>
On the latest server, by using Cluster WebUI or by running the clpgrp command, the failover group can be started (the operation can be started).
After the failover group is started, make a mirror recovery by clicking Full copy icon in the Mirror disks tab of Cluster WebUI or by executing the following clpmdctrl/clphdctrl command:
For mirror disk resources:
clpmdctrl --recovery <md_resource_name>
For hybrid disk resources:
clphdctrl --recovery <hd_resource_name>
Note
Mirror recovery can also be started by using Cluster WebUI or by running the clpmdctrl / clphdctrl command, before starting the failover group.In this case, however, the failover group cannot be started unless mirror recovery (full copy) is completed or canceled.For mirror disk resources:
clpmdctrl --force <copy_source_server> <md_resource_name>
For hybrid disk resources:
clphdctrl --force <copy_source_server> <hd_resource_name>
See also
For information on the clpmdctrl / clphdctrl command, see "Reference Guide" -> "EXPRESSCLUSTER command reference" -> "Operating mirror disk resource (clpmdctrl command)" / "Operating hybrid disk resource (clphdctrl command)".If forced mirror recovery (the method of not specifying a copy source server) is specified as the --force option, the command is executed on the server that you want to be the latest (status: "Normal" GREEN). After the execution, the failover group can be started (the operation can be started) on the server whose status is "Normal" (GREEN).If full copy (the method of specifying a copy source server) is specified as the --force option, the command is executable on any servers. After the execution, mirror recovery (full copy) is started. Once mirror recovery is started, the failover group cannot be started (the operation cannot be started) unless mirror recovery is completed or interrupted.
2.21.3. Restoring the mirror disk on the single server from the disk image
To restore only the mirror disk of the standby server with the active server operating, see "How to restore a virtual machine ~For a mirror disk~", read "the server with the system disk to be restored" as " the server with the mirror disk to be restored", and then follow the procedure from step 1 (moving a failover group) through step 11 (confirming that the mirror is synchronized normally). In steps 4 and 5, create only a virtual hard disk for the mirror disk and replace with it the existing disk.
For the procedure of restoring mirror disks only on the active server or its server group, with the standby server or its server group (not to be restored) stopped, execute restoration as specified in "Simultaneously restoring the mirror disks on both of the active and standby servers from their respective disk images", in which "both" or "both servers" is considered as "single" or "single server", respectively.
See also
If you want to start the cluster service immediately without waiting for the startup of the other server, run the following command to cancel the cluster activation synchronization wait processing:clpbwctrl -cThe executed command causes an error if the cluster activation synchronization wait processing is timed out or not yet started.For information on the clpbwctrl command, see "Reference Guide" -> "EXPRESSCLUSTER command reference" -> "Controlling cluster activation synchronization wait processing (clpbwctrl command)".Important
2.22. How to back up a mirror disk with the business going on
This section describes how to back up (or take a snapshot of) a disk volume of mirror-disk partitions (cluster and data partitions) with the failover group operating. Depending on your situation, follow either of the following procedures with prerequisites and notes:
For backing up active- and standby-side mirror disks individually (with the business going on)
Important
clpbackup.sh --pre --online. This interruption continues, through the completion of backing up (or taking a snapshot of) the disk, until you performclpbackup.sh --post --online.This interruption may cause timeouts in some applications in their attempts at writing.For any system with such an application, do either of the following:- Before backing up (or taking a snapshot of) the mirror disk, configure the application so that it cannot start writing to the disk.- According not to either of the above procedures but to the procedure described in "2.20. How to back up a mirror/hybrid disk to its disk image", back up (or take a snapshot of) the disk.clpbackup.sh --pre --online. This interruption continues until you performclpbackup.sh --post --online.During this suspension period, no failure triggers its detection or a failover.Note
Important
Note
In addition, pay attention to the following common to "How to back up a mirror/hybrid disk to its disk image".
Note
Note
See also
For more information on clpbackup.sh, see "Reference Guide" -> "EXPRESSCLUSTER command reference" -> "Preparing for backup to a disk image (clpbackup.sh command)".
2.22.1. For backing up the mirror disk of either of the active and standby servers (with the business going on)
Switch a target mirror disk to the backup mode by using the clpbackup.sh command.
clpbackup.sh --pre --online
Note
This leads to the following:
- The cluster service is suspended; the monitoring is paused.
- Data cached in memory is flushed to the mirror disk.Then requests to write to the mirror disk are paused.
- The mirror disk becomes in the backup mode.
- Automatically starting the cluster service and the failover group is disabled.
Back up (or take a snapshot of) the mirror disk (cluster and data partitions).
After completing Step 2, return the mirror disk from the backup mode to the normal mode.
clpbackup.sh --post --online
Note
This leads to the following:
The suspended cluster service returns to normal; the monitoring is resumed.
Writing to the mirror disk is resumed.
The mirror disk is returned to the normal mode.
Automatically starting the cluster service and the failover group is enabled again.
2.22.2. For backing up active- and standby-side mirror disks individually (with the business going on)
Take the following steps one at a time:
Seeing "For backing up the mirror disk of either of the active and standby servers (with the business going on)", back up (or take a snapshot of) the active-side mirror disk.
Seeing "For backing up the mirror disk of either of the active and standby servers (with the business going on)", back up (or take a snapshot of) the standby-side mirror disk.
Important
2.23. How to restore a mirror disk from its backup created with the business going on
For restoring the same mirror disk image to active and standby servers simultaneously
For restoring the respective mirror disks of active and standby servers simultaneously
Important
Note
2.23.1. For restoring the same mirror disk image to active and standby servers simultaneously
clprestore.sh --post --online --skip-copyImportant
Before this procedure, disable Execute the initial mirror construction and Execute initial mkfs in the settings for the mirror/hybrid disk resource by using Cluster WebUI or other tools; otherwise an error will occur.
2.23.2. For restoring the respective mirror disks of active and standby servers simultaneously
clprestore.sh --post --online
2.23.3. For restoring the mirror disk of either of the active and standby servers from a mirror-disk backup of a server which was active during its acquisition
Read the expressions like "both of active/standby mirror disks" and "both of the active/standby servers" as "either of the active and standby mirror disks" and "either of the active and standby servers" respectively.
Follow the procedure from Step 1 (to stop the failover group) through Step 12 (to start the failover group).
clprestore.sh --post --onlineSee also
When you start up a server, running the following command allows you to immediately start up the cluster service without awaiting other servers' startup:clpbwctrl -c* Note that the command execution causes an error with the cluster activation synchronization wait processing timed out or not yet started.For more information on the clpbwctrl command, see "Reference Guide" -> "EXPRESSCLUSTER command reference" -> "Controlling cluster activation synchronization wait processing (clpbwctrl command)".Important
2.23.4. For restoring the mirror disk of a standby server
On a standby server to be restored, move its failover group in operation, if any, to the corresponding active server. After the transfer, check if each of the group resources works properly on the active server.
On the standby server, execute the following command to shut it down:
clprestore.sh --pre
- On the standby server, restore the cluster and data partitions.If you restore the cluster and data partitions from a snapshot: Use it to create a disk volume which includes the partitions, then replace an old disk volume with the new one.
Start the standby server.
- On the started server, check paths to the restored cluster and data partitions and to other disks.If any of the paths are changed: Start Cluster WebUI, then switch it to the config mode. In the Details tab of the mirror disk resource properties or in any other setting place, correct the path; then perform Apply the Configuration File.
Important
Carefully specify the path. Its incorrect setting may cause the start of mirroring to fail or the corresponding partition to be destroyed.Should you set a wrong path leading to a failure in the start of mirroring, begin the above procedure over again from Step 2.Note
If Apply the Configuration File fails or if you do not want to perform Apply the Configuration File because it requires stopping the cluster, use the [clpcfctrl] command to forcibly apply the settings as follows. - Perform Export to save the configuration data to the disk.- Extract and put the configuration data file on a disk accessible from a server which belongs to the cluster. Then forcibly distribute the file to servers by executing the clpcfctrl command:clpcfctrl --push -x <path to the directory where the extracted configuration data file, clp.conf, exists> --force --nocheck
- After completing the distribution, you can delete the saved compressed file and the extracted configuration data file.- If the distribution fails for any server due to its stoppage, remember to perform the distribution to the server later to avoid inconsistency in the configuration data.See also
For more information on the clpcfctrl command, see "Reference Guide" -> "EXPRESSCLUSTER command reference" -> "Changing, backing up, and checking cluster configuration data (clpcfctrl command)". Executing the following command to restart the standby server:
clprestore.sh --post
On the restarted server, execute the following command:
clprestore.sh --post --online
Make a mirror recovery (full copy) of all the mirror disk resources, from the mirror disk list in Cluster WebUI or by executing the clpmdctrl command as follows:
clpmdctrl --force <copy-source server name> <md resource name>
Make sure that the mirror synchronization is normal, by using Cluster WebUI or by executing the clpmdstat command as follows:
clpmdstat --mirror <md resource name>
Note
The GREEN status on each of the two servers indicates that the mirror synchronization is normal.
2.24. Wait time for synchronized cluster startup
Even all servers in a cluster are powered on simultaneously, it does not always mean that EXPRESSCLUSTER will start up simultaneously on all servers. EXPRESSCLUSTER may not start up simultaneously after rebooting the cluster following shutdown. Because of this, with EXPRESSCLUSTER, if one server is started, it waits for other servers in the cluster to start.
By default, 5 minutes is set to the startup synchronization time. To change the default value, click Cluster Properties in the Cluster WebUI, click Timeout tab, and select Synchronize Wait Time.
For more information, see "Cluster properties Timeout tab" in "Parameter details" in the "Reference Guide".
2.25. Changing disk resources file system
Connect to the Cluster WebUI with a management IP address. If you do not have any management IP address, connect to it by using the actual IP address of any server.
To change the disk resource file system, follow the steps below:
In the operation mode of Cluster WebUI, click Stop Cluster.
- Run the following command.For example, when the disk resources partition device is /dev/sdb5:
# clproset -w -d /dev/sdb5
This makes disk partition of disk resources readable/writable regardless of the EXPRESSCLUSTER behavior.Note
Do not use this command for any other purposes.If you use this command when the EXPRESSCLUSTER daemon is active, the file system may be corrupted. Create the file system in the partition device.
- Run the following command to set the disk resources partition to ReadOnly.For example, when the disk resources partition device is /dev/sdb5:
# clproset -o -d /dev/sdb5
Change the configuration data of disk resource file system in the config mode of Cluster WebUI.
Upload the cluster configuration data in the config mode of Cluster WebUI.
In the operation mode of Cluster WebUI, click Start Cluster.
The settings reflecting the changes become effective.
2.26. Changing offset or size of a partition on mirror disk resource
Follow the procedure below when changing the offset (location) or size of the data partition or cluster partition configured on a mirror disk resource after the operation of a cluster is started.
Note
Be sure to follow the steps below to change them. Mirror disk resources may not function properly if you change the partition specified as a data partition or cluster partition only by fdisk.
2.26.1. Data partition configured with LVM
If LVM is used for partitioning, you can extend data partition without re-creating resources or stopping your business (depending on the file system used).
File system of data partition |
Resource re-creation |
Business down |
Reference |
|---|---|---|---|
xfs, ext3, ext4, No file system |
Not required |
Not required |
2.26.1.1. Data partition extension for an ext-based or xfs system, or no file system used |
Other than above |
Required |
Required |
Note
This method is intended for only extension. To shrink partitions, refer to "2.26.2. Data partition configured with other than LVM".
Note
If you follow the instruction below to extend data partition, LVM must be used for the data partition and unused PE (physical extents) of the volume group are sufficient.
2.26.1.1. Data partition extension for an ext-based or xfs system, or no file system used
Confirm the mirror disk resource name you want to resize by [clpstat] command or Cluster WebUI.
For unexpected events, back up partition data in a server where an active group has mirror disk resources you want to resize (use a backup device such as tape device). Note that backup commands to access partition device directly is not supported. Ignore this step if you can discard the data on mirror disk resources.
Confirm the followings:
Mirror disk resource status is normal.
On both servers, unused PE (physical extents) of the volume group that data partition belongs to are sufficient.
Suspend all the mirror disk monitor resources in the operation mode of Cluster WebUI to prevent automatic mirror recovery.
Run the following [clpmdctrl] command on the server an inactive mirror disk resource belongs to. If the resource is not activated on either server, run the command on either of the servers. The following is an example for extending an md01 data partition to 500 gibibytes.
# clpmdctrl --resize 500G md01
Important
If a mirror disk resource is activated on either of the servers, make sure to run the command on the server that a deactivated mirror disk belongs to. Execution on an activated server results in a mirror break.
Run the [clpmdctrl] command on the other server. The following is an example for extending an md01 data partition to 500 gibibytes.
# clpmdctrl --resize 500G md01
If an xfs or ext-based file system is configured on the data partition, extend the file system area by running the command on the server where mirror disk resources are activated.
<For xfs file systems># xfs_growfs /mnt/nmp1
Change /mnt/nmp1 as necessary depending on the mirror disk resources mount point.)<For ext-based file systems># resize2fs -p /dev/NMP1
(Replace NMP1 with the mirror partition device name.)If you have not configured any file system on the data partition, ignore this step.
In the operation mode of Cluster WebUI, restart all the mirror disk monitor resources that were suspended in step 4.
Important
# clpmdctrl --resize -force 500G md01
Note
# clpmdctrl --resize 1022M md01 is specified, the data partition size becomes 1024M and the file system extension limit becomes 1022M.Note
During the execution of the xfs_growfs command or the resize2fs command , a massive writing process may degrade the operation I/O performance. It is recommended that the execution be performed during off-peak hours.
2.26.1.2. Data partition extension for other file systems
The basic procedure is the same as "2.26.2. Data partition configured with other than LVM".
Note: Use the [lvextend] command instead of [fdisk] to resize partition size.
2.26.2. Data partition configured with other than LVM
2.26.2.1. When not changing a device name of a partition on mirror disk resource
Check the name of a mirror disk resource whose size you want to change by the clpstat command or by the Cluster WebUI.
- On the server where a group with a mirror disk resource whose size you want to change is activated, back up the data in a partition to a device such as tape. Note that backup commands that access a partition device directly are not supported.This step is not required if there is no problem to discard the data on a mirror disk resource.

Fig. 2.26 Mirror disk resources activated on Server 1
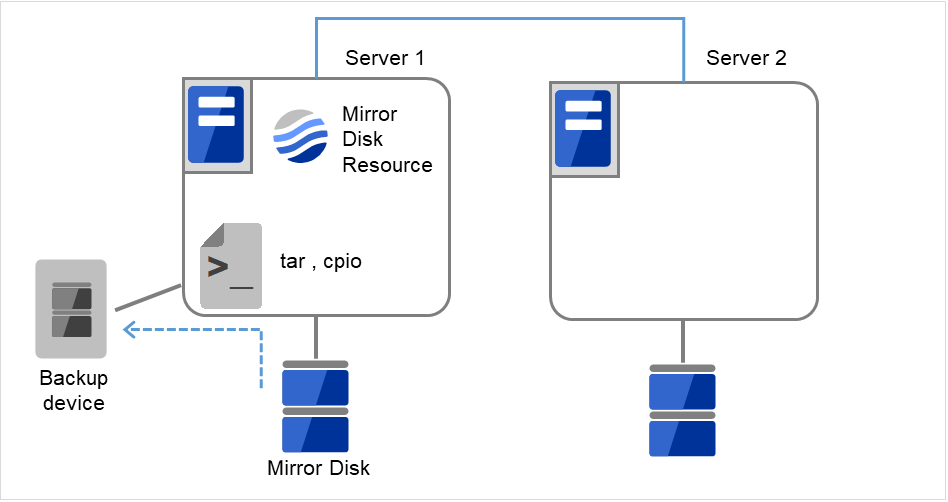
Fig. 2.27 Back up the data on Server 1
Set the EXPRESSCLUSTER service not to start up on either of the servers.
clpsvcctrl.sh --disable core

Fig. 2.28 Set the EXPRESSCLUSTER service not to start
- Shut down a cluster, and then restart the OS.To shut down a cluster, run the clpstdn command on either of a server, or execute a cluster shutdown on the Cluster WebUI.

Fig. 2.29 Execute a cluster shutdown on either of the servers

Fig. 2.30 Restart the OS
On both servers, run the fdisk command to change the offset or size of a partition.
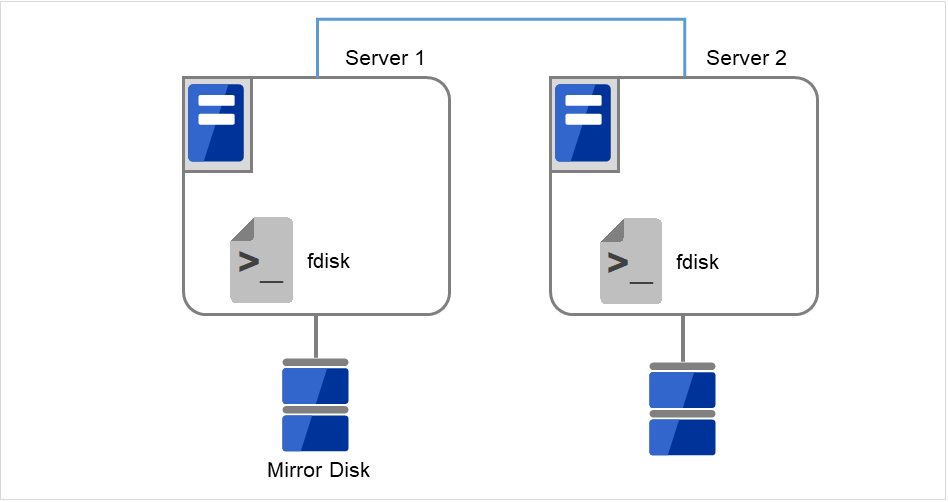
Fig. 2.31 Change the size of a partition
Run the following command on both servers.
# clpmdinit --create force <Mirror_disk_resource_name>
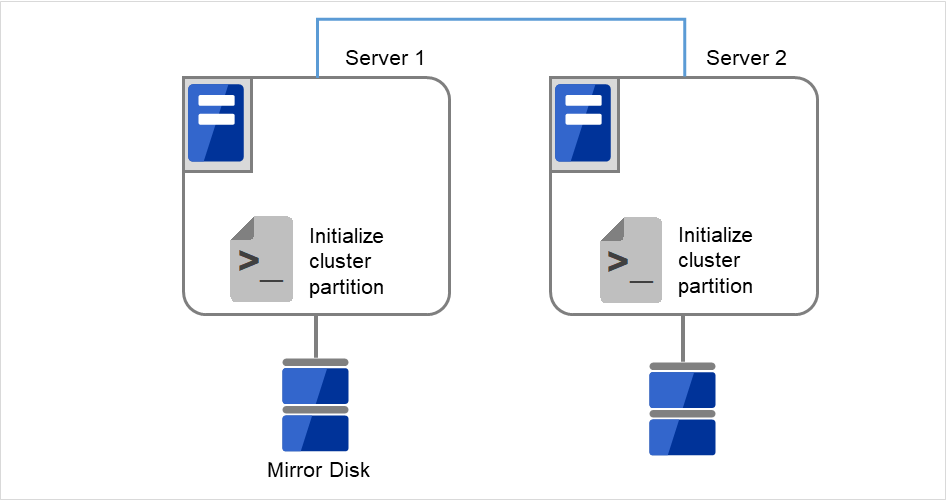
Fig. 2.32 Initialize a cluster partition

Fig. 2.33 Execute the first mkfs to create a file system
Note
When you set Execute initial mkfs to off in the mirror disk resource setting, mkfs will not be executed automatically. Please execute mkfs manually to the data partition of mirror disk resource.
Set the EXPRESSCLUSTER service to start up on both servers.
clpsvcctrl.sh --enable core

Fig. 2.34 Set the EXPRESSCLUSTER service to start
Run the reboot command to restart both servers. The servers are started as a cluster.
After a cluster is started, the same process as the initial mirror construction at cluster creation is performed. Run the following command or use the Cluster WebUI to check if the initial mirror construction is completed.
# clpmdstat --mirror <Mirror_disk_resource_name>

Fig. 2.35 Start mirror recovery on Server 1
When the initial mirror construction is completed and a failover group starts, a mirror disk resource becomes active.
Fig. 2.36 Initial mirror construction is completed
- On the server where a group with a mirror partition whose size you changed is activated, restore the data you backed up. Note that backup commands that access a partition device directly are not supported.This step is not required if there is no problem to discard the data on a mirror disk resource.
Fig. 2.37 Restore the data that was backed up
2.26.2.2. When changing a device name of a partition on mirror disk resource
Check the name of a mirror disk resource whose size you want to change by the clpstat command or by the Cluster WebUI.
- On the server where a group with a mirror disk resource whose size you want to change is activated, back up the data in a partition to a device such as tape. Note that backup commands that access a partition device directly are not supported.This step is not required if destroying the data on a mirror disk resource does not cause any problem.
Fig. 2.38 Mirror disk resources activated on Server 1

Fig. 2.39 Back up the data on Server 1
Set the EXPRESSCLUSTER service not to start up on either of the servers.
clpsvcctrl.sh --disable core
Fig. 2.40 Set the EXPRESSCLUSTER service not to start
- Shut down a cluster, and then restart the OS.To shut down a cluster, run the clpstdn command on either of a server, or execute a cluster shutdown on the WebManager.
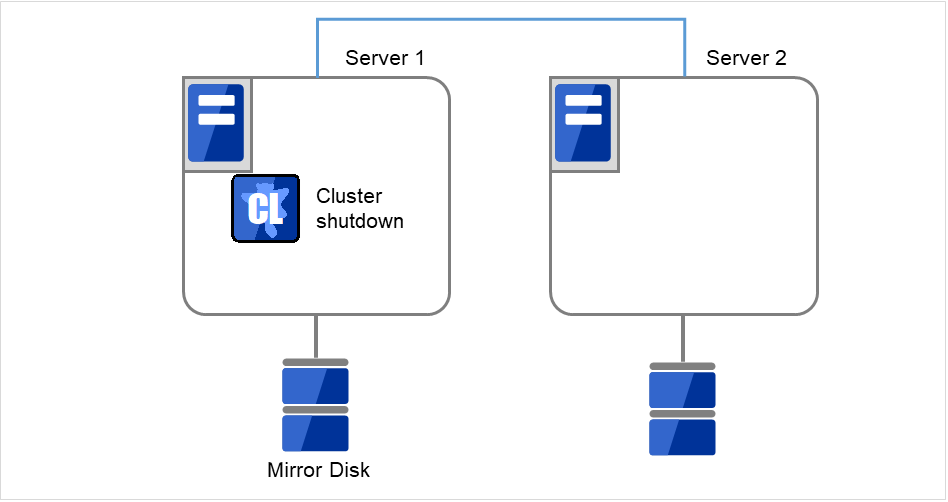
Fig. 2.41 Execute a cluster shutdown on either of the servers
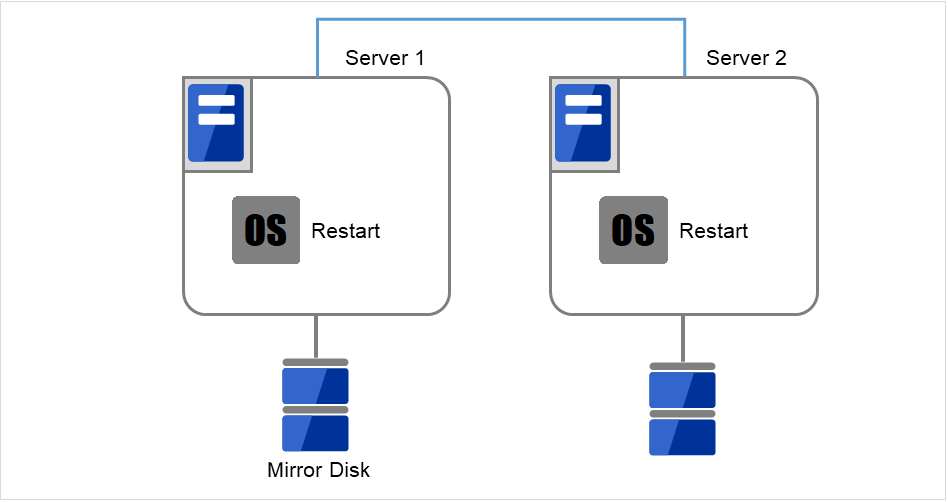
Fig. 2.42 Restart the OS
On both servers, run the fdisk command to change the offset or size of a partition.

Fig. 2.43 Change the size of a partition
Change and upload the cluster configuration data. Change a mirror disk resource as described in "Modifying the cluster configuration data by using the Cluster WebUI" in "Modifying the cluster configuration data" in the "Installation and Configuration Guide".
Run the following command on the both servers.
# clpmdinit --create force <Mirror_disk_resource_name>

Fig. 2.44 Initialize a cluster partition

Fig. 2.45 Execute the first mkfs to create a file system
Note
When you set Execute initial mkfs to off in the mirror disk resource setting, mkfs will not be executed automatically. Please execute mkfs manually to the data partition of mirror disk resource.
Set the EXPRESSCLUSTER service to start up on both servers.
clpsvcctrl.sh --enable core

Fig. 2.46 Set the EXPRESSCLUSTER service to start
Run the reboot command to restart both servers. The servers are started as a cluster.
After a cluster is started, the same process as the initial mirror construction at cluster creation is performed. Run the following command or use the Cluster WebUI to check if the initial mirror construction is completed.
# clpmdstat --mirror <Mirror_disk_resource_name>
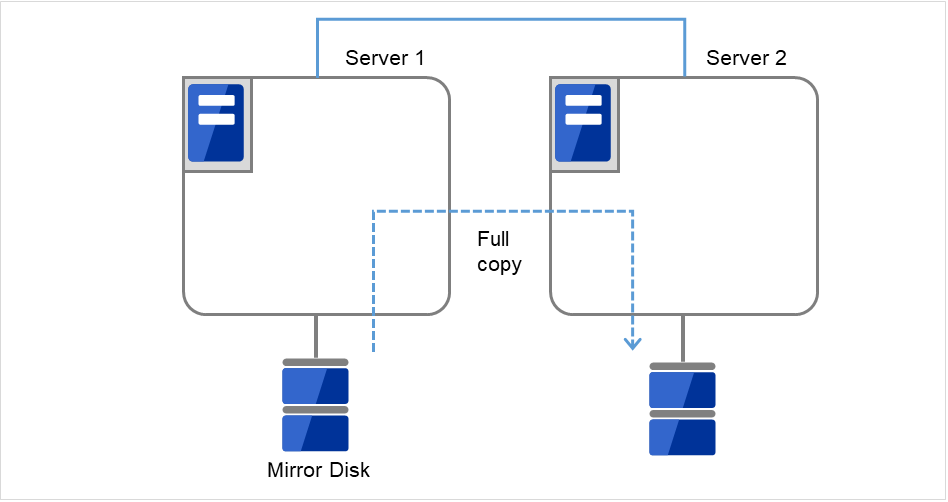
Fig. 2.47 Start mirror recovery on Server 1
When the initial mirror construction is completed and a failover group starts, a mirror disk resource becomes active.

Fig. 2.48 Initial mirror construction is completed
- On the server where a group with a mirror partition whose size you changed is activated, restore the data you backed up. Note that backup commands that access a partition device directly are not supported.This step is not required if there is no problem to discard the data on a mirror disk resource.
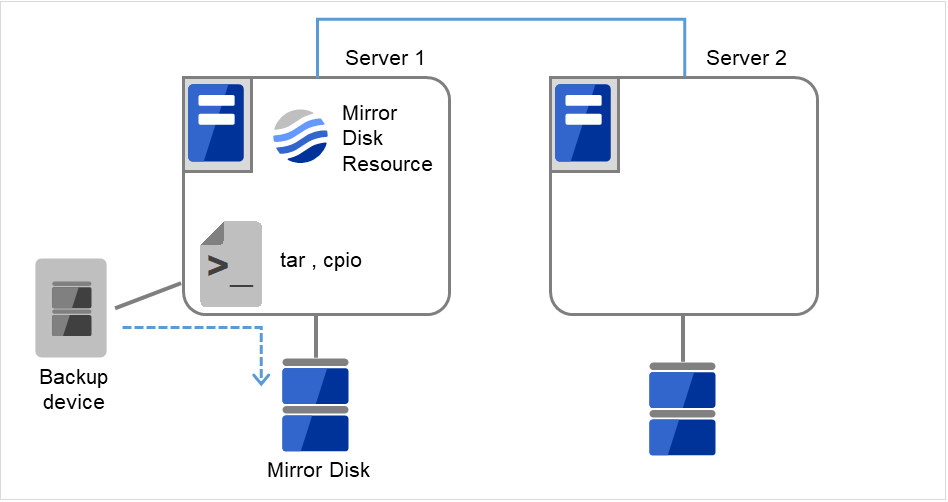
Fig. 2.49 Restore the data that was backed up
2.27. Changing offset or size of a partition on hybrid disk resource
Follow the procedure below when changing the offset (location) or size of the data partition or cluster partition configured on a hybrid disk resource after the operation of a cluster is started.
Note
Be sure to follow the steps below to change them. Hybrid disk resources may not function properly if you change the partition specified as a data partition or cluster partition only by fdisk.
2.27.1. With the data partition configured with LVM
If LVM is used for partitioning, you can extend the data partition without re-creating resources or stopping your business (depending on the file system used).
File system of data partition |
Resource re-creation |
Business down |
Reference |
|---|---|---|---|
xfs, ext3, ext4, or no file system (none) |
Not required |
Not required |
2.27.1.1. Expanding data partition for an ext-based or xfs system, or no file system used |
Other than above |
Required |
Required |
Note
This method is intended only for extension. To shrink partitions, refer to "2.27.2. With the data partition configured without LVM".
Note
If you follow the instruction below to extend data partition, LVM must be used for the data partition, and unused PE (physical extents) of the volume group must be sufficient.
2.27.1.1. Expanding data partition for an ext-based or xfs system, or no file system used
Run the [clpstat] command or use Cluster WebUI to confirm the name of a hybrid disk resource you want to resize.
On the server containing the activated group with the hybrid disk resource to be resized, back up the data in a partition to a device (such as tape) for unexpected events. However, there is no support for any backup command for direct access to the partition device. You can skip this step if there is no problem with discarding the data on the hybrid disk resource.
Confirm the following:
The status of the hybrid disk resource is normal.
On both servers, there is sufficient, unused PE (physical extent) of the volume group that the data partition belongs to.
Suspend all the hybrid disk monitor resources in the operation mode of Cluster WebUI to prevent automatic mirror recovery.
Keeping in operation the current server of each server group, shut down all the other servers. You can check the status of the current server by executing the clphdstat with the -a option. The following shows an example of checking the status of the current server in the hd01 resource:
clphdstat -a hd01
- Execute the following clphdctrl command on the current server of the server group where the hybrid disk resource is deactivated.If the resource is not activated on either server group, run the command on either of the servers. The following is an example for extending an hd01 data partition to 500 gibibytes.
# clphdctrl --resize 500G hd01
Important
If the hybrid disk resource is activated on either of the servers, make sure to run the command on the server where the hybrid disk resource is deactivated. Execution on an active server group results in a mirror break.
- Likewise, perform the following clphdctrl command on the current server of the other server group.The following is an example for extending an hd01 data partition to 500 gibibytes.
# clphdctrl --resize 500G hd01
If an xfs or ext-based file system is configured on the data partition, extend the file system area by running the command on the server where hybrid disk resources are activated.
<For xfs file systems># xfs_growfs /mnt/nmp1
(Change /mnt/nmp1 as necessary depending on the hybrid disk resources mount point.)<For ext-based file systems># resize2fs -p /dev/NMP1
(Replace NMP1 with the mirror partition device name.)You can skip this step if no file system is used for the data partition (none).
In the operation mode of Cluster WebUI, restart all the hybrid disk monitor resources that were suspended in step 4.
Start up all the servers that you shut down in step 5.
Important
# clphdctrl --resize -force 500G hd01
Note
# clphdctrl --resize 1022M hd01 is specified, the size of the data partition becomes 1024M and the limit of the file system extension becomes 1022M.Note
During the execution of xfs_growfs and resize2fs, a massive writing process may degrade the operation I/O performance. It is recommended that the execution be performed during off-peak hours.
2.27.1.2. Expanding data partition for other file systems
The basic procedure is the same as "2.27.2. With the data partition configured without LVM".
Note: Use the [lvextend] command instead of [fdisk] to resize a partition size.
2.27.2. With the data partition configured without LVM
2.27.2.1. When not changing a device name of a partition on hybrid disk resource
Check the name of a hybrid disk resource whose size you want to change by the clpstat command or by the Cluster WebUI.
- On the server where a group with the hybrid disk resource whose size you want to change is activated, back up the data in a partition to a device such as tape. Note that backup commands that access a partition device directly are not supported.This step is not required if there is no problem to discard the data on the hybrid disk resource.

Fig. 2.50 Server 1 containing the activated group with the hybrid disk resource
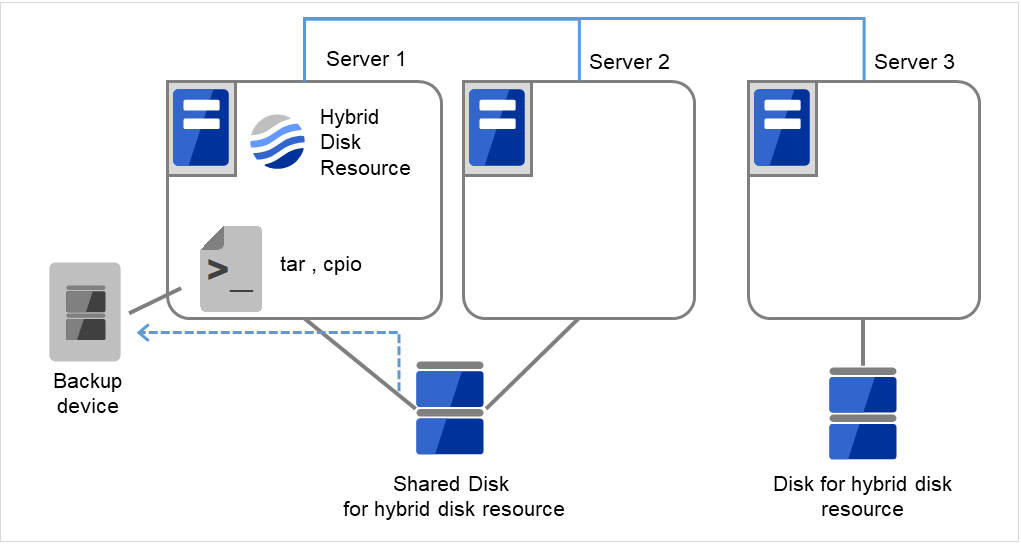
Fig. 2.51 Back up the data on Server 1
Set the EXPRESSCLUSTER service not to start up on any of all the servers.
clpsvcctrl.sh --disable core

Fig. 2.52 Set the EXPRESSCLUSTER service not to start
- Shut down a cluster, and then restart the OS.To shut down a cluster, run the clpstdn command on either of a server, or execute a cluster shutdown on the Cluster WebUI.

Fig. 2.53 Execute a cluster shutdown on either of the servers
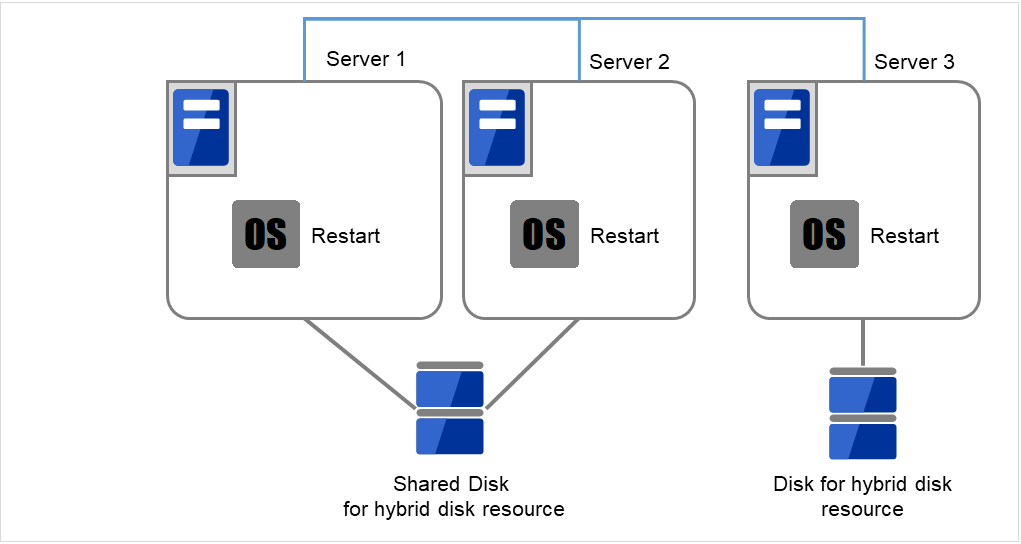
Fig. 2.54 Restart the OS
Run the fdisk command on a server to change the offset or size of a partition. When servers are connected to the shared disk, run the fdisk from either of the servers for the change.

Fig. 2.55 Change the size of a partition
- Run the following command on a server. When servers are connected to the shared disk, run the command on the server where the command in previous step was executed.
# clphdinit --create force <Hybrid disk resource name>

Fig. 2.56 Initialize a cluster partition
- Run the following command on a server.When servers are connected to the shared disk, run the command on the server where the command in previous step was executed.
# mkfs -t <Type of Filesystem>* <Data Partition>

Fig. 2.57 Execute the first mkfs to create a file system
Set the EXPRESSCLUSTER service to start up on all servers.
clpsvcctrl.sh --enable core
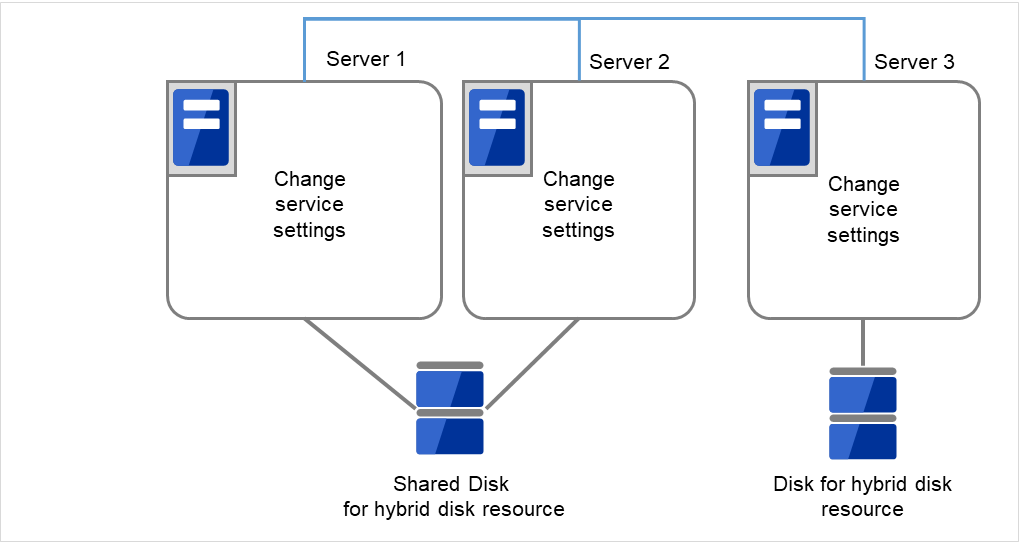
Fig. 2.58 Set the EXPRESSCLUSTER service to start
Run the reboot command to restart all servers. The servers are started as a cluster.
After the cluster is started, the same process as the initial mirror construction at cluster creation is performed. Run the following command or use the Cluster WebUI to check if the initial mirror construction is completed.
# clphdstat --mirror <hybrid_disk_resource_name>
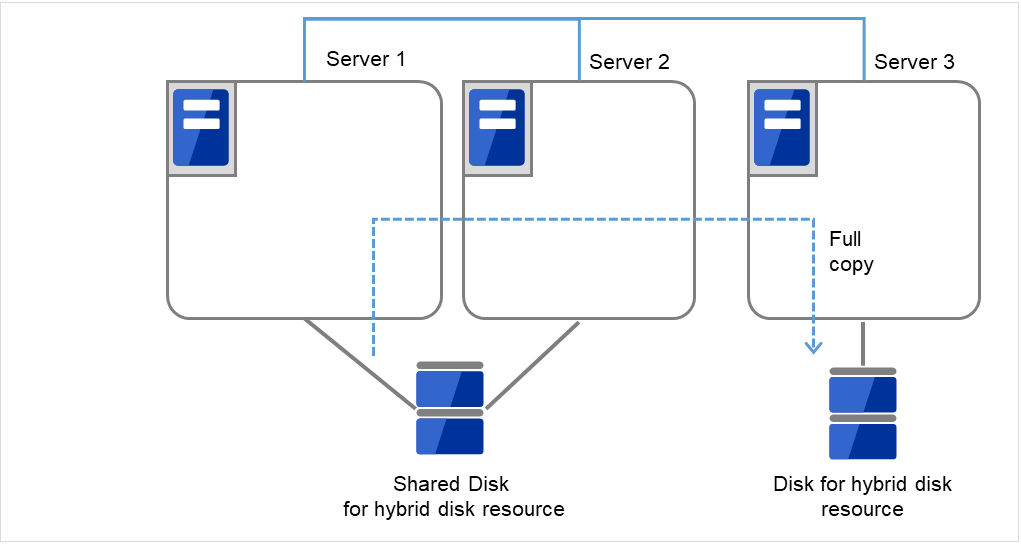
Fig. 2.59 Start mirror recovery on Server 1
When the initial mirror construction is completed and a failover group starts, a hybrid disk resource becomes active.

Fig. 2.60 Initial mirror construction is completed
- On the server where a group with the partition whose size you changed is activated, restore the data you backed up. Note that backup commands that access a partition device directly are not supported.This step is not required if there is no problem to discard the data on a hybrid disk resource.

Fig. 2.61 Restore the data that was backed up
2.27.2.2. When changing a device name of a partition on hybrid resource
Check the name of a hybrid disk resource whose size you want to change by the clpstat command or by the Cluster WebUI.
- On the server where a group with the hybrid disk resource whose size you want to change is activated, back up the data in a partition to a device such as tape. Note that backup commands that access a partition device directly are not supported.This step is not required if destroying the data on the hybrid disk resource does not cause any problem.

Set the EXPRESSCLUSTER service not to start up on any of all the servers.
clpsvcctrl.sh --disable core

Fig. 2.64 Set the EXPRESSCLUSTER service not to start
- Shut down a cluster, and then restart the OS.To shut down a cluster, run the clpstdn command on either of a server, or execute a cluster shutdown on the Cluster WebUI.
Fig. 2.65 Execute a cluster shutdown on either of the servers

Fig. 2.66 Restart the OS
On a server, run the fdisk command to change the offset or size of a partition. When servers are connected to the shared disk, run the fdisk command from either of servers to change.

Fig. 2.67 Change the size of a partition
Change and upload the cluster configuration data. Change a hybrid disk resource as described in "Modifying the cluster configuration data by using the Cluster WebUI" in "Modifying the cluster configuration data" in the "Installation and Configuration Guide".
Run the following command on the server. When servers are connected to the shared disk, execute the command on the server where the command was executed in step 5.
# clphdinit --create force <Hybrid_disk_resource_name>
Fig. 2.68 Initialize a cluster partition
- Run the following command on the server.When servers are connected to the shared disk, run the command on the server where the command in previous step was executed.
# mkfs -t <Type of Filesystem> <Data Partition>
Fig. 2.69 Execute the first mkfs to create a file system
Set the EXPRESSCLUSTER service to start up on all servers.
clpsvcctrl.sh --enable core
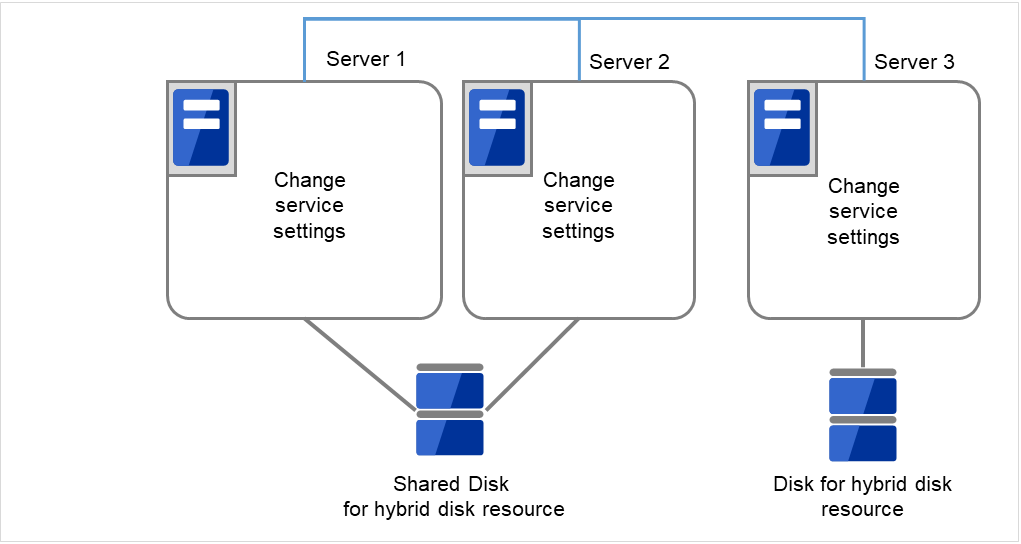
Fig. 2.70 Set the EXPRESSCLUSTER service to start
Run the reboot command to restart all servers. The servers are started as a cluster.
After the cluster is started, the same process as the initial mirror construction at cluster creation is performed. Run the following command or use the Cluster WebUI to check if the initial mirror construction is completed.
# clphdstat --mirror <Hybrid_disk_resource_name>
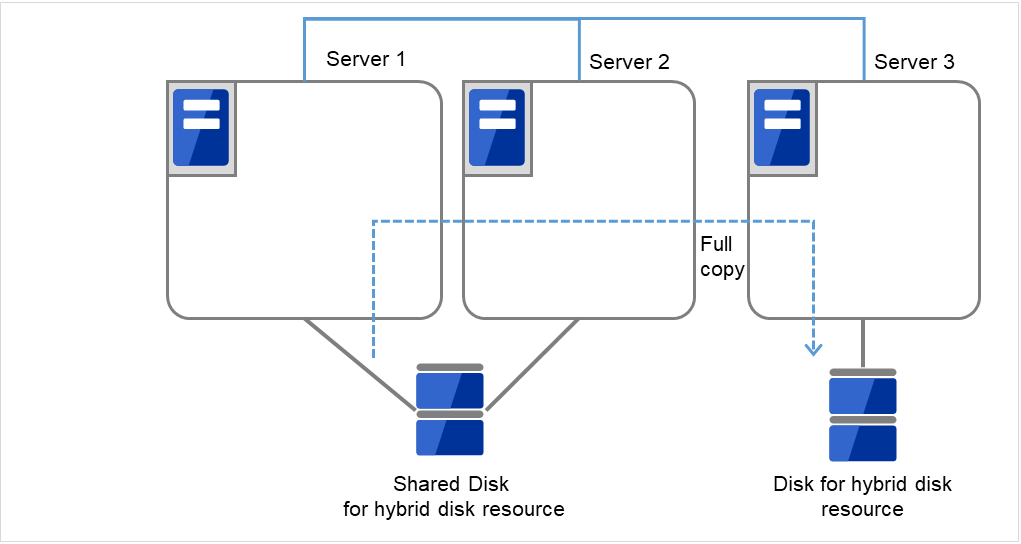
Fig. 2.71 Start mirror recovery on Server 1
When the initial mirror construction is completed and a failover group starts, a hybrid disk resource becomes active.
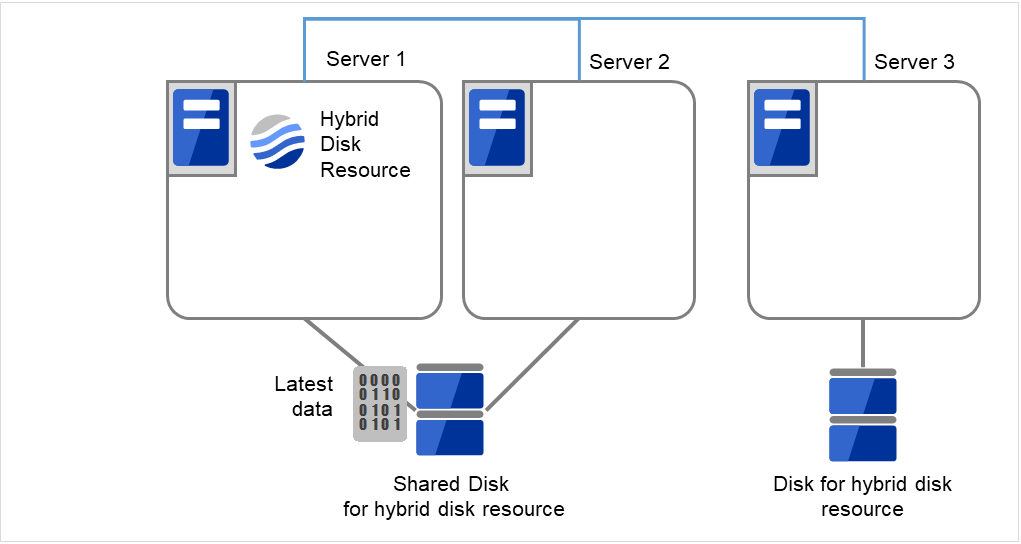
Fig. 2.72 Initial mirror construction is completed
- On the server where a group with the partition whose size you changed is activated, restore the data you backed up. Note that backup commands that access a partition device directly are not supported.This step is not required if there is no problem to discard the data on the hybrid disk resource.

Fig. 2.73 Restore the data that was backed up
2.28. Changing the server configuration (add/delete)
2.28.1. Adding a server (mirror disk or hybrid disk is not used)
To add a server, follow the steps below:
Important
When adding a server in changing the cluster configuration, do not make any other changes such as adding a group resource.
Make sure that the cluster is working normally.
Install the EXPRESSCLUSTER Server on a new server. For details, see "Installing the EXPRESSCLUSTER RPM" in "Setting up the EXPRESSCLUSTER Server" in "Installing EXPRESSCLUSTER" in the "Installation and Configuration Guide". Restart the server on which the EXPRESSCLUSTER Server was installed.
Access the other server in the cluster with a Web browser and click Add server in the Cluster WebUI config mode.
By using the config mode of Cluster WebUI, configure the following settings of the Add server.
Information on the Source IP Address of the server to add, on the Details tab of Properties of the virtual IP resource (when using the virtual IP resource).
Information on the ENI ID of the server to add, on the Details tab of Properties of the AWS elastic IP resource (when using the AWS elastic IP resource).
Information on the ENI ID of the server to add, on the Details tab of Properties of the AWS virtual IP resource (when using the AWS virtual IP resource).
Information on the ENI ID of the server to add, on the Details tab of Properties of the AWS secondary IP resource (when using the AWS secondary IP resource).
Information on the IP Address of the server to add, on the Details tab of Properties of the Azure DNS resource (when using the Azure DNS resource).
Information on the IP Address of the server to add, on the Details tab of Properties of the Google Cloud DNS resource (when using the Google Cloud DNS resource).
Information on the Region, Zone OCID, and IP Address of the server to add, on the Details tab of Properties of the Oracle Cloud DNS resource (when using the Oracle Cloud DNS resource).
Click Apply the Configuration File in the config mode of Cluster WebUI to apply the cluster configuration information on the cluster.
Note: Apply the configuration when the confirmation message is displayed.
Perform Start server service of the server added from the Cluster WebUI config mode.
Click Refresh data in the operation mode of Cluster WebUI to verify the cluster is properly working.
2.28.2. Adding a server (Mirror disk or hybrid disk is used)
To add a server, follow the steps below:
Important
When adding a server in changing the cluster configuration, do not make any other changes such as adding a group resource.
- The additional server license must be registered.To register licenses, refer to "Installation and Configuration Guide" > "Registering the license".
Make sure that the cluster is working normally.
Install the EXPRESSCLUSTER Server on a new server. For details, see "Installing the EXPRESSCLUSTER RPM" in "Setting up the EXPRESSCLUSTER Server" in "Installing EXPRESSCLUSTER" in the "Installation and Configuration Guide". Restart the server on which the EXPRESSCLUSTER Server was installed.
In the operation mode of Cluster WebUI, click Stop cluster.
Perform Stop Mirror Agent in the Cluster WebUI operation mode.
Access to other server in the cluster via the Web browser and click the server to add in the config mode of Cluster WebUI.
By using the config mode of Cluster WebUI, configure the following settings of the Add server.
Information on the Source IP Address of the server to add, on the Details tab of Properties of the virtual IP resource (when using the virtual IP resource).
Information on the ENI ID of the server to add, on the Details tab of Properties of the AWS elastic IP resource (when using the AWS elastic IP resource).
Information on the ENI ID of the server to add, on the Details tab of Properties of the AWS virtual IP resource (when using the AWS virtual IP resource).
Information on the ENI ID of the server to add, on the Details tab of Properties of the AWS secondary IP resource (when using the AWS secondary IP resource).
Information on the IP Address of the server to add, on the Details tab of Properties of the Azure DNS resource (when using the Azure DNS resource).
Information on the IP Address of the server to add, on the Details tab of Properties of the Google Cloud DNS resource (when using the Google Cloud DNS resource).
Information on the Region, Zone OCID, and IP Address of the server to add, on the Details tab of Properties of the Oracle Cloud DNS resource (when using the Oracle Cloud DNS resource).
When using a hybrid disk resource in the added server, click Properties of Servers in the Conf mode of Cluster WebUI. From the Server Group tab, add the server to the servers that can run the Group. Do this for required servers only.
Click Apply the Configuration File in the config mode of Cluster WebUI to apply the cluster configuration information on the cluster. Select OK when the service restart dialog appears.
Perform Start Mirror Agent in the Cluster WebUI operation mode.
In the operation mode of Cluster WebUI, click Start cluster.
Click Refresh data in the operation mode of Cluster WebUI to verify the cluster is properly working.
2.28.3. Deleting a server (Mirror disk or hybrid disk is not used)
To delete a server, follow the steps below:
Important
When adding a server in changing the cluster configuration, do not make any other changes such as adding a group resource.
Refer to the following information for licenses registered in the server you want to delete.
No action required for CPU licenses.
No action required for fixed term licenses. Unused licenses are automatically collected and provided to other servers.
Make sure that the cluster is working normally. If any group is active on the server you are going to delete, move the group to another server.
When the server to be deleted is registered in a server group, click Properties of Server of the config mode of Cluster WebUI. Delete the server from Servers that can run the Group in the Server Group tab.
Click Remove Server of the server to delete in the config mode of Cluster WebUI.
Click Apply the Configuration File in the config mode of Cluster WebUI to apply the cluster configuration information on the cluster.
Note: Apply the configuration when the confirmation message is displayed.
Click Refresh data in the operation mode of Cluster WebUI to verify the cluster is properly working.
- Deleted servers will not belong to clusters. To uninstall EXPRESSCLUSTER servers, refer to "Installation and Configuration Guide" > "Uninstalling and reinstalling EXPRESSCLUSTER" > "Uninstallation" > " Uninstalling the EXPRESSCLUSTER Server".Note: In the uninstallation reference, assume server rebooting as OS rebooting in the deleted server.
2.28.4. Deleting a server (Mirror disk or hybrid disk is used)
To delete a server, follow the steps below:
Important
When deleting a server in changing the cluster configuration, do not make changes (such as adding a group resource) other than ones given below.
Refer to the following information for licenses registered in the server you want to delete.
No action required for CPU licenses.
- VM node licenses and other node licenses are discarded when EXPRESSCLUSTER is uninstalled.Back up the serial numbers and keys of licenses if required.
No action required for fixed term licenses. Unused licenses are automatically collected and provided to other servers.
Make sure that the cluster is working normally. If any group is active on the server you are going to delete, move the group to another server.
In the operation mode of Cluster WebUI, click Stop cluster.
Perform Stop Mirror Agent in the Cluster WebUI operation mode.
Click Remove resource of mirror disk resources or hybrid disk resources in the Cluster WebUI config mode.
When the server to be deleted is registered in a server group, click Properties of Server of the config mode of Cluster WebUI. Delete the server from Servers that can run the Group in the Server Group tab.
Click Remove Server of the server to delete in the config mode of Cluster WebUI.
Click Apply the Configuration File in the config mode of Cluster WebUI to apply the cluster configuration information on the cluster.
In the operation mode of Cluster WebUI, click Start Mirror Agent (if Mirror Agent is stopped) and then Start Cluster. Perform Start Mirror Agent and Start cluster in the Cluster WebUI operation mode.
Click Refresh data in the operation mode of Cluster WebUI to verify the cluster is properly working.
- Deleted servers will not belong to clusters. To uninstall EXPRESSCLUSTER servers, refer to "Installation and Configuration Guide" > "Uninstalling and reinstalling EXPRESSCLUSTER" > "Uninstallation" > "Uninstalling the EXPRESSCLUSTER Server".Note: In the uninstallation reference, assume server rebooting as OS rebooting in the deleted server.
2.29. Changing the server IP address
To change the server IP address after you have started the cluster system operation, follow the instructions below.
2.29.1. Changing the interconnect IP address / mirror disk connect IP address
Use the clpstat command or the Cluster WebUI to verify all servers in the cluster are working normally.
- Back up the cluster configuration data. Use the clpcfctrl command to back up the data.If you have the configuration data that contains the data at the cluster creation, use that configuration data.
In the config mode of Cluster WebUI, change the server IP address based on the back up cluster configuration data, and then save it.
Disable the startup settings of the EXPRESSCLUSTER daemon in all servers in the cluster. For more information, see "Disabling the EXPRESSCLUSTER daemon"in "Suspending EXPRESSCLUSTER" in "Preparing to operate a cluster system" in the Installation and Configuration Guide.
By the clpstdn command or in the operation mode of Cluster WebUI, to shut down the cluster, and then restart all servers.
Change the IP address. If a server reboot is required after changing the IP address, run the reboot command or use other means on the server where the IP address has changed.
Verify the changed IP address is valid by running the ping command or using other means.
Distribute the cluster configuration data to all the servers. Use the clpcfctrl command to deliver the data.
Enable the startup settings of the EXPRESSCLUSTER daemon in all servers in the cluster.
Run the reboot command or use other means on all servers in the cluster to reboot them.
Use the clpstat command or the Cluster WebUI to verify all servers in the cluster are working normally.
2.29.2. Changing only the subnet mask of the interconnect IP address
Use the clpstat command or the Cluster WebUI to verify all servers in the cluster are working normally.
- Back up the cluster configuration data. Use the clpcfctrl command to back up the data.If you have the configuration data that contains the data at the cluster creation, use that configuration data.
In the config mode of Cluster WebUI, change the server IP address based on the back up cluster configuration data, and then save it.
Disable startup settings of the EXPRESSCLUSTER daemon in all servers in the cluster.
By the clpstdn command or in the operation mode of Cluster WebUI, to shut down the cluster, and then restart all servers.
Change the subnet mask of the IP address. If server reboot is required after changing the subnet mask of IP address, run the reboot command or use other means on the server where the subnet mask of the IP address has been changed.
Verify the changed IP address is valid by running the ping command or using other means.
Distribute the cluster configuration data to all servers. Use the clpcfctrl command to deliver the data.
Enable the startup settings of the EXPRESSCLUSTER daemon in all servers in the cluster.
Run the reboot command or use other means on all the servers in the cluster.
Use the clpstat command or the Cluster WebUI to verify all the servers in the cluster are working normally.
2.30. Changing the host name
Follow the steps below if you want to change the host name of a server after you have started the cluster system operation.
2.30.1. Changing the host name
Use the clpstat command or the Cluster WebUI to verify all the servers in the cluster are working normally.
- Back up the cluster configuration data. Use the clpcfctrl command to back up the data.If you have the configuration data that contains the data at the cluster creation, use that configuration data
In the config mode of Cluster WebUI, change the host name of your target server based on the back up cluster configuration data, and then save it.
Disable the startup settings of the EXPRESSCLUSTER daemon in all servers in the cluster. For more information, see "Disabling the EXPRESSCLUSTER daemon" in "Suspending EXPRESSCLUSTER in "Preparing to operate a cluster system" in the "Installation and Configuration Guide".
By the clpstdn command or in the operation mode of Cluster WebUI, to shut down the cluster, and then restart all servers.
Change the host name. If the server needs to be rebooted after changing the host name, run the reboot command or use other means on the server.
Verify the changed host name is valid by running the ping command or using other means.
Distribute the cluster configuration data to all the servers. Use the clpcfctrl command to deliver the data. Executing the clpcfctrl command requires the --nocheck option.
Note
Check cluster configuration information before the distribution if required.
Enable the startup settings of the EXPRESSCLUSTER daemon in all servers in the cluster.
Run the reboot command or use other means on all the servers in the cluster to reboot them.
Use the clpstat command or the Cluster WebUI to verify all the servers in the cluster are in the normal status.
See also
2.31. How to add a resource without stopping the group
You can add, to a group that is already running, a resource that supports dynamic resource addition without stopping the group.
Group resources that currently support dynamic resource addition are as follows:
Group resource name |
Abbreviation |
Supported version |
|---|---|---|
EXEC resource |
exec |
4.0.0-1 or later |
Disk resource |
disk |
4.0.0-1 or later |
Floating IP resource |
fip |
4.0.0-1 or later |
Virtual IP resource |
vip |
4.0.0-1 or later |
Volume manager resource |
volmgr |
4.0.0-1 or later |
See also
Perform the following procedure to dynamically add a resource after starting the operation.
2.31.1. How to dynamically add a resource
Confirm that all servers in the cluster are operating normally by running the [clpstat] command or using the Cluster WebUI.
Confirm that all resources in the group to which a resource is added are started normally by running the [clpstat] command or using the Cluster WebUI.
Use the config mode of Cluster WebUI to add a resource to the group and save it.
Run the [clpcl --suspend] command or use the operation mode of Cluster WebUI to suspend the cluster.
Distribute the cluster configuration data to all the servers. Run the [clpcfctrl] command to deliver the data. Run the following command to dynamically add a resource.
Do either of the following depending on the type of configuration data saved in the config mode of Cluster WebUI.
clpcfctrl --dpush -x <path of configuration data file>
Run the [clpcl --resume] command or use the operation mode of Cluster WebUI to resume the cluster.
Confirm that the resource has been added by running the [clpstat] command or using the Cluster WebUI.
See also
For information on troubleshooting [clpcfctrl] problems, see "Changing, backing up, and checking cluster configuration data (clpcfctrl command)" in "EXPRESSCLUSTER command reference" in the "Reference Guide".
2.32. Updating data encryption key file of mirror/hybrid disk resources
Perform the following procedure to update the encryption key used for the mirror communication encryption of mirror disk resources/hybrid disk resources.
Note
The following procedure is executable while mirror disk resources and hybrid disk resources are activated. At this time, however, mirroring in progress is suspended. In this case, execute mirror recovery after the completion of the procedure.
Run the openssl command to create a new encryption key file:
openssl rand 32 -out newkeyfile.bin
Overwrite the encryption key files for all the servers of which mirror disk resources/hybrid disk resources can be activated, by using the file created at step 1. Keep the original file then.
Execute the --updatekey option for the clpmdctrl or clphdctrl command.
for mirror disk resources
clpmdctrl --updatekey md01
for hybrid disk resources
clphdctrl --updatekey hd01
Once you execute the option on either server on which resources can be activated, the key information is updated for all servers necessary for updated.At this time, mirroring in progress is suspended.Updating of encryption key information is completed. From now on, the mirror communication encryption/decryption is executed by using the new encryption key.
If necessary, perform mirror recovery to resume the suspended mirroring.