1. Preface
1.1. Who Should Use This Guide
The "EXPRESSCLUSTER X 4.2 HA Cluster Configuration Guide for Amazon Web Services (Linux)" is intended for administrators who set up cluster systems, system engineers who provide user support for such systems, and cluster-system maintenance personnel. They must also have knowledge of Amazon EC2, Amazon VPC, and IAM provided by Amazon Web Services.
1.2. Scope of Application
This guide covers the following product versions.
EXPRESSCLUSTER X 4.2 for Linux (Internal version: 4.2.0-1)
EXPRESSCLUSTER X Replicator 4.2 for Linux
VPC Management console, EC2 Management Console: Environment as of November 25, 2019
1.3. How This Guide is Organized
3. Operating Environment: Describes the tested operating environment of this function.
5. Constructing an HA cluster based on VIP control: Describes how to create an HA cluster based on VIP control.
6. Constructing an HA cluster based on EIP control: Describes how to create an HA cluster based on EIP control.
7. Constructing an HA cluster based on DNS name control: Describes how to create an HA cluster based on DNS name control.
8. Configuring the IAM: Describes how to configure the IAM.
9. Troubleshooting: Describes the problems and their solutions.
1.4. EXPRESSCLUSTER X Documentation Set
The EXPRESSCLUSTER X manuals consist of the following six guides. The title and purpose of each guide is described below:
EXPRESSCLUSTER X Getting Started Guide
This guide is intended for all users. The guide covers topics such as product overview, system requirements, and known problems.
EXPRESSCLUSTER X Installation and Configuration Guide
This guide is intended for system engineers and administrators who want to build, operate, and maintain a cluster system. Instructions for designing, installing, and configuring a cluster system with EXPRESSCLUSTER are covered in this guide.
EXPRESSCLUSTER X Reference Guide
This guide is intended for system administrators. The guide covers topics such as how to operate EXPRESSCLUSTER, function of each module and troubleshooting. The guide is supplement to the Installation and Configuration Guide.
EXPRESSCLUSTER X Maintenance Guide
This guide is intended for administrators and for system administrators who want to build, operate, and maintain EXPRESSCLUSTER-based cluster systems. The guide describes maintenance-related topics for EXPRESSCLUSTER.
EXPRESSCLUSTER X Hardware Feature Guide
This guide is intended for administrators and for system engineers who want to build EXPRESSCLUSTER-based cluster systems. The guide describes features to work with specific hardware, serving as a supplement to the Installation and Configuration Guide.
EXPRESSCLUSTER X Legacy Feature Guide
This guide is intended for administrators and for system engineers who want to build EXPRESSCLUSTER-based cluster systems. The guide describes EXPRESSCLUSTER X 4.0 WebManager and Builder.
1.5. Conventions
In this guide, Note, Important, See also are used as follows:
Note
Used when the information given is important, but not related to the data loss and damage to the system and machine.
Important
Used when the information given is necessary to avoid the data loss and damage to the system and machine.
See also
Used to describe the location of the information given at the reference destination.
The following conventions are used in this guide.
Convention |
Usage |
Example |
|---|---|---|
Bold |
Indicates graphical objects, such as text boxes, list boxes, menu selections, buttons, labels, icons, etc. |
Click Start.
Properties dialog box
|
Angled bracket within the command line |
Indicates that the value specified inside of the angled bracket can be omitted. |
|
# |
Prompt to indicate that a Linux user has logged on as root user. |
|
Monospace (Courier) |
Indicates path names, commands, system output (message, prompt, etc.), directory, file names, functions and parameters. |
/Linux |
Monospace bold (Courier) |
Indicates the value that a user actually enters from a command line. |
Enter the following:
# clpcl -s -a |
Monospace italic (Courier) |
Indicates that users should replace italicized part with values that they are actually working with. |
|
2. Overview
2.1. Functional overview
The settings described in this guide allow you to construct an HA cluster with EXPERSSCLUSTER in the Amazon Virtual Private Cloud (VPC) environment provided by Amazon Web Services (AWS).
Because more important applications can be performed by constructing an HA cluster, a wider range of system configuration options are available in the AWS environment. The AWS has a robust configuration made up of multiple availability zones (hereafter referred to as AZ) in each region. The user can select and use an AZ as needed. EXPERSSCLUSTER realizes highly available applications by allowing the HA cluster to operate between multiple AZs in a region (hereafter referred to as Multi-AZ).
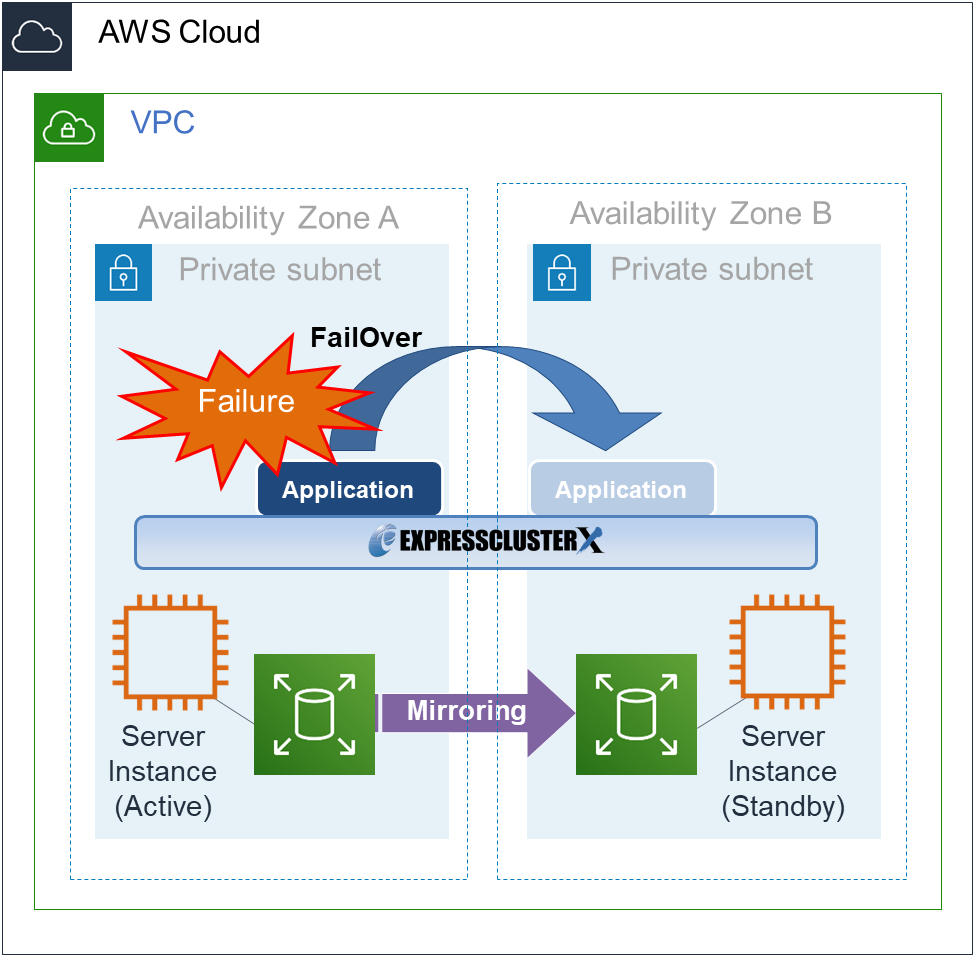
Fig. 2.1 Mirror Type HA Cluster in Multi-AZ Configuration
In the AWS environment, a virtual IP can be used to connect to the cluster server. The AWS Virtual IP resource and AWS Elastic IP resource and AWS DNS resource enable the client not to be aware of switching the destination server even if a "failover" or "group transition" occurred.
2.2. HA cluster configuration
This guide describes two HA cluster configurations: HA cluster based on virtual IP (VIP) control, HA cluster based on elastic IP (EIP) control and HA cluster based on DNS name control. This section describes a single AZ configuration. For a multi-AZ configuration, refer to "2.3. Multi-AZ"
Location of a client accessing an HA cluster |
Resource to be selected |
Reference in this chapter |
|---|---|---|
In the same VPC |
AWS Virtual IP resource |
HA cluster based on VIP control |
Internet |
AWS Elastic IP resource |
HA cluster based on EIP control |
Voluntary location |
AWS DNS resource |
HA cluster based on DNS name control |
2.2.1. HA cluster based on VIP control
This guide assumes the configuration in which a client in the same VPC accesses an HA cluster via a VIP address. For example, a DB server is clustered and accessed from a web server via a VIP address.
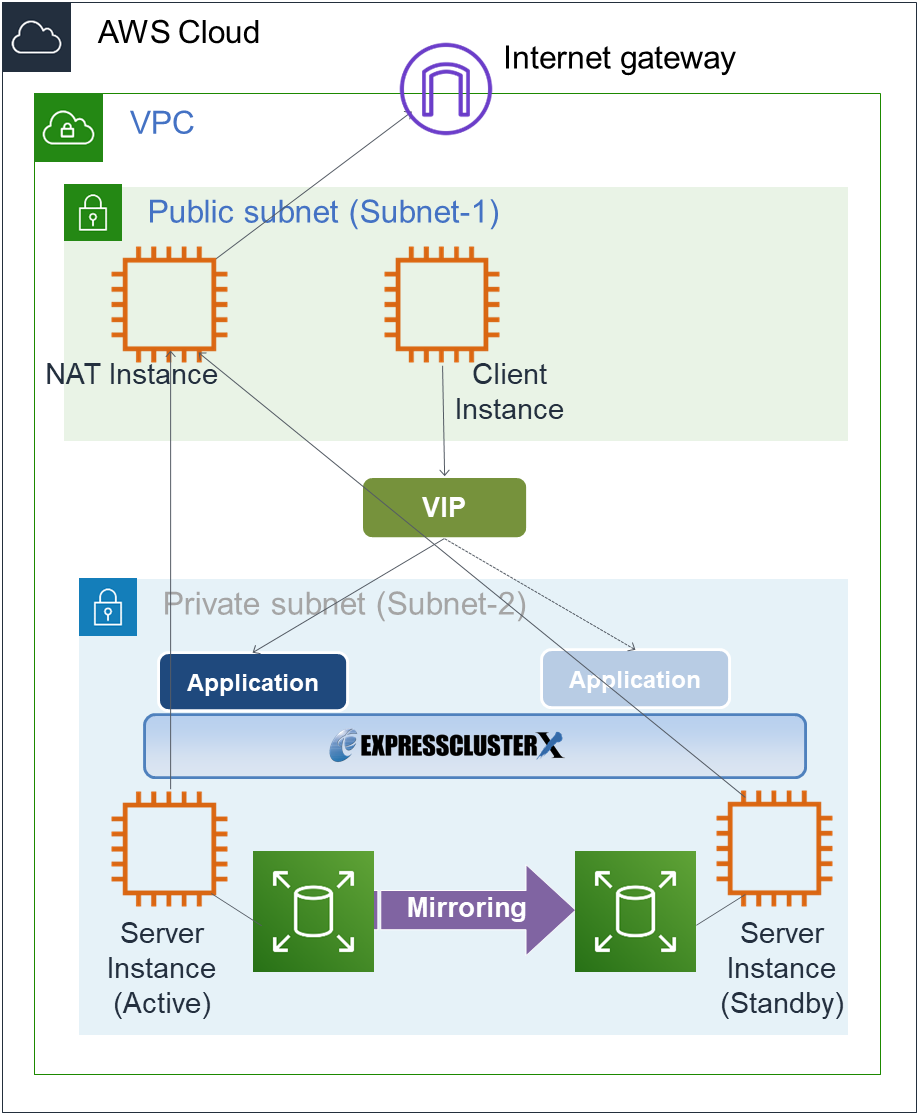
Fig. 2.2 HA Cluster Based on VIP Control
In the above figure, the server instances are clustered and placed on the private subnet. The AWS Virtual IP resource of EXPRESSCLUSTER sets a VIP address to the active server instance and rewrites the VPC route table. This enables the client instance placed on any subnet in the VPC to access the active server instance via the VIP address. The VIP address must be out of the VPC CIDR range.
NEC has verified that the AWS specifications do not allow clients outside the VPC to access the server instance via the VIP address assigned by the AWS Virtual IP resource. Therefore, to enable clients outside the VPC to access, specify the EIP address assigned by the AWS Elastic IP resource.
The following resources and monitor resources are required for an HA cluster based on VIP control configuration.
Resource type |
Description |
Setup |
|---|---|---|
AWS Virtual IP resource |
Assigns a VIP address to an active sever instance, changes the route table of the assigned VIP address, and publishes operations within the VPC. |
Required |
AWS Virtual IP monitor resource |
Periodically monitors whether the VIP address assigned by the AWS Virtual IP resource exists in the local server and whether the VPC route table is changed illegally.
(This monitor resource is automatically added when the AWS Virtual IP resource is added.)
|
Required |
AWS AZ monitor resource |
Periodically monitors the health of the AZ in which the local server exists by using Multi-AZ. |
Recommended |
IP monitor resource |
Monitors the health of communication between subnets by checking whether communication with a NAT is available. |
Required to check the health of communication between subnets. |
Other resources and monitor resources |
Depends on the configuration of the application, such as a mirror disk, used in an HA cluster. |
Optional |
2.2.2. HA cluster based on EIP control
This guide assumes the configuration in which a client accesses an HA cluster via a global IP address assigned to the EIP through the Internet.
Clustered instances are placed on a public subnet. Each instance can access the Internet via the Internet gateway.
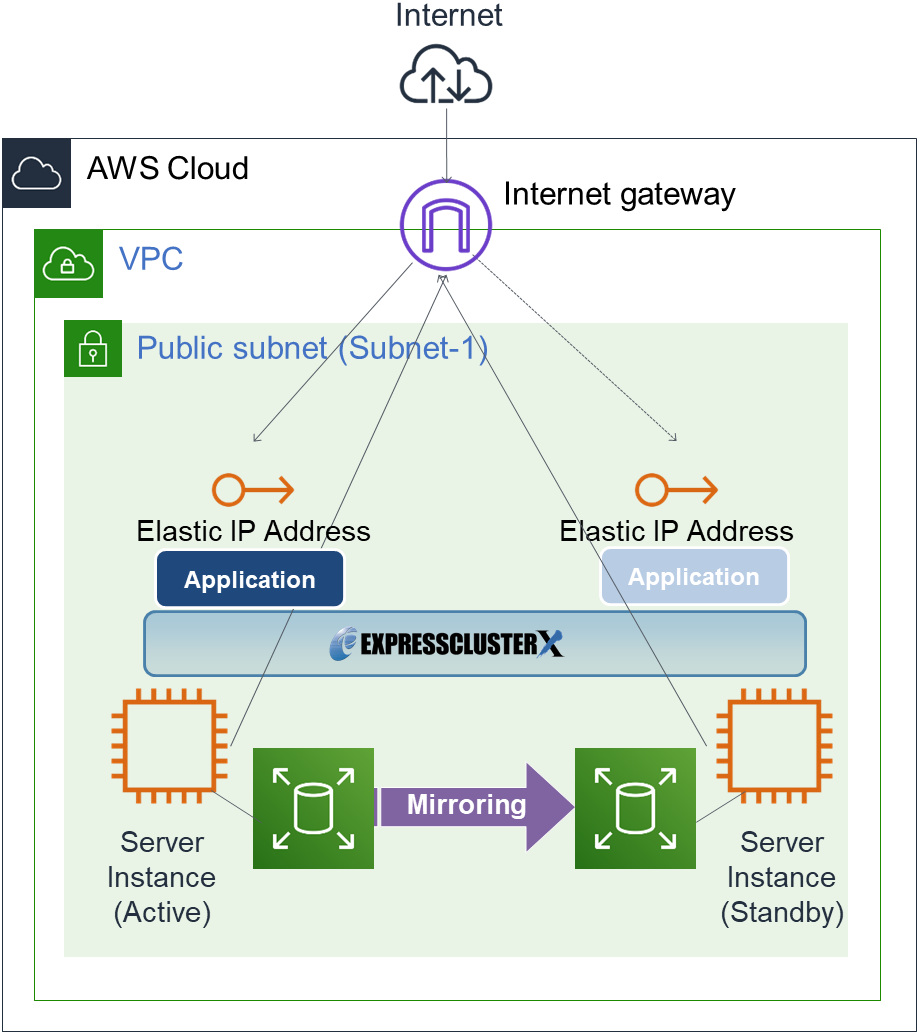
Fig. 2.3 HA Cluster Based on EIP Control
In the above figure, the server instances are clustered and placed on the public subnet. The AWS Virtual IP resource of EXPRESSCLUSTER attaches the EIP to the active server instance. This enables a client on the Internet to access the active server instance via the EIP address.
* When executing the AWS CLI, each instance must be able to communicate with the regional endpoint by using a method such as a proxy server, NAT, public IP, and EIP. In this guide, a public IP assigned to the instance is used for the HA cluster based on EIP control.
The following resources and monitor resources are required for an HA cluster based on EIP control configuration.
Resource type |
Description |
Setup |
|---|---|---|
AWS Elastic IP resource |
Assigns an EIP address to an active sever instance and publishes operations to the Internet. |
Required |
AWS elastic IP monitor resource |
Periodically monitors whether the EIP address assigned by the AWS Elastic IP resource exists in the local server.
(This monitor resource is automatically added when the AWS Elastic IP resource is added.)
|
Required |
AWS AZ monitor resource |
Periodically monitors the health of the AZ in which the local server exists by using Multi-AZ. |
Recommended |
Custom monitor resource |
Monitors a network partition (NP) so that the same resource does not start in multiple instances at the same time. |
Required to perform NP resolution |
2.2.3. HA cluster based on DNS name control
This guide assumes the configuration in which a client accesses an HA cluster via the same DNS name. For example, a DB server is clustered and accessed from a web server via a DNS name.
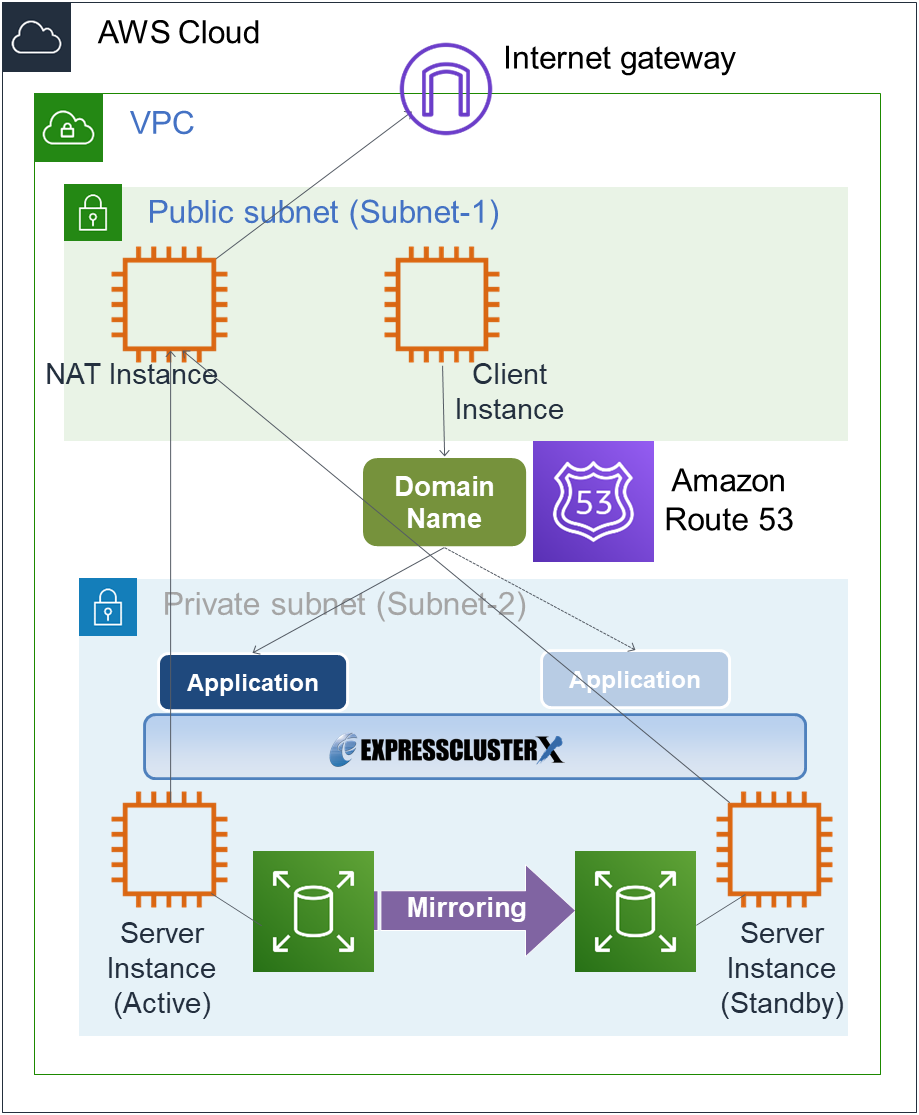
Fig. 2.4 HA cluster based on DNS name control
In the above figure, the server instances are clustered and placed on the private subnet. The AWS DNS resource of EXPRESSCLUSTER registers resource record set including the DNS name and the IP address of the active server into the Private Hosted Zone of Amazon Route 53. This enables the client instance placed on any subnet in the VPC to access the active server instance via the DNS name.
In this guide, clustered server instances are placed on the private subnet. However, the instances can be also placed on a public subnet. In this case, this enables a client on the Internet to access the active server instance via the DNS name by registering the resource record set including the DNS name and the public IP address of the active server into the Public Hosted Zone of Amazon Route 53. Furthermore, in order that the query to the domain of the Public Hosted Zone can refer to the Amazon Route 53 name server, it is required to set the name server (NS) record of the registrar in advance.
Moreover, for a configuration in which the cluster and client exist in different VPCs, use a VPC peering connection. Preliminary create a peering connection between the VPCs and associate the VPCs with the private hosted zone of Amazon Route 53. And then register the resource record set including the DNS name and the IP address of the active server into the private hosted zone. This enables the client in the different VPC to access the active server instance via DNS name.
* When executing the AWS CLI, each instance must be able to communicate with the regional endpoint by using a method such as a proxy server, NAT, public IP and EIP. In this guide, NAT is used for the HA cluster based on DNS name control.
The table below shows the necessary resources and monitor resources for constructing a HA cluster based on DNS name control.
Resource Type |
Description |
Configuration |
|---|---|---|
AWS DNS resource |
Registers the resource record sets including the DNS name and the IP address of the active server instance into the hosted zone of Amazon Route 53, and publishes operations within the VPC or to the Internet. |
Required |
AWS DNS monitor resource |
AWS DNS resource periodically monitors whether the registered resource record set exists in the hosted zone of Amazon Route 53 and whether the resolution of the DNS name is available.
(This monitor resource is automatically added when the AWS DNS resource is added.)
|
Required |
AWS AZ monitor resource |
Periodically monitors the health of the AZ in which the local server exists by using Multi-AZ. |
Recommended |
IP monitor resource |
Monitors the health of communication between subnets by checking whether communication with a NAT is available. |
Required to check the health of communication between subnets. |
Other resources and monitor resources |
Depends on the configuration of the application, such as a mirror disk, used in an HA cluster. |
Optional |
2.3. Multi-AZ
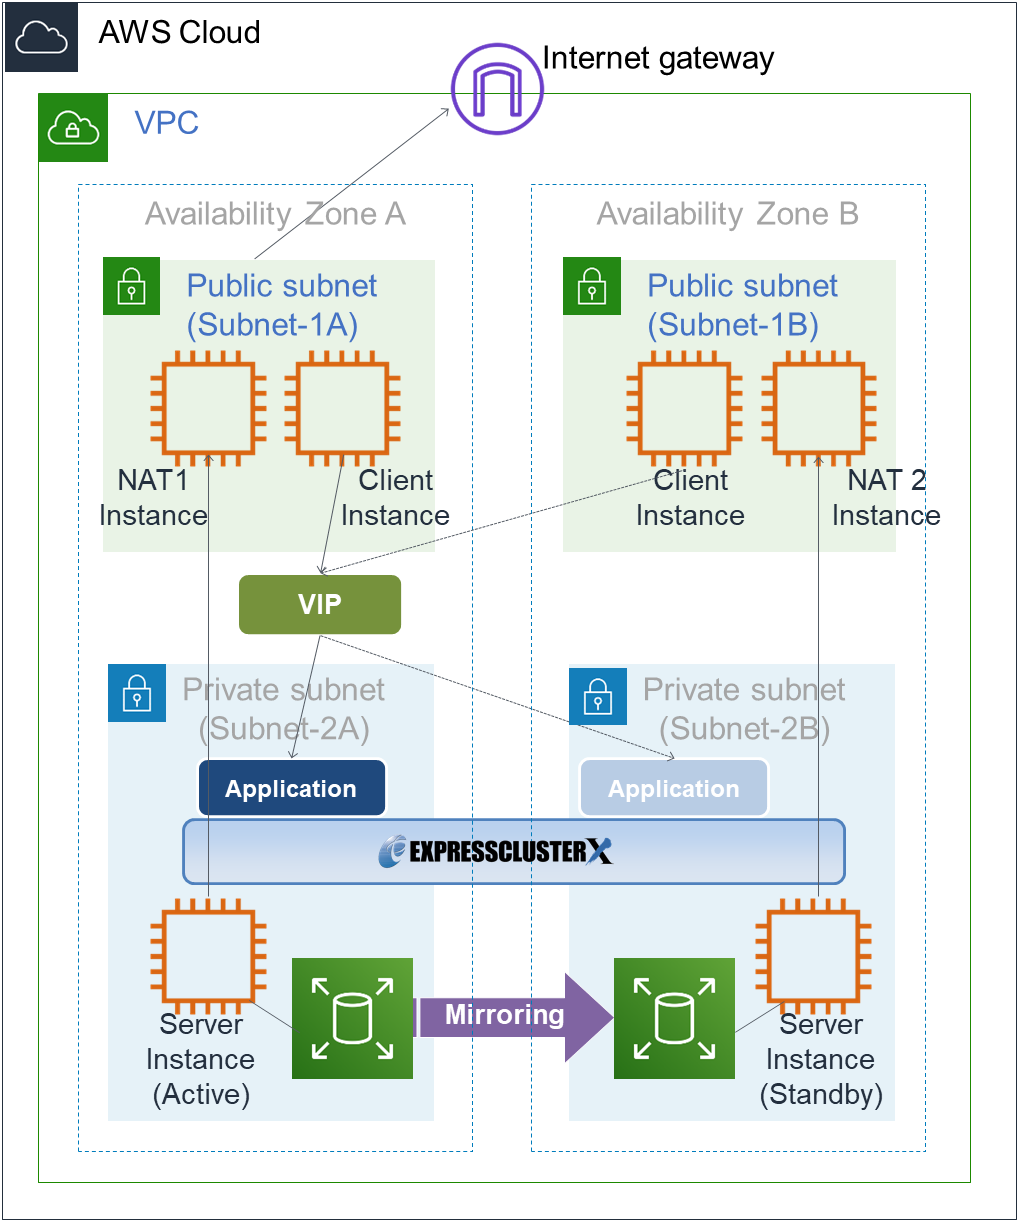
Fig. 2.5 HA Cluster Using Multi-AZ
2.4. Network partition resolution
The instances configuring an HA cluster perform alive monitoring on each other by using heartbeat. In the configuration in which instances are distributed to multiple subnets, an undesirable condition such as redundant startup of a service occurs if the heartbeat is lost. To prevent redundant startup of a service, it is required to determine whether the instance itself was isolated in a network (network partition: NP) or the other instance was down.
The NP resolution conducts a ping or LISTEN port test for an always running device that can return a response (hereafter referred to as an acknowledgement device). If the acknowledgement device does not return a response, it is determined that an NP has occurred and the predefined process is performed (for example, issuing a warning, performing a recovery operation, or shutting down the server).
The Amazon VPC uses the following as the ping device usually.
HA cluster type |
ping device |
Method |
Remarks |
|---|---|---|---|
HA cluster based on VIP control |
Instance always running on another subnet |
Ping |
In this guide, Instance for NAT is used. |
HA cluster based on EIP control |
Regional endpoint |
LISTEN port acknowledgement |
For the regional endpoints, refer to the following URL:
Example:
When the region name is Asia Pacific (Tokyo), the regional endpoint is ec2.ap-northeast-1.amazonaws.com.
|
2.5. On-premises and AWS
Function |
On-premises |
AWS |
|---|---|---|
Creation of a shared disk type cluster |
A |
NA |
Creation of a mirror disk type cluster |
A |
A |
Floating IP resource |
A |
NA |
Virtual IP resource |
A |
NA |
AWS Elastic IP resource |
NA |
A |
AWS Virtual IP resource |
NA |
A |
AWS DNS resource |
NA |
A |
The following table describes the creation flow of a 2-node cluster that uses a mirror disk and various resources in the on-premises and AWS environments.
Before installing EXPRESSCLUSTER
Step
On-premises
AWS
1
Configure the VPC environment.
Not required
- When using the AWS Virtual IP resource, refer to "5.1. Configuring the VPC Environment" in this guide.- When using the AWS Elastic IP resource, refer to "6.1. Configuring the VPC Environment" in this guide.- When AWS DNS resource is used, refer to "7.1. Configuring the VPC Environment" in this guide.2
Configure the instance.
Not required
- When using the AWS Virtual IP resource, refer to "5.2. Configuring the instance" in this guide.- When using the AWS Elastic IP resource, refer to "6.2. Configuring the instance" in this guide.- When AWS DNS resource is used, refer to "7.2. Configuring the instance" in this guide.3
Configure a partition for a mirror disk resource.
Refer to the following:Same as the on-premises environment
4
Adjust the OS startup time.
Refer to the following:Same as the on-premises environment
5
Check the network.
Refer to the following:Same as the on-premises environment
6
Check the root file system
Refer to the following:Same as the on-premises environment
7
Check the firewall.
Refer to the following:Same as the on-premises environment
8
Synchronize the server time.
Refer to the following:Same as the on-premises environment
9
Install EXPRESSCLUSTER.
Same as the on-premises environment
After installing EXPRESSCLUSTER
Step
On-premises
AWS
10
Register the EXPRESSCLUSTER license.
Same as the on-premises environment11
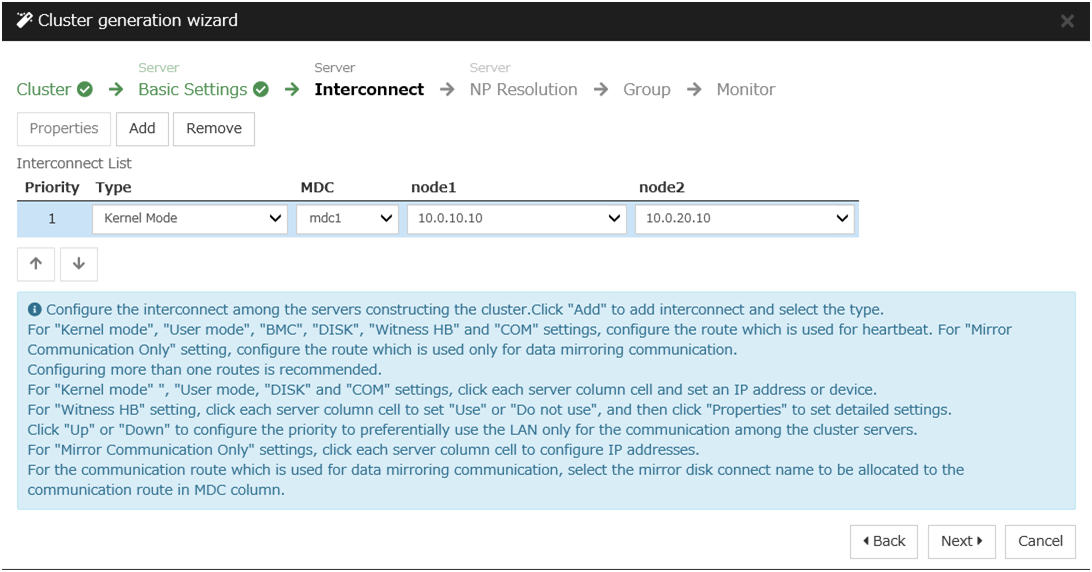
Construct a cluster - Set up the heartbeat method.
Refer to the following:COM heartbeat, BMC heartbeat and DISK heartbeat cannot be used.12
Construct a cluster: Set up the NP resolution.
Use an NP resolution resource.Refer to the following:- When using the AWS Virtual IP resource, refer to-> "3) Add a monitor resource."-> "IP monitor resource"in this guide.- When using the AWS Elastic IP resource, refer to- When AWS DNS resource is used, refer to13
Construct a cluster: Create a failover groupCreate a monitor resource.Refer to the following:In addition to the reference for the on-premises environment, refer to the following:- When using the AWS Virtual IP resource- "5.3. Setting up EXPRESSCLUSTER" in this guide- When using the AWS Elastic IP resource, refer to the following:- "6.3. Setting up EXPRESSCLUSTER" in this guide- When AWS DNS resource is used, refer to below documents:- "7.3. Setting up EXPRESSCLUSTER" in this guide.
4. Notes
4.1. Notes on Using EXPRESSCLUSTER in the VPC
Note the following points when using EXPRESSCLUSTER in the VPC environment.
Access from the Internet or different VPC
NEC has verified that the AWS specifications do not allow clients on the internet or different VPC to access the server instance via the VIP address assigned by the AWS Virtual IP resource. In case of accessing from the client on Internet, specify the EIP address assigned by the AWS Elastic IP resource. In case of accessing from the client on different VPC, specify the DNS name registered to Amazon Route 53 with AWS DNS resource and then make an access via VPC Peering Connection.
Access from different VPC via VPC peering connection
AWS virtual IP resources cannot be used if access via a VPC peering connection is necessary. This is because it is assumed that an IP address to be used as a VIP is out of the VPC range and such an IP address is considered invalid in a VPC peering connection. If access via a VPC peering connection is necessary, use the AWS DNS resource that use Amazon Route 53.
Using VPC endpoint
By using VPC endpoint, it is able to control Amazon EC2 services of AWS CLI without preparing proxy server or NAT, even on the private network. Therefore, in the case of "5. Constructing an HA cluster based on VIP control", it is able to use VPC endpoint instead of NAT. When the VPC endpoint is created, the name which ends in ".ec2" must be selected.However, if NAT does not exist, IP address monitoring cannot be executed by IP monitor resource for NP resolution. Therefore, ping device should be prepared separately.Moreover, even when VCP endpoint is used, NAT gateway etc. will be required if internet access (for online update of instance, module download etc.) or access to AWS cloud service which is not supported by VPC endpoint are needed.
Restrictions on the group resource and monitor resource functions
Mirror disk performance
For a mirror type HA cluster, a write request to a mirror disk takes the following routes:
5. Constructing an HA cluster based on VIP control
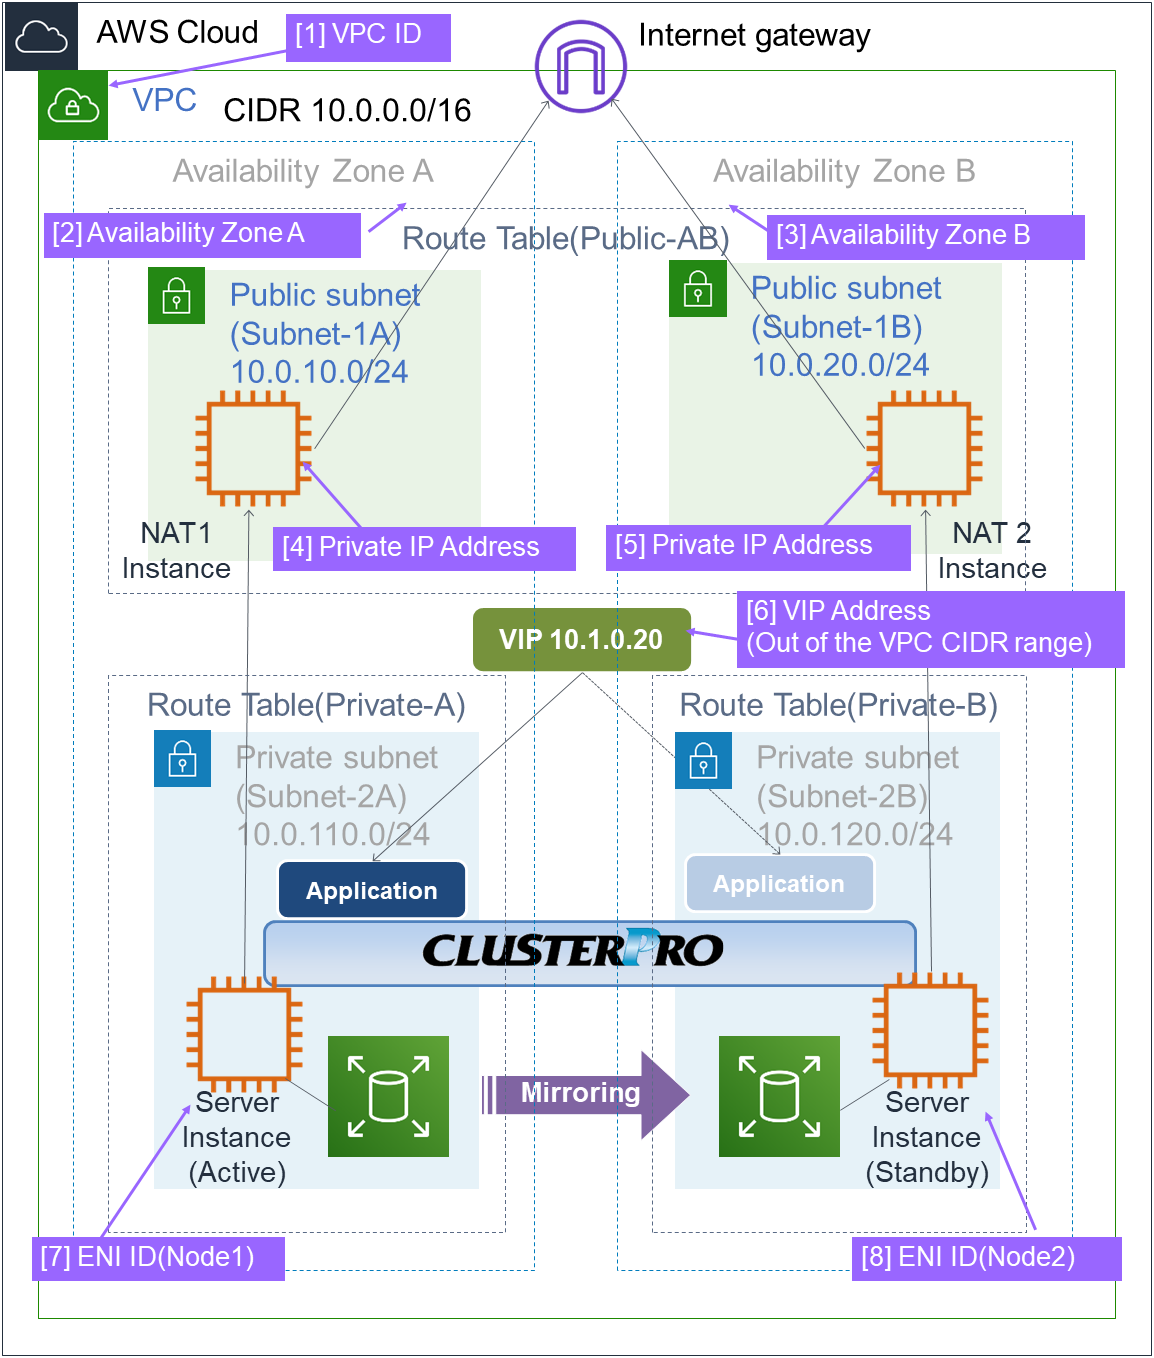
Fig. 5.1 System Configuration of the HA Cluster Based on VIP Control
5.1. Configuring the VPC Environment
Configure the VPC and subnet.
Create a VPC and subnet first.
-> Add a VPC and subnet in VPC and Subnets on the VPC Management console.
 Write down the VPC ID (vpc-xxxxxxxx) because it is necessary to set up the AWS Virtual IP resource later.
Configure the Internet gateway.
Add an Internet gateway to access the Internet from the VPC.
-> To create an Internet gateway, select Internet Gateways > Create internet gateway on the VPC Management console. Attach the created Internet gateway to the VPC.
Configure the network ACL and security group.
Specify the appropriate network ACL and security group settings to prevent unauthorized network access from in and out of the VPC.Change the network ACL and security group path settings so that the instances of the HA cluster node can communicate with the Internet gateway via HTTPS, communicate with Cluster WebUI, and communicate with each other. The instances are to be placed on the private networks (Subnet-2A and Subnet-2B).-> Change the settings in Network ACLs and Security Groups on the VPC Management console.
For the port numbers that are used by the EXPRESSCLUSTER components, refer to the following:
Add an HA cluster instance.
Create an HA cluster node instance on the private networks (Subnet-2A and Subnet-2B).To use an IAM role by assigning it to an instance, specify the IAM role.-> To create an instance, select Instances > Launch Instance on the EC2 Management console.
-> For details about the IAM settings, refer to "8. Configuring the IAM"
Disable Source/Dest. Check of the elastic network interface (ENI) assigned to each created instance.To perform the VIP control by using the AWS Virtual IP resource, communication with the VIP address (10.1.0.20 in the above figure) must be routed to the ENI of the instance. It is necessary to disable Source/Dest. Check of the ENI of each instance to communicate with the private IP address and VIP address.-> To change the settings, right-click the added instance in Instances on the EC2 Management console, and select Networking > **Change Source/Dest. Check.

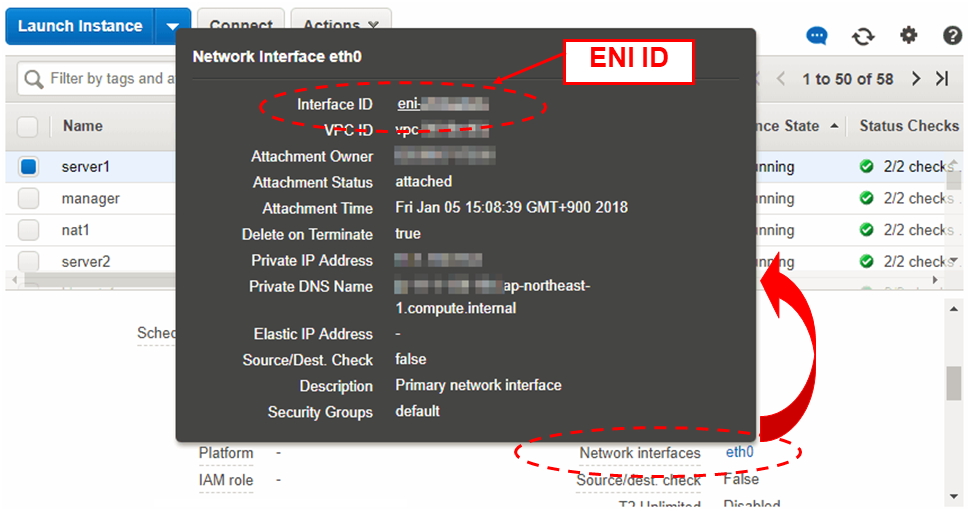
 Write down the ENI ID (eni-xxxxxxxx) of each instance because it is necessary to set up the AWS Virtual IP resource later.
Use the following procedure to check the ENI ID assigned to the instance.
Select the instance to display its detailed information.
Click the target device in Network Interfaces.
Check Interface ID displayed in the pop-up window.
Add a NAT instance.
To perform the VIP control by using the AWS CLI, communication from the instance of the HA cluster node to the regional endpoint via HTTPS must be enabled.To do so, create a NAT instance on the public networks (Subnet-1A and Subnet-1B). In the AWS environment, amzn-ami-vpc-nat-pv-2014.09.1.x86_64-ebs is prepared as the AMI with the string, amzn-ami-vpc-nat included.When creating a NAT instance, enable the public IP. In addition, disable Source/Dest. Check of the added NAT instance to enable the NAT function.-> To change the settings, right-click the NAT instance in Instances on the EC2 Management console, and select Networking > Change Source/Dest. Check.
Configure the route table.
Add the routing to the Internet gateway so that the AWS CLI can communicate with the regional endpoint via NAT and the routing so that a client in the VPC can access the VIP address. The number of CIDR blocks of the VIP address must always be 32.The following routings must be set in the route table (Public-AB) of the public networks (Subnet-1A and Subnet-1B in the above figure).Route table (Public-AB)
Destination
Target
Remarks
VPC network(Example: 10.0.0.0/16)localExisting by default0.0.0.0/0
Internet gateway
Add (required)
VIP address(Example: 10.1.0.20/32)eni-xxxxxxxx (ENI ID of the active server instance) Add (required)The following routings must be set in the route tables (Private-A and Private-B) of the private networks (Subnet-2A and Subnet-2B in the above figure).
Route table (Private-A)
Destination
Target
Remarks
VPC network(Example: 10.0.0.0/16)localExisting by default0.0.0.0/0
NAT1
Add (required)
VIP address(Example: 10.1.0.20/32)eni-xxxxxxxx (ENI ID of the active server instance) Add (required)
Route table (Private-B)
Destination
Target
Remarks
VPC network(Example: 10.0.0.0/16)localExisting by default0.0.0.0/0
NAT2
Add (required)
VIP address(Example: 10.1.0.20/32)eni-xxxxxxxx (ENI ID of the active server instance) Add (required)
When a failover occurred, the AWS Virtual IP resource switches all routings to the VIP address set in these route tables to the ENI of the standby server instance by using the AWS CLI.
 The VIP address must be out of the VPC CIDR range of the VPC.Write down the VIP address set to the route table because it is necessary to set up the AWS Virtual IP resource later.
Configure other routings according to the environment.
Add a mirror disk (EBS).
Add an EBS to be used as the mirror disk (cluster partition or data partition) as needed.
-> To add an EBS, select Volumes > Create Volume on the EC2 Management console, and then attach the created volume to an instance.
5.2. Configuring the instance
Disable SELinux.
Set permissive or disabled to SELinux to perform communication required by EXPRESSCLUSTER. Run the following command to check the status of SELinux.
$ getenforce
Enforcing
(* Enforcing indicates that SELinux is enabled.)
Change the status of SELinux to "disabled" by using/etc/sysconfig/selinuxand restart SELinux. Then run the getenforce command to confirm that Disabled is returned.Configure a firewall.
Change the firewall setting as needed.For the port numbers that are used by the EXPRESSCLUSTER components, refer to the following:Install Python.
Install Python required by EXPRESSCLUSTER.First, confirm that Python is installed.If Python has not been installed, install it by using a command such as yum.The installation path of the python commands must be any of the following:/sbin, /bin, /usr/sbin, /usr/binInstall the AWS CLI.
Install the AWS CLI by running the pip command from a shell.
$ pip install awscli
For details about the pip command, refer to the following:The installation path of the AWS CLI must be any of the following:/sbin, /bin, /usr/sbin, /usr/bin, /usr/local/binFor details about how to set up the AWS CLI, refer to the following:(If EXPRESSCLUSTER has been installed before installing Python or the AWS CLI, be sure to restart the OS before using EXPRESSCLUSTER.)Register the AWS access key ID.
Run the following command from the shell.
$ sudo aws configure
Enter information such as the AWS access key ID to the inquiries.The settings to be specified vary depending on whether an IAM role is assigned to the instance or not.Instance to which an IAM role is assigned.
AWS Access Key ID [None]: (Press Enter without entering anything.)
AWS Secret Access Key [None]: (Press Enter without entering anything.)
Default region name [None]: <default region name>
Default output format [None]: text
Instance to which an IAM role is not assigned.
AWS Access Key ID [None]: <AWS access key ID>
AWS Secret Access Key [None]: <AWS secret access key>
Default region name [None]: <default region name>
Default output format [None]: text
For "Default output format", other format than "text" may be specified.If you specified incorrect settings, delete the directory/root/.awsentirely, and specify the above settings again.Prepare the mirror disk.
If an EBS has been added to be used as the mirror disk, divide the EBS into partitions and use each partition as the cluster partition and data partition.
For details about the mirror disk partition, refer to the following:
Install EXPRESSCLUSTER.
For the installation procedure, refer to "Installation and Configuration Guide".Store the EXPRESSCLUSTER installation media in the environment to which to install EXPRESSCLUSTER.(To transfer data, use any method such as Remote Desktop and Amazon S3.)After the installation, restart the OS.
5.3. Setting up EXPRESSCLUSTER
For details about how to set up and connect to Cluster WebUI, refer to the following:
This section describes how to add the following resources:
Mirror disk resource
AWS Virtual IP resource
AWS AZ monitor resource
AWS Virtual IP monitor resource
NP resolution (IP monitor resource)
For the settings other than the above, refer to "Installation and Configuration Guide".
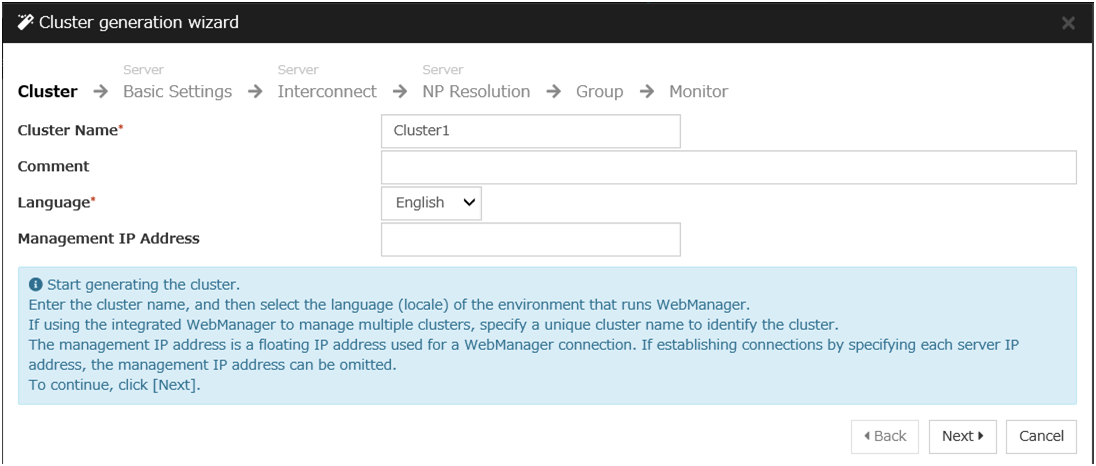
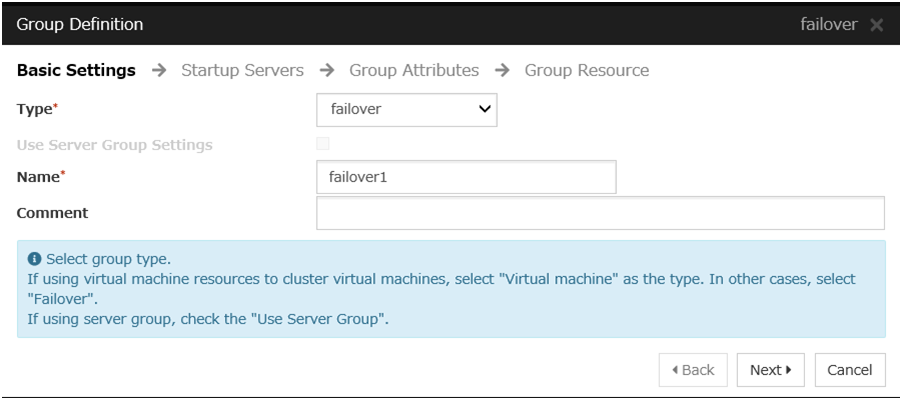
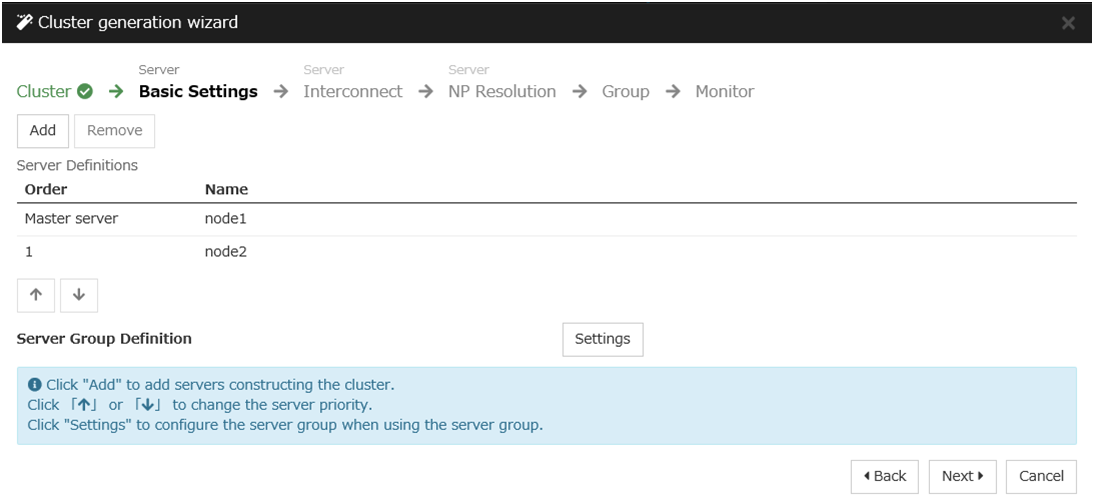
Construct a cluster.
Start the Cluster generation wizard to construct a cluster.
Construct a cluster.
Steps


Add a group resource.
Group definition
Create a failover group.
Steps
Mirror disk resource
Create a mirror disk resource according the mirror disk (EBS) as needed.
For details, refer to the following:
Steps
Click Add in Group Resource List.
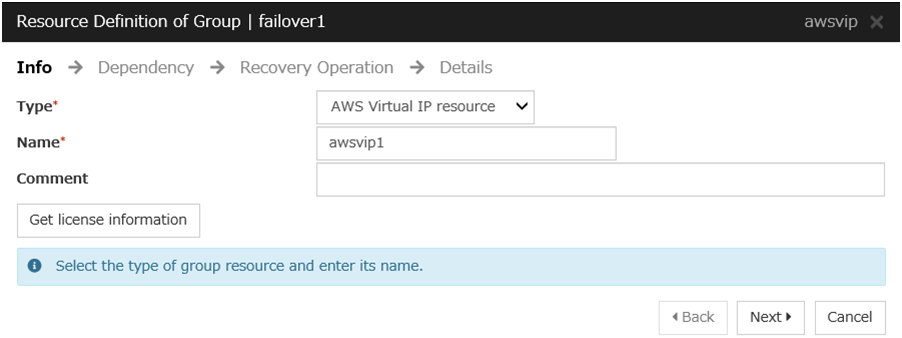
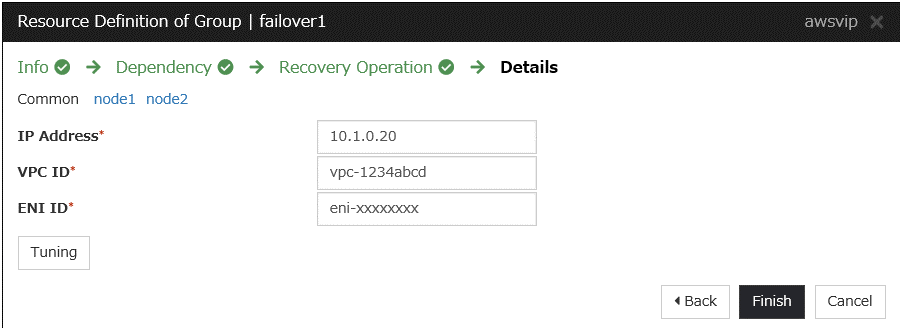
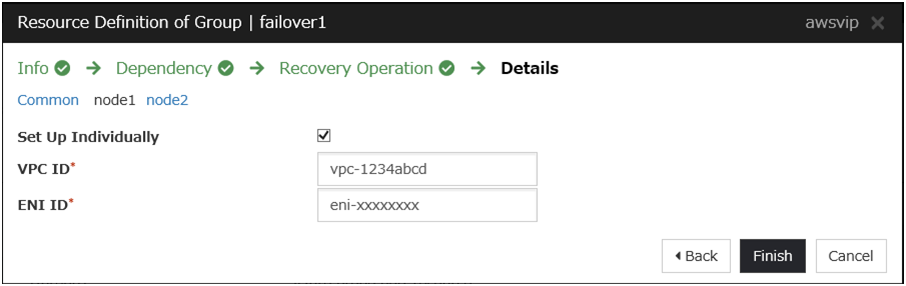
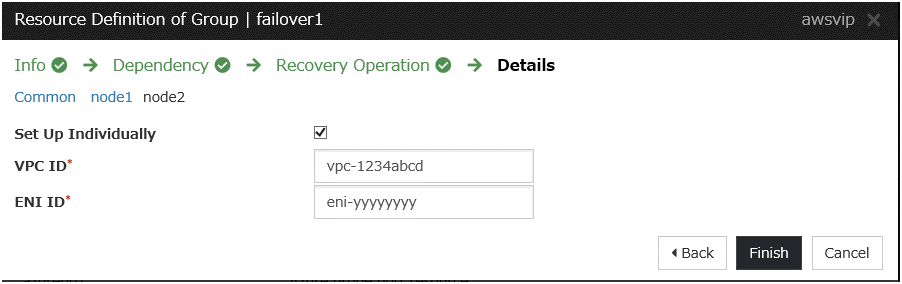
AWS Virtual IP resource
Add the AWS Virtual IP resource that controls the VIP by using the AWS CLI.
For details, refer to the following:
-> Understanding AWS Virtual IP resourcesSteps
Click Add in Group Resource List.
The Dependency window is displayed. Click Next without specifying anything.
Click Finish to complete setting.

Add a monitor resource.
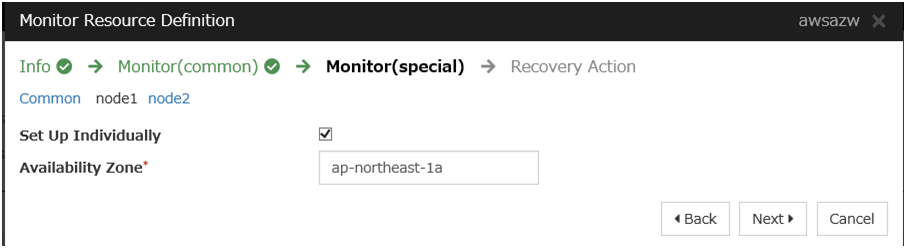
AWS AZ monitor resource
Create an AWZ AZ monitor resource to check whether the specified AZ is usable by using the monitor command.
For details, refer to the following:
-> Understanding AWS AZ monitor resourcesSteps
Click Add in Monitor Resource List.
Click Finish to complete setting.
AWS Virtual IP monitor resource
This resource is automatically added when the AWS Virtual IP resource is added.The existence of the VIP address and the health of the route table can be checked by using the OS API and the AWS CLI commands.For details, refer to the following:-> Understanding AWS Virtual IP monitor resourcesIP monitor resource
Create the IP monitor resource to monitor the health of the subnet by sending a ping to a NAT instance placed in each AZ. Specify the following:
Steps
Click Add in Monitor Resource List.
Click Finish to complete setting.


Apply the settings and start the cluster.
Select the Operation Mode on the drop down menu of the toolbar in Cluster WebUI to switch to the operation mode.
The procedure depends on the resource used. For details, refer to the following: Installation and Configuration Guide -> How to create a cluster
6. Constructing an HA cluster based on EIP control
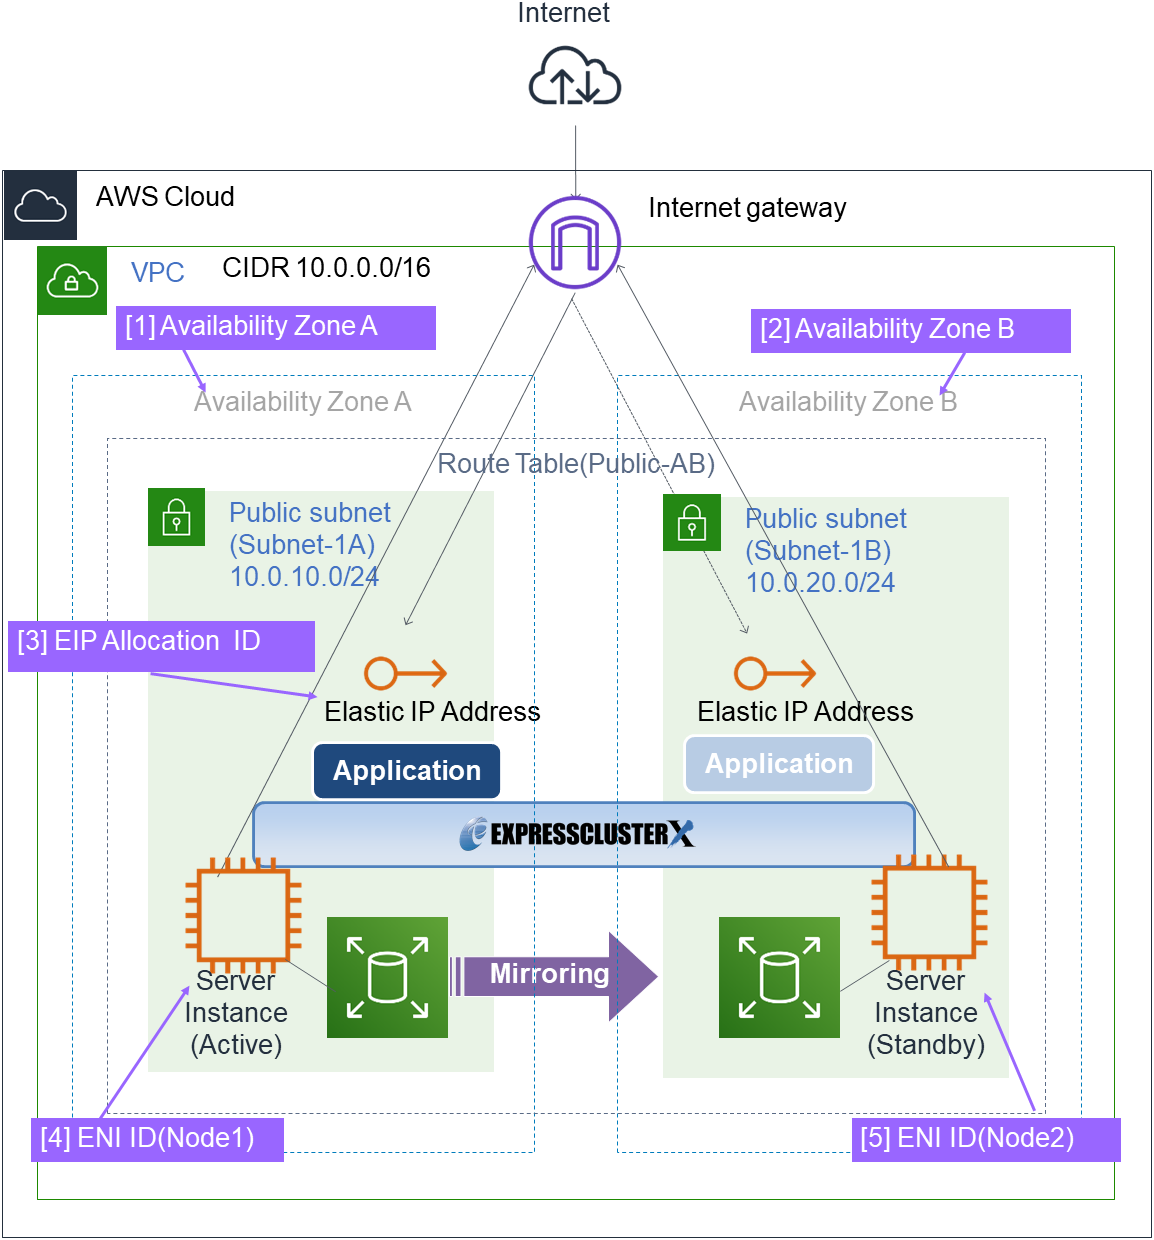
Fig. 6.1 System Configuration of the HA cluster based on EIP control
6.1. Configuring the VPC Environment
Configure the VPC and subnet.
Create a VPC and subnet first.
-> Add a VPC and subnet in VPC and Subnets on the VPC Management console.
Configure the Internet gateway.
Add an Internet gateway to access the Internet from the VPC.
-> To create an Internet gateway, select Internet Gateways > Create internet gateway on the VPC Management console. Attach the created Internet gateway to the VPC.
Configure the network ACL and security group.
Specify the appropriate network ACL and security group settings to prevent unauthorized network access from in and out of the VPC.Change the network ACL and security group path settings so that the instances of the HA cluster node can communicate with the Internet gateway via HTTPS, communicate with Cluster WebUI, and communicate with each other. The instances are to be placed on the public networks (Subnet-1A and Subnet-1B).-> Change the settings in Network ACLs and Security Groups on the VPC Management console.
For the port numbers that are used by the EXPRESSCLUSTER components, refer to the following:
Add an HA cluster instance.
Create an HA cluster node instance on the public networks (Subnet-1A and Subnet-1B).When creating an HA cluster node instance, be sure to specify the setting to enable a public IP. If an instance is created without using a public IP, it is necessary to add an EIP or NAT needs to be prepared.(This guide does not describe this case.)-> To create an instance, select Instances > Launch Instance on the EC2 Management console.
-> For details about the IAM settings, refer to "8. Configuring the IAM".
Check the ID of the elastic network interface (ENI) assigned to each created instance.

 Write down the ENI ID (eni-xxxxxxxx) of each instance because it is necessary to set up the AWS Elastic IP resource later.
Use the following procedure to check the ENI ID assigned to the instance.
Select the instance to display its detailed information.
Click the target device in Network Interfaces.
Check Interface ID displayed in the pop-up window.

Add an EIP.
Add an EIP to access an instance in the VPC from the Internet.
-> To add an EIP, select Elastic IPs > Allocate new address on the EC2 Management console.
 Write down the Allocation ID (eipalloc-xxxxxxxx) of the added EIP because it is necessary to set up the AWS Elastic IP resource later.
Configure the route table.
Add the routing to the Internet gateway so that the AWS CLI can communicate with the regional endpoint via NAT.
The following routings must be set in the route table (Public-AB) of the public networks (Subnet-1A and Subnet-1B in the above figure).
Route table (Public-AB)
Destination
Target
Remarks
VPC network(Example: 10.0.0.0/16)local
Existing by default
0.0.0.0/0
Internet Gateway
Add (required)
When a failover occurred, the AWS Elastic IP resource deassigns the EIP assigned to the active server instance by using the AWS CLI, and assign it to the standby server instance.Configure other routings according to the environment.Add a mirror disk (EBS).
Add an EBS to be used as the mirror disk (cluster partition or data partition) as needed.
-> To add an EBS, select Volumes > Create volume on the EC2 Management console, and then attach the created volume to an instance.
6.2. Configuring the instance
Log in to each instance of the HA cluster and specify the following settings.
For the Python and AWS CLI versions supported by EXPRESSCLUSTER, refer to the following:
Disable SELinux.
Set permissive or disabled to SELinux to perform communication required by EXPRESSCLUSTER. Run the following command to check the status of SELinux.
$ getenforce
Enforcing
(* Enforcing indicates that SELinux is enabled.)
Change the status of SELinux to "disabled" by using/etc/sysconfig/selinuxand restart SELinux. Then run the getenforce command to confirm that Disabled is returned.Configure a firewall.
Change the firewall setting as needed.
For the port numbers that are used by the EXPRESSCLUSTER components, refer to the following:
Install Python.
Install Python required by EXPRESSCLUSTER.First, confirm that Python is installed.If Python has not been installed, install it by using a command such as yum.The installation path of the python commands must be any of the following:/sbin, /bin, /usr/sbin, /usr/binInstall the AWS CLI.
Install the AWS CLI by running the pip command from a shell.
$ pip install awscli
For details about the pip command, refer to the following:The installation path of the AWS CLI must be any of the following:/sbin, /bin, /usr/sbin, /usr/bin, /usr/local/binFor details about how to set up the AWS CLI, refer to the following:(If EXPRESSCLUSTER has been installed before installing Python or the AWS CLI, be sure to restart the OS before using EXPRESSCLUSTER.)Register the AWS access key ID.
Run the following command from the shell.
$ sudo aws configure
Enter information such as the AWS access key ID to the inquiries.The settings to be specified vary depending on whether an IAM role is assigned to the instance or not.Instance to which an IAM role is assigned.
AWS Access Key ID [None]: (Press Enter without entering anything.)
AWS Secret Access Key [None]: (Press Enter without entering anything.)
Default region name [None]: <default region name>
Default output format [None]: text
Instance to which an IAM role is not assigned.
AWS Access Key ID [None]: <AWS access key ID>
AWS Secret Access Key [None]: <AWS secret access key>
Default region name [None]: <default region name>
Default output format [None]: text
For "Default output format", other format than "text" may be specified.If you specified incorrect settings, delete the directory/root/.awsentirely, and specify the above settings again.Prepare the mirror disk.
If an EBS has been added to be used as the mirror disk, divide the EBS into partitions and use each partition as the cluster partition and data partition.For details about the mirror disk partition, refer to the following:Install EXPRESSCLUSTER.
For the installation procedure, refer to "Installation and Configuration Guide".Store the EXPRESSCLUSTER installation media in the environment to which to install EXPRESSCLUSTER.(To transfer data, use any method such as Remote Desktop and Amazon S3.)After the installation, restart the OS.
6.3. Setting up EXPRESSCLUSTER
For details about how to set up and connect to Cluster WebUI, refer to the following:
This section describes how to add the following resources:
Mirror disk resource
AWS Elastic IP resource
AWS AZ monitor resource
AWS Elastic monitor resource
NP resolution (Custom monitor resource)
For the settings other than the above, refer to "Installation and Configuration Guide".
Construct a cluster.
Start the Cluster generation wizard to construct a cluster.
Construct a cluster.
Steps


Add a group resource.
Group definition
Create a failover group.
Steps
Mirror disk resource
Create the mirror disk resource according the mirror disk (EBS) as needed.
For details, refer to the following:
Steps
Click Add in Group Resource List.
Enter the device name for the partition set up in "Configuring the instance" -> "6. Prepare the mirror disk." in Data Partition Device Name and Cluster Partition Device Name. Specify Mount Point and File System. Click Finish to finish setting.
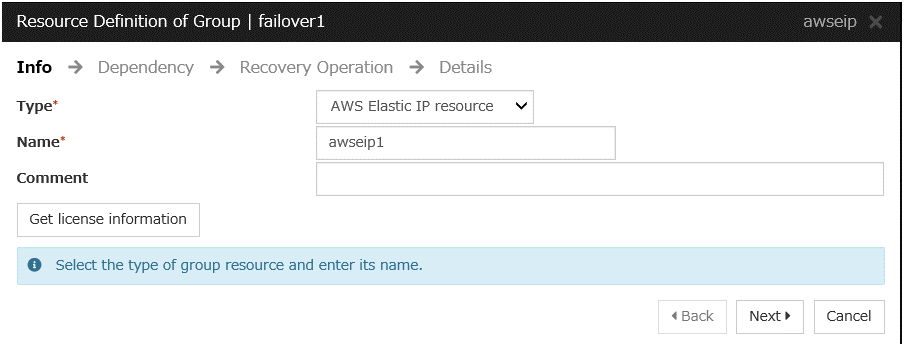
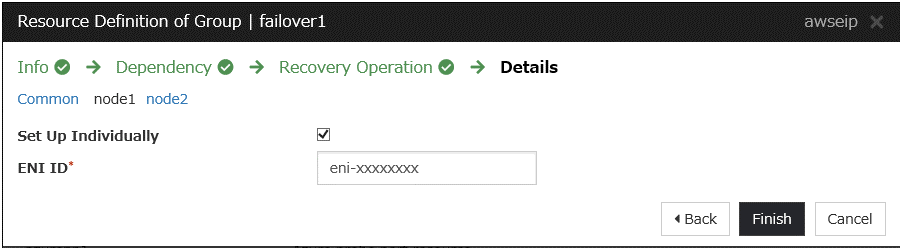
AWS Elastic IP resource
Add an AWS Elastic IP resource that controls the EIP by using the AWS CLI.
For details, refer to the following:
-> Understanding AWS Elastic IP resourcesSteps
Click Add in Group Resource List.
The Dependency window is displayed. Click Next without specifying anything.
Click Finish to complete setting.


Add a monitor resource.
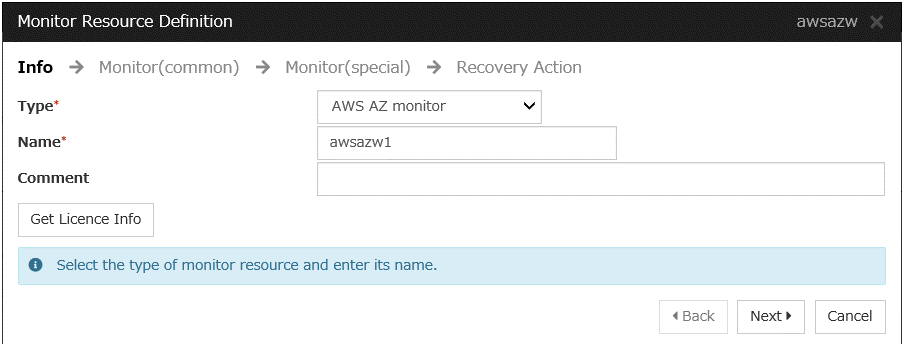
AWS AZ monitor resource
Create the AWZ AZ monitor resource to check whether the specified AZ is usable by using the monitor command.For details, refer to the following:Steps
Click Add in Monitor Resource List.
Click Finish to complete setting.
AWS Elastic IP monitor resource
This resource is automatically added when the AWS Elastic IP resource is added.The health of the EIP address can be checked by monitoring the communication with the EIP address that is assigned to the active server instance.For details, refer to the following:Custom monitor resource
This resource checks the status of the communication with the EIP address by monitoring the communication with port 443 of the endpoint of the region in which the environment has been constructed.
For the regional endpoints, refer to the following URL:
https://docs.aws.amazon.com/general/latest/gr/rande.html
For details, refer to the following:


Apply the settings and start the cluster.
Select the Operation Mode on the drop down menu of the toolbar in Cluster WebUI to switch to the operation mode.
The procedure depends on the resource used. For details, refer to the following: Installation and Configuration Guide -> How to create a cluster
7. Constructing an HA cluster based on DNS name control
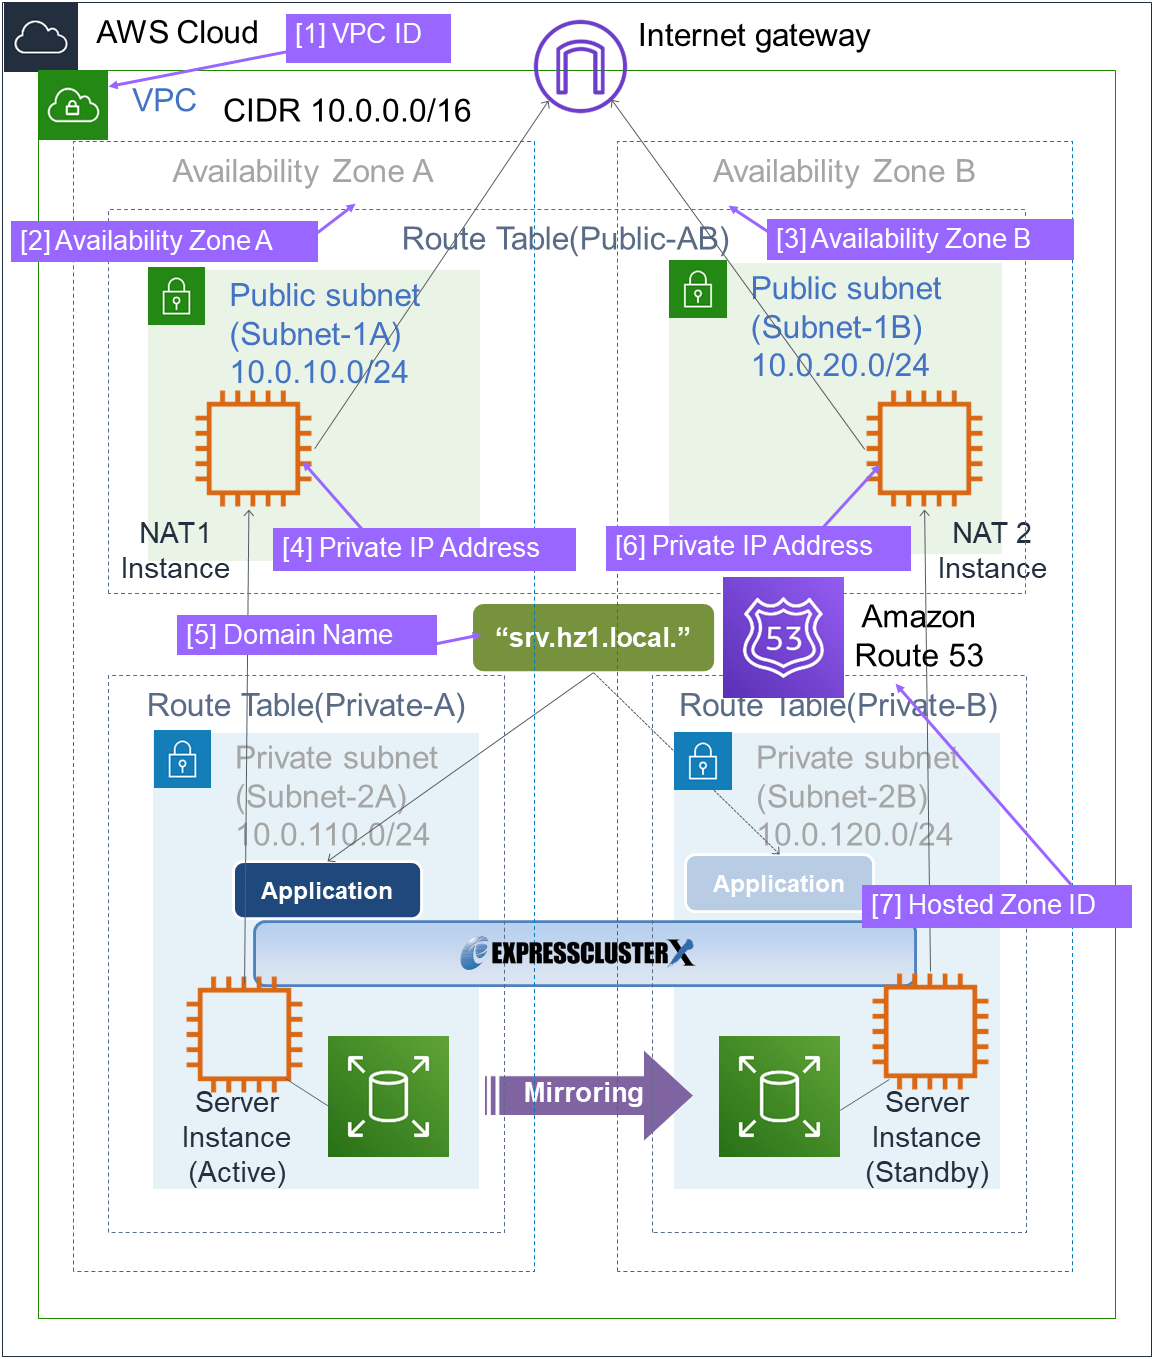
Fig. 7.1 System Configuration HA Cluster Based on DNS Name Control
7.1. Configuring the VPC Environment
Configure the VPC on the VPC Management console and EC2 Management console.
The IP addresses used in the figures and description are an example. In the actual configuration, use the actual IP addresses assigned to the VPC. When installing EXPRESSCLUSTER in the existing VPC, specify the appropriate settings such as adding a subnet if the number of subnets is insufficient. This guide does not describe the case to perform operations by adding an ENI to an instance of an HA cluster node.
Configure the VPC and subnet.
Create a VPC and subnet first.
-> Add a VPC and subnet in VPC and Subnets on the VPC Management console.
 Write down the VPC ID (vpc-xxxxxxxx) because it is necessary to add the Hosted Zone later.
Configure the Internet gateway.
Add an Internet gateway to access the Internet from the VPC.
-> To create an Internet gateway, select Internet Gateways > Create internet gateway on the VPC Management console. Attach the created Internet gateway to the VPC.
Configure the network ACL and security group.
Specify the appropriate network ACL and security group settings to prevent unauthorized network access from in and out of the VPC.
Change the network ACL and security group path settings so that the instances of the HA cluster node can communicate with the Internet gateway via HTTPS, communicate with Cluster WebUI, and communicate with each other. The instances are to be placed on the private networks (Subnet-2A and Subnet-2B).
-> Change the settings in Network ACLs and Security Groups on the VPC Management console.
For the port numbers that are used by the EXPRESSCLUSTER components, refer to the following:
Add an HA cluster instance.
Create an HA cluster node instance on the private networks (Subnet-2A and Subnet-2B).
-> To create an instance, select Instances > Launch Instance on the EC2 Management console.
-> For details about the IAM settings, refer to "8. Configuring the IAM"
Add a NAT instance.
To perform the VIP control by using the AWS CLI, communication from the instance of the HA cluster node to the regional endpoint via HTTPS must be enabled.
To do so, create a NAT instance on the public networks (Subnet-1A and Subnet-1B). In the AWS environment, amzn-ami-vpc-nat-pv-2014.09.1.x86_64-ebs is prepared as the AMI with the string, amzn-ami-vpc-nat included.
When creating a NAT instance, enable the public IP. In addition, disable Source/Dest. Check of the added NAT instance to enable the NAT function.
-> To change the settings, right-click the NAT instance in Instances on the EC2 Management console, and select Networking > Change Source/Dest. Check.
Configure the route table.
Add the routing to the Internet gateway so that the AWS CLI can communicate with the regional endpoint via NAT.
The following routings must be set in the route table (Public-AB) of the public networks (Subnet-1A and Subnet-1B in the above figure).
Route Table (Public-AB)
Destination
Target
Remarks
VPC network(Example: 10.0.0.0/16)local
Existing by default
0.0.0.0/0
Internet gateway
Add (required)
The following routings must be set in the route tables (Private-A and Private-B) of the private networks (Subnet-2A and Subnet-2B in the above figure).Route Table (Private-A)
Destination
Target
Remarks
VPC network(Example: 10.0.0.0/16)local
Existing by default
0.0.0.0/0
NAT1
Add (required)
Route Table (Private-B)
Destination
Target
Remarks
VPC network(Example: 10.0.0.0/16)local
Existing by default
0.0.0.0/0
NAT2
Add (required)
Configure other routings according to the environment.
Add a Hosted Zone
Private Hosted Zone is added to Amazon Route 53.
-> To add a hosted zone, select DNS management > Created Hosted Zone on the Route 53 Management Console. Select Private Hosted Zone for Amazon VPC from the Type box and set the ID of VPC where the instance belongs, in the VPC ID box.
Note the Hosted Zone ID separately because it will be needed for the setup of AWS DNS resource later.The reason that this guide includes the procedure to add Privae Hosted Zone is to make it possible to access from the client within the VPC with the cluster located on the Private subnet. When access from internet is required, cluster must be located on Public subnet, therefore Public Hosted Zone will be added.

Add a mirror disk (EBS).
Add an EBS to be used as the mirror disk (cluster partition or data partition) as needed.
-> To add an EBS, select Volumes > Create Volume on the EC2 Management console, and then attach the created volume to an instance.
7.2. Configuring the instance
Disable SELinux.
Set permissive or disabled to SELinux to perform communication required by EXPRESSCLUSTER. Run the following command to check the status of SELinux.
$ getenforce
Enforcing
(* Enforcing indicates that SELinux is enabled.)
Change the status of SELinux to "disabled" by using
/etc/sysconfig/selinuxand restart SELinux. Then run the getenforce command to confirm that Disabled is returned.Configure a firewall.
Change the firewall setting as needed.For the port numbers that are used by the EXPRESSCLUSTER components, refer to the following:Install Python.
Install Python required by EXPRESSCLUSTER.First, confirm that Python is installed.If Python has not been installed, install it by using a command such as yum.The installation path of the python commands must be any of the following:/sbin, /bin, /usr/sbin, /usr/binInstall the AWS CLI.
Install the AWS CLI by running the pip command from a shell.
$ pip install awscli
For details about the pip command, refer to the following:The installation path of the AWS CLI must be any of the following:/sbin, /bin, /usr/sbin, /usr/bin, /usr/local/binFor details about how to set up the AWS CLI, refer to the following:(If EXPRESSCLUSTER has been installed before installing Python or the AWS CLI, be sure to restart the OS before using EXPRESSCLUSTER.)Register the AWS access key ID.
Run the following command from the shell.
$ sudo aws configure
Enter information such as the AWS access key ID to the inquiries.The settings to be specified vary depending on whether an IAM role is assigned to the instance or not.Instance to which an IAM role is assigned.
AWS Access Key ID [None]: (Press Enter without entering anything.)
AWS Secret Access Key [None]: (Press Enter without entering anything.)
Default region name [None]: <default region name>
Default output format [None]: text
Instance to which an IAM role is not assigned.
AWS Access Key ID [None]: <AWS access key ID>
AWS Secret Access Key [None]: <AWS secret access key>
Default region name [None]: <default region name>
Default output format [None]: text
For "Default output format", other format than "text" may be specified.If you specified incorrect settings, delete the directory/root/.awsentirely, and specify the above settings again.Prepare the mirror disk.
If an EBS has been added to be used as the mirror disk, divide the EBS into partitions and use each partition as the cluster partition and data partition.For details about the mirror disk partition, refer to the following:Install EXPRESSCLUSTER.
For the installation procedure, refer to "Installation and Configuration Guide".Store the EXPRESSCLUSTER installation media in the environment to which to install EXPRESSCLUSTER.(To transfer data, use any method such as Remote Desktop and Amazon S3.)After the installation, restart the OS.
7.3. Setting up EXPRESSCLUSTER
For details about how to set up and connect to Cluster WebUI, refer to the following:
This section describes how to add the following resources:
Mirror disk resource
AWS DNS resource
AWS AZ monitor resource
AWS DNS monitor resource
NP resolution (IP monitor resource)
For the settings other than the above, refer to "Installation and Configuration Guide".
Construct a cluster.
Start the Cluster generation wizard to construct a cluster.
Construct a cluster.
Steps


Add a group resource.
Group definition
Create a failover group.
Steps
Mirror disk resource
Create a mirror disk resource according the mirror disk (EBS) as needed.
For details, refer to the following:
Steps
Click Add in Group Resource List.
Enter the drive letter for the partition set up in "Configuring the instance" -> "6. Prepare the mirror disk." in Data partition device name and Cluster partition device name. Specify Mount Point and File System. Click Finish to finish setting.
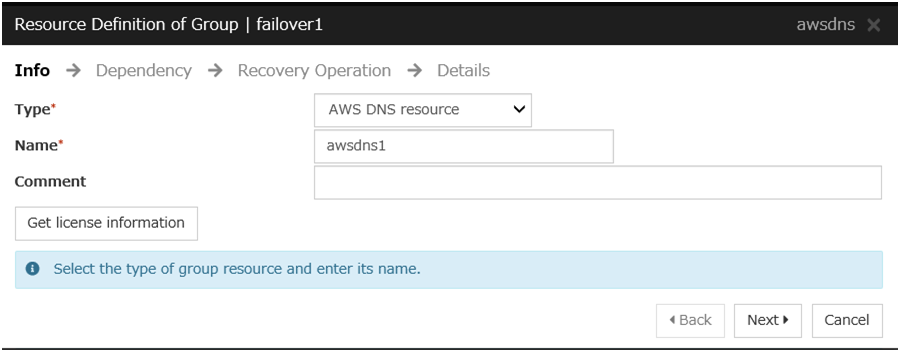
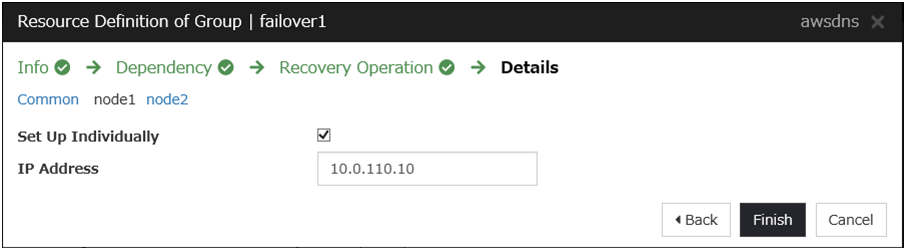
AWS DNS resource
Add the AWS DNS resource that controls the DNS name by using the AWS CLI.
For details, refer to the following:
Steps
Click Add in Group Resource List.
The Dependency window is displayed. Click Next without specifying anything.
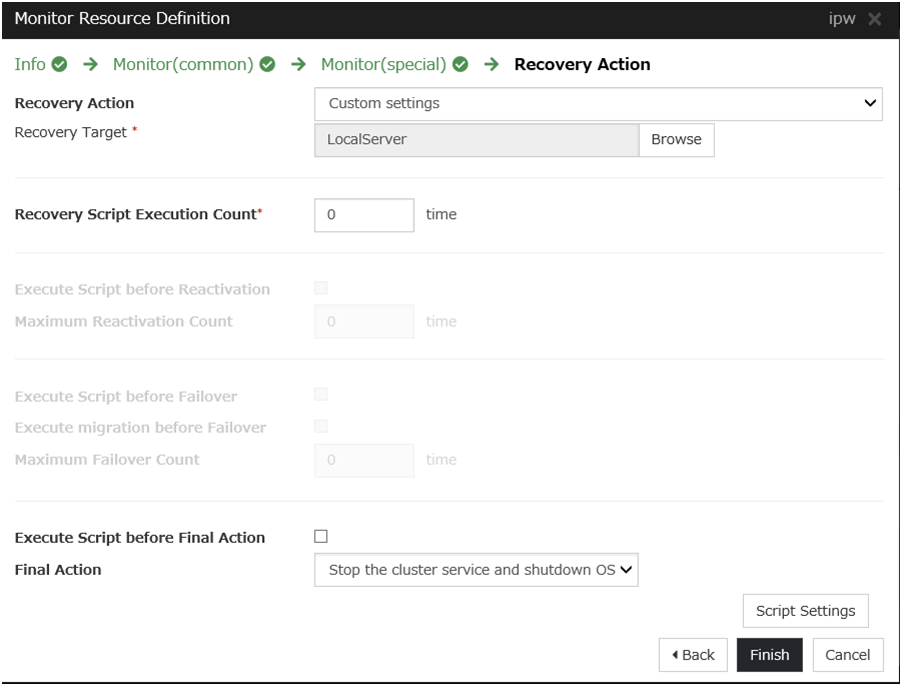
The Recovery Operation window is displayed. Click Next.
Click Finish to complete setting.


Add a monitor resource.
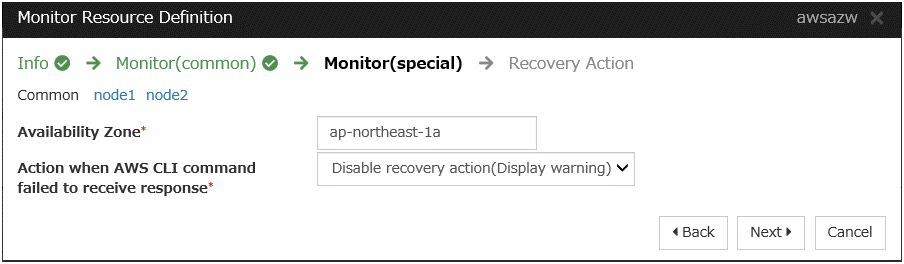
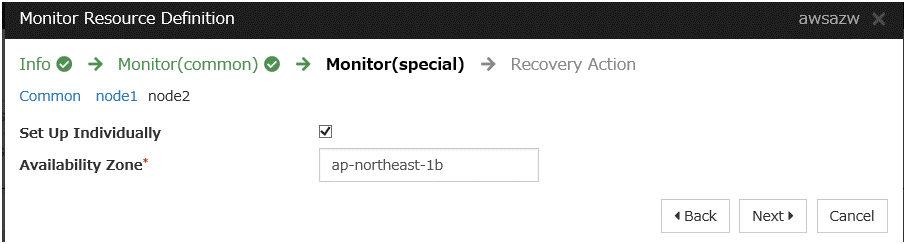
AWS AZ monitor resource
Create an AWZ AZ monitor resource to check whether the specified AZ is usable by using the monitor command.
For details, refer to the following:
Steps
Click Add in Monitor Resource List.
Click Finish to complete setting.
AWS DNS monitor resource
This resource is automatically added when the AWS DNS resource is added.
Using the OS API and the AWS CLI commands, check the existence of the resource record set and whether the registered IP address can be obtained by resolving the DNS name.
For details, refer to the following:
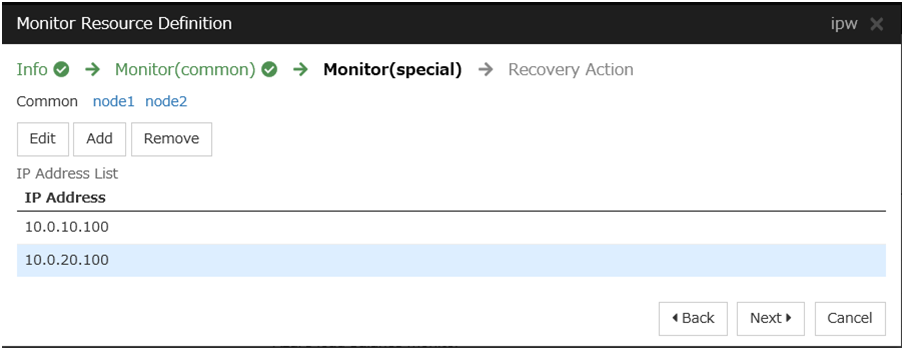
IP monitor resource
Create the IP monitor resource to monitor the health of the subnet by sending a ping to a NAT instance placed in each AZ. Specify the following:
Steps
Click Add in Monitor Resource List.
Click Finish to complete setting.


Apply the settings and start the cluster.
Select the Operation Mode on the drop down menu of the toolbar in Cluster WebUI to switch to the operation mode.
The procedure depends on the resource used. For details, refer to the following: Installation and Configuration Guide -> How to create a cluster
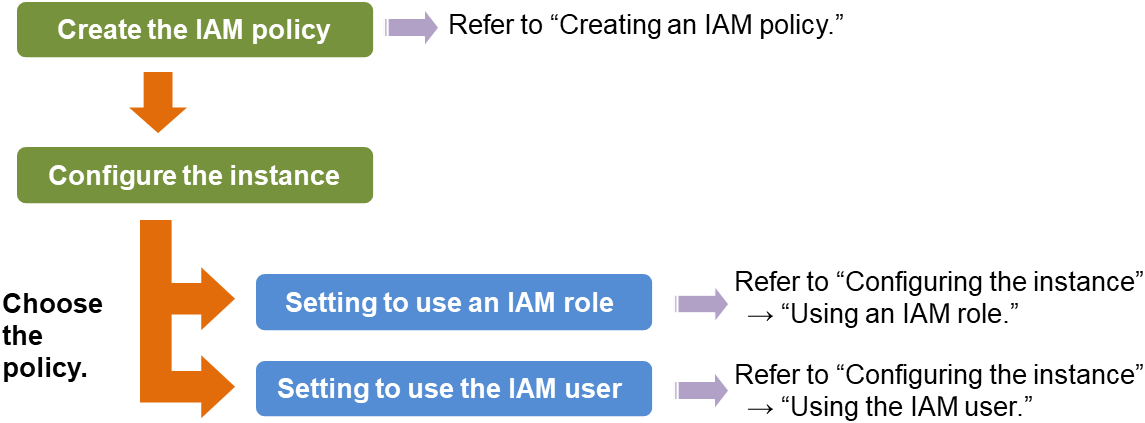
8. Configuring the IAM
There are two methods to grant access permissions to the AWS CLI: the policy to use an IAM role and the policy to use an IAM user. NEC recommends the policy to use an IAM role because it is unnecessary to store the AWS access key ID and AWS secret access key in each instance in principle, enhancing the security.
The following table describes the advantages and disadvantages of both policies.
Advantages |
Disadvantages |
|
|---|---|---|
Policy to use an IAM role |
High security
Easy to manage key information.
|
None. |
Policy to use an IAM user |
Available to set access permissions to an individual instance later |
High risk of key information disclosure
Complicated to manage key information
|
The procedure to configure the IAM is as follows:
8.1. Creating an IAM policy
Create a policy in which access permissions granted to the actions for the services such as EC2 and S3 of AWS are described. Access permissions need to be granted to the following actions so that the AWS related resources and monitor resources of EXPRESSCLUSTER run the AWS CLI.
The required policies may be changed in future.
AWS Virtual IP resource and AWS Virtual IP monitor resource
Action
Description
ec2:DescribeNetworkInterfacesec2:DescribeVpcsec2:DescribeRouteTablesRequired to obtain information of a VPC, route table, and network interface.
ec2:ReplaceRoute
Required to update a route table.
AWS Elastic IP resource and AWS Elastic IP monitor resource
Action
Description
ec2:DescribeNetworkInterfacesec2:DescribeAddressesRequired to obtain information of an EIP and network interface.
ec2:AssociateAddress
Required to assign an EIP to an ENI.
ec2:DisassociateAddress
Required to deassign an EIP from an ENI.
AWS DNS resource/AWS DNS monitor resource
Action
Description
Route 53:ChangeResourceRecordSets
Required to add/delete a resource record set and update the setting details.
Route 53:ListResourceRecordSets
Required to obtain the information of a resource record set.
AWS AZ monitor resource
Action
Description
ec2:DescribeAvailabilityZones
Required to obtain information of an AZ.
In the following custom policy example, access permissions are granted to all actions to be used by the AWS-related resources and monitor resources.
{
    "Version": "2012-10-17",
    "Statement": [
    {
        "Action": [
            "ec2:Describe*",
            "ec2:ReplaceRoute",
            "ec2:AssociateAddress",
            "ec2:DisassociateAddress",
            "route53:ChangeResourceRecordSets",
            "route53:ListResourceRecordSets"
        ],
        "Effect": "Allow",
        "Resource": "*"
    }
    ]
}
-> To create a custom policy, select Policies > Create Policy on the IAM Management console.
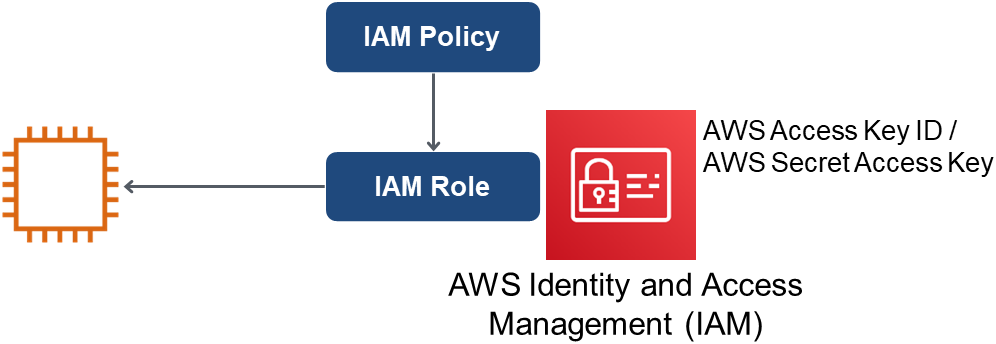
8.2. Configuring the instance
Using an IAM role
Create an IAM role and assign the created IAM role to an instance to run the AWS CLI.
Create an IAM role. Attach the IAM policy to the created role.
-> To create an IAM role, select Roles > Create New Role on the IAM Management console.
When creating an instance, specify the created IAM role for IAM Role.
Log on to the instance.
Install Python.
Install Python required by EXPRESSCLUSTER.First, confirm that Python is installed.If Python has not been installed, install it by using a command such as yum.The installation path of the python commands must be any of the following:/sbin, /bin, /usr/sbin, /usr/binInstall the AWS CLI.
Install the AWS CLI by running the pip command from a shell.
$ pip install awscliFor details about the pip command, refer to the following:The installation path of the AWS CLI must be any of the following:/sbin, /bin, /usr/sbin, /usr/bin, /usr/local/binFor details about how to set up the AWS CLI, refer to the following:(If EXPRESSCLUSTER has been installed before installing Python or the AWS CLI, be sure to restart the OS before using EXPRESSCLUSTER.)Run the following command from the shell.
$ sudo aws configureEnter information such as the AWS access key to the inquiries.
The settings to be specified vary depending on whether an IAM role is assigned to the instance or not.
AWS Access Key ID [None]: (Press Enter without entering anything.)
AWS Secret Access Key [None]: (Press Enter without entering anything.)
Default region name [None]: <default region name>
Default output format [None]: text
If you specified incorrect settings, delete the directory
/root/.awsentirely, and specify the above settings again.
Using an IAM user
Create an IAM user and store the access key ID and secret access key of the created user in an instance to run the AWS CLI. It is not required to assign the created IAM role to an instance to be created.
Create an IAM user. Attach the IAM policy to the created user.
-> To create an IAM user, select Users > Create New Users on the IAM Management console.
Log on to the instance.
Install Python.
Install Python required by EXPRESSCLUSTER.First, confirm that Python is installed.If Python has not been installed, install it by using a command such as yum.The installation path of the python commands must be any of the following:/sbin, /bin, /usr/sbin, /usr/binInstall the AWS CLI.
Install the AWS CLI by running the pip command from a shell.
$ pip install awscliFor details about the pip command, refer to the following:The installation path of the AWS CLI must be any of the following:/sbin, /bin, /usr/sbin, /usr/bin, /usr/local/binFor details about how to set up the AWS CLI, refer to the following:(If EXPRESSCLUSTER has been installed before installing Python or the AWS CLI, be sure to restart the OS before using EXPRESSCLUSTER.)Run the following command from the shell.
$ sudo aws configureEnter the information required to run the AWS CLI to the inquiries. For the AWS access key ID and AWS secrete access key, enter those obtained from the IAM use detailed information window.
AWS Access Key ID [None]: <AWS access key ID>
AWS Secret Access Key [None]: <AWS secret access key>
Default region name [None]: <default region name>
Default output format [None]: text
If you specified incorrect settings, delete the directory
/root/.awsentirely, and specify the above settings again.

9. Troubleshooting
This chapter describes the points to be checked and solutions if EXPRESSCLUSTER cannot be set up in the AWS environment.
Failed to start a resource or monitor resource related to AWS.
Confirm that the OS has restarted, Python and the AWS CLI are installed, and the AWS CLI has been set up correctly.
If the OS has been restarted when installing EXPRESSCLUSTER, the environment variable settings might be changed by installing Python and the AWS CLI. In this case, restart the OS again.
Failed to start the AWS Virtual IP resource.
- Cluster WebUI message
Activating awsvip1 resource has failed.(99 : Internal error. (status=nn))
- Possible cause
Any of the following might be the cause.
Python has not been installed, or the path does not reach python.
The AWS CLI has not been installed, or the path does not reach AWS CLI.
- Solution
Confirm that Python or the AWS CLI is installed.
- The installation path of the python commands must be any of the following:
/sbin, /bin, /usr/sbin, /usr/bin - The installation path of the AWS CLI must be any of the following:
/sbin, /bin, /usr/sbin, /usr/bin, /usr/local/bin
- Cluster WebUI message
- Possible cause
Any of the following might be the cause.
The AWS CLI has not been set up. (aws configure has not been run.)
The specified AWS CLI settings (such as a region, access key ID, and secret key) are not correct.
The specified VPC ID or ENI ID is invalid.
The regional endpoint has been stopped due to maintenance or failure.
An issue of the communication path to the regional endpoint.
Delay caused by the heavily loaded node.
- Solution
Check the following:
Correct the AWS CLI settings. Then confirm that the AWS CLI works successfully.
When the node is heavily loaded, remove the causes.
For an operation using an IAM role, check the settings on the AWS Management Console.
- Cluster WebUI message
- Possible cause
The specified VPC ID might not be correct or might not exist.
- Solution
Specify a correct VPC ID.
- Cluster WebUI message
- Possible cause
The specified ENI ID might not be correct or might not exist.
- Solution
Specify a correct ENI ID.
- Cluster WebUI message
- Possible cause
If the ReplaceRoute right of an IAM role can be exercised only on a route table specified in a resource in the IAM policy, the route table might have an error or lack of its settings.
- Solution
- Cluster WebUI message
- Possible cause
Any of the following might be the cause:
The AWS CLI command might not be able to communicate with the regional endpoint, due to a misconfiguration of the route table, NAT, or proxy server.
Delay caused by the heavily loaded node.
- Solution
Check the following:
The instance for NAT is running.
The routing for the NAT instance has been set up.
The packet is not excluded by filtering.
Check the settings of the route table, NAT, or proxy server.
When the node is heavily loaded, remove the causes.
- Cluster WebUI message
- Possible cause
The specified VIP address is not appropriate because it is within of the VPC CIDR range.
- Solution
Specify an IP address out of the VPC CIDR range as the VIP address.
The AWS Virtual IP resource is running normally, but ping cannot reach the VIP address.
- Cluster WebUI message
-- Possible cause
Source/Dest. Check of the ENI set to the AWS Virtual IP resource is enabled.
- Solution
Disable Source/Dest. Check of the ENI set to the AWS Virtual IP resource.
The AWS Virtual IP monitor resource enters the error state.
- Cluster WebUI message
Detected an error in monitoring awsvipw1. (8 : The routing for VIP vvv.www.xxx.yyy was changed.)
- Possible cause
In the route table, the target of the VIP address corresponding to the AWS Virtual IP resource has been changed to another ENI ID for some reason.
- Solution
- When an error is detected, the AWS Virtual IP resource is restarted automatically and the target is updated to a correct ENI ID.Check whether another HA cluster uses the same VIP address mistakenly and so on.
Failed to start the AWS Elastic IP resource.
- Cluster WebUI message
Activating awseip1 resource has failed.(99 : Internal error. (status=nn))
- Possible cause
Any of the following might be the cause.
Python has not been installed, or the path does not reach python.
The AWS CLI has not been installed, or the path does not reach AWS CLI.
- Solution
Check the following:
Confirm that Python or the AWS CLI is installed.
- The installation path of the python commands must be any of the following:
/sbin, /bin, /usr/sbin, /usr/bin - The installation path of the AWS CLI must be any of the following:
/sbin, /bin, /usr/sbin, /usr/bin, /usr/local/bin
- Cluster WebUI message
- Possible cause
Any of the following might be the cause:
The AWS CLI has not been set up. (aws configure has not been run.)
The specified AWS CLI settings (such as a region, access key ID, and secret key) are not correct.
The specified EIP Allocation ID or ENI ID is invalid.
The regional endpoint has been stopped due to maintenance or failure.
An issue of the communication path to the regional endpoint.
Delay caused by the heavily loaded node.
- Solution
Check the following:
Correct the AWS CLI settings. Then confirm that the AWS CLI works successfully.
When the node is heavily loaded, remove the causes.
For an operation using an IAM role, check the settings on the AWS Management Console.
- Cluster WebUI message
- Possible cause
The specified EIP Allocation ID might not be correct or might not exist.
- Solution
Specify a correct EIP Allocation ID.
- Cluster WebUI message
- Possible cause
The specified ENI ID might not be correct or might not exist.
- Solution
Specify a correct ENI ID.
- Cluster WebUI message
- Possible cause
Any of the following might be the cause:
The AWS CLI command might not be able to communicate with the regional endpoint, due to a misconfiguration of the route table, NAT, or proxy server.
Delay caused by the heavily loaded node.
- Solution
Check the following:
Confirm that a public IP is assigned to each instance.
Confirm that the AWS CLI works normally in each instance.
Check the settings of the route table, NAT, or proxy server.
When the node is heavily loaded, remove the causes.
The AWS Elastic IP monitor resource enters the error state.
- Cluster WebUI message
Detected an error in monitoring awseipw1. (7 : The EIP address does not exist. (EIP ALLOCATION ID=eipalloc-xxxxxxxx))
- Possible cause
The specified ENI ID and elastic IP have been deassociated for some reason.
- Solution
- When an error is detected, the AWS Elastic IP resource is restarted automatically and the specified ENI ID and elastic IP are associated.Check whether another HA cluster uses the same EIP allocation ID mistakenly and so on.
Fails to start the AWS DNS resource.
- Cluster WebUI message
Activating awsdns1 resource has failed.(99 : Internal error. (status=nn))
- Possible cause
Any of the following might be the cause:
Python has not been installed, or the path does not reach python.
The AWS CLI has not been installed, or the path does not reach AWS CLI.
- Solution
Check the following:
Confirm that Python or the AWS CLI is installed.
- The installation path of the python commands must be any of the following:
/sbin, /bin, /usr/sbin, /usr/bin - The installation path of the AWS CLI must be any of the following:
/sbin, /bin, /usr/sbin, /usr/bin, /usr/local/bin
- Cluster WebUI message
- Possible cause
Any of the following might be the cause:
The AWS CLI has not been set up (aws configure has not been started).
Incorrect values are set in AWS CLI configuration (e.g. region, accesskey, secret key etc.).
The specified resource record set is invalid.
The regional endpoint has been stopped due to maintenance or failure.
An issue of the communication path to the regional endpoint.
Delay caused by the heavily loaded node.
Route 53 cannot be accessed or does not respond.
No VPC to which the HA instance belongs is added to a VPC targeted in the hosted zone of Route 53.
DNS name resolution is not enabled in the VPC to which the HA instance belongs.
The value of Resource Record Set Name is specified in capital letters.
# aws route53 list-resource-record-sets --hosted-zone-id <hosted-zone ID>If the error message "Could not connect to the endpoint URL" appears, the possible cause is either of the following:- If you are using a VPC endpoint, which does not support the Route 53 service, AWS DNS resources/monitor resources are unavailable.- If you are not using a VPC endpoint, there may be some issue of the AWS configuration.- Solution
Check the following:
Correct the AWS CLI settings. Then confirm that the AWS CLI works successfully.
When the node is heavily loaded, remove the causes.
In applicable Hosted Zone of the Route 53 Management Console, check that the necessary VPC is added to Associated VPC.
On the VPC Management Console, check that enableDnsSupport is enabled in the properties of the current VPC. If enableDnsSupport is intentionally disabled, set an appropriate DNS resolver for the record set added in the AWS DNS resource by the instance.
Specify the value of Resource Record Set Name in lowercase letters.
If you are using a VPC endpoint, consider changing to any of the following methods: a NAT gateway, NAT instance, or proxy server. If you are not using a VPC endpoint, consult AWS.
For an operation using an IAM role, check the settings on the AWS Management Console.
- Cluster WebUI message
- Possible cause
Specified Host Zone ID may not be correct or exist.
- Solution
pecify the correct Host Zone ID.
- Cluster WebUI message
- Possible cause
Any of the following might be the cause:
The AWS CLI command might not be able to communicate with the regional endpoint, due to a misconfiguration of the route table, NAT, or proxy server.
Delay caused by the heavily loaded node.
Delayed processing on the Route 53 endpoint side.
Delayed access to the instance metadata by the AWS CLI.
- Solution
Check the following:
If the NAT instance is running.
If the routing for the NAT instance has been configured properly.
If the packets are not blocked by filtering.
Check the settings of the route table, NAT, or proxy server.
When the node is heavily loaded, remove the causes.
# aws route53 list-resource-record-sets
Despite the normal operation of the AWS DNS resource, it takes time to resolve names on clients.
- Cluster WebUI message
-
- Possible cause
Any of the following might be the cause:
- Due to the specification of Route 53, it takes up to 60 seconds to propagate its settings to all the authoritative servers. Refer to the following:Amazon Route 53 FAQsQ. How quickly will changes I make to my DNS settings on Amazon Route 53 propagate globally?
The OS-side resolver takes time.
- During a failover, the AWS DNS resource takes time to delete and create resource record sets.If the Delete a resource record set at deactivation checkbox is checked: A resource record set deleted on a failover source with the AWS DNS resource deactivated is created on a failover destination with the AWS DNS resource activated. This may delay name resolution.If the checkbox is not checked: No resource record set is deleted even with the AWS DNS resource deactivated or with the cluster stopped, and only the IP address of the corresponding resource record set is updated. This may shorten the time before names can be resolved. Even after the AWS DNS resource is deactivated or the cluster is stopped, names are resolved.
A large value of TTL for the AWS DNS resource.
- A small value of Start Monitor Wait Time for the AWS DNS monitor resource.If a name resolution is tried prior to the completion of Route 53 change propagation, the DNS returns NXDOMAIN (non-existing domain). In this case, the name resolution fails until the valid period of the negative cache expires.Therefore, with Start Monitor Wait Time set at a small value, a name resolution may take a long time.
- Solution
Check the following:
Review the settings of the OS-side resolver.
Uncheck the Delete a resource record set at deactivation checkbox of the AWS DNS resource.
Set TTL at a smaller value for the AWS DNS resource.
Set Start Monitor Wait Time at an allowable large value for the AWS DNS monitor resource.
The AWS DNS monitor resource enters the error state.
- Cluster WebUI message
Detected an error in monitoring awsdnsw1. (7 : The resource record set in Amazon Route 53 does not exist.)
- Possible cause
Any of the following might be the cause:
In the Host Zone, the resource record set corresponding to the AWS DNS resource has been deleted for some reason.
- Immediately after the AWS DNS resource is activated, if the AWS DNS monitor resource starts monitoring prior to the propagation of changed DNS settings in Route 53, the monitoring fails due to inability in resolving names. Refer to the following:
Of the IAM policy, the following is not set: route53:ChangeResourceRecordSets and route53:ListResourceRecordSets. Refer to "8.1. Creating an IAM policy".
No VPC to which the HA instance belongs is added to a VPC targeted in the hosted zone of Route 53.
- Solution
Check the following:
No other HA clusters use the same resource record set by mistake. (If used, that is a cause of the deleted resource record set.)
The value of Start Monitor Wait Time of the AWS DNS monitor resource is set larger than that of the time to propagate changed DNS settings in Route 53.
The following is set in the IAM policy: route53:ChangeResourceRecordSets and route53:ListResourceRecordSets.
In applicable Hosted Zone of the Route 53 Management Console, the necessary VPC is added to Associated VPC.
- Cluster WebUI message
- Possible cause
In the Host Zone, the IP address of resource record set corresponding to the AWS DNS resource has been changed for some reason.
- Solution
Resource record set may have been deleted when another HA cluster uses the same resource record set by mistake.
- Cluster WebUI message
- Possible cause
The name resolution using the DNS name registered in the hosted zone as resource record set failed.
- Solution
Check the following:
If the resolver settings are correct.
If the network settings are correct.
If the domain query is set to refer to Amazon Route 53 name server (NS) based on the NS record setting of registrar when Public Host Zone is used.
- Cluster WebUI message
- Possible cause
The IP address obtained by name resolution check with the DNS name registered in the Hosted Zone as the resource record set is not correct.
- Solution
Check the following:
If the resolver setting is correct.
If there are no entries related to the DNS name in the hosts file.
The AWS DNS monitor resource enters the warning or error state.
- Cluster WebUI message
- [Warning]
Warn monitoring awsdnsw1. (106 : Timeout occurred.)
- [Error]
Detected an error in monitoring awsdnsw1. (6 : Timeout occurred.)
- Possible cause
Any of the following might be the cause:
The AWS CLI command might not be able to communicate with the regional endpoint, due to a misconfiguration of the route table, NAT, or proxy server.
Delay caused by the heavily loaded node.
Delayed processing on the Route 53 endpoint side.
Delayed access to the instance metadata by the AWS CLI.
- Solution
Check the following:
If the NAT instance is running.
If the routing for the NAT instance has been configured properly.
If the packets are not blocked by filtering.
Check the settings of the route table, NAT, or proxy server.
- The value of Timeout for Monitor (common) in the AWS environment is set at or larger than that of the time required for running the AWS CLI. Measure the required time by manually executing the AWS CLI. The AWS DNS monitor resource runs the following AWS CLI:
# aws route53 list-resource-record-sets - For an operation using an IAM role: When running the AWS CLI, the AWS DNS resource and monitor resource of EXPRESSCLUSTER acquires credentials (such as an access key ID) from the instance metadata.Check if access to the instance metadata is not delayed, by manually determining the time required for executing the commands below.If running either of the commands is delayed, the access to the instance metadata is delayed.If the delay is confirmed, allow an IAM user to access the instance metadata--by running the aws configure command to add the settings of the access key ID and secret access key to each of the cluster nodes. This may reduce the occurrence of timeouts.- On each of the cluster nodes, run the curl command or use a browser to access the URL: http://169.254.169.254/latest/meta-data/- On any of the cluster nodes, run the command: aws configure list
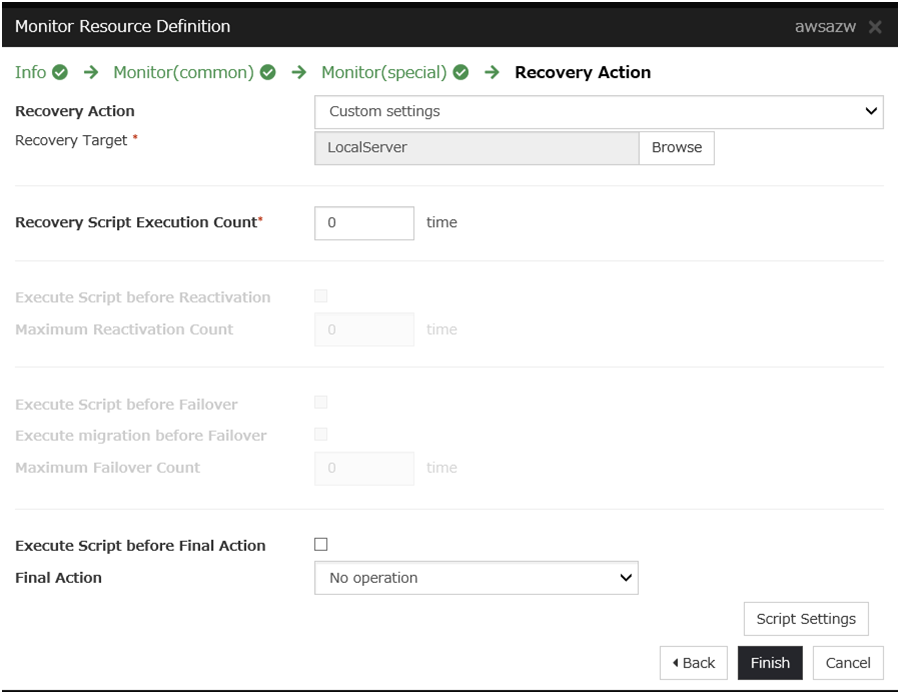
The AWS AZ monitor resource enters the warning or error state.
- Cluster WebUI message
- [Warning]
Warn monitoring awsazw1. (105 : Failed in the AWS CLI command.)
- [Error]
Detected an error in monitoring awsazw1. (5 : Failed in the AWS CLI command.)
- Possible cause
Any of the following might be the cause:
The AWS CLI has not been set up. (aws configure has not been run.)
- The AWS CLI configuration file could not be found. (A user other than root ran aws configure, or A user without sudo ran aws configure.)Search for a credentials file and a config file by the following order (in case of policy for which the IAM user is used).1) $HOME/.aws follower2) /root/.aws follower
The specified AWS CLI settings (such as a region, access key ID, and secret key) are not correct.
- (For an operation using an IAM role) An IAM role has not been set to the instance.Access the URL below from the corresponding instance and then check whether the given IAM role name is displayed. If the message "404 Not Found" appears, no IAM role has been set.
The specified AZ is invalid.
The regional endpoint has been stopped due to maintenance or failure.
An issue of the communication path to the regional endpoint.
Delay caused by the heavily loaded node.
- Solution
Check the following:
Correct the AWS CLI settings. Then confirm that the AWS CLI works successfully.
When the node is heavily loaded, remove the causes.
If the warning frequently appears, it is recommended to change to Disable recovery action (Display warning). Even if you do it, it is possible to detect errors except those caused by delayed response and by failure in running the AWS CLI on the monitor resource.
For an operation using an IAM role, check the settings on the AWS Management Console.
- Cluster WebUI message
- [Warning]
- [Error]
- Possible cause
The specified AZ might not be correct or might not exist.
- Solution
Specify a correct AZ.
- Cluster WebUI message
- [Warning]
- [Error]
- Possible cause
Any of the following might be the cause:
The AWS CLI command might not be able to communicate with the regional endpoint, due to a misconfiguration of the route table, NAT, or proxy server.
Delay caused by the heavily loaded node.
- Solution
Check the following:
The NAT instance is running.
The routing for the NAT instance has been set up.
The packet is not excluded by filtering.
Check the settings of the route table, NAT, or proxy server.
# aws ec2 describe-availability-zonesIf When the node is heavily loaded, remove the causes.