1. Preface
1.1. Who Should Use This Guide
The HA Cluster Configuration Guide for Google Cloud Platform (Windows) is intended for administrators who want to build a cluster system, and for system engineers and maintenance personnel who provide user support.
The software and setup examples introduced in this guide are for reference only, and the software is not guaranteed to run.
1.2. Scope of application
For information on the system requirements, see "Getting Started Guide" -> "Installation requirements for EXPRESSCLUSTER".
This guide contains product- and service-related information (e.g., screenshots) collected at the time of writing this guide. For the latest information, which may be different from the content in this guide, refer to corresponding websites and manuals.
1.3. How This Guide is Organized
"3. Operating Environments ": Describes the tested operating environment of this function.
"4. Cluster Creation Procedure (for an HA Cluster with an Internal TCP Load Balancer)": Describes how to create an HA cluster involving an internal TCP load balancer.
"5. Error Messages": Describes the error messages and solutions.
"6. Notes and Restrictions ": Describes the notes and restrictions on creating and operating a cluster.
1.4. EXPRESSCLUSTER X Documentation Set
The EXPRESSCLUSTER X manuals consist of the following four guides. The title and purpose of each guide is described below:
EXPRESSCLUSTER X Getting Started Guide
This guide is intended for all users. The guide covers topics such as product overview, system requirements, and known problems.
EXPRESSCLUSTER X Installation and Configuration Guide
This guide is intended for system engineers and administrators who want to build, operate, and maintain a cluster system. Instructions for designing, installing, and configuring a cluster system with EXPRESSCLUSTER are covered in this guide.
EXPRESSCLUSTER X Reference Guide
This guide is intended for system administrators. The guide covers topics such as how to operate EXPRESSCLUSTER, function of each module and troubleshooting. The guide is supplement to the Installation and Configuration Guide.
EXPRESSCLUSTER X Maintenance Guide
This guide is intended for administrators and for system administrators who want to build, operate, and maintain EXPRESSCLUSTER-based cluster systems. The guide describes maintenance-related topics for EXPRESSCLUSTER.
1.5. Conventions
In this guide, Note, Important, See also are used as follows:
Note
Used when the information given is important, but not related to the data loss and damage to the system and machine.
Important
Used when the information given is necessary to avoid the data loss and damage to the system and machine.
See also
Used to describe the location of the information given at the reference destination.
The following conventions are used in this guide.
Convention |
Usage |
Example |
|---|---|---|
Bold |
Indicates graphical objects, such as text boxes, list boxes, menu selections, buttons, labels, icons, etc. |
Click Start.
Properties dialog box
|
Angled bracket within the command line |
Indicates that the value specified inside of the angled bracket can be omitted. |
|
> |
Prompt to indicate that a Windows user has logged on as root user. |
|
Monospace |
Indicates path names, commands, system output (message, prompt, etc.), directory, file names, functions and parameters. |
|
bold |
Indicates the value that a user actually enters from a command line. |
Enter the following:
> clpcl -s -a |
|
Indicates that users should replace italicized part with values that they are actually working with. |
|
 In the figures of this guide, this icon represents EXPRESSCLUSTER.
2. Overview
2.1. Functional overview
Region
On GCP, a region is a division: a physical and logical unit (like New York and London).It is possible to build all nodes in a single region. However, a network failure or a natural disaster may make all of them crash to prevent the business from continuing.To increase availability, distribute nodes to multiple regions.A region is a group of zones.Zone
On GCP, a zone is a logical group to which each node can be distributed.By distributing each node to a different zone, you can minimize the effects of planned GCP maintenance and those of unplanned maintenance due to a physical hardware failure.
2.2. Basic configuration
Purpose |
EXPRESSCLUSTER resource to be chosen |
Necessary GCP service |
|---|---|---|
Accessing the cluster at a virtual/internal IP address from a client |
Google Cloud virtual IP resource |
Internal TCP load balancing |
HA cluster with a load balancer
For virtual machines in a GCP environment, client applications can use a virtual IP (VIP) address to access nodes that constitute a cluster. Using the VIP address eliminates the need for the clients to be aware of switching between the virtual machines even after a failover or a group migration occurs.As Fig. 2.1 HA cluster with an internal TCP load balancer shows, the cluster in the GCP environment can be accessed by specifying the VIP address (front-end IP address for Cloud Load Balancing) of the GCP load balancer (for Cloud Load Balancing).The GCP load balancer switches between the active server and the standby server, with its health check. The health check is performed through a port provided by the Google Cloud virtual IP resource.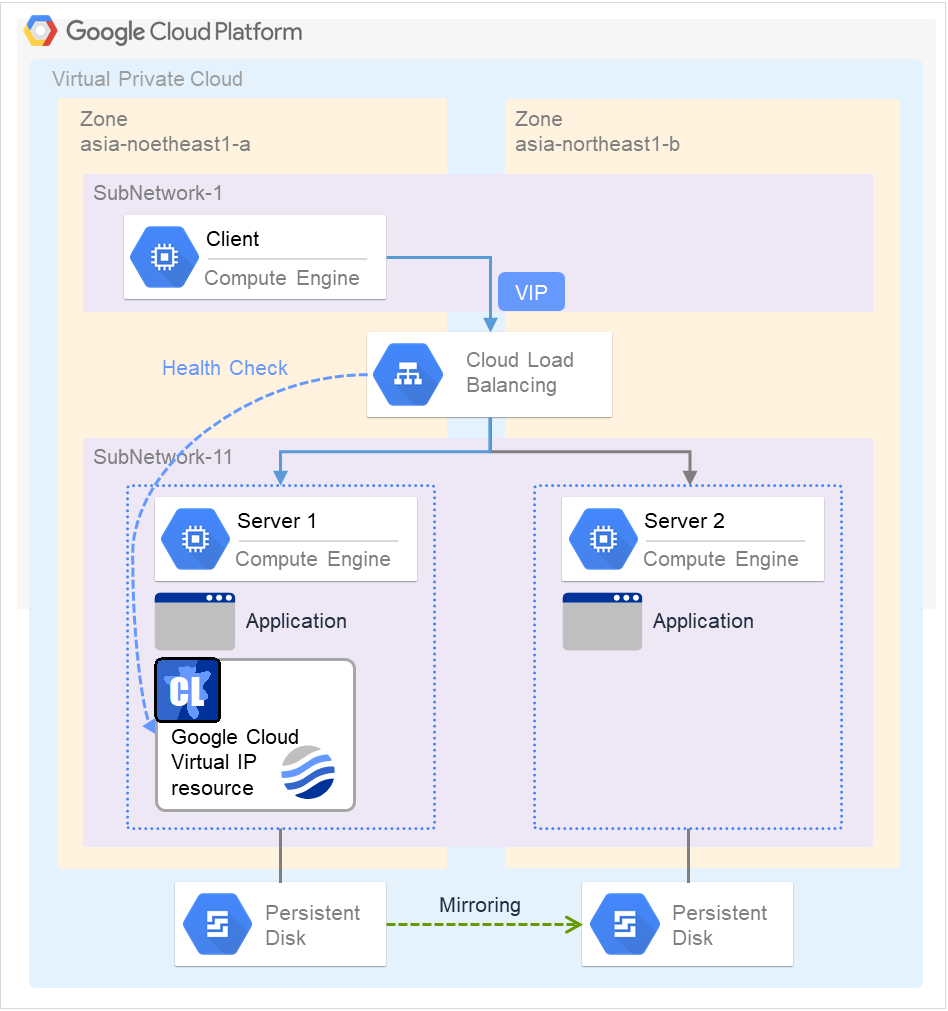
Fig. 2.1 HA cluster with an internal TCP load balancer
SubNetwork-1
10.0.1.0/24
IP Address (Client)
10.0.1.200
Virtual IP Address (VIP)
10.0.1.100
SubNetwork-11
10.0.11.0/24
IP Address (Server1)
10.0.11.101
IP Address (Server2)
10.0.11.102
Health Check Port
12345
For more information on Cloud Load Balancing, refer to the following:Cloud Load Balancing:The following is an example of an HA cluster with a load balancer:
Purpose
Load balancer to be used
Creation procedure
Sharing business within the GCP network
Internal TCP load balancer
See "4. Cluster Creation Procedure (for an HA Cluster with an Internal TCP Load Balancer)" of this guide.
An HA cluster configuration with a load balancer requires the following resources and monitor resources.For a network partition resolution resource, which is not set in this guide, see "2.3. Network partition resolution" to determine how it should be depending on your system configuration.
Resource/monitor resource
Description
Setting
Google Cloud virtual IP resource
Required
Google Cloud virtual IP monitor resource
Performs alive monitoring of a control process to be started in activating a Google Cloud virtual IP resource, for the node where the Google Cloud virtual IP resource is started.
Required
Google Cloud load balance monitor resource
Checks whether the same port as that for the health check is opened, for a node where the Google Cloud virtual IP resource is not started.
Required
Other resources and monitor resources
Depends on the configuration of the application (such as a mirror disk) to be used in the HA cluster.
Optional
2.3. Network partition resolution
Virtual machines constituting an HA cluster mutually perform alive monitoring with heartbeat.If heartbeat ceases with each virtual machine existing on a different subnet, an undesirable event (such as double-launching a service) occurs.Its prevention requires determining whether any of the virtual machines has been isolated from the network, in a network partition (NP) state, or another virtual machine has crashed.The NP resolution feature pings a device which always operates and is expected to respond. If there is no reply, the feature considers the device to be in an NP state and takes a specified measure (such as warning, recovery, and server shutdown).The target and method of NP resolution needs to be individually considered, in accordance with the locations of clients accessing the cluster system and with the conditions for connecting to an on-premise environment (e.g. using a leased line).There is no recommended target or method of NP resolution.For more information on NP resolution, refer to the following:
4. Cluster Creation Procedure (for an HA Cluster with an Internal TCP Load Balancer)
4.1. Creation example
This guide describes how to create a two-node, uni-directional standby cluster with EXPRESSCLUSTER.Through this procedure, you are to create an HA cluster accessible from clients within the same VPC network on GCP.This procedure is intended to create a mirror-disk type configuration in which server1 is used as the active server.The following tables list parameters which do not have their default values, and parameters whose values are changed from their default values.Of the firewall rules, IP range is necessary for allowing communication from the GCP health check system (130.211.0.0/22, 35.191.0.0/16).
GCP settings (common to server1 and server2)
Item
Value
Configuration of the VPC network
Name
test-vpc
New subnet (name)
subnetwork-1, subnetwork-11
New subnet (region)
asia-northeast1
New subnet (IP address range)
10.0.1.0/24, 10.0.11.0/24
Configuration of the firewall rules
Name
test-allow-health-check
Network
test-vpc
Traffic direction
Upstream
Action in response to agreement
Allow
Target
Specified target tag
Target tag
test-allow-health-check
Source filter
IP range
Source IP range
130.211.0.0/22, 35.191.0.0/16
Specified protocol and port
Allow all
Configuration of the load balancer
Type
TCP load balancing
For internet connection or private use
Only between VMs
Multi- or mono-region
Only mono-region
Name
test-lb
Configuration of the load balancer (back end)
Region
asia-northeast1
Network
test-vpc
Instance group
test-ig-a, test-ig-b
Health check (name)
test-health-check
Health check (protocol)
TCP
Health check (port)
12345
Health check (proxy protocol)
None
Session affinity
None
Configuration of the load balancer (front end)
Name
test-frontend
Subnetwork
subnetwork-1
Internal IP address
10.0.1.100
Port
80 (number of the port through which the application is available)
GCP settings (to be set separately on server1 and server2)
Item
Value
server1
server2
Configuration of the instances
Region
asia-northeast1
asia-northeast1
Zone
asia-northeast1-a
asia-northeast1-b
New disk
server1-datadisk-0
server2-datadisk-0
Configuration of the instance groups
Name
test-ig-a
test-ig-b
Group type
Unmanaged instance group
Unmanaged instance group
Region
asia-northeast1
asia-northeast1
Zone
asia-northeast1-a
asia-northeast1-b
Network
test-vpc
test-vpc
Subnetwork
subnetwork-11
subnetwork-11
VM instance
server1
server2
Network configuration
Network
test-vpc
test-vpc
Subnetwork
subnetwork-11
subnetwork-11
Internal IP address
10.0.11.101
10.0.11.102
EXPRESSCLUSTER settings (cluster properties)
Item
Value
server1
server2
Cluster name
Cluster1
Cluster1
Server name
server1
server2
EXPRESSCLUSTER settings (failover group)
Resource name
Item
Value
Mirror disk resource
Resource name
md
Mirror disk resource
Details tab - drive letter of the data partition
G:
Mirror disk resource
Details tab - drive letter of the cluster partition
F:
Google Cloud virtual IP resource
Resource name
gcvip1
Google Cloud virtual IP resource
Port number
12345: as specified for Health check (port)
EXPRESSCLUSTER settings (monitor resource)
Monitor resource name
Item
Value
Mirror disk monitor resource
Monitor resource name
mdw1
Google Cloud virtual IP monitor resource
Monitor resource name
gcvipw1
Google Cloud virtual IP monitor resource
Recovery target
gcvip1
Google Cloud load balance monitor resource
Monitor resource name
gclbw1
Google Cloud load balance monitor resource
Recovery target
gcvip1
4.2. Configuring GCP
Creating the VPC network
Access GCP Console (https://console.cloud.google.com/).Create the VPC network and subnets.For more information on the procedure, refer to the following:Using VPC networks:
Creating the instances
Create each of the instances based on a public image.During this creation, add a secondary disk for the mirror disk (cluster partition and data partition).Create as many instances as the number of virtual machines constituting the cluster.For more information on the procedure, refer to the following:How-to guides:
Configuring the instances
Access and log in to the created instances (server1 and server2).For more information on the procedure, refer to the following:Connecting to VMs:Next, set the partitions for the mirror disk resource.Create the cluster partition and data partition on the secondary disk added to the instance.For more information on setting the partitions for the mirror disk resource, refer to the following:
Creating the firewall rules
Create the firewall rules for allowing communication from the GCP health check system (130.211.0.0/22, 35.191.0.0/16), where the health check is to be performed by the load balancer to the instance.In addition, add the target tag to the network tag of the instances (server1 and server2).For more information on the procedure, refer to the following:Using firewall rules:Creating health checks:
Creating the instance groups
Create the instance groups to be specified as the back ends of Cloud Load Balancing. To the group, add the instances (server1 and server2).For more information on the procedure, refer to the following:Creating groups of unmanaged instances:
Creating the load balancer
Create the load balancer. Select TCP Load Balancing.For more information on the procedure, refer to the following:Setting up a network load balancer with a target pool:Next, configure the back end and the front end.For Ports of the front end, specify the number of the port through which the application is available.For more information on the procedure, refer to the following:Setting up Internal TCP/UDP Load Balancing:
Adjusting the OS startup time, verifying the network settings, verifying the firewall settings, synchronizing the server clock, and turning off the power-saving function
For information on each of the procedures, refer to the following:
Installing EXPRESSCLUSTER
For information on the procedure, refer to the following document. After completing the installation, reboot the OS.
Registering the EXPRESSCLUSTER license
For information on the procedure, refer to the following document:
4.3. Configuring EXPRESSCLUSTER
For information on how to set up and access Cluster WebUI, refer to the following:
This section describes how to add the following resources and monitor resources:
Mirror disk resource
Google Cloud virtual IP resource
Google Cloud virtual IP monitor resource
Google Cloud load balance monitor resource
For information on other settings, refer to the following:
Creating a cluster
To create a cluster, start the cluster generation wizard first.
Creating a cluster
Adding group resources
Defining a group
Create a failover group.
Mirror disk resource
Create a mirror disk resource.For more information, refer to the following:
Google Cloud virtual IP resource
With EXPRESSCLUSTER used on GCP, this resource provides a mechanism for awaiting access from the load balancer to a specific port for the alive monitoring--over the port, an application works on a node.For more information on the Google Cloud virtual IP resource, refer to the following:
Adding monitor resources
Google Cloud virtual IP monitor resource
This monitor resource provides a mechanism for monitoring the alive-monitoring port, for the node where the Google Cloud virtual IP resource is started.Adding one Google Cloud virtual IP resource automatically creates one Google Cloud virtual IP monitor resource.For more information, refer to the following:Google Cloud load balance monitor resource
This monitor resource provides a mechanism for checking whether the same port as that for the health check is opened, for a node where the Google Cloud virtual IP resource is not started.Adding one Google Cloud virtual IP resource automatically creates one Google Cloud load balance monitor resource.For more information, refer to the following:
Applying the settings and starting the cluster
Refer to the following:
4.4. Verifying the created environment
5. Error Messages
For information on error messages of the resources/monitor resources, refer to the following:
"Reference Guide" -> "Error messages"
6. Notes and Restrictions
6.1. HA cluster with a load balancer
6.1.1. Notes on GCP
In designing a performance-oriented system, keep this in mind: GCP tends to increase its performance deterioration rate in multi-tenant cloud environments, compared with that in physical environments or general and virtualized (non-cloud) environments.
6.1.2. Notes on EXPRESSCLUSTER
- GCP's specification requires HTTP-protocol-based legacy health checks for external TCP network load balancing.The Google Cloud virtual IP resource, which supports only TCP-protocol-based health checks, cannot respond to health checks by an external TCP network load balancer.Therefore, use an internal TCP load balancer instead of an external TCP network load balancer, with which and the Google Cloud virtual IP resource the HA cluster cannot be used.Refer to the following:Health checks overview:
- For an HA cluster configuration with an internal TCP load balancer, the HA cluster cannot be accessed from any client which belongs to a region different from that of the HA cluster--due to GCP's specification.Refer to the following:Internal TCP/UDP Load Balancing overview:
- Make the OS startup time longer than the time of Heartbeat Timeout.Refer to the following:
See also:
"Getting Started Guide" -> "Notes and Restriction" -> "Communication port number"
"Getting Started Guide" -> "Notes and Restriction" -> "Setting up Google Cloud virtual IP resources"
"Getting Started Guide" -> "Notes and Restriction" -> "Setting up Google Cloud load balance monitor resources"
"Reference Guide" -> "Notes on Google Cloud Virtual IP resources"
"Reference Guide" -> "Notes on Google Cloud Virtual IP monitor resources"
"Reference Guide" -> "Notes on Google Cloud load balance monitor resources"