9. Troubleshooting
This chapter provides instructions for troubleshooting problems with EXPRESSCLUSTER.
This chapter covers:
9.1. Troubleshooting
The following provides instructions for troubleshooting problems you experience in operating the EXPRESSCLUSTER system.
9.1.1. When the EXPRESSCLUSTER system does not start or end
A cluster system starts working by restarting servers after installing EXPRESSCLUSTER. If your cluster system does not behave properly, check the following:
Registration of cluster configuration data
The cluster configuration data should be registered with all servers (which will form a cluster system) when you cluster them. If the cluster configuration data does not exist in the following path, the data may not be registered yet. Check it is registered.
/opt/nec/clusterpro/etc/clp.conf
If the cluster configuration data does not exist in the above path, see "Creating the Cluster Configuration Data" in the "Installation and Configuration Guide" for registering the data.
Server names and IP addresses in the cluster configuration data
Check the server names and IP addresses are valid.(# hostname,# ifconfig....)License registration
The license may not be registered yet. Run the following command on all servers in the cluster to confirm the license is registered:
# clplcnsc -l -a
See "Managing licenses (clplcnsc command)" in "8.2. EXPRESSCLUSTER commands" in this guide for more information on the above command.
If you are using the trial version license or fixed term license, confirm if it is not expired yet.
EXPRESSCLUSTER service start status
Run the following command to check the settings for starting service of EXPRESSCLUSTER:
For init.d environment:
# chkconfig --list clusterpro
clusterpro 0:off 1:off 2:off 3:on 4:off 5:on 6:off
For systemd environment:
# systemctl is-enabled clusterproCluster process status
Run the following command to check if EXPRESSCLUSTER is working properly:
# ps -ef | grep clp

root 1669    1 0 00:00 ? 00:00:00 clpmonp -event -a 2 -r 0 -w 0
root 1670 1669 0 00:00 ? 00:00:00 clpevent
root 1684    1 0 00:00 ? 00:00:00 clpmonp -trnsv -a 2 -r 0 -w 0
root 1685 1684 0 00:00 ? 00:00:00 clptrnsv
root 1784    1 0 00:00 ? 00:00:00 /opt/nec/clusterpro/bin/clppm
root 1796 1795 0 00:00 ? 00:00:00 clprc
root 1809 1808 0 00:00 ? 00:00:00 clprm
root 1813 1812 0 00:00 ? 00:00:00 clpnm
root 1818 1813 0 00:00 ? 00:00:00 clplanhb
root 1820 1813 0 00:00 ? 00:00:00 clpdiskhb
root 1822 1813 0 00:00 ? 00:00:00 clpcomhb
root 1823 1813 0 00:00 ? 00:00:00 clplankhb
root 1935    1 0 00:00 ? 00:00:00 clpmonp -webmgr -a 2 -o -start -r 0 -w 0
root 1936 1935 0 00:00 ? 00:00:00 clpwebmc -start
root 1947    1 0 00:00 ? 00:00:00 clpmonp -webalert -a 2 -r 0 -w 0
root 1948 1947 0 00:00 ? 00:00:00 clpaltd
If you can check the run statuses of the following processes by executing the ps command, EXPRESSCLUSTER is working properly.
Event process and data transfer process
root 1685 1684 0 00:00 ? 00:00:00 clptrnsv
root 1669    1 0 00:00 ? 00:00:00 clpmonp -event
root 1670 1669 0 00:00 ? 00:00:00 clpevent
root 1684    1 0 00:00 ? 00:00:00 clpmonp -trnsv
If the event process is not started yet, the process manager described in the following section will not start.
Process manager
root 1784 1 0 00:00 ? 00:00:00 /opt/nec/clusterpro/bin/clppm
By starting up this process, the following processes are generated. Therefore, if any error such as error in cluster configuration data file is detected, EXPRESSCLUSTER will not start.
clprcclprmclpnmResource control process:
root 1796 1795 0 00:00 ? 00:00:00 clprc
* This process can start up even if no group resources are registered yet.
Resource monitor process:
root 1809 1808 0 00:00 ? 00:00:00 clprm
* This process can start up even if no monitor resources are registered yet.
Server management process:
root 1813 1812 0 00:00 ? 00:00:00 clpnm
Heartbeat process:
root 1813 1821 0 00:00 ? 00:00:00 clpcomhb
root 1813 1817 0 00:00 ? 00:00:00 clplanhb
root 1813 1819 0 00:00 ? 00:00:00 clpdiskhb
root 1823 1813 0 00:00 ? 00:00:00 clplankhb
If a disk heartbeat resource has been added to the heartbeat resources in the cluster configuration data, clpdiskhb is started. If a COM interface has been added, clpcomhb is started. If a kernel mode LAN heartbeat resource has been added, clplankhb is started.
WebManager process:
root 1936 1935 0 00:00 ? 00:00:00 clpwebmc -start
Alert process:
root 1948 1947 0 00:00 ? 00:00:00 clpaltd
The display style of the ps command may look different from the above depending on the distribution.
Cluster process status ~ For Replicator~
Run the following commands to check if EXPRESSCLUSTER is working properly:
# ps -ef | grep clp

root 1669    1 0 00:00 ? 00:00:00 clpmonp -event -a 2 -r 0 -w 0
root 1670 1669 0 00:00 ? 00:00:00 clpevent
root 1684    1 0 00:00 ? 00:00:00 clpmonp -trnsv -a 2 -r 0 -w 0
root 1685 1684 0 00:00 ? 00:00:00 clptrnsv
root 1696    1 0 00:00 ? 00:00:00 clpmonp -mdagent -a 5 -r 0 -w 30
root 1697 1696 0 00:00 ? 00:00:00 clpmdagent
root 1784    1 0 00:00 ? 00:00:00 /opt/nec/clusterpro/bin/clppm
root 1796 1795 0 00:00 ? 00:00:00 clprc
root 1809 1808 0 00:00 ? 00:00:00 clprm
root 1813 1812 0 00:00 ? 00:00:00 clpnm
root 1818 1813 0 00:00 ? 00:00:00 clplanhb
root 1822 1813 0 00:00 ? 00:00:00 clpcomhb
root 1823 1813 0 00:00 ? 00:00:00 clplankhb
root 1935    1 0 00:00 ? 00:00:00 clpmonp -webmgr -a 2 -o -start -r 0 -w 0
root 1936 1935 0 00:00 ? 00:00:00 clpwebmc -start
root 1947    1 0 00:00 ? 00:00:00 clpmonp -webalert -a 2 -r 0 -w 0
root 1948 1947 0 00:00 ? 00:00:00 clpaltd
If you can check the run statuses of the following processes by executing the ps command, EXPRESSCLUSTER is working properly.
Event process, data transfer process, and mirror agent
root 1696    1 0 00:00 ? 00:00:00 clpmonp --mdagent -a 5 -r 0 -w 30
root 1697 1696 0 00:00 ? 00:00:00 clpmdagent
If the event process is not started yet, the process manager in the following section will not start.
Process manager
root 1784 1 0 00:00 ? 00:00:00 /opt/nec/clusterpro/bin/clppm
By starting up this process, the following processes are generated. Therefore, if any error such as error in cluster configuration data file is detected, EXPRESSCLUSTER will not start.
clprcclprmclpnmResources control process:
root 1796 1795 0 00:00 ? 00:00:00 clprc
* This process can start up even if no group resources are registered yet.
Resource monitor process:
root 1809 1808 0 00:00 ? 00:00:00 clprm
* This process can start up even if no monitor resources are registered yet.
Server management process:
root 1813 1812 0 00:00 ? 00:00:00 clpnm
Heartbeat process:
root 1822 1813 0 00:00 ? 00:00:00 clpcomhb
root 1818 1813 0 00:00 ? 00:00:00 clplanhb
root 1823 1813 0 00:00 ? 00:00:00 clplankhb
If a COM heartbeat resource has been added to the heartbeat resources in the cluster configuration data, clpcomhb is started. If a kernel mode LAN heartbeat resource has been added, clplankhb is started.
WebManager process:
root 1936 1935 0 00:00 ? 00:00:00 clpwebmc - start
Alert process:
root 1948 1947 0 00:00 ? 00:00:00 clpaltd
The display style of the ps command may look different from the above depending on the distribution.
Loading of the mirror driver ~For Replicator~
Run the lsmod command. Check that the run result of lsmod contains the following loadable module.
Liscal
Loading of the kernel mode LAN heartbeat driver ~For kernel mode LAN heartbeat resource~
Run the lsmod command. Check that the run result of lsmod contains the following loadable module.
clpkhb
Loading of the keepalive driver ~For userw User mode monitor resource (keepalive)~
Run the lsmod command. Check that the run result of lsmod contains the following loadable module.
clpka
Normal startup of the cluster from syslog
To see EXPRESSCLUSTER processes are working properly by looking into syslog, find the following messages.
To check the process manager's startup:
<type: pm><event: 1> Starting the cluster daemon...
To check heartbeat resources' activation:
<type: nm><event: 3> Resource lanhb1 of server server1 has started.
<type: nm><event: 3> Resource diskhb1 of server server1 has started.
<type: nm><event: 1> Server server1 has started.
<type: nm><event: 3> Resource diskhb1 of server server2 has started.
<type: nm><event: 1> Server server2 has started.
<type: nm><event: 3> Resource lanhb1 of server server2 has started.
You will see the above messages when the followings are specified for heartbeat resources in a 2-node configuration.
lanhb1 LAN heartbeat resourcesdiskhb1 Disk heartbeat resourcesTo check group resources' activation:
<type: rc><event: 10> Activating group grp1 has started.
<type: rc><event: 30> Activating fip1 resource has started.
<type: rc><event: 31> Activating fip1 resource has completed.
<type: rc><event: 30> Activating disk1 resource has started.
<type: rc><event: 31> Activating disk1 resource has completed.
<type: rc><event: 11> Activating group grp1 has completed.
You will see the above messages when the group resource, grp1, is activated on server1. The group resources' configuration data is as follows:
fip1 Floating IP addresses resourcesdisk1 Shared disk resourcesTo check monitor resources' startup:
<type: rm><event: 1> Monitoring userw has started.
<type: rm><event: 1> Monitoring ipw1 has started.
You will see the above messages when the monitor resources are specified as follows:
userw User mode monitor resourcesipw1 IP monitor resourcesTo check license consistency:
Product version
<type: lcns><event: 1> The number of licenses is 2. (Product name:EXPRESSCLUSTER X)
You will see the above message when 2-CPU license is registered.
Trial version
<type: lcns><event: 2> The trial license is valid until yyyy/mm/dd. (Product name: EXPRESSCLUSTER X)
Successful startup of the cluster ~For Replicator~
To see EXPRESSCLUSTER processes are working properly by looking into syslog, find the following messages.
To check the mirror agent's startup:
<type: mdagent><event: 1> Agent has started successfully.
To check the mirror driver's startup:
<type: liscal><event: 101> Registered blkdev with major=218.
To check the process manager's startup:
<type: pm><event: 1> Starting the cluster daemon...
To check heartbeat resources' activation:
<type: nm><event: 3> Resource lanhb1 of server server1 has started.
<type: nm><event: 1> Server server1 has started.
<type: nm><event: 3> Resource lanhb1 of server server2 has started.
<type: nm><event: 1> Server server2 has started.
You will see the above messages when the following is specified for heartbeat resources in a 2-node configuration.
lanhb1 LAN heartbeat resources
To check group resources' activation:
<type: rc><event: 10> Activating group grp1 has started.
<type: rc><event: 30> Activating fip1 resource has started.
<type: rc><event: 31> Activating fip1 resource has completed.
<type: rc><event: 30> Activating md1 resource has started.
<type: rc><event: 31> Activating md1 resource has completed.
<type: rc><event: 11> Activating group grp1 has completed.
You will see the above messages when the group resource, grp1, is activated on server1. The group resources' configuration data is as follows;
fip1 Floating IP addresses resourcesmd1 Mirror disk resourcesTo check start of monitoring by monitoring resources:
<type: rm><event: 1> Monitoring userw has started.
<type: rm><event: 1> Monitoring ipw1 has started.
<type: rm><event: 1> Monitoring mdw1 has started.
<type: rm><event: 1> Monitoring mdnw1 has started.
You will see the above messages when the monitor resources are specified as follows;
userw User mode monitor resourcesipw1 IP monitor resourcesmdw1 Mirror disk monitor resourcesmdnw1 Mirror disks connect monitor resourcesTo check license consistency:
Product version
<type: lcns><event: 1> The number of licenses is 2. (Product name: EXPRESSCLUSTER X)
You will see the above message when a 2-CPU license is registered.
Trial version
<type: lcns><event: 2> The trial license is valid until yyyy/mm/dd. (Product name:EXPRESSCLUSTER X)
Free disk space
Run the df command to check the size of the free disk space in the file system that contains /opt/nec/clusterpro. For details on the disk space to be used by the EXPRESSCLUSTER Server, see "Installation requirements for EXPRESSCLUSTER" in "Getting Started with Guide".
Usage of memory or OS resource
Run the top or free command to check the OS memory usage and CPU utilization.
9.1.2. When activating or deactivating group resources fails
If any error is detected in activation of a group resource, detailed error information is logged in the alert and syslog. Examine the logs to find the cause of the error and take appropriate action for it.
- Floating IP resourceCheck that the specified IP address is not already used on the network or you have not specified an IP address of a wrong network segment.For more information on errors, see "Floating IP resources".
- Disk resourcesCheck that the device and mount point exist, and the file system is configured.For more information on errors, see "Disk resources".
- EXEC resourcesCheck that the script path is correct and what is scripted is appropriate.For more information on errors, see "EXEC resources".
- Mirror disk resources ~For Replicator~Check that the devices and mount points exist, and the cluster partitions and data partitions are allocated. Check the file system specified for mirror disk resources is available as well.For more information on errors, see "Mirror disk resources".
- Hybrid disk resources ~For Replicator DR~Check that the devices and mount points exist, and the cluster partitions and data partitions are allocated. Check the file system specified for mirror disk resources is available as well.For more information on errors, see "Hybrid disk resources".
9.1.3. When a monitor resource error occurs
If a monitor resource detects any error, detailed information on error is logged in the alert and syslog. Examine the logs to find the cause of the error and take appropriate action for it.
- Error detected by the IP monitor resourceCheck that you can send packets with the ping command, and other network segments are routed if any.For more information on errors, see "IP monitor resources".
- Error detected by the disk monitor resourceCheck that a disk device exists. If you are using a shared disk, check SCSI or fibre cables are securely connected to the shared disk.For more information on errors, see "Disk monitor resources".
- Error detected by the PID monitor resourceCheck that the process to be monitored exists by using a command, such as ps command.For more information on errors, see "PID monitor resources".
- Error detected by the User mode monitor resource (monitor method: softdog)When "initialization failure" is detected, confirm that the softdog driver can be loaded by using the insmod command of OS.Furthermore, when "server reset" occurs, check the load status of the user space.For more information on errors, see "User mode monitor resources".
- Error detected by the mirror disk monitor resource ~For Replicator~Check that the disk devices exist, and the cluster partitions and data partitions are allocated. Confirm that the Mirror Agent is active.For more information on errors, see "Mirror disk monitor resources".
- Error detected by the mirror disks connect monitor resource ~For Replicator~Check that the mirror disk is connected and the Mirror Agent is active.For more information on errors, see "Mirror disk connect monitor resources".
- Error detected by the hybrid disk monitor resource ~For Replicator DR~Check that the mirror disk is connected and the Mirror Agent is active.For more information on errors, see "Hybrid disk monitor resources".
- Error detected by the hybrid disk connect monitor resource ~For Replicator DR~Check that the mirror disk is connected and the Mirror Agent is active.For more information on errors, see "Hybrid disk connect monitor resources".
- Error detected by the NIC Link Up/Down monitor resourceCheck how the NIC of the server is connected to the network device.For more information on errors, see "NIC link up/down monitor resources".
9.1.4. When a heartbeat time-out occurs
Possible causes of heartbeat time-out between servers are listed below:
Cause |
Solution |
|---|---|
Disconnection of LAN/disk/COM cables |
For disk or COM cables, check if the cables are connected securely. For LAN cables, check that you can send packets with the ping command. |
Heavily loaded user space (resulting in misinterpreted heartbeat time-out) |
Run the following command in advance to extend the heartbeat time-out when running an application that can make the OS heavily loaded for a long time. # clptoratio -r 3 -t 1d The above mentioned command triples the heartbeat time-out for 24 hours. |
9.1.5. When network partitioning occurs
Network partitioning indicates that all communication routes are blocked between servers. This section describes how you can check whether or not the network is partitioned and what you should do about it. The following examples assume that you have registered LAN kernel mode LAN, disk and COM for heartbeat resources in a 2-node cluster configuration.
When all heartbeat resources are normal (the network is not partitioned), the result of executing the clpstat command is:
When you run the command on server1
# clpstat -n
==================== HEARTBEAT RESOURCE STATUS =================
Cluster : cluster
  *server0 : server1
   server1 : server2

   HB0 : lanhb1
   HB1 : lanhb2
   HB2 : lankhb1
   HB3 : lankhb2
   HB4 : diskhb1
   HB5 : comhb1

[on server0 : Online]
       HB   0   1   2   3   4   5

-----------------------------------------------------------------
  server0 : o   o   o   o   o   o
  server1 : o   o   o   o   o   o

[on server1 : Online]
       HB   0   1   2   3   4   5

-----------------------------------------------------------------
  server0 : o   o   o   o   o   o
  server1 : o   o   o   o   o   o
When you run the command on server2
# clpstat -n
==================== HEARTBEAT RESOURCE STATUS =================
    Cluster : cluster
    server0 : server1
   *server1 : server2

    HB0 : lanhb1
    HB1 : lanhb2
    HB2 : lankhb1
    HB3 : lankhb2
    HB4 : diskhb1
    HB5 : comhb1

[on server0 : Online]
       HB   0   1   2   3   4   5

-----------------------------------------------------------------
  server0 : o   o   o   o   o   o
  server1 : o   o   o   o   o   o

[on server1 : Online]
       HB   0   1   2   3   4   5

-----------------------------------------------------------------
  server0 : o   o   o   o   o   o
  server1 : o   o   o   o   o   o

=================================================================
When the network is partitioned, the result of executing the clpstat command is what is described below. Both servers recognize each other that the counterpart is down.
When you run the command on server1
# clpstat -n
==================== HEARTBEAT RESOURCE STATUS =================
 Cluster : cluster
   *server0 : server1
    server1 : server2

    HB0 : lanhb1
    HB1 : lanhb2
    HB2 : lankhb1
    HB3 : lankhb2
    HB4 : diskhb1
    HB5 : comhb1

   [on server0 : Caution]
         HB   0   1   2   3   4   5

-----------------------------------------------------------------
    server0 : o   o   o   o   o   o
    server1 : x   x   x   x   x   x

   [on server1 : Offline]
         HB   0   1   2   3   4   5

-----------------------------------------------------------------
    server0 : -   -   -   -   -   -
    server1 : -   -   -   -   -   -
=================================================================
When you run the command on server2
# clpstat -n
==================== HEARTBEAT RESOURCE STATUS =================
 Cluster : cluster
    server0 : server1
   *server1 : server2

    HB0 : lanhb1
    HB1 : lanhb2
    HB2 : lankhb1
    HB3 : lankhb2
    HB4 : diskhb1
    HB5 : comhb1

   [on server0 : Offline]
         HB   0   1   2   3   4   5

-----------------------------------------------------------------
    server0 : -   -   -   -   -   -
    server1 : -   -   -   -   -   -

   [on server1 : Caution]
         HB   0   1   2   3   4   5
-----------------------------------------------------------------
    server0 : x   x   x   x   x   x
    server1 : o   o   o   o   o   o
=================================================================
Shut down both servers immediately if the network is partitioned. Check the following for heartbeat resources.
LAN heartbeat resource
LAN cable status
Network interface status
Kernel mode LAN heartbeat resource
LAN cable status
Network interface status
Disk heartbeat resource
Disk cable status
Disk device status
COM heartbeat resource
COM cable status
If interconnection LAN is recovered from the network partitioning, EXPRESSCLUSTER causes the servers to shut down.
If EXPRESSCLUSTER detects that the same group is active on multiple servers, it causes the servers to shut down.
For the replicator, depending on the server shutdown timing, the statuses of mirror disk resources may not be the same after rebooting the server.
Depending on the timing of server shutdown, the status of mirror disk resources may be the one requiring forced mirror recovery, mirror recovery, or normal.
9.1.6. When all interconnection LANs are disconnected
This section describes how to check the status when all interconnections (LAN heartbeat resources, kernel mode LAN heartbeat resources) between the servers are disconnected. The following examples assume that you have registered LAN, disk and COM for heartbeat resources in a 2-node cluster configuration. (You cannot register disks for the replicator.)
The following shows that the results of executing the clpstat command when all interconnections are disconnected and the disk and COM are normal. Both servers recognize that the other server is running.
When you run the command on server1
# clpstat -n
==================== HEARTBEAT RESOURCE STATUS =================
 Cluster : cluster
   *server0 : server1
    server1 : server2

    HB0 : lanhb1
    HB1 : lanhb2
    HB2 : lankhb1
    HB3 : lankhb2
    HB4 : diskhb1
    HB5 : comhb1

    [on server0 : Warning]
           HB 0   1   2   3   4   5

-----------------------------------------------------------------
    server0 : o   o   o   o   o   o
    server1 : x   x   x   x   o   o

[on server1 : Warning]
          HB 0   1   2   3   4   5

-----------------------------------------------------------------
   server0 : -   -   -   -   -   -
   server1 : -   -   -   -   -   -
=================================================================
When you run the command on server2
# clpstat -n
==================== HEARTBEAT RESOURCE STATUS =================
 Cluster : cluster
    server0 : server1
   *server1 : server2

    HB0 : lanhb1
    HB1 : lanhb2
    HB2 : lankhb1
    HB3 : lankhb2
    HB4 : diskhb1
    HB5 : comhb1

    [on server0 : Warning]
           HB 0   1   2   3   4   5

-----------------------------------------------------------------
    server0 : -   -   -   -   -   -
    server1 : -   -   -   -   -   -

    [on server1 : Warning]
           HB 0   1   2   3   4   5

-----------------------------------------------------------------
    server0 : x   x   x   x   o   o
    server1 : o   o   o   o   o   o
=================================================================
A failover does not occur when all interconnections are disconnected like the example above because communication can be achieved by disk heartbeats and COM heartbeats.
However, interconnections must be recovered as soon as possible because commands communicated by interconnections become unavailable.
Check the following for heartbeat resources:
LAN heartbeat resources
LAN cable status
Network interface status
Kernel mode LAN heartbeat resources
LAN cable status
Network interface status
When interconnects are also used as mirror disk connect in the replicator, a mirror break occurs if the interconnections (mirror disconnects) are disconnected. Run mirror recovery after restoring the interconnections.
9.1.8. Mounting mirror disks manually
This section describes how to manually mount mirror disks when you cannot start EXPRESSCLUSTER due to some sort of failure.
9.1.9. Normally mounting mirror disk when mirroring is available
Follow the steps below when the mirror agent (EXPRESSCLUSTER data mirror daemon) can be activated while the EXPRESSCLUSTER daemon cannot.
Run the following command on the server where you want to mount disks.
clpmdctrl --active <mirror_disk_resource_name (Example: md1)>
The mount point of mirror disk resources becomes accessible. Written data is mirrored to the other server.
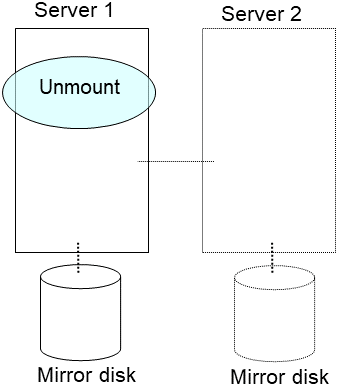
9.1.10. Forcibly mounting mirror disk when mirroring is not available
Follow the steps below to save data to mirror disks when neither the EXPRESSCLUSTER daemon nor the mirror agent (EXPRESSCLUSTER data mirror daemon) can be activated.
However, the mirroring status up to the moment just before both the EXPRESSCLUSTER daemon and EXPRESSCLUSTER data mirror daemon became unable to be activated must be normal, or you must know which server has the latest data.
Set the EXPRESSCLUSTER service not to start.
clpsvcctrl.sh --disable -a
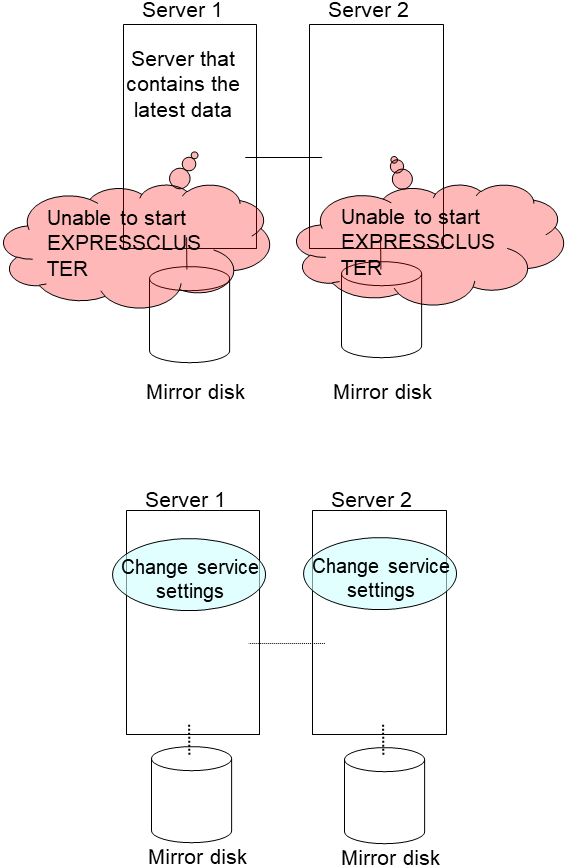
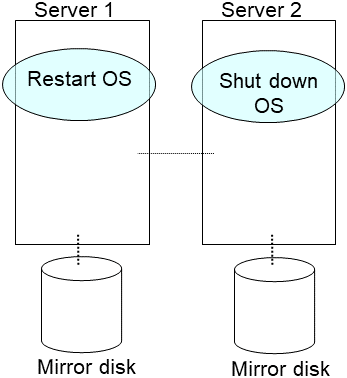
Run the reboot command to restart the server that has the latest data or that activated the mirror disk resources last time. Shut down the other server with the shutdown command.
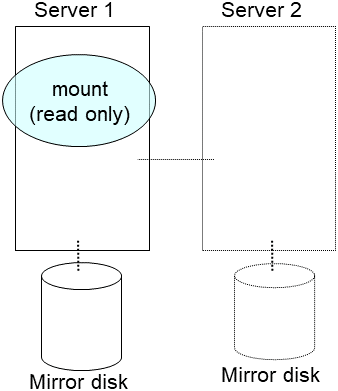
Run the mount command to mount a data partition on a mirror disk in the read-only mode.
(Example) mount -r -t ext3 /dev/sdb5 /mnt
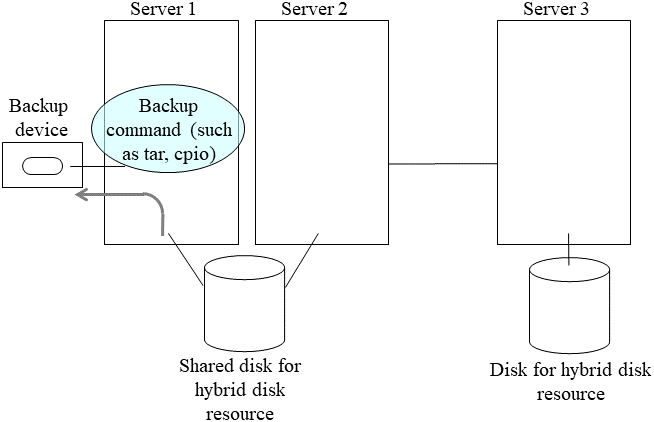
Back up the data in the data partition on a DAT tape or other media.
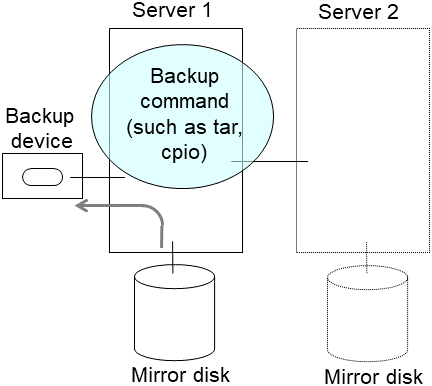
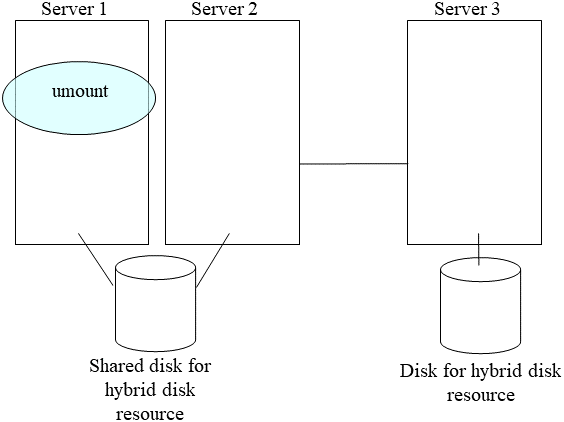
Unmount the mounted data partition.
9.1.11. Mounting hybrid disks manually
This section describes how to manually mount hybrid disks when you cannot start EXPRESSCLUSTER due to a failure or any other reasons.
9.1.12. Normally mounting mirror disk when mirroring is available
Follow the steps below when the mirror agent (EXPRESSCLUSTER data mirror daemon) can be activated while the EXPRESSCLUSTER daemon cannot.
Run the following command on the server where you want to a mount disk.
clphdctrl --active <hybrid_disk_resource_name (Example: hd1)>
The mount point of hybrid disk resource becomes accessible. Written data is mirrored to the other server group.
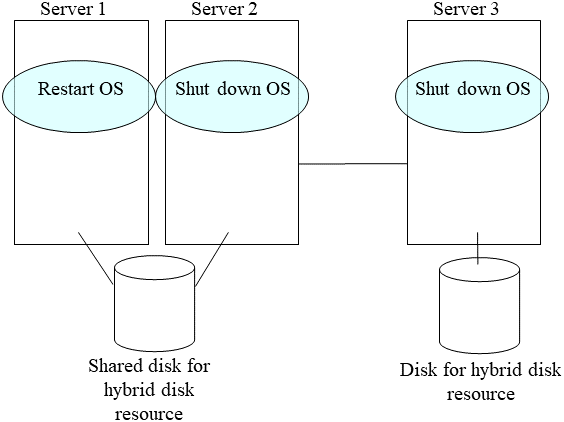
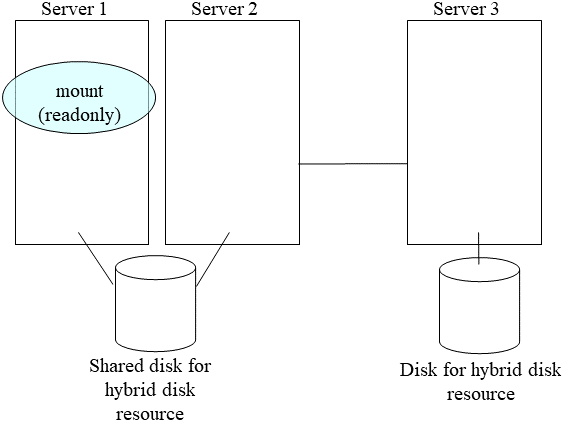
9.1.13. Forcibly mounting mirror disk when mirroring is not available
Follow the steps below to save data to hybrid disks when neither the EXPRESSCLUSTER daemon nor the mirror agent (EXPRESSCLUSTER data mirror daemon) can be activated.
This can be performed provided the mirroring status up to the moment just before both the EXPRESSCLUSTER daemon and EXPRESSCLUSTER data mirror daemon became unable to be activated was normal, or you know which server has the latest data.
Set the EXPRESSCLUSTER service not to start.
clpsvcctrl.sh --disable -a
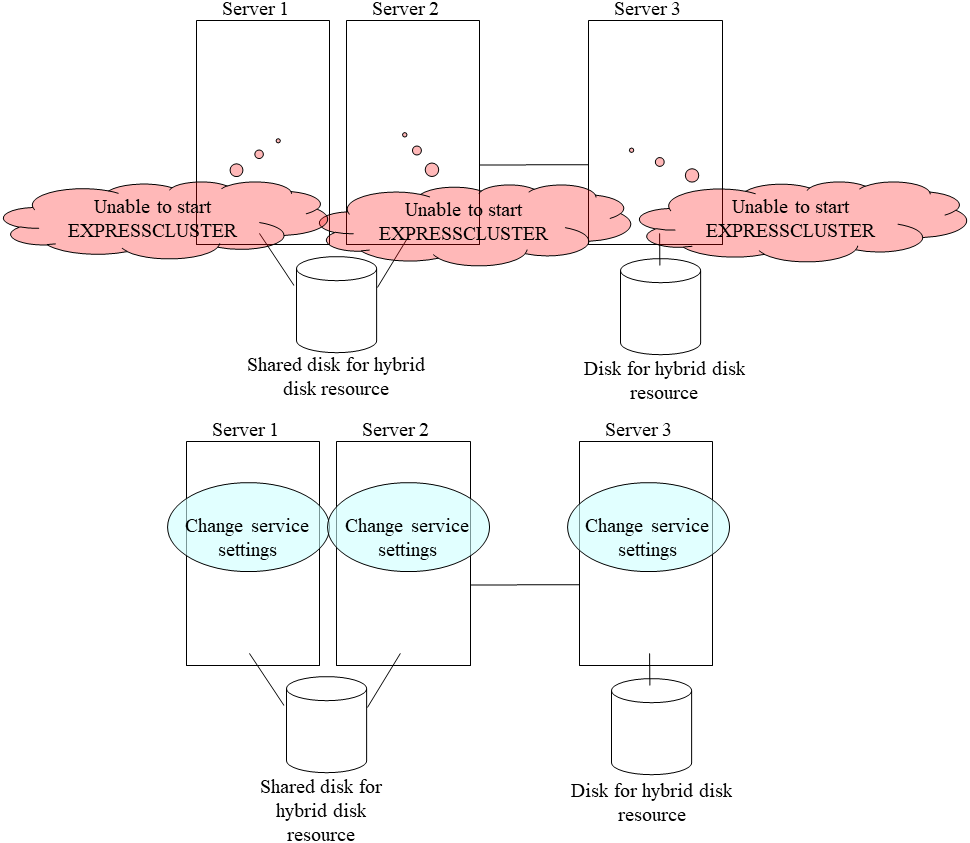
Run the reboot command to restart the server that has the latest data or that activated the hybrid disk resources last time. Shut down other servers with the shutdown command.
Run the mount command to mount the data partition on the hybrid disk in the read-only mode.
(Example) mount -r -t ext3 /dev/sdb5 /mnt
Back up the data in the data partition on a DAT tape or other medium.
Unmount the mounted data partition.
9.1.14. Manually running mkfs to mirror disk or hybrid disk
To recreate the file system of a mirror partition without changing the cluster or mirror configuration, follow the steps below:
Confirm that the cluster is in the normal status.
If you need to back up the data, see "Backup procedures" and "Restoration procedures" in "Verifying operation" in the "Installation and Configuration Guide" for the procedure.
Stop the group which has the mirror disk resources that you want to run the mkfs command.
Run the following command on the server where you will run mkfs.
For mirror disk:
clpmdctrl --active -nomount <mirror_disk_resource_name (Example: md1)>
For hybrid disk:
clphdctrl --active -nomount <hybrid_disk_resource_name (Example: hd1)>
- Run the mkfs command to configure a file system.Because disks are mirrored, the mkfs command is also run on the other server.
(Example) mkfs -t ext3 <mirror_partition_device_name (Example: /dev/NMP1)>
If you need to restore the backup data, see "Backup procedures" or "Restoration procedures" in "Verifying operation" in the "Installation and Configuration Guide" for the procedure.
After confirming the completion of the file system creation, run the following command:
For mirror disk:
clpmdctrl --deactive <mirror_disk_resource_name (Example: md1)>
For mirror disk:
clphdctrl --deactive <hybrid_disk_resource_name (Example: md1)>
9.1.15. Recovering from mirror breaks
When the auto-mirror recovery is enabled, no special operation is required. Mirroring is automatically recovered.
However, if mirroring needs to be recovered forcibly, execution of a command or operations for forcible mirror recovery using the Cluster WebUI are required.
The difference mirror recovery function is disabled in the forcible mirror recovery and the data is fully copied.
If the auto-mirror recovery is disabled, you have to recover mirroring by executing a command or using the Cluster WebUI.
9.1.16. Automatically recovering from mirroring
When the auto-mirror recovery is enabled, mirroring is recovered under the following conditions:
Mirror disk resources or hybrid disk resources are active.
The server where mirror disk resources or hybrid disk resources are active contains the latest data.
Servers in the cluster are in the normal status, and you can verify their mirroring statuses.
The data among the servers is not the same.
The auto-mirror recovery is not performed if any of the following applies.
One of the servers is not started.
- You cannot confirm the mirroring status of the other server.(For example, communication is impossible or the cluster of the other server stops.)
There is no server whose mirror status is normal.
The mirror status is pending (hybrid disk resources only)
- Mirror synchronization is stopped manually.(For example, synchronization is stopped by executing the --break option with the clpmdctrl or clphdctrl command, or the GREEN-GREEN status is changed to the GREEN-RED status by clicking the Mirror break icon on the Mirror disks tab of the Cluster WebUI. This excludes, however, the case in which the server is restarted after synchronization stops or in which synchronization is started manually.)
- The mirror disk monitor resource and hybrid disk monitor resource stopped.(For example, the relevant monitor resource is temporarily stopped by the clpmonctrl command or Cluster WebUI.)
For information on how to verify the progress of recovering mirroring, see "Checking the mirror recovery progress with a command" and "Checking the mirror recovery progress from the Cluster WebUI".
9.1.17. Checking the mirror break status with a command
Run the following command to view the mirror break statuses.
For mirror disk:
clpmdstat --mirror <mirror_disk_resource_name (Example: md1)>
For hybrid disk:
clphdstat --mirror <hybrid_disk_resource_name (Example: hd1)>
You can view the statuses of mirror disk resource or hybrid disk resource by running the clpmdstat command or clphdstat command.
When normal:
Mirror Status: Normal

md1                 server1               server2
--------------------------------------------------------
Mirror Color        GREEN                 GREEN
When the mirror recovery is required:
Mirror Status: Abnormal
Total Difference: 1%

md1                 server1                server2
------------------------------------------------------------
Mirror Color        GREEN                  RED
Lastupdate Time     2018/03/04 17:30:05    --
Break Time          2018/03/04 17:30:05    --
Disk Error          OK                     OK
Difference Persent  1%                     --
When the forcible mirror recovery is required:
Mirror Status: Abnormal
Total Difference: 1%

md1                  server1                server2
----------------------------------------------------------------
Mirror Color         RED                    RED
Lastupdate Time      2018/03/09 14:07:10    2004/03/09 13:41:34
Break Time           2018/03/09 14:06:21    2004/03/09 13:41:34
Disk Error           OK                     OK
Difference Persent   1%                     1%
While the mirroring is being recovered:
9.1.18. Checking the mirror recovery progress with a command
Run the following command to view the progress of recovering mirroring.
For mirror disk:
clpmdstat --mirror <mirror_disk_resource_name (Example: md1)>
For hybrid disk:
clphdstat --mirror <hybrid_disk_resource_name (Example: hd1)>
You will see the following data while mirroring is being recovered.
Mirror Status: Recovering

md1              server1            server2
---------------------------------------------------
Mirror Color     YELLOW              YELLOW

Recovery Status   Value
-------------------------------------
Status:            Recovering
Direction:         server1 -> server2
Percent:           7%
Used Time:         00:00:09
Remain Time:       00:01:59
You will see the following information when the mirror recovery is successfully completed.
Mirror Status: Normal

md1              server1            server2
--------------------------------------------------------
Mirror Color     GREEN               GREEN
9.1.19. Recovering mirror with a command
Run the following command to start the mirror recovery.
For mirror disk:
clpmdctrl --recovery <mirror_disk_resource_name (Example: md1)>
For hybrid disk:
clphdctrl --recovery <hybrid_disk_resource_name (Example: hd1)>
When FastSync Option is enabled, only the difference data is recovered. Therefore, the mirror recovery takes less time than when FastSync Option is disabled(FastSync technology).
This command immediately returns the control once the mirror recovery starts. For information on how to verify the mirror recovery progress, see "Checking the mirror recovery progress with a command" and "Checking the mirror recovery progress with a command".
9.1.20. Running the forcible mirror recovery with a command
If EXPRESSCLUSTER cannot determine which server contains the latest data, you have to run the forcible mirror recovery.
In this case, you have to manually identify the server that holds the latest data, and perform the forcible mirror recovery.
Identify the server that holds the latest data by any of the following means:
Using the Cluster WebUI
In the Mirror disks tab of Cluster WebUI, click the mirror disk resource to be checked.
Click Details icon.
See the last update time stamp (Last Data Updated Time) to identify the server which has the latest data. However, this Last Data Updated Time depends on the operating system's clock.
Using the clpmdstat or clphdstat command
Confirmation method is the same as Cluster WebUI except that you use a command.
Run the following command.
For mirror disk:
clpmdstat --mirror <mirror_disk_resource_name (Example: md1)>
For hybrid disk:
clphdstat --mirror <hybrid_disk_resource_name (Example: hd1)>
See the last update time stamp (Last Data Updated Time) to identify the server which has the latest data. However, this Last Data Updated Time depends on the operating system's clock.
- Using data on mirror disksThis method is not recommended because the data may be corrupted if anything goes wrong in the procedure. Perform the following steps on both servers to identify which has the latest data.1. Confirm all groups are stopped.2. Mount the data partition in the read only mode by referring to "Forcibly mounting mirror disk when mirroring is not available".3. Logically examine the data on the mount point.4. Unmount the data partition.
Identify the server that holds the latest data and then start forcible mirror recovery by any of the following means:
- Method (1) Using full-scale copy while the group is activeForcible mirror recovery by this method disables the difference mirror recovery function and instead uses full-scale copy.If the group stops during forcible mirror recovery, you cannot start the group until forcible mirror recovery is completed. Once forcible mirror recovery completion has been confirmed, the mirror disk can be used by starting the group.If full-scale copy is performed while the group is active, the system load may be high because forcible mirror recovery must be performed while the group is active.If the group contains two or more mirror disk resources or hybrid disk resources, these resources must all contain the latest data on the same server.
- Execute the clpmdctrl or clphdctrl command to start full-scale copy.(specify the name of the server containing the latest data and the resource name for command arguments.)
For mirror disk:
clpmdctrl --force <server_containing_the_latest_data> <mirror_disk_resource_name (Example: md1)>
For hybrid disk:
clphdctrl --force <server_containing_the_latest_data> <hybrid_disk_resource_name (Example: hd1)>
When mirror recovery is started by the command, the command returns control immediately. Confirm the mirror recovery status and then wait for mirror recovery to complete.
When the group is not active, after confirming the completion of mirror recovery, start the group.
- Method (2) Performing full copy while the group is activeWith forcible mirror recovery using this method, the difference mirror recovery function is disabled, and full copy is performed instead.Depending on the file system type, disk usage, and load status, this takes less copying time than the procedures of methods (1) and (3), which are performed in the active state.Perform this method while the group is stopped. Until forcible mirror recovery is completed, you cannot start the group. Once forcible mirror recovery completion has been confirmed, the mirror disk can be used by starting the group.If the group contains two or more mirror disk resources or hybrid disk resources, these resources all need to contain the latest data on the same server.
If the group is active, stop the group.
- Execute the clpmdctrl or clphdctrl command to start full-scale copy.(Specify the latest data holding server name and resource name in the command argument.)
For mirror disk
clpmdctrl --force <server_containing_the_latest_data> <mirror_disk_resource_name (Example: md1)>
For hybrid disk
clphdctrl --force <server_containing_the_latest_data> <hybrid _disk _resource _ name (Example: hd1)>
When mirror recovery is started by the command, the command returns control immediately. Confirm the mirror recovery status and then wait for mirror recovery to complete.
After confirming the completion of mirror recovery, start the group.
- Method (3) Performing full copy by changing the group from the deactivated state to the active stateWith forcible mirror recovery using this method, the difference mirror recovery function is disabled, and full copy is performed instead.If the group is stopped during forcible mirror recovery, the group cannot be started until forcible mirror recovery is complete. In such a case, once forcible mirror recovery completion has been confirmed, the mirror disk can be used by starting the group.Note that, because forcible mirror recovery is performed concurrently while the group is active, the system load may be high.If the group contains two or more mirror disk or hybrid disk resources, these resources must all contain the latest data on the same server.
- While the group is not active, suspend the mirror disk monitor resource or the hybrid disk monitor resource being used to monitor a mirror disk resource or a hybrid disk resource.On each server, execute the command below.This causes auto-mirror recovery to be temporarily unavailable.
clpmonctrl -s -m <relevant_monitor_resource_name (example: mdw1)>
(To suspend a monitor resource by using Cluster WebUI instead of the command, click the relevant mirror disk monitor resource or hybrid disk monitor resource, and then execute Suspend monitor. In the confirmation window, select Suspend. The monitor will enter the "suspended" state.)
- On the server holding the latest data, execute the clpmdctrl or clphdctrl command to change the mirror disk status of the relevant server to the latest status.(Do not specify the latest data holding server name in the command argument.)
For mirror disk
clpmdctrl --force <mirror_disk_resource_name (Example: md1)>
For hybrid disk
clphdctrl --force <hybrid_disk_resource_name (Example: hd1)>
- Confirm that the relevant mirror disk resource and hybrid disk resource have entered the latest status (Normal) by using the Cluster WebUI, clpmdstat command, or clphdstat command.After confirming the status, start the relevant group on the server holding the latest data using the clpgrp command or Cluster WebUI.
- Upon the completion of group start, execute the clpmdctrl or clphdctrl command to start full copy.(specify the name of the server containing the latest data and the resource name for command arguments.)
For mirror disk :
clpmdctrl --force <server_containing_the_latest_data> <mirror_disk_resource_name (Example: md1)>
For hybrid disk :
clphdctrl --force <server_containing_the_latest_data> <hybrid_disk_resource_name (Example: hd1)>
- When you start mirror recovery with the command, the command will return control immediately.Then, return the suspended monitor resource to its original state.On each server, execute the following command.
clpmonctrl -s -m <relevant_monitor_resource_name (example: mdw1)>
(To resume a monitor resource by using Cluster WebUI instead of the command, click the relevant mirror disk monitor resource or hybrid disk monitor resource, and then execute Resume monitor. In the confirmation window, select Resume.)
- Method (4) Using auto mirror recovery and difference mirror recoveryIf difference mirror recovery is possible, perform recovery using the difference information.Since mirror recovery is performed while the group is activated, the system load may be high.If the group contains two or more mirror disk resources or hybrid disk resources, these resources all need to hold the latest data on the same server.
- On the server holding the latest data, execute the clpmdctrl or clphdctrl command to change the mirror disk status of the relevant server to the latest status.(Do not specify the latest data holding server name in the command argument.)
For mirror disk
clpmdctrl --force <mirror_disk_resource_name (Example: md1)>
For hybrid disk
clphdctrl --force <hybrid_disk_resource_name (Example: hd1)>
- When the group is not active, confirm that the relevant mirror disk resource and hybrid disk resource have entered the latest status (Normal) by using the Cluster WebUI, clpmdstat command, or clphdstat command.After confirming the status, start the relevant group on the server holding the latest data using the clpgrp command or Cluster WebUI.
- When the group is not active, auto mirror recovery starts after the relevant group starts (after activation).When the group is active, auto mirror recovery starts after the operation in 1.If auto mirror recovery is not started because, for example, Auto Mirror Recovery is cleared, use the clpmdctrl or clphdctrl command or Cluster WebUI to start mirror recovery manually.
For mirror disk
clpmdctrl --recovery <mirror_disk_resource_name (Example: md1)>
For hybrid disk
clphdctrl --recovery <hybrid_disk_resource_name (Example: hd1)>
The clpmdctrl or clphdctrl command immediately returns control once mirror recovery starts. For information on how to check the mirror recovery progress, see "Checking the mirror recovery progress with a command" and "Checking the mirror recovery progress from the Cluster WebUI".
9.1.21. Running the forcible mirror recovery with a command only on one server
In some cases, you cannot start one of the servers due to a hardware or OS failure, and the server that can be started may not have the latest data. If you want to start applications at least on the server that can be started, you can perform the forcible mirror recovery on that server.
However, remember that if you do this, the data on the server where you run this command becomes the latest data no matter which server actually has it. Therefore, even if you are able to start the other server later, you cannot handle the data in that server as the latest one. Make sure you understand the consequence before running the following command.
Run the following command to start the forcible mirror recovery:
For mirror disk:
clpmdctrl --force <mirror_disk_resource_name (Example: md1)>
For hybrid disk:
clphdctrl --force <hybrid_disk_resource_name (Example: hd1)>
After running the command, you can activate the groups and use the mirror disks or hybrid disks.
9.1.22. Checking the mirror break status from the Cluster WebUI
When normal:

When mirror recovery is required:

When forcible mirror recovery is required:

While mirror recovery is in progress:
See "Checking the mirror recovery progress from the Cluster WebUI".
9.1.23. Checking the mirror recovery progress from the Cluster WebUI
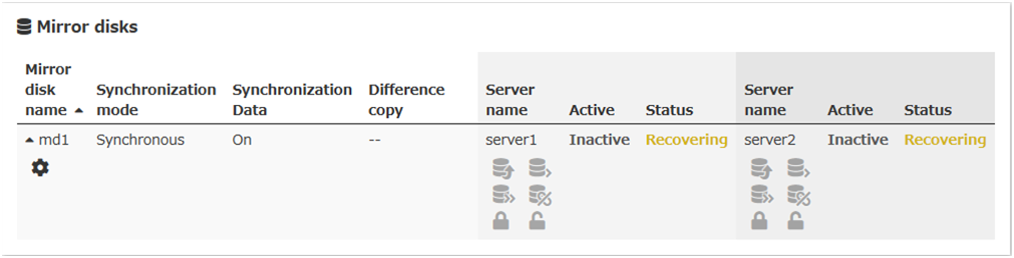
Click Mirror disks tab on the Cluster WebUI to view the mirror recovery progress. (The following is an example of mirror disk resource. What the statuses mean and description are the same for hybrid disk resources, although the screen display is different.)
You will see the following screen during the mirror recovery.
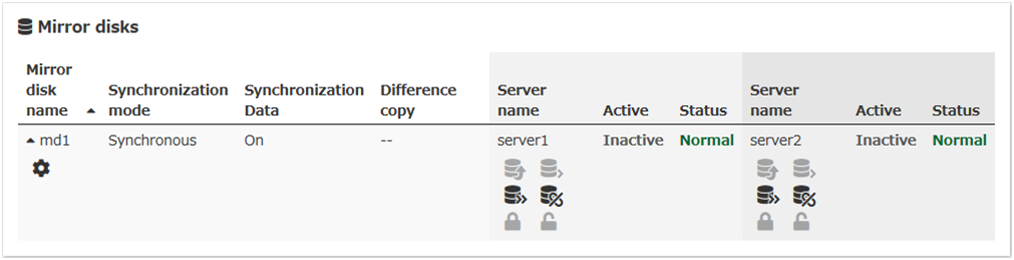
You will see the following screen when the mirror recovery is successfully completed.
9.1.24. Recovering mirror using the Cluster WebUI
Click Mirror disks tab of the ClusterWebUI and display the detailed data of the mirror disk resources you want to start mirror recovery. For information on the Mirror disks tab, see the online manual of the Cluster WebUI.
For information on how to check the mirror recovery progress, see "Checking the mirror recovery progress with a command" and "Checking the mirror recovery progress from the Cluster WebUI".
9.1.25. Running the forcible mirror recovery using the Cluster WebUI
When EXPRESSCLUSTER cannot determine which server has the latest data, you have to perform the forcible mirror recovery.
In this case, you have to manually identify the server which holds the latest data, and perform the forcible mirror recovery.
Identify the server that has the latest data by any of the following methods:
Using Cluster WebUI
On the screen of the Mirror disks tab of the Cluster WebUI, display the detailed data of the mirror disk resources you want to see.
Click Details icon.
See the last update time stamp (Last Data Updated Time) to identify the server which has the latest data. However, this Last Data Updated Time depends on the operating system's clock.
Using the clpmdstat command or clphdstat command
Confirm method is the same as Cluster WebUI except that you use a command.
Run the following command:
For mirror disk:
clpmdstat --mirror <mirror_disk_resource_name (Example: md1)>
For hybrid disk:
clphdstat --mirror <hybrid_disk_resource_name (Example: hd1)>
See the last update time stamp (Last Data Updated Time) to identify the server which contains the latest data. However, this Last Data Updated Time depends on the operating system's clock.
- Using data on mirror disksThis is not recommended because the data may be corrupted destroyed if anything goes wrong in the procedure.Perform the following steps on both servers to identify which has the latest data.
Confirm that all groups are inactive.
See "Forcibly mounting mirror disk when mirroring is not available".
Logically examine the data on the mount point.
Unmount the data partition.
When you have identified the server containing the latest data, start the forcible mirror recovery from the Mirror disks tab of the Cluster WebUI. For information on the Mirror disks tab, see the online manual of the Cluster WebUI.
Start forcible mirror recovery using any of the following methods:
- Method (1) Using full-scale copyForcible mirror recovery by this method disables the difference mirror recovery function and instead uses full-scale copy.Note that the group cannot be started until forcible mirror recovery is complete. Once forcible mirror recovery completion has been confirmed, the mirror disk can be used by starting the group.
- In the Mirror disks tab, select Full copy icon to execute full-scale copy from the server holding the latest data to the copy destination server and then start mirror recovery.(When the group has already been started, Full copy icon cannot be selected from the Mirror disks. In this case, stop the group, or perform forcible mirror recovery with the relevant command.)
After confirming the completion of mirror recovery, start the group.
- Method (2) Using auto mirror recovery and difference mirror recoveryIf difference mirror recovery is possible, perform recovery using the difference information. The mirror recovery takes less time than when the forcible mirror recovery is performed (FastSync technology).Because mirror recovery is performed while the group is activated, the system load may be high.If the group contains two or more mirror disk resources or hybrid disk resources, these resources all need to hold the latest data on the same server.
- In the Mirror disks tab, select Mirror recovery icon to change the mirror disk status of the server holding the latest data from Abnormal to Normal.(When the group has already been started, this Mirror recovery operation cannot be executed from the Mirror disks. In this case, stop the group, or perform forcible mirror recovery with the relevant command.)
- Confirm that the relevant mirror disk resource and hybrid disk resource have entered the latest status (Normal).After confirming the status, start the relevant group on the server holding the latest data.
- After the relevant group starts (after activation), auto mirror recovery starts.If difference mirror recovery is possible, it is performed.If difference mirror recovery is impossible, full-scale copy is performed.If auto mirror recovery is not started such as the auto mirror recovery is OFF, start the mirror recovery manually from the Mirror disks.
For information on how to check the forcible mirror recovery progress, see "Checking the mirror recovery progress with a command" and "Checking the mirror recovery progress from the Cluster WebUI".
9.1.26. Running the forcible mirror recovery from the Cluster WebUI only on one Server
In some cases, you cannot start one of the servers due to a hardware or OS failure, and the server that can be started may not have the latest data.
If you want to start applications at least on the server that can be started, you can perform the forcible mirror recovery on that server.
However, remember that if you do this, the data on the server where you run this command becomes the latest data regardless of which server actually contains the data. Therefore, even if the other server becomes available later, you cannot handle the data in that server as the latest one. Make sure you understand the consequence before running the following command.
Start the forcible mirror recovery from the Mirror disks tab of Cluster WebUI. For information on the Mirror disks tab of the Cluster WebUI, seethe online manual of the Cluster WebUI.
When the forcible mirror recovery is successfully completed, you can activate the groups and use the mirror disks.
9.1.27. Changing current server on hybrid disk
Conditions in which current server can be changed is as follows:
Hybrid disk status |
Whether or not current server can be changed |
||
|---|---|---|---|
Server group 1 |
Server group 2 |
Server group 1 |
Server group 2 |
error/deactivated |
error/deactivated |
Yes |
Yes |
normal/deactivated |
error/deactivated |
Yes |
Yes |
error/deactivated |
normal/deactivated |
Yes |
Yes |
normal/deactivated |
normal/deactivated |
Yes |
Yes |
normal/activated |
error/deactivated |
No |
Yes |
error/deactivated |
normal/activated |
Yes |
No |
normal/activated |
normal/deactivated |
No |
No |
pending/deactivated |
pending/deactivated |
Yes |
Yes |
9.1.28. Changing current server with a command
Run the following command on the server which you want to make current server to change the current server of hybrid disk.
clphdctrl --setcur <hybrid_disk_resource_name(Example:hd1)>
9.1.29. Changing current server with Cluster WebUI
For information on the Mirror disks tab of Cluster WebUI, see the online manual of the Cluster WebUI.
9.2. Troubleshooting problems with VERITAS volume manager
This section describes how to handle trouble when using VERITAS volume manager.
9.2.1. Modifying the VERITAS volume manager configuration
Whether or not the OS needs to be restarted determines the steps for changing the VERITAS Volume Manager configuration.
If the OS does not need to be restarted when changing the configuration, see "When the OS does not need to be restarted to change the configuration of VERITAS Volume Manager".
If the OS needs to be restarted when changing the configuration, see "When restart of the OS is necessary to change the configuration of VERITAS Volume Manager".
When the OS does not need to be restarted to change the configuration of VERITAS Volume Manager
Connect to the Cluster WebUI with a management IP address. If you do not have any management IP address, connect to it by using the actual IP address of any server.
On the Cluster WebUI, click Stop Cluster icon.
Change the configuration of VERITAS Volume Manager.
Change the settings of the resource in the Config mode of Cluster WebUI.
Upload the cluster configuration data in the Config mode of Cluster WebUI.
In the Operation mode of Cluster WebUI, click Start Cluster icon.
The settings will be effective.
When restart of the OS is necessary to change the configuration of VERITAS Volume Manager
Back up the cluster configuration data. Choose Step A or B depending on the type of OS that uses the Cluster WebUI.
Run the command below to make a backup of the Cluster WebUI which operates on the Web browser of Linux.
clpcfctrl --pull -l -x <path of configuration data file>
Run the command below to make a backup of the Cluster WebUI which operates on the Web browser of Windows.
clpcfctrl --pull -w -x <path of configuration data file>
For information on troubleshooting clpcfctrl problems, see "Changing, backing up, and checking cluster configuration data (clpcfctrl command)" in "8.2. EXPRESSCLUSTER commands" in this guide.
Set the EXPRESSCLUSTER services not to start on all servers.
For systemd environment:
clpsvcctrl.sh --disable core
Stop the EXPRESSCLUSTER daemon.
clpcl -t -a
Change the configuration of VERITAS Volume Manager, and restart the OS.
Change the settings of resources in the Config mode of Cluster WebUI.
Upload the cluster configuration data in the Config mode of Cluster WebUI.
Set the EXPRESSCLUSTER services to start on all servers.
clpsvcctrl.sh --enable core
Restart all servers.
The services will be effective next time the OS is started.
9.2.2. Operations of EXPRESSCLUSTER when VERITAS volume manager fails
See procedures in "To change the cluster configuration data," if you do not wish to failover groups or the final action to take place when a problem occurs in VERITAS Volume Manager and an error is detected in the disk resource and/or VxVM volume manager resource.
See procedures in "Restoring the cluster configuration information," if you wish to recover from a VERITAS Volume Manager error and to establish control again by using the EXPRESSCLUSTER.
To change the cluster configuration data
Start all servers at run level 1.
Set the EXPRESSCLUSTER services not to start on all servers
clpsvcctrl.sh --disable core
Restart all servers.
Make a backup of the cluster configuration data. Choose Step A or B depending on the type of OS that uses the Cluster WebUI.
Run the command shown below to make a backup of the Cluster WebUI which operates on the Web browser of Linux.
clpcfctrl --pull -l -x <path of configuration data file>
Run the command below to make a backup of the Cluster WebUI which operates on the Web browser of Windows.
clpcfctrl --pull -w -x <path of configuration data file>
For information on troubleshooting clpcfctrl problems, see "Changing, backing up, and checking cluster configuration data (clpcfctrl command)" in "8.2. EXPRESSCLUSTER commands" in this guide.
Change the settings of resources in the Config mode of Cluster WebUI.
disk resource
VxVM volume manager resource
For these group resources, make the following settings on the Recovery operation tab of the Resource Properties window:
- Recovery operation at activation failureRetry Count at Activation Failure 0 timeFailover Threshold 0 timeFinal Action No Operation (Next Resource Are Activated)
- Recovery operation at deactivation failureRetry Count at Deactivation Failure 0 timeFinal Action No Operation (Next Resource Are Deactivated)
VxVM volume manager monitor resource
disk monitor resource
For these monitor resources, make the following settings on the Recovery Action tab of the Monitor Resources Properties window:
- Error DetectionRecovery Action Execute only the final actionFinal Action No Operation
Upload the cluster configuration data in the Config mode of Cluster WebUI.
Set the EXPRESSCLUSTER services to start on all servers.
clpsvcctrl.sh --enable core
Restart all servers.
The services will be effective next time the OS is started.
Restoring the cluster configuration information
Stop the EXPRESSCLUSTER daemon using the command shown below if the EXPRESSCLUSTER daemon is running.
clpcl -t -a
Load the configuration information created in Step 5 of "To change the cluster configuration data" to the server. Choose Step A or B depending on the version of the configuration data that you backed up.
Run the command below to use the configuration data that you backed up for Linux.
clpcfctrl --push -l -x <path of configuration data file>
Run the command below to use the configuration data that you backed up for Windows.
clpcfctrl --push -w -x <path of configuration data file>
For information on troubleshooting clpcfctrl problems, see "Changing, backing up, and checking cluster configuration data (clpcfctrl command)" in "8.2. EXPRESSCLUSTER commands" in this guide.
The setting will be effective next time the EXPRESSCLUSTER daemon is activated.
9.3. To confirm the progress of the fsck / xfs_repair command
Fsck or xfs_repair carried out when activating a disk resource, a mirror disk resource and a hybrid disk resource may needs long time by completion by the size of the partition and the state of the file system.
It's possible to refer to the following logfile for progress of the fsck or xfs_repair command a disk resource, a mirror disk resource and a hybrid disk resource issued and check it:
Resource type |
Log file |
|---|---|
Disk resource |
disk_fsck.log.cur |
Mirror disk resource |
md_fsck.log.cur |
Hybrid disk resource |
hd_fsck.log.cur |